background image

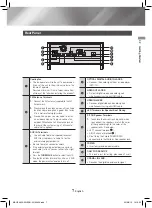
PREMIUM Hi-Fi component System

(MP3/WMA/CD-DA Playback with CD/USB)

user's manual

MX-HS6800

imagine 

the possibilities

Thank you for purchasing this Samsung product. 

To receive more complete service, 

please register your product at

www.samsung.com/register

MX-HS6800-ZN-ENG-20140429.indd   1

2014/8/13   14:19:18

Summary of Contents for MX-HS6800

Page 1: ...ck with CD USB user s manual MX HS6800 imagine the possibilities Thank you for purchasing this Samsung product To receive more complete service please register your product at www samsung com register MX HS6800 ZN ENG 20140429 indd 1 2014 8 13 14 19 18 ...

Page 2: ...ant instructions accompanying the product WARNING To reduce the risk of fire or electric shock do not expose this appliance to rain or moisture CLASS 1 LASER PRODUCT This Compact Disc player is classified as a CLASS 1 LASER product Use of controls adjustments or performance of procedures other than those specified herein may result in hazardous radiation exposure Complies with 21CFR 1040 10 except...

Page 3: ...oduct has reached room temperature before using The batteries used with this product contain chemicals that are harmful to the environment Do not dispose of batteries in the general household trash Place the loudspeakers at a reasonable distance on either side of the system to ensure good stereo sound Direct the loudspeakers towards the listening area Do not expose this apparatus to dripping or sp...

Page 4: ...no blank spaces or special characters Use discs recorded with a compression decompression data rate greater than 128Kbps Only a consecutively written multisession disc can be played If there is a blank segment in the Multisession disc the disc can be played only up to the blank segment If the disc is not closed it will take longer to begin playback and not all of the recorded files may play For fi...

Page 5: ...ck 23 Setting the Timer 25 Cancelling the Timer 25 The Recording Function 25 Basic Recording 26 Recording Speed 27 Special Sound Effect 27 Selecting EQ Mode 27 FOOTBALL MODE function 27 GOAL Function 28 GIGA SOUND Function 28 BEAT WAVING Function 28 DJ BEAT Function 29 PANNING Function 29 NON STOP MUSIC RELAY Function 29 DANCE TIME Function 29 TEMPO Function 29 Booting Sound Function APPENDIX 30 T...

Page 6: ...PROGRAM button DISC slot Display Panel BEAT WAVING button MIC jack a AUX IN 1 jack Connecting an external device such as an MP3 player Connect AUX IN 1 on the front panel of the product to the Audio Out of an external device MP3 player Press the TUNER AUX button to select AUX1 b USB REC button c USB button d USB 2 jack for Playing and USB Recording e USB 1 jack for Playback only f TEMPO button g N...

Page 7: ...has only one Audio Out jack connect either left or right terminal Press the TUNER AUX button to select the AUX If no button actions for more than 8 hours in AUX mode the power will automatically turn off 4 OPTICAL DIGITAL AUDIO IN JACKS Receives the audio signal from a video player DVD TV 5 HDMI OUT JACKS Outputs digital video and audio signals simultaneously using an HDMI cable 6 HDMI IN JACKS Re...

Page 8: ...ne from the system Power HDMI OPTICAL COAXIAL TUNING MODE PLAY PAUSE TIMER SET MY KARAOKE CD Bluetooth USB TUNER AUX NON STOP MUSIC RELAY TEMPO STOP FOOTBALL EQ PROGRAM TIMER ON OFF DISPLAY MIC VOLUME AUTO CHANGE BEAT WAVING TV SoundConnect REC SPEED MO ST DJ BEAT EFFECT LEVEL AV SYNC REPEAT GOAL DANCE TIME DELETE Anynet SLEEP Press and hold Anynet button turn Anynet On and OFF Set a sleep time to...

Page 9: ...perate properly if it is subject to shaking or external shocks or if the speakers are not installed as recommended Do not stretch the speaker wires or place a heavy object on them Please place these subwoofers separately and keep a distance at least 5cm for each other Cautions on Moving the Speakers When moving the main unit and speakers make sure to separate all connected speaker cables before Wh...

Page 10: ...limited by the performance of the connected device Since HDMI connection supports both video and audio you don t have to connect an additional audio cable Connecting External Devices your TV via HDMI HDMI is a digital standard interface for connection to such devices as a TV projector DVD player Blu ray player set top box and more HDMI removes any loss of signal from analog conversion enabling you...

Page 11: ...g Volume buttons on the TV remote control NOTE If you use an HDMI cable to connect a Samsung TV to your Hi Fi component you can operate the Hi Fi component using the TV s remote control This function is available only in connection with Samsung TV and DVD player supporting Anynet HDMI CEC Please check your TV for the Anynet HDMI CEC logo If your TV has an Anynet HDMI CEC logo then it supports the ...

Page 12: ... Fi component to the Audio Out of the DVD BD player NOTE Disconnect the power plug from the outlet if you will not use this unit for a long period of time If the cable set top box has only one audio output jack connect it to either the right or left audio input jack of the main unit Connect the audio cable s red plug to the red jack and white cable to the white jack COAXIAL OUT OPTICAL OUT AUDIO O...

Page 13: ... or Anynet off NOTES This function is not available if the HDMI cable does not support ARC When use the ARC function the Hi Fi component will display ARC Speaker output If the TV and Hi Fi component are connected via HDMI you select between listening to audio through your TV or through the HI FI component by TV See the TV instructions manual for more information AUDIO MODE SPEAKER Output Display H...

Page 14: ...e remains displayed on the front panel after its playback Playing a CD Loading a Compact Disc You can play standard compact discs that require no adapter 1 Press the OPEN CLOSE button to open the disc tray Insert a disc gently into the disc tray with the disc s label facing up and Press the OPEN CLOSE button again to close the disc tray The disc will be played automatically You can load or unload ...

Page 15: ...or oddly shaped CD heart shaped octangular etc You can damage the product Carefully maintain your CDs Selecting a Track You can select a desired track while the disc is being played To play the previous track Press the 1 button within 3 seconds after the current track has started playing Press the 1 button twice 3 seconds or more after the current track starts playing To play the next track Press ...

Page 16: ...product You can damage the product To Select a File from a USB Device You can select an MP3 file while the product is playing NOTES If you want to move to the previous next track press the 1 2 buttons briefly The unit moves to the previous next file within the directory If you press the 1 2 buttons more times than the number of the files in the directory the unit moves to the next directory To rep...

Page 17: ...le system USB 2 0 HDDs should be connected to a separate power source Otherwise the USB 2 0 HDDs will not work If multiple USB external storage devices are connected together only the MP3 files in the first HDD will be played Files with DRM are not supported Digital Right Management DRM restricts unauthorized access to a DRM file so that the file is protected from piracy Even if a file has an mp3 ...

Page 18: ...low Steps 3 and 4 above 6 Press the button to play the programmed tracks 7 Press the 5 button to stop playing the programmed tracks Press the 5 button again to cancel playing the programmed tracks If you eject the disc CD programming is cancelled If you turn off the product CD USB programming is cancelled If you switch to another mode CD USB programming is maintained In Program mode if you press t...

Page 19: ... the Hi Fi component to a Bluetooth device Before you begin confirm that your Bluetooth device supports the Bluetooth compliant stereo headset function 1 Press the CD Bluetooth button of the Hi Fi component to display the BT message You will see WAIT for a short period of time and then BT READY on the front display of the Hi Fi component 2 Select the Bluetooth menu on the Bluetooth device you want...

Page 20: ...ion time may differ depending on the Bluetooth device In Bluetooth connection mode the Bluetooth connection will be lost if the distance between the Hi Fi component and the Bluetooth device exceeds 16 25 feet 5 meters If the Bluetooth device comes back into the effective range after disconnecting you can restart the Hi Fi component to restore the pairing with the Bluetooth device The Hi Fi compone...

Page 21: ...into an outlet and then set the TV SoundConnect connection again Only one Hi Fi component at a time can be connected to a TV via TV SoundConnect To connect to another TV in TV Soundconnect mode press the button for more than 5 seconds and then connect to the other TV by following the directions above To disconnect the TV from the Hi Fi component You can disconnect the TV from Hi Fi Component For i...

Page 22: ...a disc followed by a USB device connected to USB1 and or USB2 continuously Press the AUTO CHANGE button to select setting and then press to apply your selection If Program Play has not been set in CD USB mode the settings change as follows AUTO CHANGE OFF AUTO CHANGE ALL If Program Play has been set in CD USB mode the settings change differently AUTO CHANGE OFF AUTO CHANGE ALL AUTO CHANGE PROGRAM ...

Page 23: ...e control to select a preset number or Turn the DJ JOG control left or right on the main unit to select the stored station Timer Function Setting the Clock For each step you have a few seconds to set the required options If you exceed this time you must start again 1 Press the TIMER SET button on the remote control twice CLOCK is displayed 2 Press the button on the remote control The hour flashes ...

Page 24: ...M or button to select REC Y or REC N and then press button 1 If you select REC N it will cancel tuner timer recording and any currently set tuner timer recording Note that selecting REC N does not cancel the Timer setting 2 If you select REC Y you can set the tuner timer recording on and off times a Press the button Result ON is displayed for a few seconds You can set the tuner timer recording swi...

Page 25: ...s the USB button to select USB 1 Play a song from USB 1 3 Press the USB REC button on the remote control or the USB REC button on the main unit to start recording CD TRACK RECORDING is displayed and CD recording starts Press and hold the USB REC button on the remote control or press and hold the USB REC button on the main unit to start recording all tracks on the disc FULL CD RECORDING is displaye...

Page 26: ...ng a CD recording The REPEAT function is set to OFF automatically and is not available during a CD recording If you use the MIC function during a CD recording the sound from the microphone will be recorded You cannot record the radio when searching or if no stations are available in the Tuner mode Note that setting the input level too loud when recording music from an external device through the A...

Page 27: ... press the button Result Setting is complete NOTES When the Hi Fi component is recording the EQ function is turned off automatically and is unavailable If no buttons are pressed within 8 seconds your settings will automatically be cancelled and the previous settings will be saved The EQ mode may be different depending on your region Use the VOLUME SEARCH JOG to alter the EQ mode and the selected E...

Page 28: ...product Each time you press this button the mode changes as follows IMPORTANT The set scope is 15 15 and the initial set up value are all 0 FLANGER Creates an effect similar to the sound of a jet engine revving up and down CHORUS Creates an effect similar to a singing chorus WAHWAH Creates a Wah Wah effect TREMOLO Repeatedly and rapidly turns the volume up and down FUZZ Distorts the original sound...

Page 29: ...E TIME button until DANCE TIME OFF is displayed NOTES When the DANCE TIME sound file finishes playing the DANCE TIME mode changes to DANCE TIME OFF When DANCE TIME mode is switched ON the BT TV SoundConnect TUNER HDMI COAXIAL D IN ARC and AUX sources enter Mute mode When playing a DANCE TIME sound file you can change the dance music by pressing the SKIP button If you set DANCE TIME to OFF during p...

Page 30: ...e the speakers connected properly Is the speaker setup correctly customized Is the disc severely damaged The remote control does not work Is the remote control being operated within its operational angle and distance range Are the batteries drained The product is not working Example The power goes out or the front panel buttons don t work or you hear a strange noise The product is not working norm...

Page 31: ...erves the right to change the specifications without notice Weight and dimensions are approximate Design and specifications are subject to change without prior notice For information on the power supply and power consumption refer to the label attached to the product Open Source Announcement To send inquiries and requests regarding open sources contact Samsung via Email oss request samsung com For ...

Page 32: ...4726 QATAR 800 2255 800 CALL EGYPT 08000 726786 16580 www samsung com eg support ALGERIA 021 36 11 00 www samsung com n_africa support PAKISTAN 0800 Samsung 72678 www samsung com pk support TUNISIA 80 1000 12 www samsung com n_africa support JORDAN 0800 22273 06 5777444 www samsung com Levant support English SYRIA 18252273 www samsung com Levant support English IRAN 021 8255 www samsung com iran s...

Reviews:

Related manuals for MX-HS6800