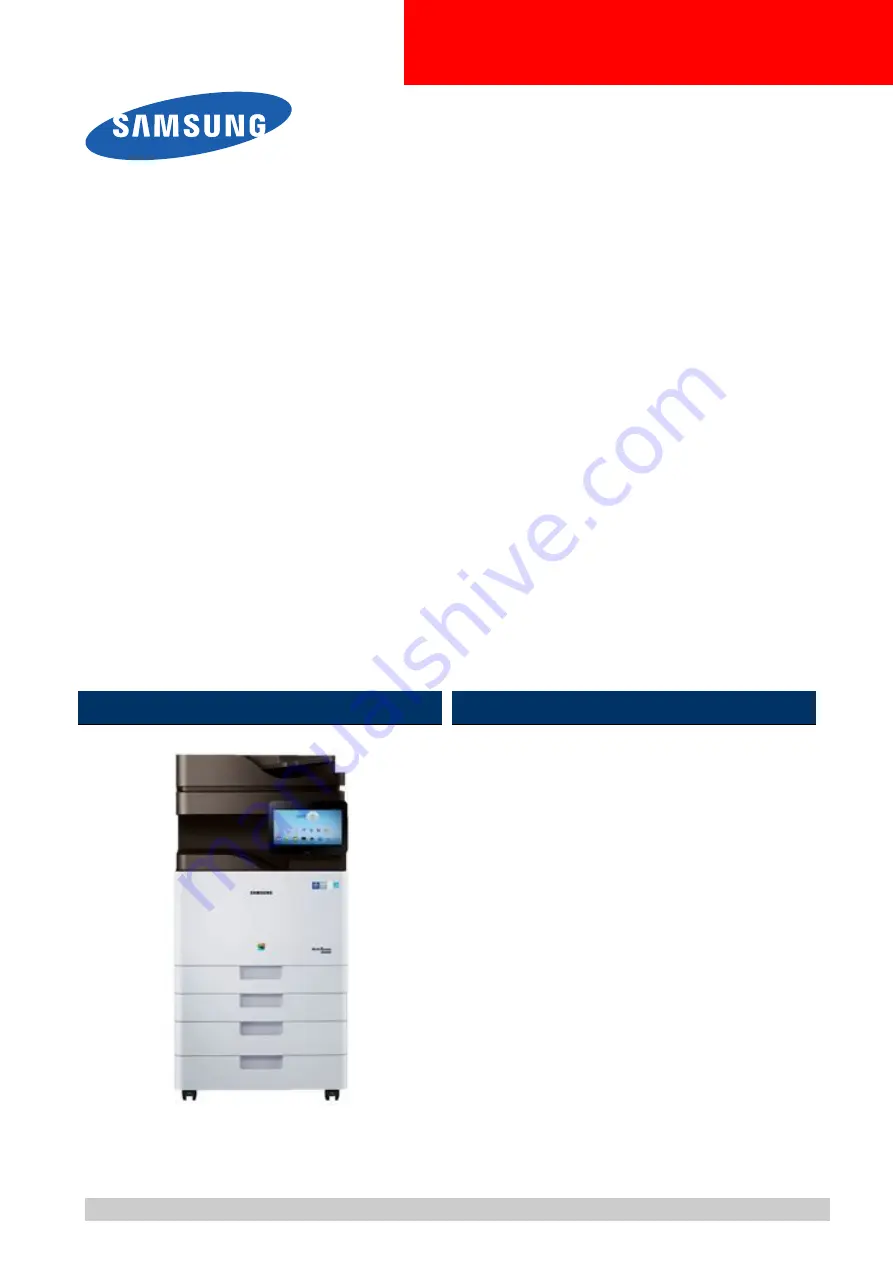
background image

A3 Color Copier

MultiXpress X4 series
SL-X4300LX / SL-X4250LX /
SL-X4220RX

(Ver 1.47)

SERVICE

MANUAL

A3 Color Copier

Contents

1. Precautions

2. Product Specifications and Description

3. Disassembly and Reassembly

4. Troubleshooting

5. Connection Diagram

6. Reference Information

Refer to the service manual in the GSPN (see the rear cover) for more information.

Summary of Contents for MultiXpress SL-X4220RX

Page 1: ...er 1 47 SERVICEMANUAL A3 Color Copier Contents 1 Precautions 2 Product Specifications and Description 3 Disassembly and Reassembly 4 Troubleshooting 5 Connection Diagram 6 Reference Information Refer to the service manual in the GSPN see the rear cover for more information ...

Page 2: ... 2 8 2 2 5 Fax specification 2 9 2 2 6 Paper Handling specification 2 11 2 2 7 Software and Solution specification 2 12 2 2 8 Supplies 2 14 2 2 9 Maintenance Parts 2 15 2 2 10 Option 2 16 2 3 Machine External View 2 21 2 4 Feeding System 2 25 2 4 1 Feeding System Overview 2 25 2 4 2 Main Components and functions 2 26 2 4 3 Cassette Tray 1 2 3 4 2 30 2 4 4 Pick Up Unit 2 31 2 4 5 Registration Unit ...

Page 3: ...58 2 8 7 Waste Toner Container Drive 2 59 2 8 8 Toner Supply Drive 2 59 2 9 Scanner System 2 60 2 9 1 Scanner System Overview 2 60 2 9 2 Scanning System Components 2 63 2 9 3 Caution for moving the scanner 2 69 2 10 Dual Scan Document Feeder DSDF for X4300 and X4250 2 70 2 10 1 DSDF overview 2 70 2 10 2 Electrical parts location 2 71 2 10 3 DSDF Drive System 2 73 2 10 3 1 DSDF Original Pick Up Ass...

Page 4: ...3 Disassembly and Reassembly 3 1 3 1 Precautions when replacing parts 3 1 3 1 1 Precautions when assembling and disassembling 3 1 3 1 2 Precautions when handling PBA 3 1 3 1 3 Releasing Plastic Latches 3 2 3 2 Maintenance 3 3 3 2 1 Machine Cleaning for maintenance 3 3 3 2 1 1 Cleaning the LSU window 3 3 3 2 1 2 Cleaning the transfer roller 3 4 3 2 1 3 Cleaning the scan glass 3 4 3 2 1 4 Cleaning t...

Page 5: ...13 Main Drive unit 3 31 3 3 14 Fuser_Exit Drive unit 3 31 3 3 15 Pick up Drive unit 3 32 3 3 16 Feed Drive unit 3 32 3 3 17 Regi_MP Drive unit 3 33 3 3 18 Toner Supply Drive unit 3 33 3 3 19 Waste toner container drive unit 3 34 3 3 20 Auto Size sensor 3 34 3 3 21 Exit Unit 3 35 3 3 22 Side Unit 3 36 3 3 22 1 Fuser out sensor 3 37 3 3 22 2 Duplex sensor and Curl sensor 3 38 3 3 22 3 MP unit 3 39 3...

Page 6: ... 3 3 35 3 Exit Sensor 3 77 3 3 35 4 Exit Motor 3 78 3 3 35 5 Sub Paddle Shaft Sub Assy 3 79 3 3 35 6 Front Jogger Motor 3 81 3 3 35 7 Front Jogger Home Sensor 3 87 3 3 35 8 Rear Jogger Motor 3 87 3 3 35 9 Rear Jogger Home Sensor 3 89 3 3 35 10 Stapler 3 90 3 3 35 11 Traverse Home Sensor 3 91 3 3 35 12 Traverse Motor 3 94 3 3 35 13 Stacker Motor 3 95 3 3 35 14 Stacker Encoder Sensor 3 95 3 3 35 15 ...

Page 7: ... 2 Understanding the LEDs 4 7 4 3 Updating Firmware 4 8 4 3 1 Updating from the Printer Control Panel 4 8 4 3 2 Updating from the Network 4 9 4 4 JAM removal 4 12 4 4 1 Clearing original document jams 4 12 4 4 2 Clearing paper jams 4 15 4 5 Service Mode Tech Mode 4 20 4 5 1 Entering the Service Mode 4 20 4 5 2 Service Mode Menu Tree 4 21 4 5 3 Information 4 26 4 5 3 1 General 4 26 4 5 3 2 Supply S...

Page 8: ...63 4 5 6 14 FDI 4 63 4 5 6 15 EIUL End of Image Unit Life 4 63 4 5 6 16 SFE Special Feature Enablement 4 63 4 5 6 17 Dealer ID 4 64 4 5 6 18 Envelope Rotate 4 65 4 5 6 19 Drain 4 65 4 6 Error Code and Troubleshooting 4 66 4 6 1 11 2Txx Paper mismatch error 4 66 4 6 2 61 1111 Hibernation Fail 4 67 4 6 3 A1 xxxx Motor error 4 68 4 6 4 A2 xxxx Fan error 4 94 4 6 5 A3 xxxx Sensor error 4 97 4 6 6 C1 x...

Page 9: ...2 Poor fusing performance 4 251 4 7 13 Stain on the paper back side 4 252 4 7 14 Setting Standard Tone 4 253 4 7 15 Duplex Blur_White Spot_Blur on color print out 4 256 4 7 16 Scan Waveform Drop Image 4 257 4 8 Other Errors 4 259 4 8 1 Image system problem 4 259 4 8 2 Fuser problem 4 269 4 8 3 Scanner and Document Feeder problem 4 270 4 8 4 Drive unit problem 4 281 4 8 5 Feeding system problem 4 2...

Page 10: ...ions 4 336 5 Connection Diagram 5 1 5 1 Connection Diagram FUSER_EXIT 5 2 5 2 Connection Diagram PICK UP_PH DRIVE_SIDE 5 3 5 3 Connection Diagram LSU_HVPS 5 4 5 4 Connection Diagram Toner 5 5 5 5 Connection Diagram FDB_SMPS 5 6 5 6 Connection Diagram UI 5 7 5 7 Connection Diagram FRONT_OPC 5 8 5 8 Connection Diagram Scanner 5 9 5 9 Connection Diagram Double Cassette Feeder 5 10 5 10 Connection Dia...

Page 11: ...rements of DHHS 21 CFR chapter 1 Subchapter J for Class I 1 laser products and elsewhere is certified as a Class I laser product conforming to the requirements of IEC EN 60825 1 2014 Class I laser products are not considered to be hazardous The laser system and printer are designed so there is never any human access to laser radiation above a Class I level during normal operation user maintenance ...

Page 12: ...product this can cause electric shock Do not allow paper clips pins or other foreign objects to fall into the product these could cause a short circuit leading to an electric shock or fire hazard 5 Never touch the plugs on either end of the power cable with wet hands this can cause electric shock When servicing the product remove the power plug from the wall socket 6 Use caution when inserting or ...

Page 13: ...ition the machine near a humidifier or in front of an air conditioner Moisture and dust built up inside the machine can lead to overheating and cause a fire or cause parts to rust 11 Do not position the product in direct sunlight This will cause the temperature inside the product to rise possibly leading to the product failing to work properly and in extreme conditions could lead to a fire 12 Do n...

Page 14: ...ns 1 Replace parts carefully and always use Samsung parts Take care to note the exact location of parts and also cable routing before dismantling any part of the machine Ensure all parts and cables are replaced correctly Please carry out the following procedures before dismantling the product or replacing any parts 2 Ensure that power is disconnected before servicing or replacing any electrical pa...

Page 15: ...n get harm 3 When you move the printer use safe lifting and handling techniques This printer is heavy Use the lifting handles located on each side of the machine Back injury could be caused if you do not lift carefully 4 Ensure the printer is installed safely Ensure the printer is installed on a level surface capable of supporting its weight Failure to do so could cause the printer to tip or fall ...

Page 16: ...n the vicinity of the assembly 3 Use only a grounded tip soldering iron to solder or desolder ESDs 4 Use only an anti static solder removal device Some solder removal devices not classified as anti static can generate electrical charges sufficient to damage ESDs 5 Do not use Freon propelled chemicals When sprayed these can generate electrical charges sufficient to damage ESDs 6 Do not remove a rep...

Page 17: ...16 ppm in A3 X4250LX Up to 25 25 ppm in A4 Letter Up to 14 14 ppm in A3 X4220RX Up to 22 22 ppm in A4 Letter Up to 12 12 ppm in A3 Processor Dual Core 1GHz Memory 4GB 2GB for Android OS Document Feeder DSDF Dual Scan Document Feeder X4300LX X4250LX RADF Reverse Automatic Document Feeder X4220RX LCD 10 1 inch Touch Color LCD Copyright 1995 2017 SAMSUNG All rights reserved 2 1 ...

Page 18: ...N A USB Device Yes Hi Speed USB 2 0 USB Host Yes Hi Speed USB 2 0 USB EDI N A Wired LAN Std Ethernet 10 100 1G Base TX Additional Wired LAN Support Opt Wireless LAN Opt IEEE 802 11b g n NFC Active Type NFC Opt IEEE 802 11b g n NFC Active Type Interface Other N A From Ready Less than 25 sec Warmup Time From Sleep Less than 21 sec Ready Less than 250 Wh Normal operation Less than 800 Wh Max Peak Les...

Page 19: ... Less than 54 dBA Sound Pressure X4220RX Less than 53 dBA Sound Pressure Standby Less than 30 dBA Sound Pressure Acoustic Noise Level Sound Power Pressure Sleep Less than 27 dBA Sound Pressure Dimension W x D x H Set inc ADF hinge depth 566 x 640 x 879 mm 22 3 x 24 x 34 6 Weight Net SET with Supplies X4300LX 89 55 kg 197 42 lb X4250LX 89 55 kg 197 42 lb X4220RX 88 23 kg 194 51 lb Recommended Month...

Page 20: ... 2nd Exit Up to 22 22 ipm in A4 Letter with 2nd Exit Up to 8 8 ipm in A3 From Ready Mono Color X4300LX Less than 9 11 5 sec X4250LX Less than 9 5 11 5 sec X4220RX Less than 10 12 sec FPOT From Sleep Mono Color X4300LX Less than 30 32 5 sec X4250LX Less than 30 5 32 5 sec X4220RX Less than 31 33 sec Optical 600 x 600 dpi Resolution Enhanced Up to 1 200 x 1 200 dpi with reduced speed Printer Languag...

Page 21: ...Mac OS X 10 5 10 9 Network Protocol IP Management DHCP BOOTP AutoIP SetIP Static Discovery Protocol SLP UPnP Bonjour DNS WINS Printing Protocol TCP IP LPR IPP WSD Management Protocol SNMPv1 2 SNMP3 SMTP Talnet Scan Protocol SMTP FTP SMB WSD Security Protocol SMB Kerberos LDAP IPsec EAP Duplex Print Built in Direct Print PRN PDF TIFF JPEG XPS Print Features WSD print Secure print Stored print Bookl...

Page 22: ...300 dpi X4250LX Simplex Up to 80 ipm 300 dpi Duplex Up to 100 ipm 300 dpi X4220RX Simplex Up to 45 ipm 300 dpi Duplex Up to 18 ipm 300 dpi Color Mode Mono Gray Color Compatibility Network TWAIN Network SANE Scan method MMT File Formats PDF Searchable PDF Compact PDF PDF Encryption Digital Signature in PDF PDF A Single Page PDF Multi Page PDF TIFF Single Page TIFF Multi Page TIFF XPS Single Page XP...

Page 23: ...fications and Description Item Specification ADF Max 297 x 437 mm 11 7 x 17 2 Scan Size Platen Max 297 x 437 mm 11 7 x 17 2 Scan Original Types Text Text Photo Photo Copyright 1995 2017 SAMSUNG All rights reserved 2 7 ...

Page 24: ...lex to Duplex Up to 14 14 ipm in A4 Letter FCOT From Ready Mono Color X4300LX Less than 5 9 7 6 sec X4250LX Less than 6 6 8 2 sec X4220RX Less than 7 2 9 sec ADF DSDF RADF Scan 600 x 600 dpi Printing 600 x 600 dpi Resolution Platen Scan 600 x 600 dpi Printing 600 x 600 dpi ADF DSDF RADF 25 400 Platen 25 400 Reduce Enlarge Preset 25 50 A3 A5 61 A3 B5 64 Ledger Letter 70 A3 A4 B4 B5 A4 A5 77 Ledger ...

Page 25: ...A Fine N A Resolution Color S Fine N A Compression Method MH MR MMR JBIG Fax Memory Standard Max N A Dual Lines Option Handset N A On hook Dial Yes Search Yes Address Book 1 Touch Dial N A Speed Dial 500 locations TAD I F Yes First Line Tone Pulse Yes Selectable in Tech Mode Pause Yes Auto Redial Yes Last Number Redial Yes Distinctive Ring No Caller ID Yes External Phone Interface Yes First Line F...

Page 26: ...d Description Item Specification Tx Rx Journal Yes Confirmation 2 Types Available With Image TCR Without Image TCR Auto Dial List N A Report List Print out System Data List N A 2 10 Copyright 1995 2017 SAMSUNG All rights reserved ...

Page 27: ...aper 177 220 g m Thin Paper 60 69 g m 16 19 lb Duplex Cotton paper 75 90 g m Duplex Colored 75 90 g m Duplex Pre Printed 71 90 g m Duplex Recycled 60 90 g m Duplex Bond Paper 105 120 g m Duplex Letterhead 75 90 g m Duplex Hole Punched Paper 75 90 g m Duplex Thin CardStock 105 163 g m Duplex Thin Glossy 106 163 g m Duplex Standard Cassette Tray Sensing H W Install Detect Yes Paper Empty Low Level D...

Page 28: ... 7 x 17 Printing size Min Size 98 x 148 mm 3 8 x 5 8 Simplex Top 4 23 1 5 mm Left 4 23 1 5 mm Max Printing Area Duplex Top 4 23 2 mm Left 4 23 2 mm Support Built in Media sizes 148 5 x 210 mm 297 x 432 mm 5 8 x 8 2 11 7 x 17 Media types Plain Thin Bond Hole Punched Pre Printed Recycled Thin CardStock Letterhead Thick Cotton Colored Archive Thin Glossy Heavy weight Duplex Printing Media weight 16 4...

Page 29: ...ru Workflow 3 0 Security SecuThru Pro 1 0 Solution Mobility SCP 1 0 14 09 Authentication Local Yes Authentication Network Yes SMB Kerberos LDAP IPSec EAP IP Address Filtering Yes IPv4 Filtering IPv6 Filtering MAC Filtering HDD Overwrite Standard Yes HDD Overwrite Max Overwrites 9 Secure Print Yes Encrypted Secure Print Yes Encrypted PDF Mode Encrypted Scanning Yes IP Sec Yes Security Smart Card Au...

Page 30: ...ous job Simplex Mode 5 Coverage Toner Cartridge Yellow CLT Y808S Approx 20 000 pages A4 Letter LEF Continuous job Simplex Mode 5 Coverage OPC Drum Unit NOTE Drum Units are exchangeable for all colors CLT R808 Approx 100 000 pages A4 Letter LEF 2 pages job Simplex Mode 5 Coverage Waste Toner Container CLT W808 Approx 33 700 pages A4 Letter LEF 2 pages job Color Ratio C30 M70 Simplex Mode 5 Coverage...

Page 31: ...C98 00980D 300 000 pages ITB Cleaner JC96 06246A 150 000 pages Transfer roller Assy JC95 01942A 150 000 pages Pick Up Reverse Forward roller Tray1 2 3 4 MP Tray JC93 00540A 200 000 pages DSDF Pick Up roller Assy JC97 04587A 200 000 pages X4300LX X4250LX DSDF Reverse roller Assy JC97 04588A 100 000 pages X4300LX X4250LX RADF Pick Up roller Assy JC97 04470A 200 000 pages X4220RX RADF Reverse roller ...

Page 32: ... install this finisher SL DPX501 is required 3 250 Sheet Stapling Finisher High Volume Finisher SL FIN702H NOTE This model is for only US This model includes SL DPX501 SL FIN701B NOTE To install this finisher SL DPX501 is required 2 250 sheet Booklet Finisher SL FIN702B NOTE This model is for only US This model includes SL DPX501 Second Exit Unit SL DPX501 Job Separator SL JSP500S 2 16 Copyright 1...

Page 33: ...L FIN501L Swedish 4 hole For Sweden SL HPU501S NOTE This model is for SL FIN501L 2 and 3 hole punch For America Asia Africa SL HPU701T NOTE This model is for SL FIN70xH SL FIN70xB 2 and 4 hole For Europe SL HPU701F NOTE This model is for SL FIN70xH SL FIN70xB Swedish 4 hole For Sweden SL HPU701S NOTE This model is for SL FIN70xH SL FIN70xB Working Table Large SL WKT101 Working Table CLX WKT101 Wir...

Page 34: ...a heavy weight Media weight Plain Paper 70 90 g m 18 5 24 lb Duplex Thick Paper 91 105 g m 25 28 lb Duplexb Heavy Weight Paper 106 176 g m Duplex Extra Heavy Weight 1 Paper 177 220 g m Thin Paper 60 69 g m 16 19 lb Duplex Cotton paper 75 90 g m Duplex Colored 75 90 g m Duplex Pre Printed 71 90 g m Duplex Recycled 60 90 g m Duplex Bond Paper 105 120 g m Duplex Letterhead 75 90 g m Duplex Hole Punch...

Page 35: ...avy weight Thin Cotton Colored Recycled Bond Archive Pre Punched Cardstock Glossy Envelope Media Weight Main 52 256 gsm 13 9 68 3 lb Top 52 325 gsm 13 9 86 7 lb Number of Bin 2 Main Top Dimension W x D x H 458 x 491 x 173 mm 18 0 x 19 3 x 6 8 inch Weight 15 kg 33 lb Tray1 Finishing Capacity 50 Sheets 80gsm Tray1 Finishing Mode Stapling Left Right Center Punch 2 3 2 4 Swedish Inner Finisher Tray2 F...

Page 36: ...EAP TTLS EAP TLS Wi Fi WPS Wi Fi Protected Setup compatible Wi Fi Direct compatible NFC NFC Pro Active type Wireless NFC Kit BLE Bluetooth Low Energy N A NOT Compatible with iOS based device Model Name SL NWE002X Wireless LAN 2 4 GHz 5GHz Dual Band IEEE 802 11 a b g n ac compliant Speed up to 433Mbps Security WEP64 WEP128 WPA WPA2 Personal WPA WPA2 Enterprise PEAPv0 EAP TTLS EAP TLS Wi Fi WPS Wi F...

Page 37: ... X4300 X4250 RADF X4220 width guides 3 DSDF X4300 X4250 RADF X4220 input tray 4 DSDF X4300 X4250 RADF X4220 output tray 5 Control panel 6 Multi purpose tray 7 Power switch 8 Power receptacle 9 Standard tray tray 1 10 Standard tray tray 2 11 Front door 12 Paper output tray Copyright 1995 2017 SAMSUNG All rights reserved 2 21 ...

Page 38: ...oduct Specifications and Description 2 Front view 2 1 Scanner glass 2 White sheet 3 Multi purpose tray paper width guide 4 Multi purpose tray 5 USB port 2 22 Copyright 1995 2017 SAMSUNG All rights reserved ...

Page 39: ...ription Rear view 1 Output support tray 2 Control board cover 3 USB port 4 USB printer port 5 Network port 6 FDI Optional cover 7 Fax1 Optional port cover 8 Fax2 Optional port cover Copyright 1995 2017 SAMSUNG All rights reserved 2 23 ...

Page 40: ...2 Product Specifications and Description Inner view 1 LSU window cleaning stick 2 Waste toner container 3 Toner Cartridges 4 Imaging units 2 24 Copyright 1995 2017 SAMSUNG All rights reserved ...

Page 41: ...eeding System Overview The feeding system picks up a paper from the cassette or MP tray and transports it to the machine inside It mainly consists of the pick up unit registration unit transfer roller Assy Exit unit Copyright 1995 2017 SAMSUNG All rights reserved 2 25 ...

Page 42: ...lers 7 Tray 3 pick up reverse forward rollers Option 8 Tray 4 pick up reverse forward rollers Option 9 MP Tray pick up reverse forward rollers 10 Tray 1 feed roller 11 Tray 2 feed roller 12 Tray 3 feed roller Option 13 Tray 4 feed roller Option 14 Sensor registration 15 Roller registration 16 Roller transfer 17 Roller Exit 1st 18 Roller Exit 2nd Option 19 Roller Invert 20 Roller Duplex1 21 Roller ...

Page 43: ...y one sheet to the feed roller When two sheets of paper or more are transported from the pick up roller the load of the torque limiter of the reverse roller is heavier than the frictional force between the sheets As a result the reverse roller is stopped and the lower paper does not advance any further Feed roller This roller transports the paper sent from the forward reverse roller to the registr...

Page 44: ...etects tray1 upper limit Tray1 paper feed jam detection sensor Detects Feed1 jam Tray2 paper size detection sensor Detects tray2 paper size Tray2 paper empty detection sensor Detects tray2 paper empty Tray2 upper limit detection sensor Detects tray2 upper limit Tray2 paper feed jam detection sensor Detects Feed2 jam Tray3 paper size detection sensor Option Detects tray3 paper size 2 28 Copyright 1...

Page 45: ...l detection sensor Detects paper full on Exit tray1 Exit2 tray path Return path solenoid Changes paper path Duplex Motor Controls duplex driving Duplex jam detection sensor Detects duplex jam Exit tray2 paper full detection sensor Detects paper full on Exit tray2 Exit 2 paper return detection sensor Detects Duplex Return position MPF Paper empty detection sensor Detects MP tray paper empty NOTE If...

Page 46: ...ize Guides in each tray Basic Cassette Specification 1 Structure Drawer Type 2 Capacity 520 Sheets 80g paper standard 3 Paper Plain paper A5 A4 A3 B5 B4 Letter 11 17 Ledger Statement Legal 4 Weight plain paper 60 216 g m 5 Plate knock up lift type Lift Motor Up Limit Sensor 2 30 Copyright 1995 2017 SAMSUNG All rights reserved ...

Page 47: ...VER INPUT CST is pushed and pick up roller moves down The forward roller and the reverse roller serve to make sure that a single sheet of paper is moved to the paper path and the paper is moved as far as the registration roller by the work of the feed roller NOTE The Pick Up Unit1 and Pick Up Unit2 can t be swapped over Pick Up Unit1 Pick Up Unit2 Copyright 1995 2017 SAMSUNG All rights reserved 2 ...

Page 48: ...r is driven by the Regi MP motor The Regi clutch is located between the Regi clutch and Regi MP motor and it controls ON OFF of the registration roller in order to match paper and an image on the drum at the predetermined registration point 2 32 Copyright 1995 2017 SAMSUNG All rights reserved ...

Page 49: ...ng Speed 30 ppm X4300 25 ppm X4250 22 ppm X4220 Letter A4 LEF Long Edge Feeding Paper Separation When the MP paper detection A sensor detects paper and the machine gets a MP printing job the MP solenoid B drops the pick up roller C onto the top of the paper stack on the MP tray This machine uses an FRR Feed and Reverse Roller system for feeding paper The friction between the reverse roller D and f...

Page 50: ...oller gives the drum a negative charge 2 Laser exposure Light produced by a laser diode hits the charged OPC through the lens and mirrors 3 Development The developing roller carries negatively charged toner to the latent image on the drum surface This machine uses four independent imaging units one for each color 4 Transfer Image transfer The first transfer rollers opposite the OPC drums transfer ...

Page 51: ...maging Unit consists of the Drum unit and the Developer unit The Developer units are not exchangeable but the Drum units are exchangeable The diameter of the drum is 30 mm circumference about 94 2 mm The developing gap between a drum and the corresponding magnetic roller cannot be adjusted The CRUM is the sub part of the Drum unit It stores the count information and several data Copyright 1995 201...

Page 52: ...agnetic roller are supplied with power from the coupling The BLDC motor maintains the constant speed So the speed sync for each color depends on the BLDC motor without the additional device Phase sync for each OPC runout prints the pattern on the ITB and is adjusted by the data automatically 2 36 Copyright 1995 2017 SAMSUNG All rights reserved ...

Page 53: ...g of magnetic toner carrier The developer in each unit is supplied to the magnetic development roller A by the two mixing augers B The diameter of the magnetic roller is 16 mm Each Developer unit has a TC Toner Concetration sensor C They are used for controlling the operating range of toner density Developer Circulation Copyright 1995 2017 SAMSUNG All rights reserved 2 37 ...

Page 54: ...r and toner well This occurs at the following times During the process control self checking During toner supply job During development job If the developer unit is stored at temperature above 50 C 122 F it does not works normally The toner in developer unit is easy to harden at temperature above 50 C 122 F 2 38 Copyright 1995 2017 SAMSUNG All rights reserved ...

Page 55: ...nd M drums on the diagram shows the direction of ITB rotation The rotation is made by the friction between the drive roller and transfer belt The tension roller provides tension to block slip There are three ACR sensor and one photo sensor Two of them are for the line position adjustment and the other is for process control One photo sensor controls the position of the first transfer roller 1 ITB ...

Page 56: ...duct Specifications and Description 2 5 3 2 Transfer belt drive The ITB drive motor A drives the transfer belt B by using gears and the ITB drive roller C 2 40 Copyright 1995 2017 SAMSUNG All rights reserved ...

Page 57: ...r drives the ITB cleaning motor The cleaning blade A in the ITB cleaner always contacts the transfer belt B and removes the used toner from the belt Then the toner collection auger C transports the waste toner to the waste toner container The film D on the ITB cleaner protects against toner contamination The driving power by driver roller is transferred to the tension roller E and the toner collec...

Page 58: ...e on both sides The lamp s are fixed inside of the fusing belt When rotating the fusing belt these lamps does not rotate 2 Fusing Belt The fusing belt gets heat from the halogen lamp and transfer it to toner and paper The fusing belt consists of three thin layers The thin fusing belt reduces warming up time and mode changing time To prevent the fusing belt from adhering to the toner the surface of...

Page 59: ... NC sensor malfunction These thermostats are used to prevent abnormal operation When the thermostat is triggered it must be replaced as well as the other damaged parts in the fuser unit 2 6 2 Fuser Unit drive The fuser motor A drives the pressure roller B through the gear train The fusing belt C pressurized by the pressure roller B is rotated by driving it Copyright 1995 2017 SAMSUNG All rights re...

Page 60: ...g lamp in the following cases The temperature detected by the NC sensors keeps higher than 240 C for 20 sec The following components are used when thermistor overheat protection fails Two thermostats get into line with the common ground wire of the fusing lamp If one of the thermostat temperatures becomes higher than 195 C it opens and cuts power to the fusing lamp If the other thermostat temperat...

Page 61: ...asses between OPC Nip and Fuser Nip the fuser unit controls paper loop level Loop Control The fuser unit detects the signal for photo sensor 1 2 and decides paper loop level And it controls motor speed as paper loop level Copyright 1995 2017 SAMSUNG All rights reserved 2 45 ...

Page 62: ...cal path for each color This LSU adopted the cross scan type scanning K Color and C Color scan the laser beam from the rear to the front M Color and Y Color scan the laser beam from the front to the rear Also the LSU has a skew adjustment function which adjusts the scanning line and the shutter device to protect the glass on the LSU optical path from the contamination 1 LD PBA 2 P Mirror Motor 3 F...

Page 63: ... Lens A determines the slope of the primary scanning line and the image position of the secondary scanning direction This is adjusted at the factory The primary scanning line slope by the machine difference is adjusted by skew adjustment in the LSU Reflecting mirrors B on each color path adjust the curvature of primary scanning This is adjusted at the factory Copyright 1995 2017 SAMSUNG All rights...

Page 64: ...g start position for yellow This machine recognizes each color from the time that they are detected Main Scan Start Detection 4 beams are detected by the PD PBA at the scanning start point and create the horizontal sync Hsync signal Data is scanned by Hsync The arrow in the above diagram shows the data scanning direction for each color Black Cyan and Yellow Magenta use the same polygon motor scann...

Page 65: ...nd rear ID sensors The controller takes the average of the spaces then adjusts the following positions and magnification Sub scan line position for CMY Main scan line position for CMY Magnification ratio for CMY Skew for CMY The transfer belt cleaning unit cleans the transfer belt after the patterns are measured KK CC MM YY Spaces between two lines of the same color KC KM KY Spaces between a black...

Page 66: ...ff However it is normally recommended to turn on this function Line position adjustment timing depends on several settings These settings include the following ΔT Temperature change of LSU Laser Scanning Unit between the temperature of the previous line position adjustment and the current temperature Pages Total printed pages after previous line position adjustment Interval During Print Job Line p...

Page 67: ...the worm gear 1 for adjustment and worm gear 2 When ACR executes it detects and adjusts the scanning line slope manually Skew adjustment assembly A for magenta cyan and yellow adjusts the skew angle of the F2 lens B This mechanism corrects main scan skew Copyright 1995 2017 SAMSUNG All rights reserved 2 51 ...

Page 68: ... container is installed it push the side of the shutter and shutter door is opened On the contrary to this when the waste toner is not installed shutter door is closed Shutter off Printing is impossible Shutter door is closed Waste toner container is not installed Shutter on Printing is possible Shutter door is opened Waste toner container is installed 2 52 Copyright 1995 2017 SAMSUNG All rights r...

Page 69: ...se driving at pressure mode BLDC 1 Regi MP driving 3 Regi MP E CLT 2 Regi MP driving control 4 Feed HB STEP 1 Feed 1 2 Roll driving 5 Pick Up PM STEP 2 Pick Up Roll CST Lift driving Reverse driving at CST Lift driving 6 Toner supply DC 4 Toner transfer in toner cartridge driving Duct 7 OPC DEVE BLDC 4 OPC DEVE driving 8 ITB BLDC 1 ITB driving 9 T1 Dis En PM STEP 1 T1 Dis Engage 10 Waste toner cont...

Page 70: ...2 Product Specifications and Description 2 8 2 Main Drive Unit OPC_DEVE_ITB_T1_Disengage_Engage Front View Rear View 2 54 Copyright 1995 2017 SAMSUNG All rights reserved ...

Page 71: ...ing is a diagram of the Pick up drive Power Train Pick up rotating Pick up input counter rotating Cst LIFT input 1 Step rotating 2 Gear Pick up driving 1 Step counter rotating 3 Gear 4 Gear 5 Gear 6 Gear CST Lift driving Copyright 1995 2017 SAMSUNG All rights reserved 2 55 ...

Page 72: ...wing is a diagram of the drives that power the MP Regi systems Power Train Regi MP BLDC driving Clutch driving control 1 BLDC 2 Gear 3 Gear 4 Clutch Gear Regi driving 1 BLDC 2 Gear 5 Gear 6 Gear 7 Clutch Gear MP driving 2 56 Copyright 1995 2017 SAMSUNG All rights reserved ...

Page 73: ... Specifications and Description 2 8 5 Feed Drive Power Train Feed HB STEP driving 1 HB STEP 2 Gear 3 Gear Feed1 driving 1 HB STEP 2 Gear 4 Gear Feed2 driving Copyright 1995 2017 SAMSUNG All rights reserved 2 57 ...

Page 74: ...ure mode BLDC Motor driving Reverse driving at fuser pressure mode Exit Step Motor driving Reverse driving at duplex mode Fuser and Fuser relase One way gear is adopted 1 BLDC Rotation 2 Gear 3 Gear Fuser driving 1 BLDC Counter rotation 4 Gear 5 Gear 6 Gear Fuser pressure mode driving 7 PM STEP 8 Gear Exit driving 2 58 Copyright 1995 2017 SAMSUNG All rights reserved ...

Page 75: ...oner container driving 1 PM STEP 2 Gear RDCN WTB Waste toner container driving 2 8 8 Toner Supply Drive Power Train DUCT Bottle driving 1 DC Motor 2 Gear RDCN SUPPLY 5 Gear DUCT DUCT driving 1 DC Motor 2 Gear RDCN SUPPLY 3 Gear SUPPLY IDLE 4 Gear SUPPLY Bottle driving Copyright 1995 2017 SAMSUNG All rights reserved 2 59 ...

Page 76: ...py For scan operation the scanner uses FR carriage and HR carriage that is moved by the wire And it scans the original document on the scan glass or ADF Auto Document Feeding The scanner system consists of 3 modules following below FR Full Rate carriage Illuminates the original and reflects the light at a 90 degree angle HR Half Rate carriage Transfers the reflected light from the FR carriage to t...

Page 77: ...d light from Mirror 1 is send to imaging lens through the Mirror 2 3 3 The light becomes smaller and makes an optical image 4 The optical image is generated to the electrical signal by the CCD sensor To make a stable image the gap between original and lens must be kept For this HR carriage moves at half distance and half speed of FR carriage Copyright 1995 2017 SAMSUNG All rights reserved 2 61 ...

Page 78: ...ensor element extracts the blue color from optical image After extraction each color is changed to electrical analog signal Analog image signal is changed to digital image signal by A D converter and transfers to the processor Image scan of the main scanning direction is performed by CCD sensor CCD sensor consist of approx 7500 pixel Image scan of sub scanning direction is performed by FR carriage...

Page 79: ... To scan the original on scan glass two carriages driven the motor moves at a regular speed The motor drives the timing belt pulley and wire The wire pulley rolls and releases the wire to move carriage The scanner consists of the scan glass FR carriage HR carriage Imaging unit and Driving unit Copyright 1995 2017 SAMSUNG All rights reserved 2 63 ...

Page 80: ...ngineer needs to replace it Light Guide Light guide changes the light from the point type to the line type It is made by the transparent resin and controls the amount of light in scan area uniformly White LED White LED emits the white light The heat sink assembled to the PBA prevents a heat deterioration Reflection holder This reflects the passed light through Light guide 2 Mirror 1 This changes t...

Page 81: ...d light through the imaging lens is focused on CCD The image reduces to fix the CCD sensor size and pixel size CCD 2 CCD PBA The image made by lens is changed to the electrical signal by CCD CCD consists of 3 channel line sensor for color image creation The brightness and darkness of image is settled to the voltage level from CCD The output voltage is changed to the digital signal The digital sign...

Page 82: ...e frame to prevent the distortion 6 Drive motor Scanner drive system uses the step motor to move the carriage It controls the position and constant speed The motor power is transferred to the wire through timing belt and pulley 7 Timing Belt Timing belt has the regular sawtooth and transfers the motor power to the pulley 2 66 Copyright 1995 2017 SAMSUNG All rights reserved ...

Page 83: ...he original 11 Cover open sensor 2 This is the reed switch to detect that the ADF unit is closed It uses the magnetic force for ADF close detection 12 ADF glass ADF glass scans the original through ADF unit When the original passes on this FR carriage reads the original If it is contaminated the horizontal black line or white line can be created 13 Shading sheet This makes the scan module detect t...

Page 84: ...2 Product Specifications and Description 2 68 Copyright 1995 2017 SAMSUNG All rights reserved ...

Page 85: ...e scan locking screw must be removed If not it causes the scanner failure 1 When installing the machine remove the scan locking screw 2 After removing the screw assemble the screw cap from accessory package 2 When moving When moving the machine tighten the scan locking screw to prevent the damage of the carriage 1 Check if the FR carriage is located to the home position 2 Remove the screw cap 3 Ti...

Page 86: ... an original from the tray and transfers it to the paper path R5 Reverse roller Prevent the multi feeding R6 Regi roller Aligns the leading edge of the paper for registration R7 Scan In roller Feeds an original before simplex scanning R8 Simplex White Bar Supports a stable scanning R9 Scan Out roller Feeds an original before duplex scanning R10 D CIS module Scans a back page of original R11 Exit r...

Page 87: ...2 Product Specifications and Description 2 10 2 Electrical parts location Copyright 1995 2017 SAMSUNG All rights reserved 2 71 ...

Page 88: ...1 0604 001394 ADF PBA S8 HARNESS MP SIZE SENSOR JC39 02087A ADF PBA S9 PHOTO INTERRUPTER SCAN OUT 0604 001381 ADF PBA S10 CONTACT IMAGE SENSOR 0609 001558 MAIN PBA S11 PHOTO INTERRUPTER EXIT 0604 001394 ADF PBA S12 PHOTO INTERRUPTER SCAN IN 0604 001381 ADF PBA S13 PHOTO INTERRUPTER REGI 0604 001394 ADF PBA S14 PHOTO INTERRUPTER FEED OUT 0604 001394 ADF PBA S15 PHOTO INTERRUPTER COVER OPEN 0604 001...

Page 89: ...ch to transfer paper 1 BLDC motor and 1 step motor drive the system for simplex and duplex job BLDC motor is used for picking up original and pick up is controlled by the clutch Step motor is used for the original registration BLDC motor is used for feeding a original Copyright 1995 2017 SAMSUNG All rights reserved 2 73 ...

Page 90: ...k up Drive Assy Pick up Assy and Guide Pick up Assy Operation Procedure 1 Checks a paper detection 2 Checks the original width size 3 Holds the original not to be moved in paper path before pick up driving 4 Starts pick up driving 5 Separates an original by the reverse roller 2 74 Copyright 1995 2017 SAMSUNG All rights reserved ...

Page 91: ...rocedure 1 The picked up original is detected by Regi Actuator and the regi sensor is on At this time the regi motor is stopped and the original is aligned 2 After the regi sensor is on regi motor rotates 3 After the transferred original passes the regi actuator the regi sensor is off and the regi motor stops Copyright 1995 2017 SAMSUNG All rights reserved 2 75 ...

Page 92: ...cedure 1 The feed motor transfers the power by the timing belt 2 When original passes the scan in sensor simplex scan starts 3 Simplex white bar functions to prevent the wrinkle and background 4 When original passes the scan out actuator duplex scan starts 5 Duplex white bar functions to prevent the wrinkle and background 6 Original is transferred to exit tray 2 76 Copyright 1995 2017 SAMSUNG All ...

Page 93: ...for registration and then sends the paper to the next feed step R3 RADF forward roller Separates an original from the tray and transfers it to the paper path R4 RADF friction pad Prevent the multi feeding R5 RADF pick up roller Picks up an original from the tray R6 Original document tray Paper input tray R7 Exit tray Paper output tray R8 Exit roller Sends an original to the exit tray and forms the...

Page 94: ...RRUPTER Regi 0604 001393 PBA ADF S5 PHOTO INTERRUPTER Detect 0604 001393 PBA ADF S6 PHOTO INTERRUPTER Exit 0604 001393 PBA ADF S7 PHOTO INTERRUPTER Duplex 0604 001393 PBA ADF S8 PHOTO INTERRUPTER Scan 0604 001381 PBA ADF S9 CLUTCH ELECTRIC Regi JC66 00994B PBA ADF S10 BLDC MOTOR JC31 00156A PBA ADF S11 CLUTCH ELECTRIC Pick Up JC47 00033A PBA ADF S12 PHOTO INTERRUPTER Cover 0604 001393 PBA ADF S13 ...

Page 95: ...m consists of one motor and two clutch to transfer the paper A BLDC motor drives the system for simplex and duplex job The Pick up and Regi clutch control the driving on off The Cam type gear and solenoid is used for duplex reverse Copyright 1995 2017 SAMSUNG All rights reserved 2 79 ...

Page 96: ...the belt The ADF roller is provided with the power while the paper is picked up and transferred to the Registration roller When the pick up drive is stopped and Registration roller is driven the ADF roller become idle The normal process is When the original is setting up the detect sensor is activated and printing job starts the motor and pick up clutch work Then the pick up roller moves down and ...

Page 97: ...ELECTRIC to drive the Registration Roller and transfer the paper to ROLLER FEED The Registration Roller aligns the leading edge of the original When original is placed in the Nip the roller is rotated for alignment The CLUTHC ELETRIC repeats on off to align each paper Copyright 1995 2017 SAMSUNG All rights reserved 2 81 ...

Page 98: ...ted to Motor The ROLLER FEED and ROLLER M IDLE SCF make the feeding force by using a spring pressure method The Motor transfers the paper through interlocking the Roller Feed in and the Roller Feed out At scan the Motor is driven continually to maintain stable paper transfer 2 82 Copyright 1995 2017 SAMSUNG All rights reserved ...

Page 99: ...red to the exit At duplex mode counter rotation occurs To keep the pressure of the Exit Roller the ROLLER EXIT_IDLE is pressurized by spring At duplex mode when it is rotated inversely it make the space between rollers to protect the jam The space between rollers is adjusted by LINK EXIT_IDLE and SHAFT EXIT_IDLE Copyright 1995 2017 SAMSUNG All rights reserved 2 83 ...

Page 100: ...nly duplex mode At Duplex Mode when the motor rotates inversely the solenoid is on and the GEAR CAM OUTER and GEAR EXIT are driven When the GEAR EXIT rotates the solenoid drives the GEAR CAM and it makes the space between the Roller Exit and Idle Roller 2 84 Copyright 1995 2017 SAMSUNG All rights reserved ...

Page 101: ...map data It controls all modules required to print that is LSU HVPS FAN Fuser etc The main controller communicates with the drive system and other devices through UART Universal Asynchronous Receiver Transmitter It communicates with the toner cartridge and drum developer unit through I2C to check their life The main controller adopted Dure Core CPU 1GHZ DDR3 2GB memory Flash NAND 128MB 320GB SATA ...

Page 102: ... to safely shut down the system power The ADF Controller controls some mechanisms required to scan by feeder continuously and communicates with the main controller to synchronize the scanning timing The HVPS board generates high voltage channels and controls it The FDB board controls the fuser lamp On Off The SMPS board generates the 5V 24V for system power 2 86 Copyright 1995 2017 SAMSUNG All rig...

Page 103: ...2 Product Specifications and Description Circuit Board Locations The following diagrams show the locations of the printer circuit boards Copyright 1995 2017 SAMSUNG All rights reserved 2 87 ...

Page 104: ...ol can Video UI FAX signal interface connection motor driving IC Engine signal interface connection power interface The main processor Dual Core 1GHz CPU controls video engine UI display and communicates the various devices The HDD is connected to the main controller by SATA cable and to the other device ADF DCF Finisher Modem by UART 1 Main Controller Diagram 2 88 Copyright 1995 2017 SAMSUNG All ...

Page 105: ...I I F 9 GIGA N W RJ45 10 USB HOST 1 2 11 USB DEVICE 12 HVPS_COLOR 13 LSU COLOR 14 HVPS PWR 15 FDB I F 16 DEVE MTR 17 POWER I F 18 DCF I F 19 SIDE COVER 20 PICKUP 21 PH DRIVER 22 ID SENSOR 23 SHUTTER 24 TONER I F COLOR 25 FUSER 26 SCAN I F 27 2nd GIGA NPC 28 MSOK I F 29 MODEM JOINT 30 COLOR FRONT 31 OPC SENSOR 32 FINISHER Information Part Code JC92 02742A Copyright 1995 2017 SAMSUNG All rights rese...

Page 106: ...information and service information NOTE When a main board needs to be exchanged the MSOK PBA should be re installed to the new main board to retain the system information Information Part Code JC92 02431A Part Name PBA MSOK 4 FAX JOINT PBA The FAX JOINT PBA is used for interfacing between the main board and modem PBA It uses UART for interface Information Part Code JC92 02743A for Dual Fax JC92 0...

Page 107: ...led by the main board 1 1st modem Information Part Code JC92 02558A PBA name PBA FAX CARD Connection 1 FAX JOINT I F connector 2 TEL Line I F connector 3 External Phone I F connector 2 2nd Modem Information Part Code JC92 02559A PBA name PBA FAX CARD Connection 1 FAX JOINT I F connector 2 TEL Line I F connector Copyright 1995 2017 SAMSUNG All rights reserved 2 91 ...

Page 108: ... interfaces to the main board Information Part Code JC92 02068A PBA name PBA SUB FDI Connection 1 Connector to Main controller 7 Dual Network board Optional The Dual Network board as a option is used to make Dual Network environment It provides 2nd Network Port Information Part Code JC92 02741A PBA name PBA NPC Connection 1 GIGA N W RJ45 2 Main PBA I F connector 2 92 Copyright 1995 2017 SAMSUNG Al...

Page 109: ...ireless module It interfaces through USB communication Information Part Code JC92 02721A PBA Name PBA OPE HUB Connection 1 MAIN Board I F Connector 2 OPE Unit I F Connector 3 Power Input Connector 4 OPE Unit Power 5 Speaker 6 External USB Host Slot 7 External USB Host Slot 8 WLAN NFC Copyright 1995 2017 SAMSUNG All rights reserved 2 93 ...

Page 110: ...for over current and overload Specification General Input Output Voltage 1 AC 110V 90V 135V 2 AC 220V 180V 270V 3 Input Current 13 7A 110V 6 8A 220V 4 Output Power 1500W DC 5V 55W DC 5VS 30W DC 24V 432W Information 110V 220V Part Code JC44 00093D JC44 00100D Part Name SMPS Type 5 V1 SMPS Type 5 V2 Connection 1 INPUT_AC 2 OUTPUT_24V1 2 3 4 5 6 to Main PBA 3 SMPS Enable 4 OUTPUT_5V1 2 3 4 S1 S2 to M...

Page 111: ...Description 1 GND 2 24VOn_Off 3 GND AC Input DC Output Connector CN3 PIN Assign PIN Name Description 1 24V1 Power 2 GND 24V Ground 3 24V2 Power 4 GND 24V Ground 5 24V3 Power 6 GND 24V Ground 7 24V4 Power 8 GND 24V Ground DC Output Connector CN4 PIN Assign PIN Name Description 1 5V1 Power 2 GND 5V Ground 3 5V2 Power 4 GND 5V Ground Copyright 1995 2017 SAMSUNG All rights reserved 2 95 ...

Page 112: ...s board supplies the voltage to Fuser AC Heater Main board Information 110V 220V SEC CODE JC44 00210C JC44 00211C PBA NAME FDB V1 FDB V2 Connection 1 Heater I F 2 Fuser AC 3 FDB I F 4 Type 5 5 Main S W 6 Inlet 7 Heater S W 2 96 Copyright 1995 2017 SAMSUNG All rights reserved ...

Page 113: ...M C K 1182V DEV DC Y M C K 498V DEV AC Y M C K Vpp 1000V THV1 Y M C K 19 97uA THV2 1893V THV2 2250V FUSER 819V SAW 703V Information Part Code JC44 00212B Part Name HVPS Connection Description PIN NAME ASSIGN Output Voltage ITHV Y M C K CN1 Output Voltage FUSER CN2 Output Voltage SAW CN3 Output Voltage THV CN4 Output Voltage DEV Y CN7 Output Voltage MHV Y CN8 Copyright 1995 2017 SAMSUNG All rights ...

Page 114: ...l ADC_I THV2 3 Output signal ADC_I THV3 4 nEN signal NEN_AC1 5 nEN signal NEN_AC2 6 nEN signal NEN_AC3 7 PWM signal PWM_AC_VPP1 8 PWM signal PWM_AC_VPP2 9 PWM signal PWM_AC_VPP3 10 PWM signal PWM_MHV1 11 PWM signal PWM_MHV2 12 PWM signal PWM_MHV3 13 Output signal ADC_MHV0 14 Output signal ADC_MHV1 15 Output signal ADC_MHV2 16 Output signal ADC_MHV3 17 PWM signal PWM_I THV1 18 PWM signal PWM_I THV2...

Page 115: ...GN PWM signal PWM_THV 27 PWM signal PWM_SAW 28 PWM signal PWM_FUSER_BIAS 29 PWM signal PWM_MHV0 30 PWM signal PWM_AC_FREQ 31 nEN signal NEN_AC0 32 PWM signal PWM_AC_VPP0 33 PWM signal PWM_ITHV0 34 PWM signal PWM_DEV_DC0 35 Copyright 1995 2017 SAMSUNG All rights reserved 2 99 ...

Page 116: ... memory for Fuser Unit Life Cycle counting It also provides a connection interface for the Fuser Step Motor position detecting sensor Connection 1 Fuser EEPROM Pressure Sensor I F 2 Pressure Sensor Information Part Code JC92 02470A Part Name PBA FUSER 2 12 8 Waste Sensor PBA The Waste Sensor PBA detects the waste toner level inside the waste toner container Information Part Code JC92 02471A Part N...

Page 117: ... CRUM Joint PBA The Deve Crum Joint PBA is the interface PBA between the imaging unit drum unit and developer unit and the machine Information Part Code JC92 02163A Part Name DEVE CRUM JOINT 2 12 11 Toner CRUM Joint PBA The Toner CRUM Joint PBA is the interface PBA between the toner cartridge and the machine Information Part Code JC92 02164A Part Name TONER CRUM I F Copyright 1995 2017 SAMSUNG All...

Page 118: ...d Description 2 12 12 Paper Size sensor PBA The paper size sensor PBA is used for sensing paper size of tray Information Part Code JC92 02622A Part Name PBA PAPER SIZE SENSOR 2 102 Copyright 1995 2017 SAMSUNG All rights reserved ...

Page 119: ... 9 7 inch touch LCD 960x600 The A31s is used to interface with users through the touch screen The A31s has a GPU SGX544MP2 which supports the Graphic Accelationfor better UI Information Part Code JC97 04499A Part Name OPE Connection 1 USB host in OPE Hub PBA 2 Input POWER Connector in OPE Hub PBA Copyright 1995 2017 SAMSUNG All rights reserved 2 103 ...

Page 120: ...tte where it improves paper handling quality and print quality by heightening internal cassette temperature in very humid environments NOTE For tray 1 2 cassette heater is installed in factory or optional depending on country For tray 3 4 cassette heater is optional 2 104 Copyright 1995 2017 SAMSUNG All rights reserved ...

Page 121: ...er Cassette 3 3 Idle Roller Cassette 3 4 Forward Roller Cassette 3 5 Retard Roller Cassette 3 6 Pickup Roller Cassette 3 7 Cassette 4 Pickup Assembly 8 Feed Roller Cassette 4 9 Idle Roller Cassette 4 10 Forward Roller Cassette 4 11 Retard Roller Cassette 4 12 Pickup Roller Cassette 4 2 Paper path 1 Tray3 paper path 2 Tray4 paper path Copyright 1995 2017 SAMSUNG All rights reserved 2 105 ...

Page 122: ...ize switch JC32 00013A CN9 1 to 4 SW2 Tray4 auto size switch JC32 00013A CN9 5 to 8 S1 Tray3 feed sensor 0604 001381 CN6 7 to 9 S2 Tray3 limit sensor 0604 001393 CN6 4 to 6 S3 Tray3 paper empty sensor 0604 001393 CN6 1 to 3 S4 Tray4 feed sensor 0604 001381 CN6 16 to 18 S5 Tray4 limit sensor 0604 001393 CN6 13 to 15 S6 Tray4 paper empty sensor 0604 001393 CN6 10 to 12 S7 Door open sensor JC39 01696...

Page 123: ...F Tray3 Paper Empty signal 4 Limit_DCF1_IHCF Tray3 Paper Limit signal 5 Feed_DCF1_IHCF Tray3 Feed signal 6 P_Size_DCF2 Tray4 Paper Size analog signal 8 nP_Empty_DCF2 Tray4 Paper Empty signal 9 Limit_DCF2 Tray4 Paper Limit signal 10 Feed_DCF2 Tray4 Feed signal 11 nDoor_open Door open signal Copyright 1995 2017 SAMSUNG All rights reserved 2 107 ...

Page 124: ...paper is not advanced any further When the last sheet is transported from the pick up roller the retard roller rotates following the feed roller 4 9 Feed Roller Cassette 3 Feed Roller Cassette 4 This roller transports the paper from the forward roller to the basic machine 5 10 Idle Roller Cassette 3 Idle Roller Cassette 4 When the paper is passed at the feed roller this roller makes paper transpor...

Page 125: ...empty sensor feed sensor etc and communicates with the copier main board through the UART When being received the print job command from the interface connector CN7 through UART DCF board drives the feed motor and pick up motor to pick up a paper This board has 2 LEDs The left LED is for checking 5V power supply and the right LED is checking the micom operation Copyright 1995 2017 SAMSUNG All righ...

Page 126: ...umber Connection CN1 Download tool I F Minicube CN2 Debug I F CN3 Cover open Switch 24V interlock Switch CN4 USB I F CN5 EMPTY LIFT FEED Tray3 4 Sensor CN6 FEED PICKUP3 4 Motor CN7 Interface with Main CN9 Papersize sensor Tray3 4 2 110 Copyright 1995 2017 SAMSUNG All rights reserved ...

Page 127: ...4 Tamper Home_F Sensor 5 Tamper Home_R Sensor 6 Eject Home Sensor 7 Jam Door Open Sensor 8 Front Door Open Sensor 9 Stacker Tray Home Sensor 10 Paper Feed roller 11 Paper Exit roller 12 Turning Knob 2 Paper Path 1 Finisher Main Tray Staple offset Punch 2 Finisher Top Tray Stack only Copyright 1995 2017 SAMSUNG All rights reserved 2 111 ...

Page 128: ... 2 S8 Photo Interrupter 0604 001415 Exit Sensor S9 Photo Interrupter 0604 001415 Stapler Position Sensor_Front S10 Photo Interrupter 0604 001415 End Defence Sensor S11 Photo Interrupter 0604 001415 Eject Sensor S12 Photo Interrupter 0604 001415 Paper Support Sensor S13 Photo Interrupter 0604 001415 Eject 2 Motor Sensor S14 Photo Interrupter 0604 001415 Tamper Position Sensor_Rear S15 Photo Interru...

Page 129: ...nterance Motor M2 JC31 00009C EJECTOR_1_Motor M3 Mabuchi EJECTOR_2_Motor M4 JC31 00149A Tamper_Motor_Front M5 JC31 00149A Tamper_Motor_Rear M6 JC31 00149A Paper Support M7 KIG Tray Motor M8 JC31 00149A Main Paddle Motor M9 JC31 00169A Exit Motor M10 JC31 00149A Traverse Motor M11 TDS 10SL Paper Holder Solenoid 4 Block Diagram 5 PBA Connection Information Copyright 1995 2017 SAMSUNG All rights rese...

Page 130: ...ection 1 CN3 REAR Joint I F 2 CN1 REAR Sensor 3 CN10 Traverse Mid Sensor 4 CN8 Debug 5 CN2 REAR I F 6 CN7 FRONT I F 7 CN6 Stacker Switch 8 CN9 Solenoid 9 CN4 Ejector Supporter I F 10 CN5 Main I F 2 114 Copyright 1995 2017 SAMSUNG All rights reserved ...

Page 131: ...r unit malfunction 3 1 2 Precautions when handling PBA Static electricity can damage a PBA always used approved anti static precautions when handling or storing a PBA Precautions when moving and storing PBA 1 Please keep PBA in a conductive case anti static bag or wrapped in aluminum foil 2 Do not store a PBA where it is exposed to direct sunlight Precautions when replacing PBA 1 Disconnect power ...

Page 132: ...tches Many of the parts are held in place with plastic latches The latches break easily release them carefully To remove such parts press the hook end of the latch away from the part to which it is latched 3 2 Copyright 1995 2017 SAMSUNG All rights reserved ...

Page 133: ...front cover Remove the waste toner container A 2 Take out the LSU window cleaning tool that is located on the front cover 3 Insert the LSU window cleaning tool to each color hole 4 Slowly pull out and push the cleaning tool 5 Repeat step 4 at least 5 times for each LSU window Copyright 1995 2017 SAMSUNG All rights reserved 3 3 ...

Page 134: ... transfer roller 1 Open the side cover 2 Clean the transfer roller A by using a soft cloth 3 2 1 3 Cleaning the scan glass 1 Open the DSDF or RADF Unit 2 Clean the scan glass A by using a soft cloth 3 4 Copyright 1995 2017 SAMSUNG All rights reserved ...

Page 135: ...3 Disassembly and Reassembly 3 2 1 4 Cleaning the DSDF white bar_CIS 1 Open the DSDF Unit 2 Clean the DSDF white bar and CIS by using a soft cloth Copyright 1995 2017 SAMSUNG All rights reserved 3 5 ...

Page 136: ...ng a soft cloth while pushing the shutter to the right 3 Close the side cover 4 Enter the SVC mode Select CTD Sensor Cleaning Diagnostics Image Management Auto Tone Adjustment CTD Sensor Cleaning 5 When appearing the confirm pop up menu select Yes button on screen 3 6 Copyright 1995 2017 SAMSUNG All rights reserved ...

Page 137: ...3 00078B_FRAME REGI HOLDER DUST will need to be cleaned after a specified number of paper is printed out Cleaning cycle 33 700 pages 1 Open the front door 2 Remove the waste toner container 3 Pull the paper dust stick out 4 Remove the paper dust Copyright 1995 2017 SAMSUNG All rights reserved 3 7 ...

Page 138: ...eassembly 5 Insert the paper dust stick back 6 Install the waste toner container until it locks in place 7 Close the front door Ensure that the cover is securely closed 3 8 Copyright 1995 2017 SAMSUNG All rights reserved ...

Page 139: ...r Remove the waste toner container 2 Turn the locking lever counterclockwise NOTE When installing the initial drum unit remove the Cap Dummy OPC after turning the locking lever counterclockwise 3 Hold the drum unit and take it out 4 Install new drum unit Copyright 1995 2017 SAMSUNG All rights reserved 3 9 ...

Page 140: ...sh the toner supply shutter to the direction of arrow And then release the toner supply cap 4 Remove the bracket A after removing 2 screws Unplug the connector 5 Remove the developer unit 6 Open the Deve cover after releasing 5 hooks NOTE When opening the Deve cover unit the angle of opening must be kept below 90 degrees 3 10 Copyright 1995 2017 SAMSUNG All rights reserved ...

Page 141: ...ngineer must execute Life Count Update and TC calibration 2 If you turn on the machine after closing the front cover toner will be supplied without TC calibration It may affect the image quality 11 When the control panel is activated select Developer Unit menu Information supply Status Field Replacement Unit Developer Unit 12 Select the Developer Unit for all colors that is replaced 13 Push the OK...

Page 142: ...cover 2 Loosen a screw Note Less than torque 6kgf cm 3 Release the ITB Cleaner 3 2 2 4 ITB Unit 1 Remove the ITB cleaner Refer to 3 2 2 3 2 Open the side cover 3 Release the right stopper 4 Release the left stopper 3 12 Copyright 1995 2017 SAMSUNG All rights reserved ...

Page 143: ... out the ITB unit until the green handles are shown totally Change your grip and release the ITB unit perfectly 8 Before install the new ITB unit align the CAM position Align 2 arrows 9 Install the new ITB unit And then install the ITB cleaner Note Less than torque 6kgf cm Copyright 1995 2017 SAMSUNG All rights reserved 3 13 ...

Page 144: ...ve the BRACKET FUSER SUPPORT after removing 1 screw NOTE The product manufactured before Jun 2015 has not the BRACKET FUSER SUPPORT 3 Remove the fuser unit after removing 2 screws 3 2 2 6 Transfer roller 1 Open the side cover 3 14 Copyright 1995 2017 SAMSUNG All rights reserved ...

Page 145: ...3 Disassembly and Reassembly 2 Hold and release the both sides of the transfer roller Copyright 1995 2017 SAMSUNG All rights reserved 3 15 ...

Page 146: ...emove the pick up reverse forward roller NOTE When replacing these rollers it is recommended that you replace all three rollers at the same time 3 Enter SVC mode Select the menu Information Supply Status Field Replacement Unit Push Reset button to reset the current count to 0 3 16 Copyright 1995 2017 SAMSUNG All rights reserved ...

Page 147: ...all tap remove the MP pick up reverse forward roller NOTE When replacing these rollers it is recommended that you replace all three rollers at the same time 4 Enter SVC mode Select the menu Information Supply Status Field Replacement Unit Push Reset button to reset the current count to 0 Copyright 1995 2017 SAMSUNG All rights reserved 3 17 ...

Page 148: ...DF open cover 2 Remove 5 screws 3 Release the pick up Assy cover after removing the spring and unplugging the connector 4 Remove the both E ring of the pick up Assy 5 Release the pick up roller Assy after releasing the Bush 3 18 Copyright 1995 2017 SAMSUNG All rights reserved ...

Page 149: ...DF unit Remove 2 screws from the bottom of the DSDF unit 2 Open the DSDF open cover Remove 8 screws 3 Release the DSDF front cover 4 Release the DSDF rear cover 5 Remove the pick up Assy 6 Remove the reverse roller cover Copyright 1995 2017 SAMSUNG All rights reserved 3 19 ...

Page 150: ...3 Disassembly and Reassembly 7 Release the reverse roller Assy 3 20 Copyright 1995 2017 SAMSUNG All rights reserved ...

Page 151: ...sassembly and Reassembly 3 2 2 11 RADF pick up roller Assy 1 Open the RADF open cover 2 Pull down the shaft holder 3 Release the RADF pick up roller Assy Copyright 1995 2017 SAMSUNG All rights reserved 3 21 ...

Page 152: ...mbly and Reassembly 3 2 2 12 RADF reverse roller Assy 1 Open the RADF open cover 2 Remove the RADF reverse roller cover 3 Release the RADF reverse roller Assy 3 22 Copyright 1995 2017 SAMSUNG All rights reserved ...

Page 153: ...VC part 3 3 1 Left Cover 1 Remove the left top cover 2 Remove the left cover after removing 10 screws 3 3 2 Rear Cover 1 Remove 5 screw caps and 5 screws 2 Remove the rear cover after removing 4 screws Copyright 1995 2017 SAMSUNG All rights reserved 3 23 ...

Page 154: ...s Release the middle hook 3 Unplug the connector Remove the HVPS board 3 3 4 Temperature_Humidity Sensor 1 Remove the left cover Refer to 3 3 1 2 Remove 3 screws 3 Remove 1 screw Unplug the sensor connector And release the temperature humidity sensor 3 24 Copyright 1995 2017 SAMSUNG All rights reserved ...

Page 155: ...e left cover Refer to 3 3 1 2 Remove the HVPS board Refer to 3 3 3 3 Remove 2 screws Unplug the temperature sensor connector And release the bracket 4 Remove 2 screws Take out the LSU slowly CAUTION If you yank the LSU the LSU harness may be damaged 5 Unplug the LSU harness from the left Remove the LSU Copyright 1995 2017 SAMSUNG All rights reserved 3 25 ...

Page 156: ... Unit 1 Open the side cover 2 Remove 2 screw caps and 2 screws 3 Remove 1 screw 4 Remove the front top cover 5 Remove 5 screw caps and 5 screws 6 Lift up and release the scan front cover 3 26 Copyright 1995 2017 SAMSUNG All rights reserved ...

Page 157: ...3 Disassembly and Reassembly 7 Remove the scan hinge cover 8 Remove 2 screws Then release the OPE Assy Copyright 1995 2017 SAMSUNG All rights reserved 3 27 ...

Page 158: ...l the new main board and insert the MSOK and memory NOTE When inserting the MSOK be careful its direction NOTE Shading Test for ADF DSDF Unit must be carried out after replacing the main board Refer to 4 5 5 3 3 3 8 SMPS Fan 1 Remove the rear cover Refer to 3 3 2 2 Unplug the connector Remove 1 screw And then remove the SMPS fan 3 28 Copyright 1995 2017 SAMSUNG All rights reserved ...

Page 159: ...er unplugging the power cord then replace it You can get a shock by the electric discharge 3 3 10 FDB board 1 Remove the rear cover Refer to 3 3 2 2 Unplug the connector Remove 4 screws And then remove the SMPS cover 3 Unplug all connectors on FDB board Remove 4 screws And then remove the FDB board CAUTION When replacing the FDB board please wait 5 minutes after unplugging the power cord then repl...

Page 160: ... the fan by separating the Fuser Duct CAUTION When assembling the new fan be careful not to change the fan direction The label must be shown on the outside 3 3 12 Main board shield 1 Remove the rear cover Refer to 3 3 2 2 Unplug all connectors on the main board 3 Remove the main board shield after removing 4 screws 3 30 Copyright 1995 2017 SAMSUNG All rights reserved ...

Page 161: ...cting the main drive unit Release the harness from the holder 4 Remove the main drive unit after removing 8 screws 3 3 14 Fuser_Exit Drive unit 1 Remove the rear cover Refer to 3 3 2 2 Remove the Fuser Duct fan Refer to 3 3 11 3 Unplug 2 motor connectors Remove 3 screws And then remove the Fuser Exit Drive unit Copyright 1995 2017 SAMSUNG All rights reserved 3 31 ...

Page 162: ...nnector Remove 3 screws And then Pick up Drive unit1 3 Unplug the connector Remove 3 screws And then Pick up Drive unit2 3 3 16 Feed Drive unit 1 Remove the rear cover Refer to 3 3 2 2 Unplug the connector Remove 3 screws And then remove the Feed Drive Unit 3 32 Copyright 1995 2017 SAMSUNG All rights reserved ...

Page 163: ...3 3 18 Toner Supply Drive unit 1 Remove the rear cover Refer to 3 3 2 2 Remove the Main board shield Refer to 3 3 12 3 Unplug the connector Remove 3 screws And then remove the Toner supply drive unit NOTE To remove K Toner supply drive unit first remove the main drive unit The toner supply drive units are exchangeable Copyright 1995 2017 SAMSUNG All rights reserved 3 33 ...

Page 164: ...g the developer units 3 Remove the inner cover after removing 8 screws 4 Unplug the connectors Remove 2 screws And then remove the Waste toner container drive unit 3 3 20 Auto Size sensor 1 Remove all cassettes See the machine inside 2 Unplug the connector Remove 2 screws And then remove the sensor 3 34 Copyright 1995 2017 SAMSUNG All rights reserved ...

Page 165: ...3 Disassembly and Reassembly 3 3 21 Exit Unit 1 Open the side cover Unplug the Exit unit connector 2 Remove the Exit unit after removing 3 screws Copyright 1995 2017 SAMSUNG All rights reserved 3 35 ...

Page 166: ...ng 3 screws 2 Unplug the side unit connector 3 Release the right stopper CAUTION The spring tension for right stopper is strong When releasing it be careful not to hurt yourself 4 Release the left stopper 5 Remove the Side Unit 3 36 Copyright 1995 2017 SAMSUNG All rights reserved ...

Page 167: ...rom the both sides Lift up the Cover side exit 2 Remove the Cover side exit after unplugging the connector 3 Separate the Cover side exit after removing 3 screws 4 Remove the Fuser out sensor after unplugging the connector Copyright 1995 2017 SAMSUNG All rights reserved 3 37 ...

Page 168: ...embly 3 3 22 2 Duplex sensor and Curl sensor 1 Remove the transfer roller Assy 2 Remove 1 screw Turn over the Guide TR Upper 3 Remove the Duplex sensor A and Curl sensor B 3 38 Copyright 1995 2017 SAMSUNG All rights reserved ...

Page 169: ...emove the Harness Cover A after removing 2 screws 2 Remove the Harness Cover Lower B after removing 2 screws 3 Remove 1 screws Stand the stopper 4 Remove 3 screws 5 Remove 1 screw 6 Remove 2 screws Copyright 1995 2017 SAMSUNG All rights reserved 3 39 ...

Page 170: ...embly 7 Remove 4 screws 8 Remove the Cover Side Guide Feed C 9 Lift up the Cover Side Duplex Lower 10 Remove 2 screws 11 Unplug the connectors 12 Remove the Cover MP Front 3 40 Copyright 1995 2017 SAMSUNG All rights reserved ...

Page 171: ... of the MP tray 14 Remove the MP Unit 15 Remove the MP cover base 16 Remove the gear C after removing the E ring 17 Remove the Bush D after removing the E ring 18 Remove the Bracket Solenoid after removing 1 screw Copyright 1995 2017 SAMSUNG All rights reserved 3 41 ...

Page 172: ...3 Disassembly and Reassembly 19 Release the MP bracket pick up after removing 4 screws 20 Remove the MP solenoid after removing 2 screws 3 42 Copyright 1995 2017 SAMSUNG All rights reserved ...

Page 173: ...efer to 3 3 22 2 Remove the Pick up Unit1 2 after removing 2 screws and unplugging the connector NOTE Before removing the pick up unit 1 upper remove the feed unit 3 Release the sensor after unplugging the connector Empty sensor A Level sensor B Copyright 1995 2017 SAMSUNG All rights reserved 3 43 ...

Page 174: ...ssembly 3 3 24 Feed sensor 1 1 Remove the Side Unit Refer to 3 3 22 2 Remove the sensor cover after removing 2 screws 3 Remove the Feed sensor after unplugging connector 3 44 Copyright 1995 2017 SAMSUNG All rights reserved ...

Page 175: ...ed sensor 2 1 Remove the Side Unit Refer to 3 3 22 2 Remove the Feed Unit A after removing 1 screw 3 Remove the bracket B after removing 3 screws 4 Remove the feed sensor after unplugging the connector Copyright 1995 2017 SAMSUNG All rights reserved 3 45 ...

Page 176: ... Unit 1 Remove the Side Unit Refer to 3 3 23 2 Remove the Regi unit A after removing 2 screws 3 Remove the bracket B after removing 3 screws 4 Remove the Regi sensor after unplugging the connector 3 46 Copyright 1995 2017 SAMSUNG All rights reserved ...

Page 177: ...2 Remove 4 screws Then release the rear cover 3 Remove 1 screw Unplug the DSDF harness from the main board 4 Remove the DSDF connector cover 5 Unplug the DSDF harness from the scan joint board 6 Open the DSDF unit Remove 2 screws Copyright 1995 2017 SAMSUNG All rights reserved 3 47 ...

Page 178: ...sembly and Reassembly 7 Lift up and release the DSDF unit NOTE Shading Test for DSDF Unit must be carried out after replacing the DSDS unit Refer to 4 5 5 3 3 48 Copyright 1995 2017 SAMSUNG All rights reserved ...

Page 179: ... Remove 1 screw from the bottom of the DSDF And close the DSDF unit 2 Open DSDF open cover Remove 2 screws 3 Release the DSDF rear cover 4 Unplug all harness on the DSDF board Remove 4 screws And release the DSDF board Copyright 1995 2017 SAMSUNG All rights reserved 3 49 ...

Page 180: ... of the DSDF And close the DSDF unit 2 Open DSDF open cover Remove 2 screws 3 Release the DSDF rear cover 4 Unplug the motor connector Remove 1 screw securing the harness guide 5 Remove 5 screws Release the DSDF main motor while pulling the harness guide 3 50 Copyright 1995 2017 SAMSUNG All rights reserved ...

Page 181: ... And close the DSDF unit 2 Open DSDF open cover Remove 2 screws 3 Release the DSDF front cover 4 Remove 2 screws Then release the DSDF pick up Assy 5 Open the DSDF unit Remove 1 screw from the bottom of the DSDF And close the DSDF unit 6 Open DSDF open cover Remove 2 screws Copyright 1995 2017 SAMSUNG All rights reserved 3 51 ...

Page 182: ...r 8 Remove 1 screw 9 Unplug the stacker connector from the DSDF board 10 Release the stacker 11 Remove 4 screws Then remove the stacker lower 12 Remove the paper length sensor after unplugging the connector 3 52 Copyright 1995 2017 SAMSUNG All rights reserved ...

Page 183: ... RADF Unit 1 Remove the RADF connector cover 2 Remove 1 screw Unplug the RADF harness 3 Open the RADF Unit Remove 2 screws securing both hinge units 4 Lift up and release the RADF Unit Copyright 1995 2017 SAMSUNG All rights reserved 3 53 ...

Page 184: ...3 28 1 RADF Board 1 Open the RADF Unit Remove 2 screws from the bottom of the RADF Unit 2 Remove the RADF rear cover 3 Unplug all harness Remove 4 screws And release the RADF board 3 54 Copyright 1995 2017 SAMSUNG All rights reserved ...

Page 185: ...ADF Unit Remove 3 screws from the bottom of the RADF Unit 2 Open the RADF Open cover Then release the linker 3 Remove the RADF front cover 4 Remove 1 screw 5 Unplug the stacker harness 6 Release the RADF stacker Copyright 1995 2017 SAMSUNG All rights reserved 3 55 ...

Page 186: ... screws Then release the scan rear cover 3 Remove 5 screw caps and 5 screws Then release the scan front cover 4 Remove 3 screw caps and 3 screws Then release the scan left cover 5 Remove 3 screw caps and 3 screws Then release the scan right cover 6 Unplug the scan cables 3 56 Copyright 1995 2017 SAMSUNG All rights reserved ...

Page 187: ...3 Disassembly and Reassembly 7 Remove 3 screws from the left 8 Remove 2 screws from the right 9 Lift up and release the platen unit Copyright 1995 2017 SAMSUNG All rights reserved 3 57 ...

Page 188: ...Then release the scan rear cover 3 Remove 5 screw caps and 5 screws Then release the scan front cover 4 Remove 3 screw caps and 3 screws Then release the scan left cover 5 Remove 3 screw caps and 3 screws Then release the scan right cover 6 Remove 2 screw caps and 2 screws 3 58 Copyright 1995 2017 SAMSUNG All rights reserved ...

Page 189: ...3 Disassembly and Reassembly 7 Remove the scan glass Copyright 1995 2017 SAMSUNG All rights reserved 3 59 ...

Page 190: ...ly 3 3 29 2 LED Lamp Module 1 Remove the scan glass Refer to 3 3 30 1 2 Remove the transparent tape 3 Unplug the flat cable 4 Remove 4 screws Then release the LED lamp module 3 60 Copyright 1995 2017 SAMSUNG All rights reserved ...

Page 191: ... scan glass up and release it NOTE Be careful not to contaminate the scan glass 3 Remove 5 screws And then release the CCD shield 4 Remove the 2 screws and 2 plate springs NOTE Do not loosen the screws marked by green X 5 Open the connector flip And then unplug the flat cable Copyright 1995 2017 SAMSUNG All rights reserved 3 61 ...

Page 192: ... Scan Imaging Unit Check the lens number of the new Scan Imaging Unit 7 Match the value between the lens number and the scale And then assemble the 2 spring plates with screw 8 Reassemble the CCD shield 3 62 Copyright 1995 2017 SAMSUNG All rights reserved ...

Page 193: ...3 Disassembly and Reassembly 9 Reassemble the scan glass Copyright 1995 2017 SAMSUNG All rights reserved 3 63 ...

Page 194: ...3 Disassembly and Reassembly 3 3 29 4 Scan Joint Board 1 Unplug all harness Remove 4 screws And release the scan joint board 3 64 Copyright 1995 2017 SAMSUNG All rights reserved ...

Page 195: ... 3 29 5 APS Sensor 1 Remove the scan glass Refer to 3 3 30 1 2 Remove the joint board cover 3 Remove 1 screw 4 Unplug the harness 5 Release the APS sensor after removing 2 screws Copyright 1995 2017 SAMSUNG All rights reserved 3 65 ...

Page 196: ...m the bottom of the ADF unit 2 Place the white sponge on the platen glass and align it with top and left line NOTE Recommendation of Gap 0 5 1 mm 3 Close the ADF unit to attach the white sponge 4 Open the ADF unit And then rub the surface of the white sponge 3 66 Copyright 1995 2017 SAMSUNG All rights reserved ...

Page 197: ...3 Disassembly and Reassembly 3 3 31 Side Cover Open Switch 1 Remove the rear cover Remove 1 screw securing the sensor 2 Remove the micro switch Copyright 1995 2017 SAMSUNG All rights reserved 3 67 ...

Page 198: ...e cover 2 Remove 2 screw caps and 2 screws 3 Remove 1 screw 4 Remove the front top cover 5 Open the front cover Remove all toner cartridges 6 Remove 8 screws Then release the front inner cover 7 Remove the cover open switch 3 68 Copyright 1995 2017 SAMSUNG All rights reserved ...

Page 199: ...ive 1 Remove 2 screw caps and 2 screws 2 Remove the Exit Tray 3 Remove the COVER EXIT REAR after removing 4 screws 4 Remove 4 screws Unplug the cable And remove the HDD Assy 5 Install the new HDD Assy Copyright 1995 2017 SAMSUNG All rights reserved 3 69 ...

Page 200: ... 34 DCF Double Cassette Feeder 3 3 34 1 DCF main board 1 Remove the Bracket Rear Cover after removing 5 screws 2 Unplug all connectors Remove 4 screws And release the DCF main board 3 70 Copyright 1995 2017 SAMSUNG All rights reserved ...

Page 201: ...e 3 screws And release the Feed Drive unit 3 Remove 3 E rings and 3 gears Remove 2 screws And release the feed motor 3 3 34 3 DCF Pick Up Motor 1 Remove the Bracket Rear Cover after removing 5 screws 2 Unplug the pick up motor connector Remove 2 screws And release the DCF pick up motor Copyright 1995 2017 SAMSUNG All rights reserved 3 71 ...

Page 202: ...embly 3 3 35 Finisher 3 3 35 1 Entrance Sensor 1 Remove 3 screws Then remove the rear cover 2 Remove the E Ring Remove the shaft And unplug the connector 3 Remove the sheet 3 72 Copyright 1995 2017 SAMSUNG All rights reserved ...

Page 203: ...Remove the E Ring and Washer Then remove the Punch Dummy 5 Remove 4 screws Then remove the Punch Dummy cover 6 Remove the screw Unplug the connector And release the sensor bracket Copyright 1995 2017 SAMSUNG All rights reserved 3 73 ...

Page 204: ... 7 Remove 1 screw Then remove the sensor 3 3 35 2 Entrance Motor 1 Remove the Front Cover and Rear Cover 2 Remove 2 screws Then remove the Assy Guide Middle Assy Cover Top Tray 3 74 Copyright 1995 2017 SAMSUNG All rights reserved ...

Page 205: ...front Bush E Ring rear As Pulley T33 S2M Bush Belt Spring Then remove the Guide Reverse and Roller Feed 4 Remove 6 screws Then remove the Guide Middle Lower NOTE Be careful not to damage the sensor Copyright 1995 2017 SAMSUNG All rights reserved 3 75 ...

Page 206: ...ssembly and Reassembly 5 Remove 2 screws 6 Open the clamps Unplug the connector Then remove the Motor Ent Sub Assy 7 Remove 2 screws Then remove the motor 3 76 Copyright 1995 2017 SAMSUNG All rights reserved ...

Page 207: ...sembly and Reassembly 3 3 35 3 Exit Sensor 1 Follow the step 1 4 in Exit Motor disassembly Refer to 3 3 34 2 2 Remove the Exit Sensor by releasing the hook Copyright 1995 2017 SAMSUNG All rights reserved 3 77 ...

Page 208: ...xit Motor 1 Remove the Front Cover 2 Remove 2 screw Unplug the motor connector And release the Motor Exit Sub Assy 3 Remove 2 screws Then remove the Exit Motor from the Bkt Motor Feed Exit 3 78 Copyright 1995 2017 SAMSUNG All rights reserved ...

Page 209: ... Shaft Sub Assy 1 Open the Cover Top Tray Sub Assy Then remove 1 screw securing the Sub Paddle Shaft Sub Assy 2 Remove 4 screws securing the Guide Harness 3 Remove the E Ring Then remove the Pulley Copyright 1995 2017 SAMSUNG All rights reserved 3 79 ...

Page 210: ...3 Disassembly and Reassembly 4 Remove the E Ring Then remove the Bush 5 Lift up and release the Sub Paddle Shaft Sub Assy 3 80 Copyright 1995 2017 SAMSUNG All rights reserved ...

Page 211: ...3 35 6 Front Jogger Motor 1 Follow the step 1 2 in Exit Motor disassembly Refer to 3 3 34 2 2 Remove 4 screws Then remove the tray 3 Remove the Tray Assy by rotating the Worm Gear Copyright 1995 2017 SAMSUNG All rights reserved 3 81 ...

Page 212: ...embly and Reassembly 4 Remove 4 screws Then remove the PBA cover 5 Remove 4 screws from both sides 6 Unplug 2 connectors Then remove the Shield Stacker Assy 3 82 Copyright 1995 2017 SAMSUNG All rights reserved ...

Page 213: ...rew Unplug the connector And remove the Main Paddle Home Sensor Sub Assy 8 Remove 3 screws Unplug the connector And release the Motor Paddle Sub Assy 9 Remove 3 screws Then remove the Duct B Copyright 1995 2017 SAMSUNG All rights reserved 3 83 ...

Page 214: ... connectors And release the Motor Paddle Sub Assy 11 Follow the step 1 5 in Paddle Shaft Sub Assy disassembly Refer to 3 3 34 5 12 Remove the E Ring Actuator Home Paddle Timing Pulley S2M48T and Paddle Cam 3 84 Copyright 1995 2017 SAMSUNG All rights reserved ...

Page 215: ...3 Disassembly and Reassembly 13 Remove the E Ring and Bush 14 Remove the Main Paddle A Unit B Unit Then remove the shaft 15 Remove 4 screws Copyright 1995 2017 SAMSUNG All rights reserved 3 85 ...

Page 216: ...bly and Reassembly 16 Unplug the connector Then pull the Tamper Front Sub Assy up and release it 17 Remove 2 screws Unplug the connector And release the motor 3 86 Copyright 1995 2017 SAMSUNG All rights reserved ...

Page 217: ...t Sub Assy Refer to the 3 3 34 6 2 Unplug the connector Then remove the Front Jogger Home Sensor 3 3 35 8 Rear Jogger Motor 1 Follow the step 1 8 in Front Jogger Motor disassembly Refer to 3 3 34 6 2 Follow the step 11 14 in Front Jogger Motor disassembly Refer to 3 3 34 6 3 Remove 4 screws Copyright 1995 2017 SAMSUNG All rights reserved 3 87 ...

Page 218: ...sembly and Reassembly 4 Unplug 2 connectors Then remove the Tamper Rear Sub Assy 5 Remove 2 screws Unplug the connector And release the Tamper Rear Sub Assy 3 88 Copyright 1995 2017 SAMSUNG All rights reserved ...

Page 219: ...mbly 3 3 35 9 Rear Jogger Home Sensor 1 Follow the step 1 4 in Rear Jogger Motor disassembly Refer to 3 3 34 8 2 Unplug the connector Then remove the Rear Jogger Home Sensor Copyright 1995 2017 SAMSUNG All rights reserved 3 89 ...

Page 220: ... 1 Follow the step 1 2 in Exit Motor disassembly Refer to 3 3 34 4 2 Remove 1 screw Unplug 2 connectors And remove the Stapler Unit 3 Remove 2 screws Then remove the Stapler Unit from the Bkt ST 3 90 Copyright 1995 2017 SAMSUNG All rights reserved ...

Page 221: ...ollow the step 1 4 in Entrance Motor disassembly Refer to 3 3 34 2 2 Follow the step 1 5 in Su Paddle Shaft Sub Assy disassembly Refer to 3 3 34 5 3 Remove 2 screws from the front 4 Remove 2 screws from the rear Copyright 1995 2017 SAMSUNG All rights reserved 3 91 ...

Page 222: ...3 Disassembly and Reassembly 5 Unplug the connector Then remove the Bkt Stay Sub Assy 6 Remove 4 screws from the front 3 92 Copyright 1995 2017 SAMSUNG All rights reserved ...

Page 223: ...Disassembly and Reassembly 7 Remove 1 screw 8 Unplug 4 connectors Open the 6 clamps And unplug the FFC cable 9 Remove the Assy Then release the sensor Copyright 1995 2017 SAMSUNG All rights reserved 3 93 ...

Page 224: ...Motor 1 Follow the step 1 4 in Entrance Motor disassembly Refer to 3 3 34 2 2 Remove 3 screws Unplug the motor connector And release the Traverse Motor Assy 3 Remove 2 screws Then release the motor 3 94 Copyright 1995 2017 SAMSUNG All rights reserved ...

Page 225: ...bly Refer to 3 3 34 6 2 Remove 2 screws Unplug the connector And release the Stacker Motor 3 3 35 14 Stacker Encoder Sensor 1 Follow the step 1 10 in Front Jogger Motor disassembly Refer to 3 3 34 6 2 Remove 1 screw Remove the shaft And release the sensor Copyright 1995 2017 SAMSUNG All rights reserved 3 95 ...

Page 226: ...5 15 Stacker Lower Limit Switch 1 Follow the step 1 10 in Front Jogger Motor disassembly Refer to 3 3 34 6 2 Remove 1 screw 3 Open 3 clamps Unplug the connector And release the sensor 3 96 Copyright 1995 2017 SAMSUNG All rights reserved ...

Page 227: ...ck Beam Sensor 1 Follow the step 1 6 in Front Jogger Motor disassembly Refer to 3 3 34 6 2 Remove 2 screws from both sides of the Shield Stacker Assy Remove the bracket And remove the sensor Copyright 1995 2017 SAMSUNG All rights reserved 3 97 ...

Page 228: ...tion Sensor 1 Follow the step 1 2 in Stacker Lower Limit Switch disassembly Refer to 3 3 34 15 2 Remove the E Ring GEAR RACK PINION Bush and PIN PARALLEL 3 Remove the SHAFT STACKER DRIVE and BUSH 3D 3 98 Copyright 1995 2017 SAMSUNG All rights reserved ...

Page 229: ...3 Disassembly and Reassembly 4 Remove the Spring Then remove the Shaft holder 5 Unplug the connector Then remove the sensor Copyright 1995 2017 SAMSUNG All rights reserved 3 99 ...

Page 230: ...Paper Holding Lever Solenoid 1 Follow the step 1 10 in Front Jogger Motor disassembly Refer to 3 3 34 6 2 Remove 1 screw Then release the Stacker Lower Limit Sensor Assy 3 Remove 2 screws 3 100 Copyright 1995 2017 SAMSUNG All rights reserved ...

Page 231: ...3 Disassembly and Reassembly 4 Unplug 2 connectors Then release the Solenoid Assy 5 Remove 2 screws Then remove the solenoid Copyright 1995 2017 SAMSUNG All rights reserved 3 101 ...

Page 232: ... the step 1 5 in Stack Position Sensor disassembly Refer to 3 3 34 17 2 Remove 4 screws Unplug 2 connectors And remove the Ejector Sub Assy 3 Remove 2 screws Unplug the connector And release the Paper Support Motor 3 102 Copyright 1995 2017 SAMSUNG All rights reserved ...

Page 233: ...Paper Support Home Sensor 1 Follow the step 1 2 in Paper Support Motor disassembly Refer to 3 3 34 19 2 Remove 1 screw 3 Release the shaft while pulling the Bush to the direction of arrow Copyright 1995 2017 SAMSUNG All rights reserved 3 103 ...

Page 234: ...3 Disassembly and Reassembly 4 Release the Paper Support with attention for pinion 5 Remove the sensor from the Paper Support 3 104 Copyright 1995 2017 SAMSUNG All rights reserved ...

Page 235: ...3 3 35 21 Ejector Motor Assy 1 Follow the step 1 3 in Paper Support Home Sensor disassembly Refer to 3 3 34 20 2 Remove the Bush Then pull and release the shaft 3 Remove 1 screw Copyright 1995 2017 SAMSUNG All rights reserved 3 105 ...

Page 236: ...3 Disassembly and Reassembly 4 Remove the E Ring and washer Release 2 belts And remove 1 screw 5 Remove the belt Then remove 1 screw 3 106 Copyright 1995 2017 SAMSUNG All rights reserved ...

Page 237: ...3 Disassembly and Reassembly 6 Unplug the motor connector Then release the motor Assy Copyright 1995 2017 SAMSUNG All rights reserved 3 107 ...

Page 238: ...3 3 35 22 Main Paddle Motor 1 Remove the Front Cover Refer to 3 3 34 4 2 Remove 3 screws Unplug the connector And release the Motor Assy 3 Remove 2 screws Then release the motor 3 108 Copyright 1995 2017 SAMSUNG All rights reserved ...

Page 239: ...ddle Home Sensor 1 Remove the Front Cover Refer to 3 3 34 4 2 Remove 1 screw Open the clamp And remove the Main Paddle Home Sensor Sub Assy 3 Remove the Main Paddle Home Sensor from the bracket Copyright 1995 2017 SAMSUNG All rights reserved 3 109 ...

Page 240: ...3 Disassembly and Reassembly 3 3 35 24 Main Paddle 1 Open the Cover Top Tray Sub Assy Then remove the Main Paddle A Unit and Main Paddle B Unit 3 110 Copyright 1995 2017 SAMSUNG All rights reserved ...

Page 241: ...ssembly 3 3 35 25 Ejector Assy 1 Follow the step 1 6 in Ejector Motor disassembly Refer to 3 3 34 21 2 Remove 2 screws 3 Unplug the harness Then remove the Ejector Assy Copyright 1995 2017 SAMSUNG All rights reserved 3 111 ...

Page 242: ... Follow the step 1 4 in Entrance Motor disassembly Refer to 3 3 34 2 2 Remove 1 screw Unplug the connector Then remove the Punch Dust Full Sensor Sub Assy 3 Remove 1 screw Then remove the Punch Dust Full Sensor 3 112 Copyright 1995 2017 SAMSUNG All rights reserved ...

Page 243: ...oor Switch 1 Follow the step 1 4 in Entrance Sensor disassembly Refer to 3 3 34 1 2 Remove 3 screws Then remove the frame 3 Remove 2 screws Unplug the connector And remove the Door Switch Copyright 1995 2017 SAMSUNG All rights reserved 3 113 ...

Page 244: ...or Switch 1 Follow the step 1 6 in Front Jogger Motor disassembly Refer to 3 3 34 6 2 Remove 1 screw 3 Unplug the connector Then remove the switch Assy 4 Remove 2 screws Then release the sensor 3 114 Copyright 1995 2017 SAMSUNG All rights reserved ...

Page 245: ...it on Working table BYOD table 1 Remove 2 screws NOTE If the Working table is not installed install its lower first 2 Remove the Table Upper 3 Attach the double sided tape to the bottom of Card Reader or NFC Kit 4 Install the Card Reader or NFC Kit on Table Lower Copyright 1995 2017 SAMSUNG All rights reserved 3 115 ...

Page 246: ...cable between the OPE HUB PBA and Card Reader or NFC Kit 6 Assemble the Table Upper 7 Assemble 2 screws 8 Attach the Tag label on the Working Table NOTE Refer to below for Tag label position 3 116 Copyright 1995 2017 SAMSUNG All rights reserved ...

Page 247: ... or NFC Kit inside Cover Scan Front 1 Open the side cover 2 Remove 2 screw caps and 2 screws 3 Remove 1 screw 4 Remove the front top cover 5 Lift up and release the Cover Scan Front 6 Remove the Cover Scan Front Copyright 1995 2017 SAMSUNG All rights reserved 3 117 ...

Page 248: ...rd Reader or NFC Kit 8 Install the Card Reader or NFC Kit on the front of Platen 9 Open the cable clamp Connect the cable between the OPE HUB PBA and Card Reader or NFC Kit And arrange the cable 10 Assemble the Cover Scan Front 3 118 Copyright 1995 2017 SAMSUNG All rights reserved ...

Page 249: ...1 Assemble 5 screws and 5 Screw caps 12 Assemble the front top cover 13 Remove 2 screws 14 Remove 1 screw 15 Close the side cover 16 Attach the Tag label on the Cover Scan Front Copyright 1995 2017 SAMSUNG All rights reserved 3 119 ...

Page 250: ...3 Disassembly and Reassembly NOTE Refer to below for Tag label position 3 120 Copyright 1995 2017 SAMSUNG All rights reserved ...

Page 251: ...up button Turn the power on or off When the blue LED is on the machine is powered on and you can use it If you turn the machine off press this button for more than two seconds Then confirmation window appears 4 Power LED Shows the power status of your machine CAUTION When you use the display screen use your finger only The screen may be damaged with a sharpen pen or anything else Copyright 1995 20...

Page 252: ...on screen items by a touch and hold gesture For example Touch and hold a widget on the home screen to move it Touch and hold on a field to display a pop up menu of options Swipe To swipe lightly drag your finger vertically or horizontally across the screen Use swipe when Scrolling through the home screen or a menu Panning To pan touch and hold a selected icon then move the device to the left or ri...

Page 253: ...The display screen image in this user s guide may differ from your machine depending on its options or models NOTE Depending on the authentication setting the machine s users have to enter an ID and a password In this case the machine can only be used by an authorized user who has registered an ID and a password on the machine Contact the machine s administrator Navigating Through the Home Screens...

Page 254: ...setting the wallpaper of Home Screen Login Screen You can setting the wallpaper of Login Screen Home and Login Screen You can setting the wallpaper of both Apps XOA Apps Widgets and Programs Place apps XOA apps widgets and program icons on home screen Folder You can create folder on home screen Page You can add page Adding a shortcut from the Apps menu 1 Tap icon to activate the main home screen 2...

Page 255: ...idget 1 Touch and hold a widget until it becomes movable 2 You can drag shortcut and place a shortcut in the trash both items turn red NOTE This action does not uninstall a widget it only removes the copy from the home screen Moving icons in the Apps menu 1 Tap icon to go to the main home screen 2 Tap icon to display your current applications 3 Tap the Apps tab at the top of the screen if it is no...

Page 256: ...nformation about processes that are running toner status darkness recent notifications and alerts NOTE On the home screen touch and hold the notification bar until the pull down displays then drag down vertically Accessing additional panel functions In addition to notifications this panel also provides quick and ready access to separate device functions These can be quickly activated or deactivate...

Page 257: ...pan Remove the old imaging unit and install a new one The toner cartridge life is totally empty Remove the old toner cartridge and install a new one A paper jam has occurred The door is open Close the door There is no paper in the tray Load paper in the tray The machine has stopped due to a major error Check the display message The waste toner container is not installed in the machine or full wast...

Page 258: ... carefully 1 Download the firmware file from the Global Service Partner Network GSPN or Technical Support Portal TSP website 2 Unzip the firmware file to a folder on your PC 3 Copy the firmware file hds or par to a USB flash drive 4 Plug the USB flash drive into the USB port 5 Press the button on control panel in this order Settings Admin Settings Application Management Application Install 6 The i...

Page 259: ...structions carefully Perform the following procedure to update the MFP firmware from the network 1 Go to the SyncThruWeb Service SWS main home page Login as Admin in Sync Thru Web Service NOTE Login using the Administrator ID and Password established during initial machine setup 2 Click on Maintenance Application Management Application Add Copyright 1995 2017 SAMSUNG All rights reserved 4 9 ...

Page 260: ...loading the f w file on MFP validation information will appear Check the Overwrite check box if you want to force the firmware update even if the firmware version to be installed is lower or same with the currently installed firmware in the device Press OK to start the firmware upgrade 4 10 Copyright 1995 2017 SAMSUNG All rights reserved ...

Page 261: ...4 Troubleshooting 6 The firmware update will start 7 Once the installation is complete the machine power off and power on automatically Copyright 1995 2017 SAMSUNG All rights reserved 4 11 ...

Page 262: ...screen CAUTION To avoid tearing the document remove the jammed document slowly and gently NOTE To prevent document jams use the scanner glass for thick thin or mixed paper type originals Original paper jam in front of scanner 1 Remove any remaining pages from the ADF 2 Open the ADF cover 3 Gently remove the jammed paper from the ADF 4 Close the ADF cover 4 12 Copyright 1995 2017 SAMSUNG All rights...

Page 263: ... 3 Gently remove the jammed paper from the ADF If you do not see paper in this area go to the next step 4 Open the input tray 5 Pull the jammed paper gently out of the ADF If you do not see paper in this area go to the next step 6 Close ADF cover and ADF input tray Copyright 1995 2017 SAMSUNG All rights reserved 4 13 ...

Page 264: ...roubleshooting 7 Open the ADF 8 Grasp the misfed paper and remove the paper from the feed area by carefully pulling it using both hands 9 Close the ADF 4 14 Copyright 1995 2017 SAMSUNG All rights reserved ...

Page 265: ...m in tray 1 2 CAUTION The fuser area is hot Take care when removing paper from the machine 1 Open the right door 2 Remove the jammed paper by gently pulling it straight out Close the right door If you do not see paper in this area go to the next step 3 Pull out tray 1 or 2 4 Remove the jammed paper from the machine 5 Insert tray 1 or 2 back into the machine until it locks into place Printing autom...

Page 266: ...see paper in this area go to the next step 3 Pull out tray 3 or 4 4 Remove the jammed paper from the machine 5 Insert tray 3 or 4 back into the machine until it locks into place Printing automatically resumes Paper jam in the multi purpose tray 1 If the paper is not feeding properly pull the paper out of the machine 2 Open and close the front door to resume printing 4 16 Copyright 1995 2017 SAMSUN...

Page 267: ...ht door 2 Remove the jammed paper by gently pulling it straight out 3 Close the right door Paper jam inside the machine Jam feed 3 Jam feed 4 1 Open the right bottom door of the dual cassette feeder 2 Remove the jammed paper by gently pulling it straight out 3 Close the dual cassette feeder right bottom door Copyright 1995 2017 SAMSUNG All rights reserved 4 17 ...

Page 268: ...r by gently pulling it straight out 3 Close the right door Paper jam inside of the machine Jam at Fuser out CAUTION The fuser area is hot Take care when removing paper from the machine 1 Open the right door 2 Open the fuser cover Then remove the jammed paper by gently pulling it straight out 3 Close the fuser cover and the right door 4 18 Copyright 1995 2017 SAMSUNG All rights reserved ...

Page 269: ...the paper out of the output tray 2 Open and close the front door Printing automatically resumes If this paper jam persists make sure the bin full sensor is unfolded The bin full sensor is located in front of the output tray Copyright 1995 2017 SAMSUNG All rights reserved 4 19 ...

Page 270: ...ode To enter the service mode 1 Press Power button until the pop up will be displayed 2 Press pop up area except Cancel and Turn Off button until the password window will be displayed 3 Enter 1934 and press the Done button 4 20 Copyright 1995 2017 SAMSUNG All rights reserved ...

Page 271: ... P 4 27 Power On Hours Service Hours Power Save Hours P 4 27 Fault Log P 4 27 Supplies Information Usage Counter Error Information Fax Protocol Dump Line 1 Fax Protocol Dump Line 2 Fax Diagnostics Line 1 Fax Diagnostics Line 2 Auto Color Registration Job Duty Auto Toning History Full Auto Color Registration ID Calibration History Maintenance Print Reports Toner Event P 4 27 RTF Format XML Format I...

Page 272: ... Duplex Jam Print Jam Exit Jam Feed Jam Regi Jam Scan Jam Exit Jam Duplex Regi Jam Duplex Scan Jam Jam Count Scan Jam Duplex Exit Jam P 4 29 Toner Cartridge Imaging Unit Development Unit Transfer Fuser Roller Maintenance Counts Part Replacement Count ADF Roller P 4 30 4 22 Copyright 1995 2017 SAMSUNG All rights reserved ...

Page 273: ...utines P 4 43 Automatic Adjustment P 4 45 Image Position P 4 46 Print Adjustment Print Test Patterns P 4 46 Copy Adjustment Image Position P 4 47 Automatic Adjustment P 4 48 Scan Area Adjustment Manual Adjustment P 4 49 Automatic Adjustment P 4 50 Adjustment ADF Adjustment Manual Adjustment P 4 51 ACS Level Adjustment 1 5 3 ACS ACS Page Adjustment 1 5 5 P 4 52 Off On Auto Color Registration Execut...

Page 274: ... Boot Logs Off On P 4 57 All Capture Log Period Start Date End Date P 4 57 Packet Capture Start Stop Capture File Download Export Network Packet Capture Capture File Delete Clear P 4 58 SYS System Recovery ALL P 4 59 T1 Control Mode Process Speed Paper for Driver T1 PWM TR Control Mode T2 Control Mode Paper Group Paper Side Paper Direction T2 PWM P 4 61 Clear System Cache P 4 62 ON OFF Hibernation...

Page 275: ...f On Type A Type B FDI Type C P 4 63 Off EIUL On P 4 63 Off Continent Branch Dealer ID On Dealer ID P 4 63 Off 90 degrees Envelope Rotate 180 degrees P 4 64 Off Yellow Drain Cyan Drain Magenta Drain Drain On Black Drain P 4 654 Copyright 1995 2017 SAMSUNG All rights reserved 4 25 ...

Page 276: ...ement Unit This menu displays the machine s field replacement unit status Users can select one item in the list to check the information of the selected unit In this menu there are five columns Item Threshold Status Count Maximum Life Status This shows the current status of the selected item OK The current count is smaller than the default warning value Check The current count is bigger than defau...

Page 277: ...red while the system was operating Pressing clear button will clear all the save fault log of the system 4 5 3 6 Print Reports Information Print Reports This menu displays reports which that can be printed from the system The following reports will be available to print Supplies Information Usage Counter Error Information Fax Protocol Dump Line 1 Fax Protocol Dump Line 2 Fax Diagnostics Line 1 Fax...

Page 278: ...This report shows history of execution of TRC control TRC control preserves color consistency against changes in supplies resulting from long time use and environmental change The purpose of the history report is to check if TRC control works normally If TRC control performs normally Pass count must be non zero value and Fail count must be zero If Fail count is not zero the image density sensor ne...

Page 279: ...ut Bins System M1 Input Trays System M2 Media Path System M3 Output Bins System M4 Auto Document Feeder System S1 Video System S2 Engine System S3 Scan System S5 UI System S6 Network System S7 HDD System U1 Fusing Unit U2 LSU Unit 4 5 4 2 Jam Count Maintenance Counts Jam Count This menu displays the jam Counts of the system Users can select one jam group which indicates the location of jams and pr...

Page 280: ...of the replacement The following table shows groups of the replaceable parts of the system Unit Item Sensing Method Toner Cartridge Toner Black Auto Sensing Imaging Unit Imaging Unit Black Auto Sensing Fuser Fuser Auto Sensing Transfer Transfer Roller Count Clear Tray 1 Roller Count Clear Tray 2 Roller Count Clear Tray 3 Roller Count Clear Roller Tray 4 Roller Count Clear ADF Roller ADF Roller Cou...

Page 281: ...ture 0 5 5 109 0070 Bond Temperature offset Media type offset for fuser roll temperature 0 5 5 109 0090 Cardstock Temperature offset Media type offset for fuser roll temperature 0 5 5 109 0100 Envelopes Temperature offset Media type offset for fuser roll temperature 0 5 5 109 0110 Labels Temperature offset Media type offset for fuser roll temperature 0 5 5 109 0130 Thick Temperature Offset Media t...

Page 282: ...Yellow 500 1000 0 112 0260 Manual Color Regi Left Width Magenta Image Area Left Width for Magenta 500 1000 0 112 0270 Manual Color Regi Right Width Magenta Image Area Right Width for Magenta 500 1000 0 112 0280 Manual Color Regi Left Width Cyan Image Area Left Width for Cyan 500 1000 0 112 0290 Manual Color Regi Right Width Cyan Image Area Right Width for Cyan 500 1000 0 112 0300 Manual Color Regi...

Page 283: ...to pick up a paper from tray3 Optional 101 0040 T4 Pick Up Clutch Engages drive to pick up a paper from tray4 Optional 101 0050 Registration Clutch Engages drive to registartion rolls 101 0060 Duplex Feed Clutch Engages drive to feed a paper into duplex path 101 0070 Duplex Gate Clutch Engages drive to convert paper direction into duplex path 101 0090 T2 Feed Clutch T2 Feed Clutch On Off 101 0100 ...

Page 284: ... Sensor Detect when paper is in tray4 102 0230 T4 Size1 sensor Detects whether auto size1 sensor of tray4 is high or low 102 0240 T4 Size2 sensor Detects whether auto size2 sensor of tray4 is high or low 102 0250 T4 Size3 sensor Detects whether auto size3 sensor of tray4 is high or low 102 0260 T4 Stack Height Sensor Detects if paper in tray4 is elevated to the sensor 102 0270 T4 Paper Low Sensor ...

Page 285: ...eveloper tank 111 0080 ID Sensor Start ID sensor sensing On Off 111 0090 ID Sensor Check Display ID sensor reading value 113 0010 Entrance Motor Entrance Motor run as IOT Speed about 5 sec 113 0020 Exit Motor Exit Motor run as IOT Speed about 5 sec 113 0030 Paddle Motor Paddling 113 0040 Front Jog Home Front Jogger move Home 113 0050 Front Jog Stand Front Jogger move to Stand 113 0060 Rear Jog Hom...

Page 286: ... Sensor Detect Staple Home position 113 0250 Staple Ready Sensor Detect Staple Ready to clinching 113 0260 Low Staple Sensor Detect Staple Low 113 0270 Paper Detector Sensor Detect paper in stapler area 113 0280 Finisher Door Switch Detect Finsher Door Open or Close 113 0300 Duplex Paper Sensor Deetct Duplex Paper feeding from IOT 4 36 Copyright 1995 2017 SAMSUNG All rights reserved ...

Page 287: ...Time ms 560 20 320 Ring Detection Freq sets the Call Indication frequency range that will be detected by LIU 1 20 330 Ring On Max Time Ring On Max Time ms 5100 20 340 Ring Off Max Time Ring Off Max Time ms 11100 20 400 DTMF High Freq Level DTMF High Freq Level dBm Country Value 20 410 DTMF Low Freq Level DTMF Low Freq Level dBm Country Value 20 420 DTMF Timing DTMF duration of on off output Ms 8 2...

Page 288: ...er environment Country Value 20 940 Ext Phone Ext Phone Detection Enable Disable Default Enable 1 If disabled Ext Phone cannot be detected by the device 1 21 999 Fax Line Setting Fax Test Line Setting Dual Fax 0 21 800 Modem Speed Line2 Select Modem Start Speed for Line 2 This item shall be displayed only when Dual Line Fax Kit is Installed 24 4 38 Copyright 1995 2017 SAMSUNG All rights reserved ...

Page 289: ...its DTMF 2 on line 1 On Off 20 025 DTMF 3 Line1 Emits DTMF 3 on line 1 On Off 20 026 DTMF 4 Line1 Emits DTMF 4 on line 1 On Off 20 027 DTMF 5 Line1 Emits DTMF 5 on line 1 On Off 20 028 DTMF 6 Line1 Emits DTMF 6 on line 1 On Off 20 029 DTMF 7 Line1 Emits DTMF 7 on line 1 On Off 20 030 DTMF 8 Line1 Emits DTMF 8 on line 1 On Off 20 031 DTMF 9 Line1 Emits DTMF 9 on line 1 On Off 20 040 V 21 300 bps Li...

Page 290: ...2 On Off 21 025 DTMF 3 Line2 Emits DTMF 3 on line 2 On Off 21 026 DTMF 4 Line2 Emits DTMF 4 on line 2 On Off 21 027 DTMF 5 Line2 Emits DTMF 5 on line 2 On Off 21 028 DTMF 6 Line2 Emits DTMF 6 on line 2 On Off 21 029 DTMF 7 Line2 Emits DTMF 7 on line 2 On Off 21 030 DTMF 8 Line2 Emits DTMF 8 on line 2 On Off 21 031 DTMF 9 Line2 Emits DTMF 9 on line 2 On Off 21 040 V 21 300 bps Line2 Emits V 21 300 ...

Page 291: ... Line2 Emits V 34 21600 bps Line2 On Off 21 058 V 34 24000 bps Line2 Emits V 34 24000 bps Line2 On Off 21 059 V 34 26400 bps Line2 Emits V 34 26400 bps Line2 On Off 21 060 V 34 28800 bps Line2 Emits V 34 28800 bps Line2 On Off 21 061 V 34 31200 bps Line2 Emits V 34 31200 bps Line2 On Off 21 062 V 34 33600 bps Line2 Emits V 34 33600 bps Line2 On Off Copyright 1995 2017 SAMSUNG All rights reserved 4...

Page 292: ...ng values will be shown on the printed report When the previous shading value is needed press Print Last Shade Report For ADF DSDF Unit 1 Load the shading sheet on the DSDF tray 2 Enter SVC mdoe Select the following menu Diagnostics Scanner Diagnostics Shading Test Shade and Print Report ADF When the previous shading value is needed press Print Last Shade Report ADF 3 Check if RESULTS on the sheet...

Page 293: ...e Edit button will be enabled only if the code is writable If the selected code is writable and the Edit button is enabled press the button to configure the desired value for the code Verification N A Specification N A Reference N A Code NVM Description Default DSDF X4300 4250 RADF X4220 05 0000 Pick Up Count 0 O O 05 0001 Retard Roller Count 0 O O 05 0010 Document Duplex Reverse Point 0 X O 05 00...

Page 294: ...Stop O O 06 0040 Scanner Platen Home Position Sensor High Low O O 05 0000 Document Length 1 Sensor High Low O O 05 0001 Document Length 2 Sensor High Low O O 05 0020 Document Cover Open Sensor High Low O O 05 0040 Document Detect Sensor High Low O O 05 0060 Document Simplex Registration Sensor High Low O O 05 0061 Document Duplex Registration Sensor High Low X O 05 0070 Document Scan Read Sensor1 ...

Page 295: ...ng Code Name Value DSDF X4300 4250 RADF X4220 05 0230 Document Jig Test High Speed Simplex Start Stop O O 05 0240 Document Jig Test High Speed Duplex Start Stop X O Copyright 1995 2017 SAMSUNG All rights reserved 4 45 ...

Page 296: ... test pattern will be printed out 4 Place the printed pattern on platen The words front side on the chart face the glass The arrows face left edge of the platen Press Scan 1 5 Press OK button Automatic scanning will occur 6 Place the printed pattern on platen The words back side on the chart face the glass The arrows face left edge of the platen Press Scan 2 7 Press OK button Automatic scanning wi...

Page 297: ...plex Side Edge Duplex Leading Edge Duplex Side Edge NOTE Adjustment must be done for each tray tray1 tray2 tray3 tray4 MP It is recommended not to choose ALL for tray selection It is always better to adjust for a particular tray at each time 3 Print out the test pattern and check if the image is moved as you want If not repeat stpe2 Diagnostics Adjustment Print Adjustment Print Test Patterns This ...

Page 298: ...n causes confusing for the adjustment 3 The Procedure for copy adjustment is almost same as Print Adjustment NOTE Adjustment must be done for each tray tray1 tray2 tray3 tray4 MP It is recommended not to choose ALL for tray selection It is always better to adjust for a particular tray at each time 1 Select a tray required adjustment 2 Change the adjustment value with then press OK button to save c...

Page 299: ...tter Choose one size to meet your primary size of use 2 Press OK button Automatic scanning will occur and the system will automatically calculate the proper value based on scanning result of the chart 3 The new value set to the system 4 Scan the Scanner A S Chart and send it to a PC Scanning must be occur from the scan glass 5 To check the image position compare the position of scale marks a b of ...

Page 300: ...adjustment value with arrow button 4 Image Position a b If the current value is smaller than the specification press Otherwise press 5 Magnification c If the current value is smaller than the specification press Otherwise press 6 Press the OK button to apply the new value to the system 7 Scan the Scanner A S Chart and send it to a PC Scanning must be occur from the scan glass 8 To check the image ...

Page 301: ...culate the proper value based on scanning result of the chart 3 The new value set to the system 4 Copy the Scanner A S Chart Scanning must be occur from the DSDF RADF 5 To check the image position compare the position of scale marks a b of the chart to the copy 6 To check the magnification compare the length of line c of the chart to the copy NOTE Specification a b 10 1 5 mm c 190 1 5 mm NOTE Afte...

Page 302: ...Image Position a b If the current value is smaller than the specification press Otherwise press 5 Magnification c If the current value is smaller than the specification press Otherwise press 6 Press the OK button to apply the new value to the system 7 Copy the Scanner A S Chart Scanning must be occur from the DSDF RADF 8 To check the image position compare the position of scale marks a b of the ch...

Page 303: ...rom 1 to 5 Classifies a document as color if color coverage of the document is higher than predefined level Level 1 has higher probability of classifying documents to color while level 5 has lower probability Verification Copy the mono copied original with auto color mode and check if print out is monochrome Specification Color coverage Level 1 0 01 Level 2 0 05 Level 3 0 1 Level 4 0 25 Level 5 0 ...

Page 304: ...tion The system executes ACR based on the count of printed pages since the last ACR execution Inner Temperature The system executes ACR when inner temperature of the device increases or decreases by the configured value since the last ACR execution LSU Temperature The system executes ACR when LSU temperature of the device increases or decreases by the configured value since the last ACR execution ...

Page 305: ...ification Print out a test job and make sure the image quality has recovered Diagnostics Image Management Auto Tone Adjustment Activation Full Purpose To correct image quality when any OPC drum is replaced or the life of the OPC drum is changed replacing any OPC drum or density of the image is poor And this function will be performed when temperature and or humidity in the room changes suddenly Op...

Page 306: ...um is replaced or the life of the OPC drum is changed replacing any OPC drum or density of the image is poor And this function will be performed when temperature and or humidity in the room changes suddenly Operation Procedure When selecting OK Full TRC will execute now Verification Print out a test job and make sure the image quality has recovered Diagnostics Image Management Auto Tone Adjustment...

Page 307: ...ance User Saved Data and Log Data Clear This function formats all the user data for example box data pending secure jobs font form macro data related applications and job log on the hard disk Service Functions Hard Disk Maintenance All Saved Data Clear This function formats all the data that can be erased with 3 functions above The function will NOT format the hard disk entirely Service Functions ...

Page 308: ...eate a trade off of performance in certain system operation Use this option when the system behaves abnormally and engineers need to investigate problems 4 5 6 6 Capture Log Service Functions Capture Log This function copies all the saved log in the system to a UBS memory as a zip file Note that the size of system log could reach up to 1GB If the system log size become considerably huge it will ta...

Page 309: ...e b Start button shall be changed to Stop button NOTE The packet capture is implemented by using tcpdump leth0 s1200 w filename Packet Size Show the file size captured 2 Export Capture File Export button Export network packet capture file to USB memory stick 3 Delete Capture File Delete button Clear network packet capture file in a device Copyright 1995 2017 SAMSUNG All rights reserved 4 59 ...

Page 310: ...he data in the selected partition a HDD Format Hidden Partition This can format and reinstall the only System Binary in HDD User data is not deleted USB This can format the HDD using USB stick All data except the stored in MSOK will be deleted Network This can format the HDD using network All data except the stored in MSOK will be deleted b HDD Repair This can restore the internal system by checki...

Page 311: ...are present in the shared folder of the server then the system will be directed to the Confirmation page otherwise an Error page will be displayed with an appropriate error message 5 When pushing Next button on option selection page the confirmation page will be displayed 6 When pushing Next button progress page will be displayed 7 When completing HDD Recovery or HDD Repair successfully reboot the...

Page 312: ... T1 PWM value Poor Transfer Increase T1 PWM value Re transfer Decrease T1 PWM value White Spot Decrease T1 PWM value Verification Print out a test job and make sure the transfer problem has resolved Specification N A Reference N A 4 5 6 10 Clear System Cache Service Functions Clear System Cache This function is to clear machine s cache data for it after installing the XOA app 4 5 6 11 Hibernation ...

Page 313: ...s to provide the configurable options On Off in service mode for technicians or dealers to satisfy the requirements from B2B sites easily without changing the firmware installed in a device NOTE The description for some codes like a 003 020 can not be provided by HQ R D policy SFE menu description SFE Code Description 001 In case of printing in directional media Letterhead Preprinted Punched the d...

Page 314: ...port page 018 The device blocks apk installation 019 User ID is not case sensitive for login 020 confidential 021 confidential 022 The device supports A6 LEF in original size for scan service 023 The device rotates copy output 180 degrees when executed on flatbed 024 The device executes copy job as only mono even though color copy is started 025 confidential 026 The device maintains HDD encryption...

Page 315: ...e shall feed from MP Tray Because the LEF envelope can be loaded only in MP Tray according to Paper Specification 2 If the length of envelope is over max size of custom width the device shall not rotate image and just determine the direction of envelope is SEF For example the A4 model support custom size like W 98 216 L148 356 This model doesn t support C5 Env 162x229 DL Env 110x220 No9 Env 98x225...

Page 316: ...P 4 66 11 2T31 Load tray 3 with Letter Plain paper P 4 66 11 2T41 Load tray 4 with Letter Plain paper P 4 66 11 2T61 Load MP with Letter Plain paper P 4 66 Error Code 11 2T01 11 2T11 11 2T21 11 2T31 11 2T41 11 2T61 Error message Load tray with Letter Plain paper Load tray 1 with Letter Plain paper Load tray 2 with Letter Plain paper Load tray 3 with Letter Plain paper Load tray 4 with Letter Plain...

Page 317: ...e if the problem persists P 4 67 Error Code 61 1111 Error message Booting Failure 61 1111 Turn off then on Call for service if the problem persists Symptom Hibernation image creation is failed Troubleshooting method 1 Turn the machine on with a normal booting 2 Enter the SVC mode Select Hibernation On again Copyright 1995 2017 SAMSUNG All rights reserved 4 67 ...

Page 318: ...em persists P 4 76 A1 2311 Motor Failure A1 2311 Turn off then on Call for service if the problem persists P 4 78 A1 2312 Motor Failure A1 2312 Turn off then on Call for service if the problem persists P 4 78 A1 2313 Motor Failure A1 2313 Turn off then on Call for service if the problem persists P 4 78 A1 2411 Motor Failure A1 2411 Turn off then on Call for service if the problem persists P 4 80 A...

Page 319: ...ff then on Call for service if the problem persists P 4 88 A1 5412 Motor Failure A1 5412 Turn off then on Call for service if the problem persists P 4 90 A1 5413 Motor Failure A1 5413 Turn off then on Call for service if the problem persists P 4 90 A1 5512 Motor Failure A1 5512 Turn off then on Call for service if the problem persists P 4 92 A1 5513 Motor Failure A1 5513 Turn off then on Call for ...

Page 320: ...MP motor is operating but machine recognizes status as Stopped 1 Turn the machine off then on If the error persists turn the machine off again 2 Open the side cover Check if there are any foreign substances or paper around Regi MP unit 3 Remove the rear cover 4 Check if the Regi MP motor connector is connected correctly 5 If the connection is OK turn the machine on Enter SVC mode Select motor test...

Page 321: ...he following If 24V power is not generated replace the SMPS board JC44 00100D 220V JC44 00093D 110V If the control signal is abnormal replace the main board JC92 02742A b If the motor is operational Check the Pin Num 8 If the value is abnormal replace the main board If the value is normal replace the harness Copyright 1995 2017 SAMSUNG All rights reserved 4 71 ...

Page 322: ...Fuser motor is operating but recognizes status as Stopped 1 Turn the machine off then on If the error persists turn the machine off again 2 Open the side cover Check if there are any foreign substances or paper around fuser unit 3 Remove the rear cover 4 Check if the fuser motor connector is connected correctly 5 If the connection is OK turn the machine on Enter SVC mode Select motor test Diagnost...

Page 323: ...he following If 24V power is not generated replace the SMPS board JC44 00100D 220V JC44 00093D 110V If the control signal is abnormal replace the main board JC92 02742A b If the motor is operational Check the Pin Num 8 If the value is abnormal replace the main board If the value is normal replace the harness Copyright 1995 2017 SAMSUNG All rights reserved 4 73 ...

Page 324: ... operational A1 1612 ITB motor is not operated for print job A1 1613 ITB motor is operating but machine recognizes status as Stopped 1 Turn the machine off then on If the error persists turn the machine off again 2 Open the side cover Remove the ITB unit Refer to 3 2 2 4 ITB Unit in chapter 3 3 Remove the rear cover 4 Check if the ITB motor connector is connected correctly 5 If the connection is O...

Page 325: ...he following If 24V power is not generated replace the SMPS board JC44 00100D 220V JC44 00093D 110V If the control signal is abnormal replace the main board JC92 02742A b If the motor is operational Check the Pin Num 8 If the value is abnormal replace the main board If the value is normal replace the harness Copyright 1995 2017 SAMSUNG All rights reserved 4 75 ...

Page 326: ...ellow OPC motor is not operated for print job A1 2213 Yellow OPC motor is operating but machine recognizes status as Stopped 1 Turn the machine off then on If the error persists turn the machine off again 2 Open the side cover Check if there are any foreign substances or paper around yellow drum drive unit 3 Remove the rear cover 4 Check if the yellow OPC motor connector is connected correctly 5 I...

Page 327: ...he following If 24V power is not generated replace the SMPS board JC44 00100D 220V JC44 00093D 110V If the control signal is abnormal replace the main board JC92 02742A b If the motor is operational Check the Pin Num 8 If the value is abnormal replace the main board If the value is normal replace the harness Copyright 1995 2017 SAMSUNG All rights reserved 4 77 ...

Page 328: ...genta OPC motor is not operated for print job A1 2313 Magenta OPC motor is operating but machine recognizes status as Stopped 1 Turn the machine off then on If the error persists turn the machine off again 2 Open the side cover Check if there are any foreign substances or paper around magenta drum drive unit 3 Remove the rear cover 4 Check if the magenta OPC motor connector is connected correctly ...

Page 329: ...he following If 24V power is not generated replace the SMPS board JC44 00100D 220V JC44 00093D 110V If the control signal is abnormal replace the main board JC92 02742A b If the motor is operational Check the Pin Num 8 If the value is abnormal replace the main board If the value is normal replace the harness Copyright 1995 2017 SAMSUNG All rights reserved 4 79 ...

Page 330: ...2 Cyan OPC motor is not operated for print job A1 2413 Cyan OPC motor is operating but machine recognizes status as Stopped 1 Turn the machine off then on If the error persists turn the machine off again 2 Open the side cover Check if there are any foreign substances or paper around cyan drum drive unit 3 Remove the rear cover 4 Check if the cyan OPC motor connector is connected correctly 5 If the...

Page 331: ...he following If 24V power is not generated replace the SMPS board JC44 00100D 220V JC44 00093D 110V If the control signal is abnormal replace the main board JC92 02742A b If the motor is operational Check the Pin Num 8 If the value is abnormal replace the main board If the value is normal replace the harness Copyright 1995 2017 SAMSUNG All rights reserved 4 81 ...

Page 332: ... Black OPC motor is not operated for print job A1 2513 Black OPC motor is operating but machine recognizes status as Stopped 1 Turn the machine off then on If the error persists turn the machine off again 2 Open the side cover Check if there are any foreign substances or paper around black drum drive unit 3 Remove the rear cover 4 Check if the black OPC motor connector is connected correctly 5 If ...

Page 333: ...he following If 24V power is not generated replace the SMPS board JC44 00100D 220V JC44 00093D 110V If the control signal is abnormal replace the main board JC92 02742A b If the motor is operational Check the Pin Num 8 If the value is abnormal replace the main board If the value is normal replace the harness Copyright 1995 2017 SAMSUNG All rights reserved 4 83 ...

Page 334: ... if the ITB connector is connected correctly or is deformed b If the harness is defective replace it c Remove the ITB unit from the machine Check if the photo interrupter sensor is contaminated or assembled properly d If the photo sensor is defective replace it e If the motor is operational but the engage gear is not operational replace the main drive unit JC93 00723A 3 If there is a motor noise o...

Page 335: ...changed to 0 or 24V replace the main board JC92 02742A Error Code A1 4410 Error message ACR Shutter Motor Failure A1 4410 Turn off then on Call for service if the problem persists Symptom The ACR shutter operation is abnormal Troubleshooting method 1 Check if there are any foreign substances in the ACR shutter area If yes remove them 2 Check if the ACR shutter harness is connected correctly 3 If t...

Page 336: ...er is not supplied 1 Open the front cover If the yellow toner pipe is blocked open it 2 Turn the machine off then on If the error persists check the following steps 3 Enter SVC mode Select the yellow toner supply motor test Diagnostics Engine Diagnostics Engine Test Routines 111 0000 Toner Dispense Motor Yellow 4 If the motor is not operational measure the yellow motor power with DVM a If 24V powe...

Page 337: ...e the 24V power on the SMPS board If the SMPS board JC44 00100D 220V JC44 00093D 110V is defective replace it If the SMPS board is normal replace the main board JC92 02742A Copyright 1995 2017 SAMSUNG All rights reserved 4 87 ...

Page 338: ... is not supplied 1 Open the front cover If the magenta toner pipe is blocked open it 2 Turn the machine off then on If the error persists check the following steps 3 Enter SVC mode Select the magenta toner supply motor test Diagnostics Engine Diagnostics Engine Test Routines 111 0010 Toner Dispense Motor Magenta 4 If the motor is not operational measure the magenta motor power with DVM a If 24V po...

Page 339: ...e the 24V power on the SMPS board If the SMPS board JC44 00100D 220V JC44 00093D 110V is defective replace it If the SMPS board is normal replace the main board JC92 02742A Copyright 1995 2017 SAMSUNG All rights reserved 4 89 ...

Page 340: ... Toner is not supplied 1 Open the front cover If the cyan toner pipe is blocked open it 2 Turn the machine off then on If the error persists check the following steps 3 Enter SVC mode Select the cyan toner supply motor test Diagnostics Engine Diagnostics Engine Test Routines 111 0020 Toner Dispense Motor Cyan 4 If the motor is not operational measure the cyan motor power with DVM a If 24V power is...

Page 341: ...e the 24V power on the SMPS board If the SMPS board JC44 00100D 220V JC44 00093D 110V is defective replace it If the SMPS board is normal replace the main board JC92 02742A Copyright 1995 2017 SAMSUNG All rights reserved 4 91 ...

Page 342: ...oner is not supplied 1 Open the front cover If the black toner pipe is blocked open it 2 Turn the machine off then on If the error persists check the following steps 3 Enter SVC mode Select the black toner supply motor test Diagnostics Engine Diagnostics Engine Test Routines 111 0030 Toner Dispense Motor Black 4 If the motor is not operational measure the black motor power with DVM a If 24V power ...

Page 343: ...e the 24V power on the SMPS board If the SMPS board JC44 00100D 220V JC44 00093D 110V is defective replace it If the SMPS board is normal replace the main board JC92 02742A Copyright 1995 2017 SAMSUNG All rights reserved 4 93 ...

Page 344: ...ersists P 4 95 A2 1521 Fan Failure A2 1521 Open the door then close it Call for service if the problem persists P 4 95 A2 1523 Fan Failure A2 1523 Open the door then close it Call for service if the problem persists P 4 95 A2 2310 Fan Failure A2 2310 Turn off then on Call for service if the problem persists P 4 95 A2 2311 Fan Failure A2 2311 Turn off then on Call for service if the problem persist...

Page 345: ...problem persists Symptom SMPS or Fuser or Duplex or LSU fan is not operational Troubleshooting method NOTE SMPS fan error A2 1211 A2 1212 A2 1221 A2 1223 Duplex fan error A2 1521 A2 1523 Fuser fan error A2 2310 A2 2311 A2 2321 A2 2323 1 Turn the machine off 2 Remove the rear cover Refer to 3 3 2 Rear Cover in chapter 3 3 Check if the corresponding fan connector is connected correctly 4 If the conn...

Page 346: ...093C 110V is defective replace it If the SMPS board is normal replace the main board JC92 02742A 6 If the fan operation is normal but the error persists a Check the yellow line signal with DVM Refer to the image in step 5 b Check fan operation as connected or disconnected If the Lock signal is 0V continually check the harness If the harness is OK replace the main board If the signal value is diffe...

Page 347: ...211 Turn off then on Call for service if the problem persists P 4 100 A3 3212 Sensor Failure A3 3212 Turn off then on Call for service if the problem persists P 4 100 A3 3310 Sensor Failure A3 3310 Turn off then on Call for service if the problem persists P 4 101 A3 3311 Sensor Failure A3 3311 Turn off then on Call for service if the problem persists P 4 101 A3 3312 Sensor Failure A3 3312 Turn off...

Page 348: ...ow A with a soft cloth 3 Close the side cover 4 Enter SVC mode Select the CTD Sensor Cleaning Diagnostics Image Management Auto Color Tone Adjustment Condition CTD Sensor Cleaning 5 When pop up appears select the Yes button NOTE a CTD sensor calibration will start Then CTD sensor failure error will be solved b If you don t execute the CTD sensor cleaning in SVC mode error message persists 4 98 Cop...

Page 349: ... A3 3112 Center NC sensor is in open status A3 3113 Side NC sensor is in short status A3 3114 Side NC sensor is in open status 1 Enter SVC mode Execute sensor test to check the sensor operation Diagnostics Engine Diagnostics Engine Test Routines 109 0000 Fuser Temperature A 109 0010 Fuser Temperature B 2 Remove and disassemble the fuser unit Refer to 3 3 23 Fuser Unit 3 Measure the resistance valu...

Page 350: ...or service if the problem persists Symptom Inner temperature sensor is defective Troubleshooting method A3 3210 Inner temperature sensor value is abnormal A3 3211 Inner temperature sensor is in short status A3 3212 Inner temperature sensor is in open status 1 Open the side cover Check the connection If the connection is OK replace the photo sensor 1404 001417 2 If the sensor is normal replace the ...

Page 351: ... Failure A3 3411 Turn off then on Call for service if the problem persists Sensor Failure A3 3412 Turn off then on Call for service if the problem persists Symptom Outer temperature humidity sensor is defective Troubleshooting method A3 3310 A3 3311 A3 3312 Temperature function is abnormal A3 3410 A3 3411 A3 3412 Humidity function is abnormal 1 Remove the left cover Refer to 3 3 4 Temperature Sens...

Page 352: ...411 Magenta toner cartridge is not installed Install it P 4 108 C1 3413 Shake magenta toner cartridge P 4 108 C1 3512 Magenta toner cartridge is not compatible Check users guide P 4 108 C1 4110 Prepare new cyan toner cartridge P 4 109 C1 4120 Replace with new cyan toner cartridge P 4 109 C1 4130 End of life Replace with new cyan toner cartridge P 4 109 C1 4140 End of life Replace with new cyan ton...

Page 353: ...will be exhausted soon Error Code C1 2120 C1 2130 C1 2140 Error message Replace with new yellow toner cartridge End of life Replace with new yellow toner cartridge Symptom The yellow toner cartridge is at the end of its life Troubleshooting method 1 Open the front cover 2 Remove the yellow toner cartridge 3 Install the new yellow toner cartridge 4 Close the front cover Copyright 1995 2017 SAMSUNG ...

Page 354: ...upply is inefficient or abnormal Troubleshooting method 1 Open the front cover 2 Remove the yellow toner cartridge Shake the toner cartridge horizontally to distribute the toner evenly inside the cartridge 3 Check if the toner supply pipe is blocked If it is closed open it 4 Close the front cover 4 104 Copyright 1995 2017 SAMSUNG All rights reserved ...

Page 355: ...rtridge is installed 2 Remove and reinstall the yellow toner cartridge 3 If the problem persists check if the toner cartridge modular jack is contaminated or deformed 4 Replace the yellow toner cartridge with a new one Error Code C1 2510 C1 2512 Error message Yellow toner cartridge is not compatible Check users guide Symptom Yellow toner cartridge is not compatible Troubleshooting method 1 Replace...

Page 356: ...ill be exhausted soon Error Code C1 3120 C1 3130 C1 3140 Error message Replace with new magenta toner cartridge End of life Replace with new magenta toner cartridge Symptom The magenta toner cartridge is at the end of its life Troubleshooting method 1 Open the front cover 2 Remove the magenta toner cartridge 3 Install the new magenta toner cartridge 4 Close the front cover 4 106 Copyright 1995 201...

Page 357: ...supply is inefficient or abnormal Troubleshooting method 1 Open the front cover 2 Remove the magenta toner cartridge Shake the toner cartridge horizontally to distribute the toner evenly inside the cartridge 3 Check if the toner supply pipe is blocked If it is closed open it 4 Close the front cover Copyright 1995 2017 SAMSUNG All rights reserved 4 107 ...

Page 358: ...tridge is installed 2 Remove and reinstall the magenta toner cartridge 3 If the problem persists check if the toner cartridge modular jack is contaminated or deformed 4 Replace the magenta toner cartridge CLT M809S with a new one Error Code C1 3512 Error message Magenta toner cartridge is not compatible Check users guide Symptom Magenta toner cartridge is not compatible Troubleshooting method 1 Re...

Page 359: ...w will be exhausted soon Error Code C1 4120 C1 4130 C1 4140 Error message Replace with new cyan toner cartridge End of life Replace with new cyan toner cartridge Symptom The cyan toner cartridge is at the end of its life Troubleshooting method 1 Open the front cover 2 Remove the cyan toner cartridge 3 Install the new cyan toner cartridge 4 Close the front cover Copyright 1995 2017 SAMSUNG All righ...

Page 360: ...pply is inefficient or abnormal Troubleshooting method 1 Open the front cover 2 Remove the cyan toner cartridge Shake the toner cartridge horizontally to distribute the toner evenly inside the cartridge 3 Check if the toner supply pipe is blocked If it is closed open it 4 Close the front cover 4 110 Copyright 1995 2017 SAMSUNG All rights reserved ...

Page 361: ...er cartridge is installed 2 Remove and reinstall the cyan toner cartridge 3 If the problem persists check if the toner cartridge modular jack is contaminated or deformed 4 Replace the cyan toner cartridge with a new one Error Code C1 4512 Error message Cyan toner cartridge is not compatible Check users guide Symptom Cyan toner cartridge is not compatible Troubleshooting method 1 Replace the cyan t...

Page 362: ... will be exhausted soon Error Code C1 5120 C1 5130 C1 5140 Error message Replace with new black toner cartridge End of life Replace with new black toner cartridge Symptom The black toner cartridge is at the end of its life Troubleshooting method 1 Open the front cover 2 Remove the black toner cartridge 3 Install the new black toner cartridge 4 Close the front cover 4 112 Copyright 1995 2017 SAMSUN...

Page 363: ...pply is inefficient or abnormal Troubleshooting method 1 Open the front cover 2 Remove the black toner cartridge Shake the toner cartridge horizontally to distribute the toner evenly inside the cartridge 3 Check if the toner supply pipe is blocked If it is closed open it 4 Close the front cover Copyright 1995 2017 SAMSUNG All rights reserved 4 113 ...

Page 364: ...er cartridge is installed 2 Remove and reinstall the black toner cartridge 3 If the problem persists check if the toner cartridge modular jack is contaminated or deformed 4 Replace the black toner cartridge with a new one Error Code C1 5512 Error message Black toner cartridge is not compatible Check users guide Symptom Black toner cartridge is not compatible Troubleshooting method 1 Replace the bl...

Page 365: ... not installed Install it P 4 119 C3 3414 Magenta Imaging Unit Failure C3 3414 Install magenta imaging unit again P 4 119 C3 3512 Magenta imaging unit is not compatible Check users guide P 4 119 C3 4110 Prepare new cyan imaging unit P 4 120 C3 4130 Replace with new cyan imaging unit P 4 120 C3 4140 End of life Replace with new cyan imaging unit P 4 120 C3 4411 Cyan imaging unit is not installed In...

Page 366: ...30 C3 2140 Error message End of life Replace with new yellow imaging unit Symptom Yellow drum unit is at the end of its life Troubleshooting method 1 Open the front cover 2 Remove the waste toner container 3 Remove the yellow drum unit Refer to 3 2 2 1 Drum Unit 4 Install the new yellow drum unit 5 Clean the LSU window Refer to 3 2 1 2 Cleaning the LSU window 6 Install the waste toner container 7 ...

Page 367: ...aste toner container 3 Remove and reinstall the yellow drum unit Refer to 3 2 2 1 Drum Unit 4 Install the waste toner container 5 Close the front cover Error Code C3 2511 C3 2512 Error message Yellow imaging unit is not compatible Check user s guide Symptom Yellow drum unit is not compatible Troubleshooting method 1 Open the front cover 2 Remove the waste toner container 3 Remove the yellow drum u...

Page 368: ...30 C3 3140 Error message End of life Replace with new magenta imaging unit Symptom Magenta drum unit is at the end of its life Troubleshooting method 1 Open the front cover 2 Remove the waste toner container 3 Remove the magenta drum unit Refer to 3 2 2 1 Drum Unit 4 Install the new magenta drum unit 5 Clean the LSU window Refer to 3 2 1 2 Cleaning the LSU window 6 Install the waste toner containe...

Page 369: ...he waste toner container 3 Remove and reinstall the magenta drum unit Refer to 3 2 2 1 Drum Unit 4 Install the waste toner container 5 Close the front cover Error Code C3 3512 Error message Magenta imaging unit is not compatible Check user s guide Symptom Magenta drum unit is not compatible Troubleshooting method 1 Open the front cover 2 Remove the waste toner container 3 Remove the magenta drum u...

Page 370: ...30 C3 4140 Error message End of life Replace with new magenta imaging unit Symptom Cyan drum unit is at the end of its life Troubleshooting method 1 Open the front cover 2 Remove the waste toner container 3 Remove the cyan drum unit Refer to 3 2 2 1 Drum Unit 4 Install the new cyan drum unit 5 Clean the LSU window Refer to 3 2 1 2 Cleaning the LSU window 6 Install the waste toner container 7 Close...

Page 371: ...waste toner container 3 Remove and reinstall the cyan drum unit Refer to 3 2 2 1 Drum Unit 4 Install the waste toner container 5 Close the front cover Error Code C3 4512 Error message Cyan imaging unit is not compatible Check user s guide Symptom Cyan drum unit is not compatible Troubleshooting method 1 Open the front cover 2 Remove the waste toner container 3 Remove the cyan drum unit Check if th...

Page 372: ...0 C3 5140 Error message End of life Replace with new magenta imaging unit Symptom Black drum unit is at the end of its life Troubleshooting method 1 Open the front cover 2 Remove the waste toner container 3 Remove the black drum unit Refer to 3 2 2 1 Drum Unit 4 Install the new black drum unit 5 Clean the LSU window Refer to 3 2 1 2 Cleaning the LSU window 6 Install the waste toner container 7 Clo...

Page 373: ...waste toner container 3 Remove and reinstall the black drum unit Refer to 3 2 2 1 Drum Unit 4 Install the waste toner container 5 Close the front cover Error Code C3 5512 Error message Black imaging unit is not compatible Check user s guide Symptom Black drum unit is not compatible Troubleshooting method 1 Open the front cover 2 Remove the waste toner container 3 Remove the black drum unit Check i...

Page 374: ...lt unit Replace new transfer belt unit Symptom The life of the ITB Unit expires soon or has expired Troubleshooting method 1 Turn the machine off 2 Replace the ITB Unit JC93 01053A Refer to 3 2 2 3 ITB Cleaner and 3 2 2 4 ITB Unit 3 Turn the machine on 4 Enter SVC mode 5 Select TRANSFER INFORMATION Supply Status Field Replacement Unit TRANSFER 6 Select ITB The RESET button will be activated Click ...

Page 375: ...rror message Prepare new transfer belt unit Symptom The life of the ITB cleaner has expired Troubleshooting method 1 Turn the machine off 2 Replace the ITB cleaner 3 Turn the machine on Copyright 1995 2017 SAMSUNG All rights reserved 4 125 ...

Page 376: ...e fuser unit is not installed or fuser unit connector is not connected properly Troubleshooting method 1 Turn the machine off then on 2 If the problem persists turn the machine off again 3 Open the side cover Check if the fuser unit is installed If not install the fuser unit 4 If the fuser unit is installed remove it Refer to 3 2 2 5 Fuser unit 5 Check if the fuser draw connector JC39 01677A is br...

Page 377: ...Order new one Waste toner container is full Replace it Symptom The life of the waste toner container expires soon or has expired Troubleshooting method 1 Open the front cover 2 Remove the waste toner container Install a new waste toner container 3 Close the front cover Error Code C7 1311 Error message Waste toner container is not installed Install it Symptom The waste toner container is not instal...

Page 378: ...it again P 4 130 C8 3313 Magenta Developer Failure C8 3313 Turn off then on Please call for service if the problem persists P 4 130 C8 4130 Replace with new cyan developer unit display Menu Stop Continue P 4 131 C8 4210 Cyan Developer Failure C8 4210 Turn off then on P 4 131 C8 4310 Cyan Developer Failure C8 4310 Install cyan developer unit again P 4 131 C8 4313 Cyan Developer Failure C8 4313 Turn...

Page 379: ... developer unit again Yellow Developer Failure C8 2313 Turn off then on Please call for service if the problem persists Symptom The yellow developer unit has a problem with toner supply or sensor calibration Troubleshooting method 1 Open the front cover 2 Remove the waste toner container 3 Check if the toner supply pipe is blocked If it is closed open it 4 Install the waste toner container Close t...

Page 380: ...a developer unit again Magenta Developer Failure C8 3313 Turn off then on Please call for service if the problem persists Symptom The magenta developer unit has a problem with toner supply or sensor calibration Troubleshooting method 1 Open the front cover 2 Remove the waste toner container 3 Check if the toner supply pipe is blocked If it is closed open it 4 Install the waste toner container Clos...

Page 381: ...eveloper unit again Cyan Developer Failure C8 4313 Turn off then on Please call for service if the problem persists Symptom The cyan developer unit has a problem with toner supply or sensor calibration Troubleshooting method 1 Open the front cover 2 Remove the waste toner container 3 Check if the toner supply pipe is blocked If it is closed open it 4 Install the waste toner container Close the fro...

Page 382: ...developer unit again Black Developer Failure C8 5313 Turn off then on Please call for service if the problem persists Symptom The black developer unit has a problem with toner supply or sensor calibration Troubleshooting method 1 Open the front cover 2 Remove the waste toner container 3 Check if the toner supply pipe is blocked If it is closed open it 4 Install the waste toner container Close the ...

Page 383: ...es soon or has expired Troubleshooting method 1 Open the side cover 2 Replace the second transfer roller JC95 01942A with a new one Refer to 3 2 2 6 Transfer roller 3 Close the side cover 4 Enter SVC mode To enter the service mode tap Service Mode App When the password dialog box appears enter 1934 and press the OK button 5 Select TRANSFER INFORMATION Supply Status Field Replacement Unit TRANSFER ...

Page 384: ...nd transfer roller T2 is not installed Troubleshooting method 1 Open the side cover 2 Remove and reinstall the second transfer roller Refer to 3 2 2 6 Transfer roller 3 Close the side cover 4 If the problem persists replace the HVPS board JC44 00212A Refer to 3 3 3 HVPS board 4 134 Copyright 1995 2017 SAMSUNG All rights reserved ...

Page 385: ...1353 Input System Failure H1 1353 Pull tray 3 out and insert it P 4 140 H1 1354 Paper is empty in tray 3 Load paper P 4 139 H1 1411 Paper jam in tray 4 P 4 141 H1 1412 Paper jam in tray 4 P 4 141 H1 1417 Paper jam in tray 4 P 4 141 H1 1418 Paper jam in tray 4 P 4 141 H1 1422 Tray 4 cassette is pulled out Insert it properly P 4 143 H1 1451 Paper is low in tray 4 Load paper P 4 144 H1 1452 Paper is ...

Page 386: ... error occurs frequently check the rollers below a Remove the tray3 and tray4 b Check if the pick up reverse forward rollers are assembled correctly c If the pick up reverse forward rollers are worn out or contaminated replace the defective roller JC93 00540A 4 If pick up reverse forward rollers have no problem check the following a Remove the DCF pick up unit1 Check if the feed sensor cable is co...

Page 387: ...t1 JC93 00513A or defective part 6 Check the DCF feed motor a Check if the DCF feed motor cable is connected correctly b If the connection is OK replace the DCF feed drive unit JC93 00447A Refer to 3 3 33 2 DCF Feed Motor 7 Check the DCF pick up motor a Check if the DCF pick up motor cable is connected correctly b If the connection is OK replace the DCF pick up drive unit JC93 00442A Refer to 3 3 ...

Page 388: ...ethod 1 Remove and insert tray3 correctly 2 If the problem persists remove tray3 and tray4 Look inside machine 3 Check if the auto size sensor cable is connected correctly Unplug and reconnect it 4 If the connection is OK replace the auto size sensor JC93 00018A 5 If the problem persists replace the DCF board JC92 02453A Refer to 3 3 33 1 DCF Main Board 4 138 Copyright 1995 2017 SAMSUNG All rights...

Page 389: ...ve Troubleshooting method 1 Remove tray3 Load the paper in tray3 2 If paper is loaded but error message has not disappeared check the following a Remove the DCF pick up unit1 b Check if the photo sensor in the DCF pick up unit1 is contaminated If so clean it c If the photo sensor 0604 001393 is defective replace it d If the actuator JC66 03199A is defective replace it Copyright 1995 2017 SAMSUNG A...

Page 390: ...he Bracket Rear Cover after removing 5 screws 5 Check if the connection between the DCF pick up drive and DCF board is correct 6 If the connection is OK replace the pick up drive unit JC93 00442A Refer to 3 3 33 3 DCF Pick Up Motor 7 If the problem persists check the following a Remove the DCF pick up unit1 b Check if the photo sensor in the DCF pick up unit1 is contaminated clean it c If the phot...

Page 391: ... assembled correctly c If the pick up reverse forward rollers are worn out or contaminated replace the defective roller JC93 00540A 4 If pick up reverse forward rollers have no problem check the following a Remove the DCF pick up unit2 Check if the feed sensor cable is connected correctly b Check if the sensor cable on DCF board is connected correctly c If the connection is OK replace the feed sen...

Page 392: ...ctly b If the connection is OK replace the DCF feed drive unit JC93 00447A Refer to 3 3 33 2 DCF Feed Motor 7 Check the DCF pick up motor a Check if the DCF pick up motor cable is connected correctly b If the connection is OK replace the DCF pick up drive unit JC93 00442A Refer to 3 3 33 3 DCF Pick Up Motor 4 142 Copyright 1995 2017 SAMSUNG All rights reserved ...

Page 393: ...method 1 Remove and insert tray4 correctly 2 If the problem persists remove tray3 and tray4 Look inside machine 3 Check if the auto size sensor cable is connected correctly Unplug and reconnect it 4 If the connection is OK replace the auto size sensor JC93 00018A 5 If the problem persists replace the DCF board JC92 02453A Refer to 3 3 33 1 DCF Main Board Copyright 1995 2017 SAMSUNG All rights rese...

Page 394: ...shooting method 1 Remove tray4 Load the paper in tray4 2 If paper is loaded but error message has not disappeared check the following a Remove the DCF pick up unit2 b Check if the photo sensor in the DCF pick up unit2 is contaminated If so clean it c If the photo sensor 0604 001393 is defective replace it d If the actuator JC66 03199A is defective replace it 4 144 Copyright 1995 2017 SAMSUNG All r...

Page 395: ...Bracket Rear Cover after removing 5 screws 5 Check if the connection between the DCF pick up drive and DCF board is correct 6 If the connection is OK replace the pick up drive unit JC93 00442A Refer to 3 3 33 3 DCF Pick Up Motor 7 If the problem persists check the following a Remove the DCF pick up unit2 b Check if the photo sensor in the DCF pick up unit2 is contaminated If so clean it c If the p...

Page 396: ...shooting method 1 Open and close the DCF Take away Cover correctly 2 If the problem persists check the following a Check if I L Switch HARNESS DCF COVER OPEN JC39 01696A is not operating normally If it is defective replace it b If the I L Switch is OK replace the DCF board JC92 02453A Refer to 3 3 33 1 DCF Main Board 4 146 Copyright 1995 2017 SAMSUNG All rights reserved ...

Page 397: ...Troubleshooting method 1 Lift up and release the DCF unit from the machine 2 Remove the Bracket Rear Cover after removing 5 screws 3 Check if the interface connector is connected to the DCF board If the interface connector JC39 01690A is defective replace it 4 If the problem persists replace the DCF board Refer to 3 3 33 1 DCF Main Board Copyright 1995 2017 SAMSUNG All rights reserved 4 147 ...

Page 398: ...nisher Call for service if the problem persists P 4 154 H2 6233 Finisher Failure H2 6233 Check finisher Call for service if the problem persists P 4 154 H2 6234 Finisher Failure H2 6234 Check finisher Call for service if the problem persists P 4 154 H2 6241 Finisher Failure H2 6241 Check finisher Call for service if the problem persists P 4 155 H2 6242 Finisher Failure H2 6242 Check finisher Call ...

Page 399: ...all for service if the problem persists P 4 162 H2 6532 Finisher Failure H2 6532 Check finisher Call for service if the problem persists P 4 162 H2 6551 Finisher Failure H2 6551 Check finisher Call for service if the problem persists P 4 163 H2 6552 Finisher Failure H2 6552 Check finisher Call for service if the problem persists P 4 163 H2 6700 Paper jam in front of finisher Display animation P 4 ...

Page 400: ...ure H2 6729 Check finisher P 4 173 H2 6730 Finisher Failure H2 6730 Check finisher P 4 173 H2 6731 Finisher Failure H2 6731 Check finisher P 4 173 H2 6732 Staple cartridge is low Replace it P 4 174 H2 6733 Staple cartridge is empty Replace it P 4 174 H2 6734 Finisher Failure H2 6734 Check finisher P 4 175 H2 6735 Too much paper in finisher stacker Remove printed paper P 4 176 H2 6736 Finisher Fail...

Page 401: ...Symptom Finisher is pulled out Finisher is not installed correctly Troubleshooting method 1 Check if the finisher cable is connected to the copier 2 Remove and reinstall the finisher 3 If the problem persists replace the finisher main board Copyright 1995 2017 SAMSUNG All rights reserved 4 151 ...

Page 402: ...er executes initialization process If component still doesn t go back to home position and error does not disappear follow the instructions below 2 Does finisher Ejector1 Assembly work well a Make sure finisher input sensor cable is connected well to the sensor connector b Make sure finisher input sensor cable is connected well to the main board connector c Remove the cover d Disassemble related p...

Page 403: ...esn t go back to home position and error does not disappear follow the instructions below 2 Does finisher Ejector2 Assembly work well a Make sure finisher input sensor cable is connected well to the sensor connector b Make sure finisher input sensor cable is connected well to the main board connector c Cover Remove d Disassemble related parts e Check the sensor position and harness condition f Che...

Page 404: ...n t go back to home position and error does not disappear follow the instructions below 2 Does finisher input sensor Standby Home sensor work well a Make sure finisher input sensor cable is connected well to the sensor connector b Make sure finisher input sensor cable is connected well to the main board connector c Replace the finisher input sensor d Replace the finisher main board 3 Does finisher...

Page 405: ...cover to check if finisher executes initialization process If Paper Support still doesn t go back to home position and error does not disappear follow the instructions below 2 Does paper support interrupt sensor work well a Make sure interrupt sensor cable is connected well to the sensor connector b Make sure interrupt sensor cable is connected well to the main board connector c Check the paper su...

Page 406: ...ompletely from stapler cartridge c Clear staple that is existed inside stapler d Stapler cover or Jam cover open and close It s the Finisher Initializing 3 Does finisher stapler input sensor work well a Make sure finisher input sensor cable is connected well to the sensor connector b Make sure finisher input sensor cable is connected well to the main board connector c Replace the finisher stapler ...

Page 407: ... finisher stapler door or jam cover to check if finisher executes initialization process If Stapler traverse still doesn t go back to home position and error does not disappear follow the instructions below 2 Does traverse interrupt sensor Standby Home sensor work well a Does traverse interrupt sensor Standby Home sensor work well i Make sure finisher input sensor cable is connected well to the se...

Page 408: ...r door or jam cover to check if finisher executes initialization process If punch hopper still doesn t go back to home position and error does not disappear follow the instructions below 2 Does finisher Punch work well a Clear Hole Punch Hopper b Stapler cover or Jam cover open and close It s the Finisher Initializing c If fault persists power Off Power On d If necessary replace the punch unit 3 C...

Page 409: ...emoving paper manually Open and close finisher stapler door or jam cover to check if finisher executes initialization process If punch still doesn t go back to home position and error does not disappear follow the instructions below 2 Does punch interrupt sensor work well a Make sure finisher input sensor cable is connected well to the sensor connector b Make sure finisher input sensor cable is co...

Page 410: ...ose finisher stapler door or jam cover to check if finisher executes initialization process If error does not disappear follow the instructions below 2 Does punch interrupt sensor work well a Make sure hopper s sensor cable is connected well to the sensor connector b Make sure hopper s sensor cable is connected well to the main board connector c Check the interrupt sensor position d Check the hopp...

Page 411: ...y position sensor cable is connected well to the sensor connector b Make sure main tray position sensor cable is connected well to the main board connector c Check the main tray position sensor d Check the finisher main board 3 Does finisher Main Tray motor Stacker motor work well a Make sure finisher Main Tray motor cable is connected well to the motor connector b Make sure finisher Main Tray mot...

Page 412: ... 2 Does finisher Ejector2 Assemble work well a Make sure finisher input sensor cable is connected well to the sensor connector b Make sure finisher input sensor cable is connected well to the main board connector c Remove the cover d Disassemble related parts e Check the sensor position and harness condition f Check sensor plug and encoder condition 3 Does finisher Ejector2 gear set work well a Ma...

Page 413: ...her executes initialization process If punch still doesn t go back to home position and error does not disappear follow the instructions below 2 Does punch interrupt sensor work well a Make sure finisher input sensor cable is connected well to the sensor connector b Make sure finisher input sensor cable is connected well to the main board connector c Check the punch interrupt sensor position d Che...

Page 414: ...nsor during initializing H2 6705 Troubleshooting method 1 Open finisher jam cover and make sure that the paper is on the paper path If there is paper removing paper manually If the error does not disappear even after removing paper and closing finisher jam door follow the instructions below 2 Does finisher input sensor work well a Make sure finisher input sensor cable is connected well to the sens...

Page 415: ...jam cover to check if finisher executes initialization process If component still doesn t go back to home position and error does not disappear follow the instructions below 2 Does the transport motor work well a Make sure transport motor cable is connected well to the motor connector b Make sure transport motor cable is connected well to the finisher main board c Replace the transport motor d Rep...

Page 416: ...r executes initialization process If component still doesn t go back to home position and error does not disappear follow the instructions below 2 Does the paddle home sensor work well a Make sure the paddle home sensor cable is connected well to the sensor connector b Make sure the paddle home sensor cable is connected well to the main board connector c Check the paddle home sensor d Check the ac...

Page 417: ...mponent still doesn t go back to home position and error does not disappear follow the instructions below 2 Does the eject 1 2 motor work well a Make sure the eject 1 2 motor cable is connected well to the motor connector b Make sure the eject 1 2 motor cable is connected well to the main board connector c Replace the eject 1 2 motor JC31 00009C JC90 01335A d Replace the finisher main board 3 Does...

Page 418: ...o check if finisher executes initialization process If component still doesn t go back to home position and error does not disappear follow the instructions below 2 Does the rear jogger home sensor work well a Make sure the sensor harness is connected well to the rear jogger home sensor b Make sure the sensor harness is connected well to the finisher main board c Replace the rear jogger home senso...

Page 419: ...check if finisher executes initialization process If component still doesn t go back to home position and error does not disappear follow the instructions below 2 Does the front jogger home sensor work well a Make sure the sensor harness is connected well to the front jogger home sensor b Make sure the sensor harness is connected well to the finisher main board c Replace the front jogger home sens...

Page 420: ...inisher Symptom Staple unit can not work stapling because paper is too thick Troubleshooting method 1 Check the paper specification for stapling If it is not proper replace the paper 2 Check the staple unit If necessary replace it 4 170 Copyright 1995 2017 SAMSUNG All rights reserved ...

Page 421: ...e Finisher Failure H2 672x Check finisher Symptom Paper can not be moved to stapling position Troubleshooting method 1 Remove and reassemble the staple unit 2 Check the staple unit If necessary replace it Copyright 1995 2017 SAMSUNG All rights reserved 4 171 ...

Page 422: ...ver itself can be closed well b The both of the finisher door covers can push door open sensor switch well c The finisher door open sensor switch can be pushed well d Replace finisher cover door or switch 3 Does finisher input sensor work well a Make sure finisher input sensor cable is connected well to the sensor connector b Make sure finisher input sensor cable is connected well to the main boar...

Page 423: ...r executes initialization process If stapler still doesn t go back to home position and error does not disappear follow the instructions below 2 Does finisher stapler move well a Make sure stapler moving motor cable is connected well to the stapler motor connector b Make sure stapler moving motor cable is connected well to the main board connector c Check the sensor position and harness condition ...

Page 424: ...oes not disappear follow the instructions below 2 Does finisher stapler cartridge refill box equip well a Make sure stapler refill box equip well into cartridge JC81 07408A b Make sure staples doesn t jam near stapler head 3 Does finisher stapler input sensor work well a Make sure finisher input sensor cable is connected well to the sensor connector b Make sure finisher input sensor cable is conne...

Page 425: ...e H2 6734 Check finisher Symptom Stapler initialization is failed Troubleshooting method 1 Remove and reassemble the staple unit 2 If necessary replace the staple unit 3 If necessary replace the finisher main board Copyright 1995 2017 SAMSUNG All rights reserved 4 175 ...

Page 426: ...tor b Make sure Top tray limit sensor cable is connected well to the main board connector c Check the tray limit actuator s condition JC66 04200A d Replace the Top tray limit sensor JC39 02178A e Replace the finisher main board 3 Does finisher main tray motor work well a Make sure finisher top tray motor cable is connected well to the main tray motor connector b Make sure finisher top tray motor c...

Page 427: ... well to the sensor connector b Make sure tray limit sensor cable is connected well to the main board connector c Check the limit actuator condition d If you need replace the limit sensor 3 Does finisher Main Tray motor work well a Make sure finisher Main Tray motor cable is connected well to the motor connector b Make sure finisher Main Tray motor cable is connected well to the main board connect...

Page 428: ...r cable is connected well to the sensor connector b Make sure stacker height sensor cable is connected well to the main board connector c Replace the stacker height sensor d Replace the finisher main board 3 Does finisher Main Tray motor work well a Make sure finisher Main Tray motor cable is connected well to the motor connector b Make sure finisher Main Tray motor cable is connected well to the ...

Page 429: ... warning does not disappear follow the instructions below 2 Does finisher stapler input sensor work well a Make sure finisher input sensor cable is connected well to the sensor connector b Make sure finisher input sensor cable is connected well to the main board connector c Replace the finisher stapler cartridge JC81 07408A d Replace the finisher stapler JC81 07917A e Replace the finisher main boa...

Page 430: ...od 1 Open finisher stapler door to refill cartridge and then close door Self Priming will be executed automatically if necessary If stapler error or warning does not disappear follow the instructions below 2 Does finisher stapler cartridge refill box equip well a Make sure stapler refill box equip well into cartridge JC81 07408A b Make sure staples doesn t jam near stapler head 3 Does finisher sta...

Page 431: ...P 4 189 M2 1213 Paper Mismatch at tray Load tray with setting paper and remove the jammed paper P 4 189 M2 1214 Paper jam inside of machine P 4 189 M2 1331 Paper jam inside of machine P 4 190 M2 1333 Check whether the pieces of paper remain in the paper path P 4 190 M2 1334 Paper jam inside of machine P 4 190 M2 2111 Paper jam at the top of duplex path P 4 190 M2 2113 Check whether the pieces of p...

Page 432: ...up reverse forward rollers are worn out or contaminated replace the defective roller JC93 00540A Refer to 3 2 5 Pickup_Reverse_Forward roller 4 If the problem persists check the pickup unit1 and feed sensor a Check if the pickup unit1 and feed sensor operate correctly b Check if the pickup unit1 harness is connected to the main board correctly c Check if the connector of the Guide feed assembly is...

Page 433: ...k if it operates correctly 6 If the problem persists replace the pickup drive unit JC93 00422A or Pickup unit1 JC93 00511A Refer to 3 3 15 Pick up Drive unit Refer to 3 3 24 Pick up Unit and Sensor Copyright 1995 2017 SAMSUNG All rights reserved 4 183 ...

Page 434: ...p reverse forward rollers are worn out or contaminated replace the defective roller JC93 00540A Refer to 3 2 5 Pickup_Reverse_Forward roller 4 If the problem persists check the pickup unit2 and feed sensor a Check if the pickup unit2 and feed sensor operate correctly b Check if the pickup unit2 harness is connected to the main board correctly c Check if the connector of the Guide feed assembly is ...

Page 435: ...k if it operates correctly 6 If the problem persists replace the pickup drive unit2 JC93 00422A or Pickup unit1 JC93 00512A Refer to 3 3 15 Pick up Drive unit Refer to 3 3 24 Pick up Unit and Sensor Copyright 1995 2017 SAMSUNG All rights reserved 4 185 ...

Page 436: ...the MP pick up forward separation rollers are worn out or contaminated replace the defective roller 3 If the problem persists check if the MP solenoid operates correctly a Enter SVC mode Execute MP solenoid test b If the MP solenoid operation is abnormal check the harness connection of MP unit c If the harness has no defects replace the MP solenoid JC33 00029B 4 If the problem persists check the R...

Page 437: ... the side cover Remove the jammed paper 2 If jammed paper occurs continually check the following a Enter SVC mode Execute feed motor test If the motor operation is normal go to step d b Remove the rear cover Check if the feed motor cable is connected correctly c If the connection is OK replace the feed drive unit JC93 00444A Refer to 3 3 16 Feed Drive unit d If the feed motor operation is normal c...

Page 438: ... side cover Remove the jammed paper 2 If jammed paper occurs continually check the following a Enter SVC mode Execute feed motor test If the motor operation is normal go to step d b Remove the rear cover Check if the feed motor cable is connected correctly c If the connection is OK replace the feed drive unit JC93 00444A Refer to 3 3 16 Feed Drive unit d If the feed motor operation is normal check...

Page 439: ...n the specified time 1 Open the side cover Remove the jammed paper 2 If jammed paper occurs continually check the following a Enter SVC mode Execute Regi motor test If the motor operation is normal go to step d b Remove the rear cover Check if the Regi MP motor cable is connected correctly c If the connection is OK replace the Regi MP drive unit JC93 00443A Refer to 3 3 17 Regi MP Drive unit d If ...

Page 440: ...he side cover Remove jammed paper 2 If the problem persists check the following a Check the Regi sensor harness If the harness is normal replace the Regi sensor 0604 001381 Refer to 3 3 27 Registration Unit b Check the sensors in the Side Unit If the harness is normal replace the defective sensor 0604 001393 Refer to 3 3 22 1 Fuser out sensor 3 3 22 2 Duplex sensor and Curl sensor 4 190 Copyright ...

Page 441: ...shooting method 1 Open the side cover Remove the jammed paper 2 If the problem persists check the following a Open the side cover Check if the connector is connected properly b Remove the JOB SEPARATOR Check if the photo sensor is assembled correctly c Check if ACTUATOR EXIT is assembled correctly If the ACTUATOR EXIT JC66 02533A is deformed or broken replace it d If the photo sensor 0604 001393 i...

Page 442: ...d insert it Call for service if the problem persists P 4 196 M1 5111 Paper is low in tray 1 Load paper P 4 197 M1 5112 Paper is empty in tray 1 Load paper P 4 197 M1 5113 Paper is empty in tray 1 Load paper P 4 197 M1 5120 Paper is empty in all tray Load paper P 4 197 M1 5211 Paper is low in tray 2 Load paper P 4 198 M1 5212 Paper is empty in tray 2 Load paper P 4 198 M1 5612 Paper is empty in MP ...

Page 443: ...ert Tray1 correctly 2 If Tray1 is not locked or pulled out without holding the locking lever remove Tray1 3 Check if foreign substance or paper is inside the space between Tray1 2 If so please remove it 4 If the problem persists check that the auto size sensor is connected properly Refer to 3 3 20 Auto Size sensor 5 If the problem persists replace the main board JC92 02452A Copyright 1995 2017 SAM...

Page 444: ...ert Tray2 correctly 2 If Tray2 is not locked or pulled out without holding the locking lever remove Tray2 3 Check if foreign substance or paper is inside the space between Tray1 2 If so please remove it 4 If the problem persists check that the auto size sensor is connected properly Refer to 3 3 20 Auto Size sensor 5 If the problem persists replace the main board JC92 02452A 4 194 Copyright 1995 20...

Page 445: ...t Routines 100 0370 4 If the pick up motor operation is abnormal turn the machine off 5 Remove the rear cover 6 Check if the connection between pickup drive unit1 and main board is secure 7 If the connection is OK replace the pickup drive unit JC93 00442A Refer to 3 3 15 Pick up Drive Unit 8 If the problem persists check the pickup unit1 Refer to 3 3 24 Pick Up Unit and Sensor a Check if the photo...

Page 446: ...t Routines 100 0380 4 If the pick up motor operation is abnormal turn the machine off 5 Remove the rear cover 6 Check if the connection between pickup drive unit2 and main board is secure 7 If the connection is OK replace the pickup drive unit JC93 00442A Refer to 3 3 15 Pick up Drive Unit 8 If the problem persists check the pickup unit2 Refer to 3 3 24 Pick Up Unit and Sensor a Check if the photo...

Page 447: ...ve tray 1 Load paper in the tray And insert tray 1 2 If paper is loaded but error message has not disappeared check the following a Turn the machine off Open the Side Cover b Remove Pick Up Unit1 Refer to 3 3 24 Pick Up Unit and Sensor c If the photo sensor is contaminated clean it d If the photo sensor is defective replace it 0604 001393 e If the actuator is defective replace it JC66 03199A Copyr...

Page 448: ... tray 2 Load paper in the tray and insert the tray 2 2 If paper is loaded but error message has not disappeared check the following a Turn the machine off Open the Side Cover b Remove Pick Up Unit2 Refer to 3 3 24 Pick Up Unit and Sensor c If the photo sensor is contaminated clean it d If the photo sensor is defective replace it 0604 001393 e If the actuator is defective replace it JC66 03199A 4 1...

Page 449: ...bleshooting method 1 Load the paper in the MP tray 2 If paper is loaded but error message has not disappeared check the following Refer to 3 3 22 3 MP unit a If the photo sensor is contaminated clean it b If the photo sensor is defective replace it 0604 001393 c If the actuator is defective replace it JC66 03217A Copyright 1995 2017 SAMSUNG All rights reserved 4 199 ...

Page 450: ...hod M3 2230 There is too much paper in output bin tray M3 2430 There is too much paper in inner tray 1 Remove the paper from output bin tray or inner tray 2 If this error ccurs continually check the following a Check if the bin full sensor and actuator is assembled correctly b Check if the bin full sensor 0604 001393 is defective 4 200 Copyright 1995 2017 SAMSUNG All rights reserved ...

Page 451: ...P 4 207 S1 2448 HDD System Failure S1 2448 Call for service P 4 207 S1 2449 HDD System Failure S1 2449 Call for service P 4 207 S1 2510 MSOK Failure S1 2510 Call for service and change MSOK P 4 209 S1 2511 MSOK System Failure S1 2511 Turn off then on P 4 209 S1 2520 MSOK Failure S1 2520 Call for service P 4 209 S1 2521 MSOK Failure S1 2521 Call for service P 4 209 S1 2523 PPM data is incorrect Cal...

Page 452: ...he color registration P 4 214 S2 5164 Failed to adjust the color registration P 4 214 S2 5210 Failed to adjust the OPC Feedforward control P 4 214 S2 5240 Failed to adjust the OPC Feedforward control P 4 214 S3 3121 Scanner locked or another problem occurred No Switch Case Scanner is locked P 4 215 S3 3211 Scan System Failure S3 3211 Turn off then on P 4 216 S4 3111 Fax System Failure S4 3111 Inst...

Page 453: ... the machine off 2 Wait until the machine is cool and then turn the machine on 3 If the problem persists turn the machine off again 4 Remove the rear cover Refer to 3 3 2 Rear Cover 5 Replace the main board JC92 02742A Refer to 3 3 7 Main Board NOTE Insert the MSOK to the new main board 6 Assemble the rear cover Turn the machine on Copyright 1995 2017 SAMSUNG All rights reserved 4 203 ...

Page 454: ...ch screen b Select General Setting c Select Date and Time and set the time 2 If the problem persists check the following a Remove the rear cover Refer to 3 3 2 Rear Cover b Remove the fax holder from the main board c Measure the voltage of the battery If the battery is normal the measured value is over 3V 3 If the battery is normal replace the main board JC92 02742A 4 204 Copyright 1995 2017 SAMSU...

Page 455: ...bleshooting method 1 Turn the machine off then on 2 If the problem persists turn the machine off again 3 Remove the rear cover Refer to 3 3 2 Rear Cover 4 Replace the main board JC92 02742A Refer to 3 3 7 Main Board NOTE Insert the MSOK to the new main board 5 Assemble the rear cover Turn the machine on Copyright 1995 2017 SAMSUNG All rights reserved 4 205 ...

Page 456: ...2 Turn off then on Symptom Hard Disk is not installed in the machine Hard Disk is defective Troubleshooting method 1 Check if the HDD is installed correctly a Remove the rear cover Refer to 3 3 2 Rear Cover b Check if the HDD cable is connected correctly 2 If the problem persists replace the HDD JC59 00035A Refer to 3 3 32 HDD 4 206 Copyright 1995 2017 SAMSUNG All rights reserved ...

Page 457: ... then on HDD System Failure S1 2447 Turn off then on HDD System Failure S1 2448 Turn off then on HDD System Failure S1 2449 Turn off then on Symptom HDD partition is full or corrupted Troubleshooting method 1 Enter SVC mode Select System Recovery in Service Function menu Refer to 4 4 6 8 System Recovery 2 Execute hard disk format and firmware re installation Refer to 4 3 Updating Firmware 3 If the...

Page 458: ...partition or memory is full Troubleshooting method NOTE S1 2434 Addresses in Address book User data in User profile S1 2435 Documents in Document box Jobs in Secure job list Fonts Forms S1 2436 System Logs S1 2437 3438 3439 Printing Error No Paper in Tray 1 Enter SVC mode Select Hard Disk Maintenance in Service Function menu Refer to 4 4 6 2 Hard Disk Maintenance 2 Execute hard disk format 3 If th...

Page 459: ...M data is incorrect Call for service change MSOK MSOK Failure S1 2540 Call for service change MSOK MSOK Failure S1 2550 Call for service and change MSOK Symptom MSOK is not installed properly MSOK is defective Troubleshooting method 1 Remove the rear cover Refer to 3 3 2 Rear Cover 2 Check if the MSOK is inserted correctly Remove and reinstall it 3 If the problem persists contact technical support...

Page 460: ...ain board JC92 02742A 4 Turn the machine on Error Code S1 4111 Error message Video System Failure S1 4111 Turn off then on Symptom The main board can t send the data through the network channel Troubleshooting method 1 Check if the green LED of the network port is on 2 If not unplug and reconnect the network cable 3 If the problem persists replace the main board JC92 02742A Refer to 3 3 7 Main Boa...

Page 461: ...1 4311 Turn off then on Symptom The USB device chip is defective Troubleshooting method 1 Turn the machine off then on 2 If the problem persists turn the machine off again 3 Replace the OPE hub board 4 Turn the machine on Copyright 1995 2017 SAMSUNG All rights reserved 4 211 ...

Page 462: ...ror 1 Turn the machine off then on 2 If the problem persists turn the machine off again 3 Replace the main board JC92 02742A 4 Turn the machine on Error Code S2 3114 Error message Engine System Failure S2 3114 Turn off then on Symptom ACR error has occurred Troubleshooting method 1 Execute ACR calibration manually Machine Setup General Settings Image Management Auto Color Registration 2 Clean the ...

Page 463: ...ne status Troubleshooting method 1 Wait until error will be disappeared Error Code S2 4210 Error message Front door is open Close it Symptom Front cover or Side cover is opened Troubleshooting method 1 Close the front cover correctly 2 Check if the cover open sensor connector is connected properly Reconnect it 3 If the sensor is defective replace it Refer to 3 3 30 Side Cover Open Switch Copyright...

Page 464: ...Open Switch Error Code S2 5111 S2 5112 S2 5120 S2 5131 S2 5132 S2 5133 S2 5135 S2 5136 S2 5161 S2 5164 S2 5210 S2 5240 Error message Failed to adjust the color registration Symptom ACR execution is failed Troubleshooting method 1 Turn the machine off then on 2 If the problem persists check the followings Check if the ACR sensor is contaminated or defective Clean the ACR sensor or replace it Remove...

Page 465: ...dule works normally 2 If the initial operation does not occurred normally turn the machine off 3 Remove the scan glass 4 Check if the home position sensor cable is connected correctly 5 Remove the scan rear cover Check if all cables on scan joint board are connected correctly 6 If the connection is OK replace the scan joint board Copyright 1995 2017 SAMSUNG All rights reserved 4 215 ...

Page 466: ...hod 1 Turn the machine off then on If the problem persists check the following 2 Turn the machine off again 3 Remove the scan rear cover Check if the connector on scan joint board is connected correctly 4 Remove the ADF rear cover Check if the connector on ADF board is connected correctly 5 If the connection is OK replace the ADF board 4 216 Copyright 1995 2017 SAMSUNG All rights reserved ...

Page 467: ...Failure S4 3111 Install fax modem card again Symptom Fax card is not installed properly Fax card is defective Troubleshooting method 1 Remove and reinstall the fax card 2 If the fax card is defective replace it Copyright 1995 2017 SAMSUNG All rights reserved 4 217 ...

Page 468: ...D may occur 1 Turn off and turn on And check if the problem disappears a If yes go to step 2 a b If no go to step 2 b 2 Check the following procedure a Print the Error Information Report Service Mode General Print Reports Error Information Check the error code which is printed on the report If S5 3111 has occurred go to step 4 If S5 3112 has occurred go to step 5 c If S5 3113 has occurred go to st...

Page 469: ...d Please capture the log and send it to development team in HQ c It seems that there is some critical issue in the USB connection between main board and OPE Please try below steps i If WiFi module is installed replace WiFi module with new one ii Check USB cable state between main board and OPE iii Replace the main board with new one iv Replace the OPE board with new one d It seems that HDD or main...

Page 470: ...tom Network cable is disconnected Troubleshooting method 1 Check if the green LED of the network port is on 2 If not unplug and reconnect the network cable 3 If the problem persists replace the main board JC92 02742A Refer to 3 3 7 Main Board 4 220 Copyright 1995 2017 SAMSUNG All rights reserved ...

Page 471: ...less LAN conflicts with that of other system Check it Symptom Network error IP address conflicts with that of another system Communication error There is no response when checking the ping test Troubleshooting method Change the machine s IP address 1 Select Machine Setup on the touch screen 2 Select Networking Setting 3 Log In 4 Select TCP IP 5 Select the proper item for your machine 6 Select IP S...

Page 472: ... on Symptom 5V power is abnormal Troubleshooting method 1 Check the 5V pin on SMPS board If it is abnormal replace the SMPS board 2 Check the related cable 3 If the SMPS is normal replace the main board Error Code S7 2110 Error message Fuser Failure S7 2110 Turn off then on Symptom Heater control relay is abnormal Troubleshooting method 1 Turn the machine off Re install the fuser unit then turn th...

Page 473: ... problem persists P 4 224 U1 2135 Fuser Unit Failure U1 2135 Turn off then on P 4 224 U1 2141 Fuser Unit Failure U1 2141 Turn off then on P 4 224 U1 2142 Fuser Unit Failure U1 2142 Turn off then on P 4 224 U1 2316 Fuser Failure U1 2316 Turn off then on P 4 224 U1 2317 Fuser Failure U1 2317 Turn off then on P 4 224 U1 2335 Fuser Failure U1 2335 Turn off then on P 4 224 U1 2337 Fuser Failure U1 2337...

Page 474: ...r unit After opening the jam cover check if jammed or wrapped paper is in the fuser unit 2 Re install the fuser unit then turn the machine on 3 If the problem persists check the following a Check if the Halogen lamp 110V 4713 001630 220V 4713 001631 is broken or disconnected b Check if the AC connection of the Halogen lamp is disconnected or contaminated c Check if the thermostat 4712 001098 is di...

Page 475: ...the side cover 2 Remove and re install the fuser unit then turn the machine on 3 If the problem persists check the following Refer to 3 3 23 Fuser Unit a When the side cover closes check if the operation sound of the pressure control unit occurs b Check if the parts of the pressure control unit are abnormal Check if the shape of the CAM REAR JC66 03299A is broken Check if there are abnormal parts ...

Page 476: ...problem persists P 4 227 U2 6123 LSU Failure U2 6123 Please turn off then on P 4 227 U2 6142 LSU Failure U2 6142 Turn off then on Call for service if the problem persists P 4 228 U2 6143 LSU Failure U2 6143 Turn off then on Call for service if the problem persists P 4 228 U2 6210 LSU Failure U1 6210 Turn off then on Call for service if the problem persists P 4 229 4 226 Copyright 1995 2017 SAMSUNG...

Page 477: ...s normally 3 If the problem persists check the following a If the LSU motor makes a sound i Enter SVC mode to check the LSU motor ready signal Diagnostics Engine Diagnostics Engine Test Routines ii Select LSU Motor1 Run Ready Diagnostics Engine Diagnostics Engine Test Routines 110 0000 iii Press Start button Check that the status has changed to Executing Low High iv If the status has not changed t...

Page 478: ...rn off then on LSU Failure U2 6143 Turn off then on Symptom Hsync signal of the LSU is abnormal Troubleshooting method CAUTION Before unplugging the LSU harness the machine must be turned off and power cord must be removed 1 Turn the machine off then on Check for the LSU motor operation sound during warm up 2 Print a demo page to check that the machine operates normally 3 If the problem persists c...

Page 479: ...he LSU JC97 04010A Error Code U2 6210 Error message LSU Failure U1 6210 Turn off then on Call for service if the problem persists Symptom LSU is not installed correctly Troubleshooting method 1 Turn the machine off then on 2 If the problem persists check the followings a Check if the LSU harness is connected correctly b If the LSU harness is OK check the LSU installation status c If the LSU instal...

Page 480: ...Original paper jam inside the scanner P 4 232 U3 3314 Original paper jam inside the scanner P 4 232 U3 3413 Original paper jam inside the scanner P 4 233 U3 3414 Original paper jam inside the scanner P 4 233 U3 3513 Original paper jam inside the scanner P 4 233 U3 3514 Original paper jam inside the scanner P 4 233 U3 3611 Original paper jam in the exit area of scanner P 4 234 U3 3613 Original pape...

Page 481: ...d close the DSDF cover Check if the error message is disappeared 2 Open the DSDF cover Push and release the pick up module Check if the pick up module returns the original position Check if the spring is deformed If the spring is defective replace it 6107 003581 3 Check If the regi sensor is OK check the scan sensor and scan actuator If their operation is abnormal replace the defective part Copyri...

Page 482: ...ove it 2 If this error occurs continually check the Regi sensor and Regi actuator Push and release the regi actuator Check if the pick up module returns the original position If the sensor is defective replace it 0604 001393 3 If the regi sensor is OK check the scan 1 sensor and reflect film If the scan 1 sensor is defective replace it 0604 001381 If the reflect film is contaminated clean it 4 232...

Page 483: ... If this error occurs continually check the Regi sensor and Regi actuator Push and release the regi actuator Check if the pick up module returns the original position If the sensor is defective replace it 0604 001393 3 If the regi sensor is OK check the scan 2 sensor and exit sensor If the scan 2 sensor is defective replace it 0604 001381 If the exit sensor is defective replace it 6107 003581 Copy...

Page 484: ...ed in exit area of the DSDF unit Troubleshooting method 1 Open the DSDF cover If there is jammed paper remove it 2 If the regi sensor is OK check the scan 2 sensor and exit sensor If the scan 2 sensor is defective replace it 0604 001381 If the exit sensor is defective replace it 6107 003581 4 234 Copyright 1995 2017 SAMSUNG All rights reserved ...

Page 485: ...and close the DSDF cover Check if the error message is disappeared 2 If the problem persists check the cover open sensor a Open the DSDF cover Remove the spring b Remove 4 screws c Check if the sensor connector is connected correctly If the sensor is defective replace it 0604 001393 Copyright 1995 2017 SAMSUNG All rights reserved 4 235 ...

Page 486: ...sfully troubleshoot print quality problems as many variables as possible must be eliminated The first step is to generate prints using printable pages embedded in the printer on laser paper The paper should be from an unopened ream that has been acclimated to room temperature and you should ensure that genuine Samsung Toner is installed in the printer Samsung A S chart A3 4 236 Copyright 1995 2017...

Page 487: ... Map image For checking fine line reproduction G Color patches For checking color reproduction and uniformity H Gradation pattern For checking tone reproduction of 7 colors C M Y K R G B 10 100 I Color Mono text For checking the reproduction of color mono text J Multilingual Feature For checking the reproduction of small text K White Gap pattern For checking color to color color to mono white gap ...

Page 488: ... P P a a r r t ts s L L i if fe e 1 1 C C h h e e c c k k O O P P E E L L E E D D 2 2 P P r r i in n t t R R e e p p o o r r t t 3 3 P P r r i in n t t T T e e s s t t P P a a g g e e A A s s s s u u m m e e D D e e f fe e c c t t T T y y p p e e C C a a u u s s e e s s T T e e s s t t a a c c a a u u s s e e P P r r i in n t t T T e e s s t t P P a a g g e e C C l le e a a r r V V e e r r i if fi...

Page 489: ...1 2 ITB belt is contaminated ITB cleaning is poor ITB Cleaning Blade is partially broken Check if ITB belt is contaminated or not If there are some problems replace the ITB Cleaner Refer to 3 2 2 3 3 Scanner unit is contaminated Scan glass contamination Mirror contamination CCD sensor contamination Wipe the contaminated part surface with a soft cloth Refer to 3 3 29 4 CAUTION Fragile parts Copyrig...

Page 490: ... empty partially Pull out a foreign substance Make the hook shape sheet Transparency sheet is recommended Put the hook into the gap between DR and Blade Pull out a foreign substance 2 The Carrier of Developer unit is insufficient Replace the Developer Unit Check the toner remain Check the toner layer on Roller Magnetic of Developer Unit is uniform or not Refer to 3 3 2 2 4 240 Copyright 1995 2017 ...

Page 491: ...Action 3 The path of laser beam is blocked Foreign substance is on the LSU window Clean the LSU window Refer to 3 2 1 2 4 OPC is scratched Replace the Drum Unit Refer to 3 2 2 1 Copyright 1995 2017 SAMSUNG All rights reserved 4 241 ...

Page 492: ... of the charge roller CR is contaminated CR is scratched Wipe the surface of contaminated part with a soft cloth and alcohol Replace the Drum unit Refer to 3 3 2 1 2 Horizontal periodic black band CR 37 7mm CR is inferior in quality Replace the Drum Unit Refer to 3 3 2 1 3 OPC is damaged Replace the Drum Unit Refer to 3 3 2 1 4 242 Copyright 1995 2017 SAMSUNG All rights reserved ...

Page 493: ... time OPC is damaged by high voltage in a short time As some time passes most of this trouble will disappear If not replace the Drum Unit Refer to 3 3 2 1 2 Horizontal periodic light dark band Roller magnetic 31 4mm Roller magnetic is inferior in quality V groove of Roller magnetic surface is not uniform Replace the Developer Unit Refer to 3 2 2 2 Copyright 1995 2017 SAMSUNG All rights reserved 4 ...

Page 494: ...lly HVPS is damaged or broken Replace HVPS board Refer to 3 3 3 3 Toner is over supplied TC sensor operates abnormally Replace Toner cartridge Refer to 3 2 2 2 4 Voltage of OPC is abnormally low T1 Voltage is abnormally high Check the T1 connection in HVPS Check if T1 roller spring in ITB is connected correctly Replace HVPS board Refer to 3 3 3 4 244 Copyright 1995 2017 SAMSUNG All rights reserved...

Page 495: ...rred image section 3 Toner is empty Toner is abnormally supplied Check if the toner is remained efficiently If not Replace Toner cartridge Refer to 3 2 2 2 Check if the Toner supply shutter is opened 4 Output voltage of HVPS is abnormally low Color density becomes low Replace HVPS board Refer to 3 3 3 5 TC down and Toner spills Replace developer unit Refer to 3 2 2 2 6 Toner spills by Eraser Check...

Page 496: ...2 transfer voltage is low Turn up the T2 transfer voltage Refer to 4 4 6 9 3 Connection between HVPS and THV is incorrect Check if the connection between T2 high voltage terminal and HVPS THV terminal is correct Check if the connection of HVPS and ITB is correct If not replace HVPS or ITB 4 HVPS operates abnormally Replace HVPS Refer to 3 3 3 4 246 Copyright 1995 2017 SAMSUNG All rights reserved ...

Page 497: ... the ACR sensor Refer to 3 2 1 1 3 Circumstances is changed To recognize the eviroment chage execute ACR after a certain amount of time Refer to 4 5 5 6 4 Check if the skew is occurs at the cassette or feeding rollers Adjust the skew manually Refer to 4 7 5 Belt surface is contaminated Remove the ITB If the surface of the belt is contaminated clean it with soft cloth Copyright 1995 2017 SAMSUNG Al...

Page 498: ...gears Grease the gears Developer unit gears Drum unit gears Main drive unit gears If the problem persists replace the abnormal units Developer unit Drum unit Main drive unit 2 Under 1 mm periodic jitter or horizontal bands has occurred Check if the LSU is assembled correctly If not remove and tighten the screws Refer to 3 3 5 If the problem persists replace LSU Refer to 3 3 5 4 248 Copyright 1995 ...

Page 499: ...e cassette guide is not set properly Reinstall the cassette properly 2 The surface of pick up reverse forward roller is contaminated or worn out Clean or replace the contaminated roller Refer to 3 2 2 7 3 If the skewed image occurs for copy job check the ADF installation Reinstall the ADF DSDF or RADF unit Adjust ADF skew Refer to 4 8 Copyright 1995 2017 SAMSUNG All rights reserved 4 249 ...

Page 500: ...er connection 2 All connectors on HVPS board are connected correctly Reconnect 3 Check if the related parts are broken Replace the HVPS board or Main board or LSU 4 Check if the connection between scan joint board and main board is OK Reconnect the harness If the connection is OK replace the main board 4 250 Copyright 1995 2017 SAMSUNG All rights reserved ...

Page 501: ...e roller is scratched Replace the fuser unit 4 Check if the temperature control system has problems Thermistor is broken or operates abnormally Halogen lamp is broken or operates abnormally Check the Non contact thermistor sensor Check the Halogen lamp Refer to 4 5 7 U1 2113 If you find some problems replace the broken parts or Fuser unit 5 Check if the pressure control system operates properly Ch...

Page 502: ... If the problem persists replace ITB unit Refer to 3 2 2 6 3 ITB Unit Is the transfer belt cleaning blade in proper contact with the transfer belt Yes Take off the transfer belt and check if the transfer belt cleaning blade pressure spring and the pressure hook are installed properly Refer to 3 2 2 6 4 Are the fuser belt and pressure roller dirty Yes Clean the fuser belt and pressure roller 5 Fuse...

Page 503: ...EF Short Edge Feeding direction on tray 2 Select Setting on main UI 3 Log in as Admin 4 Select Adjustment Tone Adjustment Setting Standard Tone 5 Select OK on confirmation window 6 The scan ID chart will be printed out 7 Load the chart on platen glass Horizontal direction 8 Start scan 9 When the scan complete window appears select OK 10 Execute FullTRC Adjustment Tone Adjustment Auto Tone Adjustme...

Page 504: ...ne by user after setting the standard tone Procedure 1 Select Adjustment Tone Adjustment Cancel Setting Standard Tone 2 When the cancel setting standard toner will be appeared select OK 3 Select FullTRC Adjustment Tone Adjustment Auto Tone Adjustment Full Execute Now 4 254 Copyright 1995 2017 SAMSUNG All rights reserved ...

Page 505: ...t direction is horizontal Re try the setting standard tone procedure 4 In case of need When installing the machine at a first time When the brightness is changed in comparison to previous image When there is the difference of the color among the same models NOTE If the problem persists after executing the setting standard tone find another causes Copyright 1995 2017 SAMSUNG All rights reserved 4 2...

Page 506: ...roup Paper Side Paper Direction 4 Raise value for T2 PWM and see if blur problem is resolved 5 When the problem persists after changing the T2 Control Mode values change the T1 Control Mode values 6 Decrease the value for each color and see whether the symptom disappears In this case 4 was applied and solved the blur 7 As there can be variation for each device change T1 T2 and observe the results ...

Page 507: ... scan glass 3 Cyan Background a Mark a point on the screw with the pen b Rotate the R screw 90 degrees in a clockwise direction This is the 1 2 mm align adjustment c Execute a copy or scan job to check the image improvement d Repeat step 2 3 for improvement NOTE If the image does not improve by three attempts please stop the adjustment Copyright 1995 2017 SAMSUNG All rights reserved 4 257 ...

Page 508: ... degrees in a counterclockwise direction This is the 1 2 mm align adjustment c Execute a copy or scan job to check the image improvement d Repeat step 2 3 for improvement NOTE If the image does not improve by three attempts please stop the adjustment 4 258 Copyright 1995 2017 SAMSUNG All rights reserved ...

Page 509: ...or and toner leakage Problem P 4 260 4 Toner cartridge detection error P 4 261 5 94 mm periodic jitter occurs in printed document P 4 262 6 Image registration problem occurs after ACR Auto Color Registration P 4 263 7 How to handle TRC error ACR P 4 264 8 Removing debris from the Developer Unit P 4 265 9 Image is not printed on media P 4 266 Copyright 1995 2017 SAMSUNG All rights reserved 4 259 ...

Page 510: ...noise problem Symptom When printing out blunt noise occurs tak tak tak at front side Cause Defect of waste toner container Troubleshooting Replace the waste toner container 4 260 Copyright 1995 2017 SAMSUNG All rights reserved ...

Page 511: ...e paper is printed out The Coupler OPC unit is difficult to rotate Coupler Locking Blade is overturned Cause CR electrification part transformation happens since Blade overturned OPC rotation torque rises up since Blade overturned Troubleshooting Replace the OPC unit with new one Copyright 1995 2017 SAMSUNG All rights reserved 4 261 ...

Page 512: ...ge Problem Symptom Toner Supply error and toner leakage has occurred Cause FRAME MAIN DUCT Toner assembly does not reach the designated position Troubleshooting Reassemble or replace the Toner Duct Assy 4 262 Copyright 1995 2017 SAMSUNG All rights reserved ...

Page 513: ...k of the toner cartridge is broken or assembled abnormally If the modular jack harness is defective replace it with new one If the modular jack is entered to the toner cartridge pull out it with hands 3 CRUM PBA problem or CRUM data broken Replace the toner cartridge with new one 4 CRUM connection Modular connector installation problem a Open the front cover Pull out the toner cartridge b Check th...

Page 514: ...ure out the type of fault 3 Switch the organic photo conductor drum OPC with another OPC of another color If this resolves the problem replace the OPC only 4 Check the gear of the main drive is changed damaged or if there is an alien substance If the gear is changed damaged then replace the main drive If an alien substance is found then remove it 5 Replace the imaging unit that causes the problem ...

Page 515: ...tion Succeed or Failed for ACR 1152 Registration cannot be adjusted by ACR a Check if Skew data of ACR Report is changed b Check if OPC surface of Y M C is OK Check if it is scratched or torn c Print and check separated Y M C color and see if it is OK d Find Succeeded or Failed for ACR from ACR report If the value is 1152 like the above report ACR cannot be done LSU need to be replaced Succeeded o...

Page 516: ...outines Toner Dispense Motor On Off 111 0000 Y 111 0010 M 111 0020 C 111 0030 K Check if toner supply is blocked Check if toner seal is removed Check if the transfer roller is installed properly Print the ACR report Check the ACR is succeeded Succeeded or Failed for ACR ACR Result 0 Success 256 LED calibration failed which is performed before ACR for pattern sensing ACR sensor is contaminated or A...

Page 517: ...nt Troubleshooting 1 Remove the developer unit Refer to 3 2 2 2 Deve Unit 2 Disassemble the developer unit cover pay attention not to destroy lock Empty developer out on clean paper 3 Remove lumps with the Jig from mag roller 4 Pay attention clean the circled area where oil can cause build up in the Fuser Copyright 1995 2017 SAMSUNG All rights reserved 4 267 ...

Page 518: ...d on media Cause After installing the OPC unit the OPC lever is not properly locked Troubleshooting 1 Check whether the OPC lever is in locking state or not Please rotate the OPC lever until the lever is properly locked as the following picture 4 268 Copyright 1995 2017 SAMSUNG All rights reserved ...

Page 519: ... 1 Acoustic noise in Fuser unit P 4 267 1 Acoustic noise in Fuser unit Symptom Acoustic noise from fuser assembly in early stage of printing Cause Fuser belt edges is damaged Troubleshooting 1 Replace the fuser unit with new one Copyright 1995 2017 SAMSUNG All rights reserved 4 269 ...

Page 520: ...feed P 4 271 4 Scanner Locked U1 2115 error P 4 272 5 How to adjust image distortion P 4 273 6 Line Skew occurs due to internal module of scanner P 4 274 7 Paper Jam occurs due to Registration ROLLER IDLE of ADF P 4 275 8 ADF is not recognized and an S3 3211 error occurs or copying must be performed from the platen P 4 276 9 During copy or scan job the original paper JAM and U3 3213 error occur P ...

Page 521: ...he copier machine UI indicate CCD Lock message and FR Carriage can t move on the rail Cause Tilted copier set over 20 degree When operate scanner in FR pushed condition Troubleshooting 1 Open the scan glass 2 Bend the spring like picture Copyright 1995 2017 SAMSUNG All rights reserved 4 271 ...

Page 522: ...ed to access the platen glass the unit should remain at a 50 angle 10 ADF unit does not remain open as expected Troubleshooting 1 Remove the ADF connector cover 2 Remove the connector and 1 screw 3 Lift up and remove the ADF unit 4 Remove 4 screws from the each hinge unit And then replace the hinge unit with new one 5 Reassemble the ADF unit again 4 272 Copyright 1995 2017 SAMSUNG All rights reser...

Page 523: ...during multi feeding This also stabilizes paper path NOTE The friction pad is also replaced when the Guide Pickup is replaced Replacement Procedure 1 Open the Cover Open Assembly 2 Remove the ADF separation pad then replace it with new one 3 Remove the Guide Pickup by pressing the side as shown below 4 Assemble the new Guide Pickup 5 Update the firmware as the latest version Copyright 1995 2017 SA...

Page 524: ... off signal pin is 0V Main board and signal is normal b The voltage at signal pin is 4 5 3V Main board and signal is abnormal 3 If the main board and signal is normal and all 24V output channels are nearly 0V check other parts i e Fuser motor scanner harness etc driven by 24V voltage before replacing the SMPS 4 If the main board and signal is normal and just one or two or three 24V output channels...

Page 525: ...1 Loosen the 4 screws of the left hinge then loosen the 4 screws of the right side Adjust the ADF 2 Perform a copy job from the ADF and see if image distortion occurs Repeat steps 1 and 2 if there is distortion 3 If image distortion is removed then tighten the hinges screws Copyright 1995 2017 SAMSUNG All rights reserved 4 275 ...

Page 526: ...h vernier calipers and make it the same and lock it c Make difference of left right smaller than 0 5mm It is OK if difference is smaller than 1mm after locking the screw HR needs to be checked CAUTION 4 screws 2 front pulleys 2 rear pulleys need to be tightly locked Need to be locked with 7kgf cm torque If it is too strong then pulley can be broken if it is too weak it can be unlocked If differenc...

Page 527: ... a paper jam Troubleshooting 1 Open ADF Cover 2 Rotate Registration ROLLER IDLE by hand At this time which is close to screw does not rotate smoothly and rotates smoothly 3 If roller does not rotate smoothly loosen screw until roller does rotate smoothly 4 When loosening screw still does not allow roller to rotate well remove ADF cover and scrape away contact point with a knife until roller rotate...

Page 528: ...nstallation is not recognized S3 3211 error occurs and copy must be performed using the platen Cause ADF power cable fails Troubleshooting 1 Reassemble the ADF power cable and if it does not solve the problem replace the cable 2 Adjust harness and make it fixed with cable tie 4 278 Copyright 1995 2017 SAMSUNG All rights reserved ...

Page 529: ...3 error occur SL K7xxx LX series SL X7xxx LX series Troubleshooting 1 Check if the Sponge Damper Separation is moved to other position 2 If yes refer to following guide a Remove 3 screws b Remove the linker pressing its upper side to the inner direction And then remove the front cover c Remove 4 screws Copyright 1995 2017 SAMSUNG All rights reserved 4 279 ...

Page 530: ...4 Troubleshooting d Remove the Pick up Assy e Replace the DSDF HOUSING SEPARATION 4 280 Copyright 1995 2017 SAMSUNG All rights reserved ...

Page 531: ...use Lack of grease in gear train Old type gear is assembled Troubleshooting 1 Enter the service mode 2 Execute the fuser motor test Service Mode Diagnostics Engine Diagnostics Engine Test Routines Fuser Motor Forward 3 Remove the fuser unit And execute the fuser motor test again 4 If the machine still makes noise replace the DRIVE FUSER EXIT Assy 5 If not replace the fuser unit Copyright 1995 2017...

Page 532: ...ocking Symptom Cassette is not open well Cause Cassette operation is not smooth because Toner power is attached to the Cassette Locker Troubleshooting 1 Wipe the Toner powder attached to the Cassette Locker 2 Applying a small amount of the grease to Cassette Locker 3 HANARL Grease Product name HANARL SN 250 Manufacture KANTO KASEI Inc Appearance Orange Directions for use Soak an object in HANARL o...

Page 533: ...ss connection on the main board Connector defect of the main board Troubleshooting 1 Check the harness connection If the harness is not connected correctly reconnect it 2 Check the pick up connector on main board If the connector has some problem of soldering replace the main board Copyright 1995 2017 SAMSUNG All rights reserved 4 283 ...

Page 534: ...pen the side cover and push the cover switch with paper forcibly b Enter the service mode Press the 1 2 3 keys simultaneously and enter the password 1934 c Select the menu below EDC Mode Diagnostics Engine Diagnostics Engine Test Routine Feed motor on off Check the two feed rollers operating status d If the feed rollers can not rotate open the rear cover and check the motor and gears 4 284 Copyrig...

Page 535: ...4 Troubleshooting 2 Check the connection between the main board CN27 and feed motor 3 If the problem persists replace the main board Copyright 1995 2017 SAMSUNG All rights reserved 4 285 ...

Page 536: ...p samsung com Knowledge Technical Resource Troubleshooting Guide TG 13020002 5 Envelope wrinkle Symptom Envelope is wrinkled when printing from MP tray Troubleshooting 1 Enter SVC mode 2 Select Envelope Rotate Service Functions Envelope Rotate 3 Select one menu among off 90 degree 180 degree Refer to 4 5 6 18 Envelope Rotate 4 286 Copyright 1995 2017 SAMSUNG All rights reserved ...

Page 537: ...Loud noise sound of LSU motor P 4 286 1 ACR fail problem Symptom Set UI indicates ACR fail message Cause The brokenness of reflection mirror Troubleshooting 1 Check the assembly condition inside of LSU 2 If the reflection mirror is deviated replace the LSU Copyright 1995 2017 SAMSUNG All rights reserved 4 287 ...

Page 538: ...noise like a siren from LSU motor in printing mode Cause LSU motor defect Troubleshooting 1 Enter the service mode and execute the LSU motor test 2 If the LSU motor run sound is loud replace the LSU 3 If not check the other unit 4 288 Copyright 1995 2017 SAMSUNG All rights reserved ...

Page 539: ...No Problem Description Troubleshooting Page 1 Driver installation problem P 4 288 2 Job pause problem P 4 289 3 Scan to PC login failure P 4 290 4 Script error in Internet Explorer P 4 291 Copyright 1995 2017 SAMSUNG All rights reserved 4 289 ...

Page 540: ...sn t apply WHQL certification 3 The wrong version CD was applied to SOP product because couldn t confirm the exact CD version in Plant Troubleshooting 1 Added the version information to the barcode on CD artwork in order to not apply wrong version CD when making SOP product at Plant 2 Can confirm the exact CD information through barcode and can apply the exact CD to product 4 290 Copyright 1995 20...

Page 541: ...ing job pausing process job status is wrong Troubleshooting 1 During job pausing process keep valid state of pause process a Pausing Paused b If user press cancel paused canceling canceled c If user press continue paused resuming progressing Copyright 1995 2017 SAMSUNG All rights reserved 4 291 ...

Page 542: ...lled on customer PC please update Easy Printer Manager to the latest version from Download Center of Samsung web site 2 Launch Easy Printer Manager and check whether Enable Scan from Device Panel is checked in the Scan to PC Settings menu 3 Even though Enable Scan from Device Panel is checked but still Login Failure is occurred please check SNMP communication between PC and MFP has been blocked or...

Page 543: ...ot print anything IE 9 or later version Cause In protected mode the RegOpenCurrentUser function with write authority returns error or access denied Can not write on the HKEY_CURRENT_USER registry Troubleshooting 1 Download the latest driver and install it Copyright 1995 2017 SAMSUNG All rights reserved 4 293 ...

Page 544: ...P 4 298 7 Home screen icon is disappeared or UI screen is broken P 4 298 8 No power problem P 4 299 9 Active NFC doesn t detect NFC tag P 4 300 1 Recognition error of the side cover problem Symptom The side cover is closed but the open message of the side cover displays on LCD Cause The spring plate of the side cover open sensor is deformed by the deformation of the stopper of the side cover Troub...

Page 545: ...0V Main board and signal is normal b The voltage at signal pin is 4 5 3V Main board and signal is abnormal 3 If Main board and signal is normal and all 24V output channels are nearly 0V check other parts i e Fuser motor scanner harness etc driven by 24V voltage before replacing the SMPS 4 If Main board and signal is normal and just one or two or three 24V output channels are nearly 0V inspect some...

Page 546: ...ng 3 HDD makes a loud noise Symptom The Hard Disk Drive makes a loud noise when working Cause HDD itself has defects Troubleshooting 1 Replace the HDD with new one 4 296 Copyright 1995 2017 SAMSUNG All rights reserved ...

Page 547: ...Do a ping test after connecting the network line to the SET If it is okay check the network configuration which may set wrong by some users without notice 3 If the result of the ping test is not good then open the rear cover and see the main board if there are some visible defects on the network related components such as connector CN16 capacitor C192 and any other components nearby Surge voltage ...

Page 548: ...frequency Troubleshooting 1 If the power cord is connected to the multi tap unplug and plug it to the independent outlet 2 If the touch malfunction persists check the followings a Press Power button until the pop up will be displayed b Press pop up area except Cancel and Turn Off button until the password window will be displayed 4 298 Copyright 1995 2017 SAMSUNG All rights reserved ...

Page 549: ...alue After changing Touch Config press Home button Proiority 1 default 4 401K_500K 5 500K_599K 3 148K_290K 2 86K_216K f Check the touch operation If the touch malfunction persists change Touch Config to another value and test the touch operation again Copyright 1995 2017 SAMSUNG All rights reserved 4 299 ...

Page 550: ... SVC mode Refer to 4 5 1 2 Execute Main Memory Clear Service Functions Main Memory Clear 7 Home screen icon is disappeared or UI screen is broken Symptom Home screen icon is disappeared or UI screen is broken Cause UI software error Troubleshooting 1 Enter SVC mode Refer to 4 5 1 2 Execute Main Memory Clear Service Functions Main Memory Clear 4 300 Copyright 1995 2017 SAMSUNG All rights reserved ...

Page 551: ...After turning the machine on it can not turn on And OPE lamp is not on Cause The main board harness is not connected correctly Troubleshooting 1 Unplug all the harness from the main board Then reconnect them Copyright 1995 2017 SAMSUNG All rights reserved 4 301 ...

Page 552: ...tronic signal between NFC reader and NFC tag Troubleshooting If the meatallic sticker has attached on Active NFC module NFC will not works fine Because metallic sticker block electronic signal between NFC model and tag If you attached following sticker on NFC module remove it now 4 302 Copyright 1995 2017 SAMSUNG All rights reserved ...

Page 553: ...ACR report the skew adjustment is unnecessary ii Adjustment method Skew Data 200 Rotate the driver in a counterclockwise direction ex Skew Data is 192 200 192 8 Click CCW rotation Skew Data 200 No need to adjustment Skew Data 200 Rotate the driver in a clockwise direction ex Skew Data is 213 213 200 13 Click CW rotation NOTE 1 Click is equal to 1 7 dot NOTE If you don t feel the click you can deci...

Page 554: ... c Check the Y M C skew error d If the value for YMC is in 200 7 complete the skew adjustment NOTE If value can not meet the target repeat the step1 3 4 9 2 Adjusting the ADF DSDF_RADF skew 1 Stand the ADF unit Loosen 2 screws securing both hinge units slightly 4 304 Copyright 1995 2017 SAMSUNG All rights reserved ...

Page 555: ...kew image is like a below sample adjust the hinge unit to the direction of arrow 1 scale 1 0 mm skew adjustment b If the skew image is like a below sample adjust the hinge unit to the direction of arrow 1 scale 1 0 mm skew adjustment Copyright 1995 2017 SAMSUNG All rights reserved 4 305 ...

Page 556: ...Troubleshooting 3 Detach the ADF sponge after adjusting the skew Place the ADF sponge on platen glass And then close the ADF unit to stick the sponge 4 306 Copyright 1995 2017 SAMSUNG All rights reserved ...

Page 557: ...hen release the scan front cover and scan glass holder cover 2 Lift the scan glass up and release it NOTE Be careful not to contaminate the scan glass 3 Tap 4 corners of the FR carriage to check the direction that adjustment is needed Copyright 1995 2017 SAMSUNG All rights reserved 4 307 ...

Page 558: ...he FR carriage as shown below And then remove the transparent sheet 5 Rotate the slider adjust to adjust the FR carriage flatness 6 Reassemble in reverse order of disassembly 4 308 Copyright 1995 2017 SAMSUNG All rights reserved ...

Page 559: ... not to contaminate the scan glass 3 Adjust R S screws as the skew status For example a If the top skew is like a below sample AS chart 1 5mm clockwise direction skew rotate S screw one turn and R screw a half turn in a clockwise direction NOTE The combination of S screw one turn and R screw a half turn must be kept Copyright 1995 2017 SAMSUNG All rights reserved 4 309 ...

Page 560: ...rclockwise direction skew rotate S screw one turn and R screw a half turn in a counterclockwise direction NOTE The combination of S screw one turn and R screw a half turn must be kept 4 Reassemble in reverse order of disassembly 4 310 Copyright 1995 2017 SAMSUNG All rights reserved ...

Page 561: ...ring a machine Specification of SPDS App 1 Mobile a Support model Galaxy series All android phone Galaxy S series S2 S3 S4 Galaxy Note series Note1 Note2 Note3 Galaxy Tab series Tab7 0 Tab7 7 Tab8 9 Tab10 1 b Android version Android 4 0 or later Ice Cream Sandwich 2 Printer a USB support model b Wifi Direct support model Copyright 1995 2017 SAMSUNG All rights reserved 4 311 ...

Page 562: ... App can be found by searching SPDS 3 Start Installation Press INSTALL after checking App information 4 Check Authority Press ACCEPT after checking required authority 5 Installing SPDS App will be installed 6 Installation Complete After completing install App you can see installation result If you want to run App press OPEN 4 312 Copyright 1995 2017 SAMSUNG All rights reserved ...

Page 563: ...han 4 characters Blank spaces are not allowed Utilize capital and small letters NOTE If E mail address is invalid you cannot progress to the next step If Partner ID is invalid you cannot receive approval of administrator 3 Request User Registration After request of user registration wait for approval of administrator If approved by the administrator email notification will be sent out Copyright 19...

Page 564: ...om of screen 2 Registration Password Press OK after ID input User Request Registration 3 Send Authentication Code Confirm Authentication Code to e mail of registered user 4 Input Authentication Code Press OK after input authentication code 5 Registration Password Input your password 6 Complete Registration Press OK and then login at login screen 4 314 Copyright 1995 2017 SAMSUNG All rights reserve...

Page 565: ...quest Registration Change Reset your Password 2 Try login Try login after input ID and Password If you forget your password press Change Reset your Password 3 Success login If you have successful login you can see the four device connectivity method Copyright 1995 2017 SAMSUNG All rights reserved 4 315 ...

Page 566: ...en present device USIM and USIM that used at sign up are different you can login after USIM Change Request 3 USIM Change Request You can login via new ID and password after administrator approve USIM change USIM information will be updated you cannot login with existing USIM 4 316 Copyright 1995 2017 SAMSUNG All rights reserved ...

Page 567: ...er you can see printer list that is available Select printer for connectivity 3 Device Connect Press WPS or Connect button of printer for connectivity Once SPDS has connected you can see User Information Consent Screen 4 Fail Device Connect When your printer firmware is not supported by SPDS a temporary device error pop up message will occur Copyright 1995 2017 SAMSUNG All rights reserved 4 317 ...

Page 568: ...nction 2 NFC Tag After login select NFC protocol on your device at Device Connect Method 3 Connect Device When NFC tagging Wi Fi Direct device connection is made confirmation window pops up Unlike Wi Fi Direct NFC Tagging method is directly connected to the printer The list of available devices is omitted 4 318 Copyright 1995 2017 SAMSUNG All rights reserved ...

Page 569: ...ty Press OK when pop up occurs Once SPDS has connected you can see User Information Consent Screen Without Connection 1 Device Connect Method Press Without Connection Need no connection to device Approval process of user information is omitted 2 Initial Screen You can see initial screen does not include any device information Copyright 1995 2017 SAMSUNG All rights reserved 4 319 ...

Page 570: ...n comes out If user information is correct press YES Press NO for customer consent 2 Customer Information Consent Customer consent has not been completed this screen comes out 3 Input information Check the checkbox after reading terms Input name company e mail of customer and then press Consent 4 320 Copyright 1995 2017 SAMSUNG All rights reserved ...

Page 571: ...y Requesting Statistics and Movie Guide 2 Error Inquiry Error Code of Connected device shows by pressing device error inquiry 3 Detailed Inquiry You can see detailed information of connected device by selecting Error code 4 When there is no error If connected device has no error code pop up comes out 5 Auto Complete If you input more than two characters Error Code auto complete function is offered...

Page 572: ...art Date and End date is requirement condition 3 Select Date When click Start Date or End date calendar comes out you can select date 4 Conduct Search After input search condition conduct search 5 Result list The results of search condition comes out as a list 6 See the detail By selecting items from list you can see detail 4 322 Copyright 1995 2017 SAMSUNG All rights reserved ...

Page 573: ...enu of Connected Device History there are History of Each Error Code History of Each Corrective Part and History of Each Service Engineer 3 Subordinate Menu Selection Corrective Histories are listed by selecting menu 4 See the detail Detailed Action comes out by selecting Corrective history list Copyright 1995 2017 SAMSUNG All rights reserved 4 323 ...

Page 574: ...r mode 2 Authority Confirm Requesting Statistics require administrator authority So if you have no administrator authority you cannot use this function 3 Requesting Statistics Usage Statistics History will be sent to e mail of requester 4 324 Copyright 1995 2017 SAMSUNG All rights reserved ...

Page 575: ...d movie exist NOTE If SD Card of the mobile phone does not exist it is not downloaded If there is movie at SD Card movie will be played If movie does not exist a download confirmation pop up comes out NOTE Movie is saved to SD Card Card Android data com sec spds files video 4 Play Movie Play Movie that exist in SD card Movie support landscape mode Copyright 1995 2017 SAMSUNG All rights reserved 4 ...

Page 576: ...consist of ON OFF HIGH LOW OPEN CLOSE INSTALL UNINSTALL 3DIGI Only ON OFF run diagnosis by Start Button Other function except ON OFF Diagnosis Mode indicate status value of connected device 3 Device Sleep Mode If device status is sleep you can use diagnosis mode after wake up process 4 Device in use However wake up device you cannot use diagnosis before status become ready 4 326 Copyright 1995 201...

Page 577: ...to Print There are five types of pattern 5 Skew Black Solid Prints out a blank sheet There are four types of pattern A4 Letter A3 Ledger 1 sided Simplex 2 sided Duplex Number of Pages to Print is only enable at Prints out a blank sheet Prints out a blank sheet 1 to 100 can be entered 3 Print When press Print options set in the print are utilized Copyright 1995 2017 SAMSUNG All rights reserved 4 32...

Page 578: ...formation Date of First Set Installation Firmware information 3 Preferences Information Preferences Information indicates Model Name Device Serial Number Date of Installation Firmware Version 4 Date of First Set Installation Date of First Set Installation Firmware information indicate each information 5 Print Press Print information indicated on UI will print out 4 328 Copyright 1995 2017 SAMSUNG ...

Page 579: ...indicate Supplies information of connected device 2 Network Network indicate Network information of connected device 3 Fax Report FAX REPORT Fax Sent Fax Received Fax Protocol Dump Fax Diagnostics Copyright 1995 2017 SAMSUNG All rights reserved 4 329 ...

Page 580: ...Login Input admin account of connected device and press Login Button 3 Export Export data of printer press OK 4 Import Importing data of data that exported from connected printer press OK 5 Complete After end of Import press OK Export menu ends Device will reboot 4 330 Copyright 1995 2017 SAMSUNG All rights reserved ...

Page 581: ...save method SD Card 4 SD Card Transport Complete If you select SD Memory Log will be saved at Phone SPDS DEBUGLOG Press OK then Send Debug Log Menu end 5 Transport Position Selection 2 Log names that can transport are indicated on screen Select save method Server 6 Server Transport Complete After completing upload pop up comes out Press OK then Send Debug Log Menu end Copyright 1995 2017 SAMSUNG A...

Page 582: ...ce Device Settings Press IP Settings 2 IP Setting Input IP Address Subnet Mask Gateway Press OK 3 Change Complete If IP changing complete normally above pop up comes out Press OK then IP Setting Menu end 4 332 Copyright 1995 2017 SAMSUNG All rights reserved ...

Page 583: ...ice Settings Press Counter Initialization 2 Counter Initialization Select item to initialize 3 Initialization Complete If initialization complete normally pop up comes out Press OK you can initialize other counter value Copyright 1995 2017 SAMSUNG All rights reserved 4 333 ...

Page 584: ...ings Press Footer ON OFF 2 Footer Setting When press ON button activate Footer value When press OFF button inactivate Footer value 3 Footer Change Request If Footer Setting is requested normally toast message will occur 4 334 Copyright 1995 2017 SAMSUNG All rights reserved ...

Page 585: ...oad Corrective will be aggregated with abnormal action 3 Corrective In the Corrective you can input Part of Action Detailed Action Attached Image 4 Select Part for Action Part for Actions are Feeding Main board Delivery Belt Scan Sensor Power Fixing Option Fax Frame Phenomenon LSU Application Driver Firmware Others 5 Input Detailed Action Part of Action and Detailed Action are required Input requi...

Page 586: ...evice If connection between App and device e g device reboot Timeout go to device connection menu 2 Disconnected Devices For App reconnect to device go to device connection menu before indicate subordinate menu 3 Subordinate Menu If device connection perform normally you can see subordinate menu 4 336 Copyright 1995 2017 SAMSUNG All rights reserved ...

Page 587: ...onnected 3G LTE WIFI try search 3 Error Message If network error 3G LTE WIFI occur error message pop up print out and cannot proceed In this case it is necessary to check the network 4 Network Normal When network 3G LTE WIFI is connected normally try search 5 Normal Result Because there is no problem with the network App will show normal results Copyright 1995 2017 SAMSUNG All rights reserved 4 33...

Page 588: ...ection diagram includes the harness part code as shown below Black text harness code is for color and mono model in common Blue text harness code is for mono model Red text harness code is for color model 5 1 Copyright 1995 2017 SAMSUNG All rights reserved ...

Page 589: ...TOR SI DE JC39 01336A EXI T1 STEP 7 6 5 4 3 2 1 1 2 3 4 5 6 7 JC39 01613A EXI T2 STEP DUPLEX RETURN SOL 8 7 6 5 4 3 2 1 1 2 3 4 5 6 7 8 EXI T2 EXI T2FULL FUSER BLDC BLDC 10 9 8 7 6 5 4 3 2 1 EXI T1FULL EXI T 3 292229 0 CN6 EXI T 5V1_LP N C GND N C nPAPER_EXI T1 N C 5V1_SLP GND nBI N_FULL_EXI T1 A_EXI T2 nA_EXI T2 nB_EXI T2 B_EXI T2 PW M _RETURN_DUPLEX 24V3 5V1_LP GND nDETECT_T1_POS1 5V1_LP GND nPA...

Page 590: ...BLDC BLDC 10 9 8 7 6 5 4 3 2 1 FEE D1 REGI OPC BLDC M ONO ITB BLDC C OLOR BLDC 10 9 8 7 6 5 4 3 2 1 CL FEE D CLUTCH CL M PCLUTCH CL REGICLUTCH PICKU P1 STE P STE P PAPE R_EM PTY2 PAPE R_LIF T2 PICKU P2 STE P STE P CN 46 PI CKUP 5V1_ LP GND nPAPER_EM PTY1 5V1_ LP GND nPAPER_LI FT1 A_PI CKUP1 nA_PI CKUP1 nB_PI CKUP1 B_PI CKUP1 A_FE ED nA_FEE D nB_FEE D B_FE ED 5V1_ LP GND nPAPER_EM PTY2 5V1_ LP GND ...

Page 591: ...5 26 27 28 29 30 31 32 33 34 35 HVPS CO LO R HVP S COLOR PW M _DEV_DC_Y_CO N PW M _I THV_Y_CO N PW M _AC_VPP_Y_CO N nEN_AC_Y_CO N PW M _AC_PREQ _CO N PW M _M HV_Y_CO N PW M _FUSER_BI AS_CO N PW M _SAW _CO N PW M _THV_CO N PW M _THV_CLEAN_CO N ADC_THV_P_CO N ADC_HV PS_24_CO N PW M _DEV_DC_K_CO N PW M _DEV_DC_C_CO N PW M _DEV_DC_M _CO N PW M _I THV_K_CO N PW M _I THV_C_CO N PW M _I THV_M _CO N ADC_M...

Page 592: ...M _BO TTLE_Y SCL_CRU M _BO TTLE_Y GN D 1 2 3 4 5 6 7 8 9 10 11 12 13 14 15 16 17 18 19 20 21 22 23 24 25 26 27 28 29 30 31 32 33 34 35 36 JC39 01665A TO NER C DC M TR DC TO NER C CO UN T JC39 01665A TO NER M DC M TR DC TO NER M CO UN T JC39 01665A TO NER Y CO UN T JC39 01665A TO NER C CRUM TO NER M CRU M TO NER Y CRUM TO NER Y DC M TR DC JC39 02091A JC39 02100A JC39 01665A I D SENSO R 2 292229 2 C...

Page 593: ...NLET M AI N SW I TCH GN D FDB SM PS TYPE5 IN LET LI VE N EU TR AL 1 2 IN LET 1 2 3 4 5 6 7 8 9 10 11 12 SM PS TYP E5 5V1 5V2 24V1 24V2 24V3 24V4 D G N D D G N D D G N D D G N D D G N D D G N D SM PS TYP E 5 TYPE5 LI VE NEU TRA L 1 2 TYPE5 TYPE5 LI VE NEU TRA L 1 2 TYPE5 JC39 01585A 1 2 3 TYPE5 SI G N A L DGN D nEN _24V_SM PS _O D G N D TYPE 5 SIGN AL FU SER LAM P1 LAM P2 C O MM O N 1 2 3 FU SER M ...

Page 594: ..._HO ST2 DP_H O ST2 GN D 1 2 3 4 USB HO ST2 CN 1 M C B USB I F 5VS DM _M CB DP_M CB GN D GN D GN D GN D GN D GN D 1 2 3 4 5 6 7 8 9 M CB USB I F C N 2 M CB PO W ER SPEA KER SPEA KER nR ST_U I nR ST_U SB_HU B _M C B 5VS 5VS nKE Y_SO FT_PW R 5VS nW AKE U P_EN G nW AKE U P_EU I GN D GN D GN D 1 2 3 4 5 6 7 8 9 10 11 12 13 14 M C B POW ER CN 2 O PE PO W ER 5VS 5VS 5VS nKEY_SO FT_PW R nR ST_U I nW AKE U...

Page 595: ...C_M nREADY_BLDC_OPC_M nEN_BLDC_OPC_M GAI N_BLDC_OPC_M BRAKE_BLDC_OPC_M GND GND 24V 2 24V 2 DI R_BLDC_OPC_Y CLK_BLDC_OPC_Y nREADY_BLDC_OPC_Y nEN_BLDC_OPC_Y GAI N_BLDC_OPC_Y BRAKE_BLDC_OPC_Y GND GND 24V 2 24V 2 1 2 3 4 5 6 7 8 9 10 11 12 13 14 15 16 17 18 19 20 21 22 23 24 25 26 27 28 29 30 31 32 33 34 35 36 37 38 39 40 OPC DRI VE 4 292229 0 BLDC 10 9 8 7 6 5 4 3 2 1 BLDC 10 9 8 7 6 5 4 3 2 1 BLDC 1...

Page 596: ...LVDO _D CI S_2_N GN D LVCK_DC I S_P LVCK_DC I S_N GN D LVDO _D CI S_1_P LVDO _D CI S_1_N GN D LVDO _D CI S_0_P LVDO _D CI S_0_N GN D GN D SDI _DC I S SCLK_DC I S SDO _DC I S SLO AD_DI CS GN D GN D PI TG 2 GN D 3 3V_A1000 3 3V_A1000 3 3V_A1000 3 3V_A1000 3 3V_A1000 3 3V_A1000 3 3V_A1000 3 3V_A1000 GN D GN D DSDF DC I S 4 292229 0 1 2 3 4 5 6 7 8 9 10 11 12 13 14 15 16 17 18 19 20 21 22 23 24 25 26 ...

Page 597: ... I F N C N C A_FEED nA_FEED nB_FEED B_FEED N C N C A_PI CKUP1 nA_PI CKUP1 nB_PI CKUP1 B_PI CKUP1 A_PI CKUP2 nA_PI CKUP2 nB_PI CKUP2 B_PI CKUP2 N C 1 2 3 4 5 6 7 8 9 10 11 12 13 14 15 16 17 M TR I F CN6 SENSOR I F 5V_SUSP GND nSENS_P_EM PTY1 5V_SUSP GND nSENS_LI FT1_LI M I T GND nSENS_P_FEED1 5V_SUSP 5V_SUSP GND nSENS_P_EM PTY2 5V_SUSP GND nSENS_LI FT2_LI M I T GND nSENS_P_FEED2 5V_SUSP 1 2 3 4 5 6...

Page 598: ..._RXD 2 MA C1_RXD 1 MA C1_RXD 0 GND M AC1_ RX_CTRL GND N C 3 3V_GE 3 3V_GE N C N C 3 3V_GE 3 3V_GE 3 3V_GE N C GND GND GND GND nRST_M AC1 GND SDA_M AC1 SCL_M AC1 GND nDET ECT_M AC1 1 2 3 4 5 6 7 8 9 10 11 12 13 14 15 16 17 18 19 20 21 22 23 24 25 26 27 28 29 30 31 32 33 34 35 36 37 38 39 40 M AI N I F CN1 NETW ORK M X0P M X0N M X1P M X2P M X2N M X1N M X3P M X3N GND LED1 LED0 3 3V_GE 1 2 3 4 5 6 7 8...

Page 599: ...d DVM Checking the fuser lamp Checking the SMPS fuse Service Spring hook When disassembling the spring Service Small vacuum To remove the toner and contamination inside of the machine Service Driver To tighten screws To remove the hinge of the cover Service Tweezers To unplug the pin connector of the fuser unit To remove the E ring Service Soft cloth To clean the rollers To clean the frame and sca...

Page 600: ...l Image Use Remark Test Chart A4 image A3 image Skew To check the image quality Service Spare Kit Screw E Ring To fix the unit or parts Service Clamp To form the harness Service 6 2 Copyright 1995 2017 SAMSUNG All rights reserved ...

Page 601: ...ting systems running on them The BOOTP servers assign the IP address from a pool of addresses to each client BOOTP enables diskless workstation computers to obtain an IP address prior to loading any advanced operating system CCD Charge Coupled Device CCD is a hardware which enables the scan job CCD Locking mechanism is also used to hold the CCD module to prevent any damage when you move the machin...

Page 602: ...f external behavior which is in contrast to simulation which concerns an abstract model of the system being simulated often considering its internal state Ethernet Ethernet is a frame based computer networking technology for local area networks LANs It defines wiring and signaling for the physical layer and frame formats and protocols for the media access control MAC data link layer of the OSI mod...

Page 603: ...t produces world wide industrial and commercial standards ITU T The International Telecommunication Union is an international organization established to standardize and regulate international radio and telecommunications Its main tasks include standardization allocation of the radio spectrum and organizing interconnection arrangements between different countries to allow international phone calls...

Page 604: ...come an industry standard Originally developed for early inkjet printers PCL has been released in varying levels for thermal dot matrix printer and laser printers PDF Portable Document Format PDF is a proprietary file format developed by Adobe Systems for representing two dimensional documents in a device independent and resolution independent format PostScript PS PostScript PS is a page descripti...

Page 605: ...N compliant program a scan can be initiated from within the program It is an image capture API for Microsoft Windows and Apple Macintosh operating systems UNC Path Uniform Naming Convention UNC is a standard way to access network shares in Window NT and other Microsoft products The format of a UNC path is servername sharename Additional directory URL Uniform Resource Locator URL is the global addr...

Page 606: ...nection easily without a computer XPS XML Paper Specification XPS is a specification for a Page Description Language PDL and a new document format which has benefits for portable document and electronic document developed by Microsoft It is an XML based specification based on a new print path and a vector based device independent document format 6 8 Copyright 1995 2017 SAMSUNG All rights reserved ...

Page 607: ...name by Segment Xpress ProXpress MultiXpress 2 Model code Information Basic Structure SL Function Information Function N Network W Wireless Network D Duplex Printing R Reverse Type ADF F Fax X XOA eXtensible Open Architecture H Handset A Auto Document Feeder Copyright 1995 2017 SAMSUNG All rights reserved 6 9 ...

Page 608: ...02 Mar 2015 P 2 91 Change FDI PBA code JC92 01616A JC92 02068A 1 35 13 Apr 2015 P 3 14 Add the step FUSER BRACKET SUPPORT for fusr unit disassembly 1 36 22 Jul 2015 P 4 218 Update the trouble shooting for S5 3111 error 1 37 16 Oct 2015 P 2 16 Modify option table 1 38 21 Jan 2016 P 4 266 P 4 277 Add two troubleshootings 1 39 28 Jan 2016 P 2 15 Change fuser unit code 220V JC91 01157A JC91 01209A 110...

Page 609: ...apan https gspn2 samsungcsportal com N America S America https gspn3 samsungcsportal com This Service Manual is a property of Samsung Electronics Co Ltd Any unauthorized use of Manual can be punished under applicable International and or domestic law 2017 Samsung Electronics Co Ltd All rights reserved Printed in Korea Code No ...

Reviews: