Samsung HW-K460, User Manual
The Samsung HW-K460 user manual is available for download, absolutely free! With just a few clicks, you can access this comprehensive manual, enabling easy setup and operation of your Samsung HW-K460. Enhance your audio experience effortlessly by downloading the user manual from manualshive.com.
Share
Download


Reviews:
No comments
Related manuals for HW-K460

PS60
Brand: JBL Pages: 38

CS1014
Brand: JBL Pages: 4
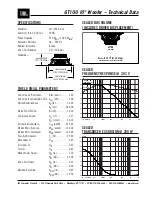
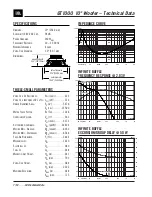
GT100
Brand: JBL Pages: 2

CS10
Brand: JBL Pages: 3

110 Series
Brand: Tannoy Pages: 16

8
Brand: JBL Pages: 16
GT1000
Brand: JBL Pages: 3

PS110
Brand: Tannoy Pages: 4

SW-200
Brand: Aaron Pages: 3

SW-200
Brand: Aaron Pages: 4

SW-200
Brand: Aaron Pages: 2

GT series
Brand: JBL Pages: 8

SW-10
Brand: Tapco Pages: 16

ES Series
Brand: YORKVILLE Pages: 16

BC Series
Brand: Danley Pages: 8

X8
Brand: M&K Sound Pages: 20

SUB-120
Brand: Aaron Pages: 4

SW-400
Brand: Aaron Pages: 2


