background image

HW-MS650 / HW-MS651

FULL MANUAL

Imagine the possibilities 

Thank you for purchasing this Samsung product.

To receive more complete service, please register 
your product at www.samsung.com/register

Summary of Contents for 6 series

Page 1: ...HW MS650 HW MS651 FULL MANUAL Imagine the possibilities Thank you for purchasing this Samsung product To receive more complete service please register your product at www samsung com register...

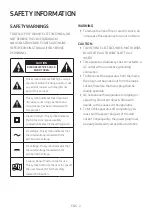
Page 2: ...ndicates that the rated voltage marked with the symbol is DC voltage Caution Consult instructions for use This symbol instructs the user to consult the user manual for further safety related informati...

Page 3: ...e unit malfunctions Your product is not intended for industrial use It is for personal use only Condensation may occur if your product has been stored in cold temperatures If transporting the unit dur...

Page 4: ...5 04 ConnectingtoyourTV 7 Method 1 Connecting with a Cable 7 Connecting a TV using an HDMI Cable 7 Connecting using an Optical Cable 8 Method 2 Connecting Wirelessly 9 Connecting a TV via Bluetooth 9...

Page 5: ...ecifications for the different sound effect modes 24 08 InstallingtheWallMount 25 Installation Precautions 25 Wallmount Components 25 Assembling the Holder Cable 27 Installing the Holder Foot 28 09 So...

Page 6: ...tions on how to use the Holder Cable To purchase additional components or optional cables contact a Samsung Service Centre or Samsung Customer Care The appearance of the accessories may differ slightl...

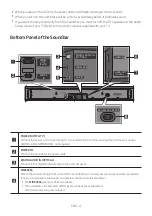
Page 7: ...olume When adjusted the volume level appears on the Soundbar s front display Source Button Selects the source input mode Inputmode Display Optical Digital input D IN ARC HDMI OUT input D IN TV ARC Aut...

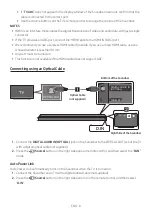
Page 8: ...K ADD HDMI IN HDMI OUT TV ARC WIRELESS AUX IN DIGITAL AUDIO IN OPTICAL POWER IN POWER OUT For TV POWEROUT ForTV Connect the power cord of a Samsung TV connected to the Soundbar and mounted on the wall...

Page 9: ...pull the plug Do not pull the cable Do not connect this unit or other components to an AC outlet until all connections between components are complete 03 CONNECTINGTHESOUNDBAR ConnectingElectricalPow...

Page 10: ...Kit WMN300SB not supplied The POWEROUT jack can connect only to Samsung TVs that use a 2 pin power cord and consume 400 W or less Connecting the jack to a device that consumes more than 400 W may dam...

Page 11: ...ConnectingaTVusinganHDMICable HDMI IN HDMI OUT TV ARC HDMI IN ARC HDMICable BottomoftheSoundbar ConnecttotheHDMIIN ARC portofyourTV ConnecttotheHDMIOUT TV ARC portoftheSoundbarmainunit RightSideofthe...

Page 12: ...Anynet must be turned on This function is not available if the HDMI cable does not support ARC ConnectingusinganOpticalCable WIRELESS AUX IN DIGITAL AUDIO IN OPTICAL OPTICAL OUT OpticalCable notsuppl...

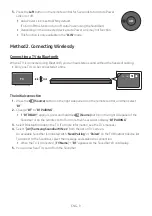
Page 13: ...alconnection 1 Press the Source button on the right side panel or on the remote control and then select BT 2 Change BT to BTPAIRING If BTREADY appears press and hold the Source button on the right sid...

Page 14: ...enter 0000 In Bluetooth connection mode the Bluetooth connection will be lost if the distance between the Soundbar and the Bluetooth device exceeds 10 meters The Soundbar automatically turns off after...

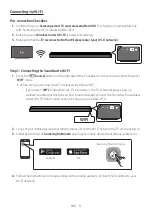
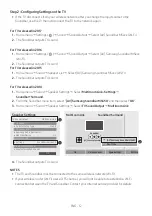
Page 15: ...lect WIFI mode When using a Samsung smart TV released in 2016 or 2017 If you select WIFI mode when the TV is turned on the TV screen displays a pop up window providing instructions on how to automatic...

Page 16: ...k Settings Soundbar Surround 2 From the Soundbar menu item select AV SamsungSoundbarMS650 and then select OK 3 Home menu Sound Speaker Settings Select TVSoundOutput MultiroomLink SpeakerSettings OK Mu...

Page 17: ...omoftheSoundbar ExternalDevice HDMI RightSideofthe Soundbar 1 Connect an HDMI cable from the HDMIIN jack on the back of the product to the HDMI OUT jack on your digital device 2 Connect an HDMI cable...

Page 18: ...able X X Connect DIGITALAUDIOIN OPTICAL on the main unit to the OPTICAL OUT jack of the Source Device using a digital optical cable not supplied Y Y Select D IN mode by pressing the Source button on t...

Page 19: ...undbar or on the remote control for more than 5 seconds to display BTPAIRING 3 Select AV SamsungSoundbarMSxxx from the list When a Soundbar is connected to the Bluetooth device BluetoothDeviceName BT...

Page 20: ...he Soundbar If several Bluetooth devices are simultaneously paired with the Soundbar If the Bluetooth device is turned off not in place or malfunctions Electronic devices may cause radio interference...

Page 21: ...uetooth Bluetooth is a technology that enables Bluetooth compliant devices to interconnect easily with each other using a short wireless connection A Bluetooth device may cause noise or malfunction de...

Page 22: ...to a mobile device via a wireless network Wi Fi the SamsungMultiroom app is required Mobiledevice Theinitialconnection 1 Press the Source button on the right side of the Soundbar or on the remote con...

Page 23: ...e audio device and one Soundbar X X Touch to go to the list of all speakers Y Y Touch on the right of the Soundbar model name Z Z Touch SurroundSetup Select Done after dragging the speaker to the desi...

Page 24: ...ntrol button for about 5 seconds to adjust the sound for each frequency band 150Hz 300Hz 600Hz 1 2KHz 2 5KHz 5KHz and 10KHz are selectable Left Right and each can be adjusted to a setting between 6 to...

Page 25: ...be distorted Surround VOL BASS SOUND MODE SMART MODE Source Press to select a source connected to the Soundbar BTPAIRINGmode To turn on BTPAIRING mode in BT mode press and hold the Source button for m...

Page 26: ...ically turn on when you turn on your TV Press and hold the Left button for 5 seconds to toggle Auto Power Link ON and OFF Anynet Auto Power Link are set to ON by default Surround VOL BASS SOUND MODE S...

Page 27: ...and hold the Surround button for 5 seconds OFF TVREMOTE appears in the Soundbar s display and the function turns off To adjust the volume using only the Samsung TV remote control press and hold the S...

Page 28: ...tput ExceptWirelessRear SpeakerKit IncludeWirelessRear SpeakerKit Surround Surround VOL WOOFER SOUND MODE Bluetooth POWER ON 2 0 ch 2 0 ch 4 0 ch 5 1 ch 3 0 ch 5 0 ch SOUNDMODE Surround VOL WOOFER SOU...

Page 29: ...nto wall studs Purchase wall mounting screws according to the type and thickness of the wall you want to mount the Soundbar on Diameter M5 Length 35 mm or longer recommended Connect cables from the un...

Page 30: ...n the wall at each marking If the markings do not correspond to the positions of studs make sure you insert appropriate anchors or mollies into the holes before you insert the support screws If you us...

Page 31: ...Wall Mounts down so that Bracket Wall Mounts rest securely on the Holder Screws AssemblingtheHolder Cable As shown in the image use the supplied Screw to fix the Holder Cable to the Soundbar and then...

Page 32: ...Soundbar on the legs of the stand WIRELESS AUX IN DIGITAL AUDIO IN OPTICAL POWER IN POWER OUT For TV HDMI IN HDMI OUT TV ARC Wi Fi SETUP SPK ADD PlaceSoundbar 09 SOFTWARE UPDATE When the Soundbar is...

Page 33: ...toofar Move the remote control closer to the Soundbar main unit CannotconnecttotheTV Ifconnectedviaawirednetwork Check if the cable is connected correctly Check the port name to make sure that the cab...

Page 34: ...For DTS patents see http patents dts com Manufactured under licence from DTS Licencing Limited DTS the Symbol DTS and the Symbol together are registered trademarks and DTS 2 0 Channel is a trademark...

Page 35: ...yRange 10 75 HDMI Video 1080p 1080i 720p 576p 480p 2160p 24 25 30Hz 4 4 4 2160p 60 50Hz 4 2 0 Speaker Woofer x 6 Tweeter x 3 4ohm Supportedplayformats DTS 2 0 sound is played in DTS format LPCM 2ch Do...

Page 36: ...0800 726 786 www samsung com nz support VIETNAM 1800 588 889 www samsung com vn support THAILAND 0 2689 3232 1800 29 3232 www samsung com th support MYANMAR 95 1 2399 888 MALAYSIA 1800 88 9999 603 77...

Reviews: