background image

Summary of Contents for 1404262L

Page 1: ...the possibilities Thank you for purchasing this Sanqsung product ...

Page 2: ...Adjusting the angle of the plate supports 16 Adjusting the height of the upper rack 16 Loading the lower rack 17 Loading the upper rack 18 Using the 3rd cutlery rack on some models 19 Using the cutlery basket 20 Using detergent 21 Using rinse aid 22 Cleaning the exterior 22 Cleaning the interior 22 Cleaning the nozzles 23 Cleaning the filters 23 Storing your dishwasher 24 Cycle chart 25 Check thes...

Page 3: ...What the icons and signs in this user manual mean H_ards or unsafe practices that may result in severe personal injury or death Z_ 1o reduce the risk of fire explosion electric shock or personal injury when using WARNING your washer follow these basic safety precautions _ H_ards or unsafe practices that may result in minor personal injury or property CAUTION damage Do NO attempt _ Do NOT disassemb...

Page 4: ... gas is flammable do not smoke or use an open flame during this time t2 Remove the door to the washing compartment when removing an old dishwasher from service or discarding it _ WARNING wA _ This product contains chemicals known to the State of California to cause cancer and reproductive toxicity o CAUTION O After unpacking the dishwasher keep the packaging out of the reach of children The dishwa...

Page 5: ...elf Disassembly repairs and modifications are permitted by authorized service technicians only Work done by an unauthorized person may void your warranty Before disposing of your dishwasher remove the door of the washing compartment or the door latch so that children or small animals cannot get trapped inside If the dishwasher is left unused for an extended period of time turn off the water supply...

Page 6: ...the installation If you are going to install it yourself make sure to read through the installation guide and follow the directions inside After unpacking your dishwasher keep the packaging out of the reach of children to ensure their safety CHECKING PARTS When your dishwasher has been unpacked make sure you ve received all the parts shown below If your dishwasher was damaged during shipping or if...

Page 7: ...to a grounded metal permanent wiring system or an equipment grounding conductor must be run with the circuit conductors and then connected to the equipment grounding terminal or lead on the appliance Water supply The hot water supply line pressure must be between 20 120 psi 140 830 kPa Adjust the water heater to deliver water between 120 F 49 C 149 F 65 C _ ost plumbing supply stores sell water su...

Page 8: ... and Lower zone lights turn on by default If you want to change the cycle once it has started press the Reset button and turn off the dishwasher Then turn on the dishwasher again and select a new cycle The default is Normal cycle When turning on the dishwasher after it has been reset the last run cycle is selected by default Select this option to clean the dishwasher TUB Run with the dishwasher em...

Page 9: ...ct the Zone Booster option This option consumes slightly more water and energy Select Zone Booster L option Applies intensive washing power to the left part of the lower rack Select Zone Booster R option Applies intensive washing power to the right part of the lower rack Select both Zone Booster L R options Applies intensive washing power to the whole lower rack _ Selecting Zone Booster does not t...

Page 10: ...ons or start the dishwasher when Child Lock is on IIIIIIIIIIIIIIIIIIIIIIIIIIIIIIIIIIIIIIIIIIIIIIIIIIIIIIIIIIIIIIIIIIIIIIIIIIIIIIIIIIIIIIIIIIIIIIIIIIIIIIIIIIIIIIIIII_ Displays cycle time and remaining hours and minutes Delay Start hours and Error messages If an error occurs during an operation an error message is displayed with a warning sound Refer to the information codes page i_ Child Lock indic...

Page 11: ...t a cycle press the Start button before closing the door Reset To cancel a currently running cycle and drain the dishwasher press and hold the Start button for three 3 seconds Once the dishwasher is reset select a cycle and option and then press Start to restart the dishwasher You can select options Self Clean Upper Lower Speed Booster Sanitize Dry Delay Start before starting a cycle If you change...

Page 12: ...ii_ _ _ii_i i ii i _ _i _i_i_i_i _ i_i_iiiii_i_ _i_i i i i_ i_ i_i i_i _i iiii iiiii_i _ i_i_i_i_ii i_i_i _i i i i i i i i i i i i i i iiiiiiiilili i i_iiii_il I I I When the dishwasher is in a wash portion of a cycle the first arrow light is illuminated and the remaining time is displayed When the dishwasher is in a rinse portion of a cycle the second arrow light is illuminated and the remaining ...

Page 13: ...r information about selecting a cycle according to the soil level of the dishes see Cycle selector 5 Press the Start button and then close the door Push the racks back so that they are in place and then press the Start button and close the door Make sure to close the door firmly If the door is slightly ajar the selected cycle will not start automatically The dishwasher will start draining after a ...

Page 14: ...ng menu and press the Delay Start button to change a setting Sound Setting Press the Sanitize button until S on or SoFF is displayed To change the setting press the Delay Start button SoFF means that the sound is off for all cycles The dishwasher maintains the Sound Setting you have selected until you change it Pocket LED Brightness Setting Press the Sanitize button until B0 BS is displayed The hi...

Page 15: ...o adjust the tines grasp the handle at the back of the rack and then push it left or right See the illustration below In the lower rack you can easily fold down the fold down tines to make room for large items such as pots and pans Remove the rack from the dishwasher and then fold down the tines one at a time See the illustration below Upper rack Lower rack English o 15 ...

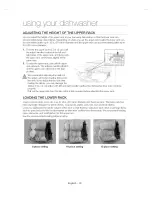
Page 16: ...ght of _ the upper rack before loading dishes into the rack If you adjust the the rack after loading the dishes you may damage the dishes If you do not adjust with left and right handle together the dishwasher door may not close properly Pull out the upper rack from the tub until it is fully revealed before adjusting the upper rack LOADING THE LOWER RACK Load cookware pots pans etc up to 14 in 36 ...

Page 17: ...bottom of the upper rack Check this by rotating the nozzle by hand When loading dishes pull the upper rack out sufficiently so you can load it without striking the counter above iiiii ii i H il 8 place setting t0 place setting t2 place setting Using the glass support You can load cups or glasses onto the glass support This is also very convenient for washing wine glasses Hang your wine glasses ont...

Page 18: ...k The entire cutlery rack can be removed if more space is needed on the upper rack for larger items Loading the cutlery pad Place items randomly or regularly Some models come with a removable foldable cutlery pad along with a cutlery rack To use place the pad on the cutlery rack and then place cutlery and serving and cooking utensils on the pad in a random or regular fashion After a wash cycle is ...

Page 19: ...ately into the cutlery stands in the basket s covers to prevent chipping and discoloration DO NOT let any item extend through the bottom _ Small forks _ Spoons _ Knives _ Large spoons and forks _ Medium sized forks _ Remaining items Salad fork Tea spoon Dinner fork Dinner spoon 8 place setting t0 place setting t2 place setting The cutlery stands as seen from above with the suggested placement of c...

Page 20: ... have swallowed dishwasher detergent or inhaled the fumes seek medical attention immediately Keep dishwasher detergent out of the reach of children WARNINe Filling the detergent dispenser t Open the detergent dispenser flap by pushing the detergent dispenser release catch The flap is always open at the end of a dishwashing cycle 2 Add the recommended amount of detergent to the main wash detergent ...

Page 21: ...formance of the dishwashen Do not add regular detergent to the rinse aid reservoir CAUTION 1 Remove the rinse aid reservoir cap by rotating it counterclockwise 2 Fill the rinse aid reservoir with rinse aid _Use the viewing when filling the rinse aid reservoir port _k Do not fill the reservoir above the full level indicator Excess rinse aid can overflow during the wash cycle 3 Turn the rinse aid in...

Page 22: ...g the detergent dispenser with dish detergent and then running the dishwasher empty periodically using the Self Clean option This will keep your dishwasher clean If white spots and odor are still present in your dishwasher run the Self Clean option with the dishwasher empty and without detergent until it flushes Then interrupt the cycle and put an 8 ounce cup of white vinegar into the lower basket...

Page 23: ...e filter door and then the flat micro filter underneath 4 Remove any dirt or other remains from the micro filter and the filter door and then rinse them under running water Filter with handle Flat micro filter 5 Re install the flat micro filter and then the filter door 6 Rotate the filter door handle clockwise to lock the filter door _ Once month clean the filter for better washing performance a I...

Page 24: ...69 Express 60 149 F 65 C 14 6 162 F 72 C o The numbers in parentheses in the Last Rinse column represent the temperature when you select Sanitize When you select the Auto or Normal cycle you can eliminate optional steps depending on the soil level of the dishes o The water consumption and wash time varies depending on the steps or options you add and on the pressure and temperature of the supplied...

Page 25: ...hes as directed in this manual Connect the water supply line to a hot water supply For best performance the temperature of the supplied water should be 120 F 49 C The water pressure should be between 20 and 120 psi 140 830 kPa Use a commercial dishwasher cleaner Use high quality fresh detergent with rinse aid Use automatic dishwasher detergent We recommend a powder or gel type dishwasher detergent...

Page 26: ...the lower rack first and then the upper rack This will revent water dripping from the upper rack onto the dishes in the lower rack Insert detergent without loading dishes and run the Normal cycle to clean the dishwasher The Drain Hose is obstructed Contact a qualified service technician to Has a bad odor remove any obstruction from the drain hose The dishwasher is not used daily With the dishwashe...

Page 27: ...ice technician to pump ou t o4 the remove any obstruction from the drain hose dishwasher and check the drain pump operation Has a bent upper The dishes are not loaded Load your dishes as recommended rack after Joading properly See page 16 dishes English o 27 ...

Page 28: ...terference close the water supply valve and contact an authorized Samsung service center Check whether the water supply valve is closed the water supply is suspended or the water inlet valve or line is frozen or clogged by foreign Water supply error 4E5 5E Drain error OE Over level water error LE Leakage Button error bE2 3E AE Communication Error bE3 AE6 particles If the problem continues close th...

Page 29: ...ls and small children cannot get trapped inside the appliance De not exceed the detergent quantities recommended in the detergent manufacturers instructions SPECI FICATIONS Type Built in Dishwasher Wash capacity 15 place setting Power 120 V 60 Hz AC only pressure 140 830 kPa 15 A circuit breaker Used water 20 120 psi Wash Motor 60 100 W Rated power uasge Heater 1100 W Dimensions 237 8 x 25 x 337 8...

Page 30: ... transportation of the product to and from an authorized service center SAMSUNG will repair replace or refund this product at our option and at no charge as stipulated herein with new or reconditioned parts or products if found to be defective during the limited warranty period specified above All replaced parts and products become the property of SAMSUNG and must be returned to SAMSUNG Replacemen...

Page 31: ...OUT LIMITING THE FOREGOING PURCHASER ASSUMES ALL RISK AND LIABILITY FOR LOSS DAMAGE OR INJURY TO PURCHASER AND PURCHASER S PROPERTY AND TO OTHERS AND THEIR PROPERTY ARISING OUT OF THE USE MISUSE OR INABILITY TO USE THIS PRODUCT THIS LIMITED WARRANTY SHALL NOT EXTEND TO ANYONE OTHER THAN THE ORIGINAL PURCHASER OF THIS PRODUCT IS NONTRANSFERABLE AND STATES YOUR EXCLUSIVE REMEDY Some states do not al...

Page 32: ...BWG 573 600 OverallDepth OverallDepth Control Panel Location Size 666 f _ 30 Door Thickness 670 11 Control Panel Location Size 745 _o 55 Door Thickness 670 DW FG720L DW FG720S DW FG720W DW FG520S DW FG520L DW FG520W DW BG970B DW BG580B DW BG770B 600 Overall Depth Control Panel Location Size 745 Overall D Control Panel Location Size 666 67O j 30 Door Thickness ...

Page 33: ...G971T DWSOH997OU DWSOH995OUS 580 650 Overall Depth Overall Depth 407 J Control Panel Location Size 748 _50 jv 480 Door Thickness 685 DW FN32OT DW FN31OT DW FN32OW DW FN31OW DW6OH6OSOF DW8OH993OU DW6OH6OSOFW DW6OHSO5OFS DW6OH5OSOFW DW6OH301OFW 600 650 Overall Depth Control Panel Location Size 745 _20 50 685 48O Door ThicknessJ Door Thickness ...

Page 34: ...our he pfu How to Videos and Live Shows _Requires reader to be installed on your smartphone Questions or Comments U S A 1 800 SAMSUNG 726 7864 www samsung com us support CANADA 1 800 SAMSUNG 726 7864 www samsung com caYsupport English www samsung com ca fr support French DD81 00149A ...

Reviews: