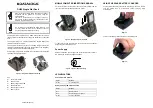
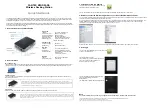
background image

X-DS

301

-K

Docking speaker with alarm clock

Radio-réveil avec dock intégré

Lautsprecher-Dockingstation mit Weckfunktion

Altoparlante per docking con sveglia

Docking luidspreker met wekkerfunctie

Radio Despertador con Docking

Sistema para iPod com despertador

Operating Instructions

Mode d’emploi

Bedienungsanleitung

Istruzioni per l’uso

Handleiding

Manual de instrucciones

Manual de instruções

Summary of Contents for X-DS301-K

Page 1: ...tation mit Weckfunktion Altoparlante per docking con sveglia Docking luidspreker met wekkerfunctie Radio Despertador con Docking Sistema para iPod com despertador Operating Instructions Mode d emploi Bedienungsanleitung Istruzioni per l uso Handleiding Manual de instrucciones Manual de instruções ...

Page 2: ... as newspapers table cloths curtains or by operating the equipment on thick carpet or a bed D3 4 2 1 7b _A1_En WARNING Store small parts out of the reach of children and infants If accidentally swallowed contact a doctor immediately Operating Environment Operating environment temperature and humidity 5 C to 35 C 41 F to 95 F less than 85 RH cooling vents not blocked Do not install this unit in a p...

Page 3: ...correct method of disposal K058a_A1_En Symbol for equipment Symbol examples for batteries When disposing of used batteries please comply with governmental regulations or environmental public instruction s rules that apply in your country area D3 4 2 3 1_B1_En CAUTION Danger of explosion if battery is incorrectly replaced Replace only with the same or equivalent type recommended by the manufacturer...

Page 4: ... may be generated which could lead to fire Furthermore contact with the connected prongs of the adapter may result in electrocution Do not insert the power cord of AC adapter into a power outlet where the connection remains loose despite inserting the prongs all the way into the outlet Heat may be generated which could lead to fire Consult with the retailer or an electrician regarding replacement ...

Page 5: ...g iPod iPhone Listening to FM Radio 13 Using Auxiliary Input 14 Using Alarm 15 Setting The Alarm Switching Alarm Mode When Alarm Sounds Setting The Clock Additional Information 16 Troubleshooting Specifications There will not be additional notification in this booklet if there is or will be any design change to the product itself Thank you for the purchase of Pioneer product please read Operating ...

Page 6: ...hown in illustration a before 1st time use To replace battery open the battery drawer in the direction as shown in illustration b 3 Clock Battery Check Up Remove the insulation insert before 1st time use 4 Switching type power adapter Slide the power plug along the guide rails of the AC adapter as shown in the figure below until there is an audible click a b Insulation Insert Screw Battery Model n...

Page 7: ...adapter DC jack into the DC in port of the unit Plug the adapter head in power outlet When connected the system will go into Standby Mode and display will show the clock time Use only the power adapter included in this package do not use power adapter of different specification DC AUX IN Before Start ...

Page 8: ... mode from BUZZ default A iPod A FM A Alarm off 6 Previous 7 ENTER to enter or confirm the actions on iPod iPhone 8 Next 9 Volume 10 Play Pause 11 Up to scroll up the list in iPod iPhone 12 Volume 13 FUNC to switch between sources FM A AUX A iPod 14 Down to scroll down the list in iPod iPhone 15 Snooze Remote Control 1 2 3 4 5 6 7 8 9 10 11 12 14 13 15 ...

Page 9: ...5 6 7 8 1 1 FUNC to select sources of music input repeat FUNC button to cycle through different sources 2 Standby On 3 Volume 4 Volume 5 DC in to connect power adapter 6 AUX in Auxiliary input for any device that has 3 5 mm jack 7 iPod iPhone Dock 8 FM antenna X DS301 Unit ...

Page 10: ...is tuned in it lights up when 88 00 MHz is tuned in The clock time is displayed under normal conditions It returns to the clock display after the following operations are completed The volume 00 30 is displayed during volume key operation The FM receiver frequency or preset number P01 P20 is displayed while tuning of the radio station Setting time is displayed during the alarm or the clock setup H...

Page 11: ...uld be removed from any kind of protective frame or cover 4 To remove or replace the dock adapter use a finger or a tool to pry the click on the dock cover Adapter identification chart Adapter Symbol iPod classic 80 GB C 160 GB 2007 D 160 GB 2009 C nano 2nd generation A 3rd generation B 4th generation A 5th generation B touch 1st generation E 2nd generation 3rd generation 4th generation iPhone 4 G...

Page 12: ...ect in iPod iPhone menu 3 Press on the remote control to enter or confirm actions NOTE When operating directly on iPod iPhone do hold the iPod iPhone with the other hand to prevent loose connection iPod iPhone will start charging when docked It will also charge under Standby mode iPod iPhone will not play automatically when docked if the source is not selected as iPod This system has been develope...

Page 13: ...nd stop at the stations Repeat same steps to automatically find more available stations Manual Tune Press previous and next on the remote control to tune the radio manually 3 Storing Stations You can store up to 20 pre set stations To store stations 1 Press FUNC to switch to FM source 2 Select radio stations 3 Press Memory to enter preset station memory mode 4 Press up and down to selected preset ...

Page 14: ... source is selected the display will show AUX on the screen NOTE When playing music through AUX source the music volume will vary depending on the volume of the music player If there is distortion when the volume is set at max lower the music player s volume and to avoid distortion Using Auxiliary Input 3 5 mm Auxiliary audio cable not included Music player ...

Page 15: ...m sounds BUZZ default sound A iPod A FM A Alarm off sound System When the system is in STANDBY mode press and hold Power to switch between different alarm sounds BUZZ default sound A iPod A FM A Alarm off sound When Alarm Sounds 1 Press SNOOZE on the remote the alarm will stop and re sound every 10 minutes 2 Press POWER to turn off the alarm Setting The Clock Set the clock time under STANDBY mode ...

Page 16: ...re it s correctly docked Check sources to make sure your audio input is switched to correct source The power does not turn on Use the AC adapter and connect the device to the power plug on the wall Can t operate the remote control Replace the batteries The clock is not set to the correct time Replace the batteries Reset the clock Specifications Amplifier section 506 SRZHU RXWSXW N 7 Tuner section ...

Page 17: ... specifically to iPod or iPhone respectively and has been certified by the developer to meet Apple performance standards Apple is not responsible for the operation of this device or its compliance with safety and regulatory standards Please note that the use of this accessory with iPod or iPhone may affect wireless performance This equipment is compatible with the audio of the iPod classic iPod na...

Page 18: ... pas l appareil posé sur un tapis épais ou un lit D3 4 2 1 7b _A1_Fr AVERTISSEMENT Gardez les pièces de petite taille hors de la portée des bébés et des enfants En cas d ingestion accidentelle veuillez contacter immédiatement un médecin Milieu de fonctionnement Température et humidité du milieu de fonctionnement De 5 C à 35 C de 41 F à 95 F Humidité relative inférieure à 85 orifices de ventilation...

Page 19: ...ur connaître les méthodes d élimination appropriées K058a_A1_Fr Marquage pour les équipements Exemples de marquage pour les batteries Lorsque vous éliminez des piles batteries usées veuillez vous conformer aux normes gouvernementales ou aux règles des institutions publiques environnementales en vigueur dans votre pays ou région D3 4 2 3 1_B1_Fr ATTENTION Danger d explosion si la pile n est pas cor...

Page 20: ...eur au niveau de la prise avec un risque d incendie En outre lorsque l adaptateur secteur est branché à la prise d alimentation tout contact avec les broches constitue un risque d électrocution Ne branchez pas l adaptateur secteur à une prise dans laquelle les broches ne seraient pas correctement maintenues bien qu elles soient insérées à fond dans la prise Il pourrait se produire un dégagement de...

Page 21: ...d un iPod iPhone 11 Connexion d un iPod iPhone Écoute de la radio FM 13 Utilisation de l entrée auxiliaire 14 Utilisation de l alarme 15 Réglage de l alarme Changement de mode d alarme Lorsque l alarme sonne Réglage de l horloge Informations supplémentaires 16 Dépannage Spécifications Les caractéristiques du produit peuvent être modifiées à tout moment sans notification Merci pour l achat de ce pr...

Page 22: ...ière utilisation Pour remplacer la pile ouvrez le tiroir de pile en tirant dans la direction indiquée sur l illustration b 3 Vérification de la pile de l horloge Retirez le film isolant avant la première utilisation 4 Adaptateur secteur Poussez la partie connecteur correspondant à votre région dans les glissières de guidage de l adaptateur secteur comme indiqué sur la figure ci dessous jusqu à ce ...

Page 23: ... dans la prise DC in de l appareil puis branchez la fiche de l adaptateur secteur à une prise murale Une fois raccordé le système se met en mode veille et l horloge s affiche Utilisez uniquement l adaptateur secteur fourni avec l appareil n utilisez pas un adaptateur secteur de spécifications différentes DC AUX IN Avant la première utilisation ...

Page 24: ...lage par défaut A iPod A FM A Alarm off alarme désactivée 6 Précédent 7 ENTER Entrée Pour entrer ou confirmer les actions sur l iPod iPhone 8 Suivant 9 Volume 10 Lecture Pause 11 Haut Pour naviguer vers le haut dans une liste sur l iPod iPhone 12 Volume 13 FUNC Pour parcourir les sources FMAAUXAiPod 14 Bas Pour naviguer vers le bas dans une liste sur l iPod iPhone 15 Snooze répétition de l alarme ...

Page 25: ...ource audio appuyez à plusieurs reprises sur la touche FUNC jusqu à ce que la source désirée s affiche 2 Standby On Veille Marche 3 Volume 4 Volume 5 DC in Pour raccorder l adaptateur secteur 6 AUX in Prise d entrée auxiliaire de 3 5 mm 7 Station d accueil pour iPod iPhone 8 Antenne FM Unité principale X DS301 ...

Page 26: ... heure Lorsque l opération suivante est terminée l appareil revient à l affichage de l heure Lorsque la touche VOL est utilisée l affichage indique le niveau de volume 00 30 Lorsque la source FM est sélectionnée la fréquence et le numéro de préréglage P01 P20 s affichent selon l opération Lorsque l alarme ou l heure sont en cours de réglage la valeur en cours de réglage s affiche Utilisation de l ...

Page 27: ...t boîtier ou couvercle de protection doit être retiré de l iPod iPhone 4 Pour retirer ou remplacer l adaptateur de station d accueil utilisez un doigt ou un outil pour faire levier sur le couvercle de la station d accueil Tableau d identification des adaptateurs Symbole de l adaptateur iPod classic 80 Go C 160 Go 2007 D 160 Go 2009 C nano 2e génération A 3e génération B 4e génération A 5e générati...

Page 28: ...dans le menu iPod iPhone 3 Appuyez sur la touche de la télécommande pour entrer ou confirmer une action REMARQUE Lorsque vous effectuez des opérations directement sur l iPod iPhone tenez l iPod iPhone avec l autre main afin d éviter une éventuelle déconnexion L iPod iPhone se recharge dès qu il est connecté à la station d accueil Il se recharge même en mode veille Si la source iPod n est pas sélec...

Page 29: ...res stations disponibles Recherche manuelle Appuyez sur la touche précédent ou suivant de la télécommande pour rechercher une station de radio manuellement 3 Mémorisation des stations Vous pouvez mémoriser jusqu à 20 stations Pour mémoriser une station 1 Appuyez sur la touche FUNC pour sélectionner la source FM 2 Sélection d une station de radio 3 Appuyez sur la touche MEMORY pour accéder au mode ...

Page 30: ...indication AUX apparaît à l affichage REMARQUE Lors de la lecture de musique via l entrée AUX le volume sonore varie en fonction du réglage du volume sur le lecteur connecté Dans le cas où un phénomène de distorsion du son se produit lorsque le volume est réglé au maximum sur l appareil abaissez le volume sur le lecteur afin d éviter ce problème Utilisation de l entrée auxiliaire Câble audio auxil...

Page 31: ...areil Lorsque l appareil est en mode STANDBY veille appuyez sans relâcher sur la touche Power Marche pour parcourir les différentes tonalités d alarme BUZZ réglage par défaut A iPod A FM A Alarm off alarme désactivée sonore Lorsque l alarme sonne 1 Appuyez sur la touche SNOOZE de la télécommande pour arrêter momentanément l alarme sonore L alarme se déclenchera de nouveau toutes les 10 minutes 2 A...

Page 32: ...UX in Vérifiez que l iPod iPhone est correctement placé sur la station d accueil Vérifiez que l entrée audio sélectionnée sur l appareil correspond à la source souhaitée Impossible de mettre l appareil sous tension Utilisez l adaptateur secteur et connectez l appareil à la prise d alimentation Impossible de faire fonctionner la télécommande Remplacez les piles L horloge n est pas à l heure Remplac...

Page 33: ...r respectivement avec un iPod ou un iPhone et sont certifiés conformes aux exigences d Apple par le fabricant Apple n est pas responsable pour le fonctionnement de cet appareil ou de sa compatibilité avec les normes réglementaires et de sécurité Veuillez noter que l emploi de cet accessoire avec un iPod ou un iPhone peut affecter les performances sans fil Cet appareil est compatible avec les signa...

Page 34: ...sigen Betrieb zu gewährleisten Um Brandgefahr auszuschließen dürfen diese Öffnungen auf keinen Fall blockiert oder mit Gegenständen z B Zeitungen Tischdecken und Gardinen abgedeckt werden und das Gerät darf beim Betrieb nicht auf einem dicken Teppich oder Bett aufgestellt sein D3 4 2 1 7b _A1_De WARNUNG Lagern Sie kleine Teile außerhalb der Reichweite von Kindern oder Kleinkindern Suchen Sie wenn ...

Page 35: ...terien nicht über den Haushaltsmüll entsorgt werden dürfen Zur richtigen Handhabung Rückgewinnung und Wiederverwertung von Altprodukten und gebrauchten Batterien bringen Sie diese bitte zu den gemäß der nationalen Gesetzgebung dafür zuständigen Sammelstellen Mit der korrekten Entsorgung dieser Produkte und Batterien helfen Sie dabei wertvolle Ressourcen zu schonen und vermeiden mögliche negative A...

Page 36: ...r Verbindung kommen was einen Brand auslösen könnte Ferner besteht die Gefahr eines tödlichen elektrischen Schlags wenn die betreffenden Stifte berührt werden Stecken Sie das Netzkabel des Netzadapters auf keinen Fall in eine Netzsteckdose in der der Anschluss lose bleibt obwohl die Stifte vollständig eingeführt worden sind Es kann zu Hitzeentwicklungen kommen die zu einem Brand führen können Wend...

Page 37: ...on FM Radio 13 Verwendung des Hilfs Eingangs 14 Verwendung des Alarms 15 Einstellen des Alarms Alarm Modus umschalten Wenn Alarm ertönt Einstellen der Uhr Weitere Informationen 16 Fehlerbehebung Technische Daten In dieser Broschüre gibt es keine Hinweise darüber ob es irgendwelche Design Änderungen für das Produkt selbst gibt oder geben wird Wir danken Ihnen für den Kauf des Pioneer Produkts Bitte...

Page 38: ...tration a dargestellt ist Öffnen Sie um die Batterie auszutauschen das Batteriefach in der Richtung wie es in der Illustration b dargestellt ist 3 Überprüfung der Batterie für die Uhr Entfernen Sie vor dem ersten Gebrauch die Isolier Einlage 4 Umschalt Stromadapter Schieben Sie den Stromstecker die Führungsschienen des Wechselstrom Adapters entlang wie es in der Abbildung unten dargestellt ist bis...

Page 39: ...tecker in den DC in Anschluss der Einheit Stecken Sie den Adapterkopf in die Strom Steckdose Wenn die Einheit angeschlossen ist geht das System in den Standby Modus über und das Display zeigt die Uhrzeit an Verwenden Sie nur den in der Verpackung befindlichen Stromadapter und keine Stromadapter mit anderen Parametern DC AUX IN Vor dem Start ...

Page 40: ...Standard A iPod A FM A Alarm aus 6 Vorherig 7 ENTER zur Eingabe oder Bestätigung der Aktionen auf dem iPod iPhone 8 Nächstes 9 Lautstärke 10 Abspielen Anhalten 11 Up zum Hochscrollen der Liste auf dem iPod iPhone 12 Lautstärke 13 FUNC zum Umschalten zwischen den Signalquellen FM A AUX A iPod 14 Down zum Abwärtsscrollen der Liste auf dem iPod iPhone 15 Schlummern Fernbedienung 1 2 3 4 5 6 7 8 9 10 ...

Page 41: ...für den Musik Eingang die FUNC Taste mehrmals drücken um im Kreislauf zu den verschiedenen Signalquellen zu gelangen 2 Standby Ein 3 Lautstärke 4 Lautstärke 5 DC in zum Anschluss des Strom Adapters 6 AUX in Hilfseingang für ein Gerät das einen 3 5 mm Stecker hat 7 iPod iPhone Andockstation 8 FM Antenne X DS301 Einheit ...

Page 42: ...wird die Zeit angezeigt Wenn die folgende Operation abgeschlossen ist wird wieder die Zeit angezeigt Wenn die VOL Taste verwendet wird wird die Lautstärke 00 30 angezeigt Bei einer FM Signalquelle werden je nach der Operation die Frequenz und die Voreinstellungsnummer P01 P20 angezeigt Wenn der Alarm oder die Zeit eingestellt wird wird die eingestellte Zeit angezeigt Verwendungsweise der FM Antenn...

Page 43: ...en Sie das iPod iPhone vorsichtig ein iPod iPhone sollten von jeder Art von Schutzblende oder Schutzabdeckung entfernt werden 4 Nehmen Sie einen Finger oder verwenden Sie ein Werkzeug um den Klick an der Andock Abdeckung zu lösen Adapter Identifikationskarte Adapter Symbol iPod classic 80 GB C 160 GB 2007 D 160 GB 2009 C nano 2 Generation A 3 Generation B 4 Generation A 5 Generation B touch 1 Gene...

Page 44: ...g um im iPod iPhone Menü auszuwählen 3 Drücken Sie auf der Fernbedienung um Aktionen einzugeben oder zu bestätigen HINWEIS Halten Sie bei der Bedienung direkt vom iPod iPhone das iPod iPhone mit der anderen Hand fest um einem losen Anschluss vorzubeugen iPod iPhone beginnen nach dem Andocken mit dem Aufladen Das Aufladen erfolgt auch im Standby Modus iPod iPhone beginnen nach dem Andocken nicht au...

Page 45: ...n Sie die gleichen Schritte um automatisch mehr verfügbare Sender zu finden Manuelle Einstellung Drücken Sie auf der Fernbedienung Vorherig und Nächstes um das Radio manuell einzustellen 3 Sender speichern Sie können bis zu 20 voreingestellte Sender speichern Speicherung von Sendern 1 Drücken Sie FUNC um die FM Signalquelle umzuschalten 2 Radiosender auswählen 3 Drücken Sie Memory um den Speicherm...

Page 46: ...ignalquelle zeigt das Display AUX auf dem Bildschirm an HINWEIS Bei der Wiedergabe von Musik durch eine AUX Signalquelle variiert die Lautstärke der Musik je nach der Lautstärke auf dem Musik Player Wenn es aufgrund der Einstellung der Lautstärke auf max zu Verzerrungen kommt ist die Lautstärke des Musik Players zu vermindern um Verzerrungen zu vermeiden Verwendung des Hilfs Eingangs 3 5 mm Audiok...

Page 47: ...m Drücken sie wenn sich das System im Standby Modus befindet Power und halten Sie die Taste gedrückt um zwischen verschiedenen Alarmlängen umzuschalten BUZZ Summer Standard A iPod A FM A Alarm aus Wenn Alarm ertönt 1 Drücken Sie SNOOZE auf der Fernbedienung Daraufhin geht der Alarm aus und ertönt dann alle 10 Minuten wieder 2 Drücken Sie POWER um den Alarm auszuschalten Einstellen der Uhr Stellen ...

Page 48: ...hone Anschluss um sicher zu sein dass korrekt angedockt worden ist Überprüfen Sie die Quellen um sicher zu sein dass der Audio Eingang auf die richtige Quelle umgeschaltet worden ist Das Gerät lässt sich nicht einschalten Verwenden Sie den Netzadapter und schließen Sie das Gerät an die Netzsteckdose an der Wand an Die Fernbedienung funktioniert nicht Tauschen Sie die Batterien aus Die Uhr ist nich...

Page 49: ...ert wurde und entsprechend vom Entwickler als die Leistungsstandards von Apple erfüllend zertifiziert wurde Apple übernimmt keine Verantwortung für die richtige Funktion dieses Geräts oder seine Erfüllung von Sicherheits oder anderen Vorschriften Bitte beachten Sie dass der Gebrauch dieses Zubehörteils in Verbindung mit einem iPod oder iPhone die drahtlose Leistung beeinträchtigen kann Diese Einhe...

Page 50: ...e possibili pericoli di incendi le aperture non devono mai venire bloccate o coperte con oggetti vari quali giornali tovaglie tende o tendaggi ecc e l apparecchio non deve essere utilizzato appoggiandolo su tappeti spessi o sul letto D3 4 2 1 7b _A1_It ATTENZIONE Conservare le pile lontano dalla portata dei bambini e dei bebè Se viene inghiottito accidentalmente recarsi immediatamente da un medico...

Page 51: ...menti allegati significano che vecchi prodotti elettrici ed elettronici e batterie esauste non devono essere mischiati ai rifiuti urbani indifferenziati Per l appropriato trattamento recupero e riciclaggio di vecchi prodotti e batterie esauste fate riferimento ai punti di raccolta autorizzati in conformità alla vostra legislazione nazionale Con il corretto smaltimento di questi prodotti e delle ba...

Page 52: ...l calore che potrebbe provocare un incendio Inoltre un contatto diretto con i denti dell adattatore se collegati potrebbe provocare folgorazione Non inserire l adattatore AC in una presa di corrente se la connessione rimane allentata e non fosse possibile inserire completamente i denti nella presa Si potrebbe generare calore con il conseguente rischio di incendi Consultare il proprio rivenditore o...

Page 53: ...Pod iPhone Ascoltare la radio FM 13 Usare l ingresso ausiliario 14 Usare la sveglia 15 Impostare la sveglia Commutare in modalità sveglia Quando suona l allarme Impostazione dell orologio Informazioni supplementari 16 Risoluzione dei problemi Specifiche Questa guida non contiene notifiche aggiuntive se ve ne fossero né le modifiche del prodotto stesso Grazie per aver acquistato un prodotto Pinonee...

Page 54: ...a di usarlo per la prima volta Per sostituire la pila aprire il cassetto della pila nella direzione mostrata nell immagine b 3 Controllo delle pile dell orologio Rimuovere l inserto isolante prima di usarlo per la prima volta 4 Commutare sul tipo di adattatore di corrente Fate scivolare la spina di corrente lungo i binari della guida dell adattatore AC come mostrato nella figura qui sotto fino a q...

Page 55: ...k dell adattatore di corrente continua nella presa DC in dell unità inserire la testa dell adattatore nella presa Una volta connesso il sistema si attiverà in modalità standby e lo schermo mostrerà l orario Usare solo l adattatore di corrente fornito con questa confezione e non di tipo diverso DC AUX IN Prima di iniziare ...

Page 56: ... da BUZZ default A iPod A FM A Alarm off 6 Previous 7 ENTER per immettere o confermare le azioni su iPod iPhone 8 Next 9 Volume 10 Play Pause 11 Su per scorrere verso l alto la lista di iPod iPhone 12 Volume 13 FUNC per commutare tra le sorgenti FM A AUX A iPod 14 Giù per scorrere verso il basso la lista di iPod iPhone 15 Snooze Telecomando 1 2 3 4 5 6 7 8 9 10 11 12 14 13 15 ...

Page 57: ...nti di ingresso musicale premere di nuovo il tasto FUNC per cambiare ciclo tra diverse sorgenti 2 Standby On 3 Volume 4 Volume 5 DC in per connettere l adattatore di corrente 6 AUX in Ingresso ausiliario per qualsiasi apparecchio abbia una spina jack di 3 5 mm 7 Aggancio iPod iPhone 8 Antenna FM Unità X DS301 ...

Page 58: ...i 0 05 MHz Generalmente permette di visualizzare l orario Quando sono state completate le seguenti operazioni si visualizzerà di nuovo l orario Se si usa il tasto VOL si visualizzerà il volume 00 30 Se la sorgente è FM la frequenza e il numero preimpostato P01 P20 saranno visualizzati secondo l operazione eseguita Se si sta impostando l allarme o l orario quest ultimo sarà visualizzato Come usare ...

Page 59: ...mosso da qualsiasi tipo di schermo protettivo o copertura 4 Per rimuovere o sostituire l aggancio dell adattatore usare un dito o uno strumento per far leva sul coperchio in modo che si senta lo scatto Schema di identificazione dell adattatore Simbolo dell adattatore iPod classic 80 GB C 160 GB 2007 D 160 GB 2009 C nano 2a generazione A 3a generazione B 4a generazione A 5a generazione B touch 1a g...

Page 60: ...per selezionare il menù di iPod iPhone 3 Premere sul telecomando per immettere o confermare le azioni NOTA Se si opera direttamente su iPod iPhone tenere fermo l iPod iPhone con l altra mano per prevenire la perdita della connessione L iPod iPhone inizia a caricarsi quando è agganciato Si carica anche in modalità Standby L iPod iPhone non suonerà automaticamente anche se agganciato se non viene se...

Page 61: ...ggi per trovare più stazioni disponibili automaticamente Sintonizzazione manuale Premere Previous e Next sul telecomando per sintonizzare la radio manualmente 3 Salvare le stazioni Si possono salvare fino a 20 stazioni preimpostate Salvare le stazioni 1 Premere FUNC per commutare la sorgente FM 2 Selezionare le stazioni radio 3 Premere Memory per immettere la stazione reimpostata in modalità memor...

Page 62: ... volta selezionata la sorgente AUX la schermata mostrerà AUX sullo schermo NOTA Se si riproduce della musica attraverso una sorgente AUX il suo volume può variare secondo quello del lettore musicale Se mettendo il volume al massimo vi è distorsione abbassare quello del lettore musicale per evitarla Usare l ingresso ausiliario Cavo audio ausiliario di 3 5 mm non compreso Lettore musicale ...

Page 63: ...ZZ suono default A iPod A FM A suono Alarm off Sistema Se il sistema si trova in modalità STANDBY premere e tenere premuto Power per scegliere tra i diversi suoni della sveglia BUZZ suono default A iPod A FM A suono Alarm off Quando suona l allarme 1 Premere SNOOZE sul telecomando la sveglia si spegnerà e risuonerà ogni 10 minuti 2 Premere POWER per spegnere la sveglia Impostazione dell orologio I...

Page 64: ...e sia agganciato correttamente Controllare le sorgenti per assicurarsi che l ingresso audio sia commutato sulla sorgente corretta È impossibile attivare l alimentazione Usare l adattatore AC e connettere l apparecchio alla presa di corrente sul muro Il telecomando non funziona Sostituire le pile L orologio non è regolato sull ora corretta Sostituire le pile Regolare di nuovo l orologio Specifiche ...

Page 65: ...nto con l iPod o l iPhone ed è stato certificato dal suo sviluppatore corrispondere agli standard operativi stabiliti da Apple Apple non può essere considerata responsabile di questo dispositivo o della sua osservanza delle norme di sicurezza e dei vari regolamenti Tenere presente che l uso di questo accessorio con l iPod o l iPhone può peggiorare le prestazioni wireless Questo apparecchio è compa...

Page 66: ...kkeerd worden of dat ze afgedekt worden door voorwerpen kranten tafelkleed gordijn e d of door gebruik van het apparaat op een dik tapijt of een bed D3 4 2 1 7b _A1_Nl WAARSCHUWING Berg kleine onderdelen op buiten het bereik van kinderen en peuters Raadpleeg onmiddellijk een arts als ze per ongeluk zijn ingeslikt Gebruiksomgeving Temperatuur en vochtigheidsgraad op de plaats van gebruik 5 C tot 35...

Page 67: ...g van het product K058a_A1_Nl Symbool voor toestellen Symbolen voor batterijen Wanneer u lege batterijen weggooit gelieve daarbij de geldende wetgeving en bepalingen na te leven D3 4 2 3 1_B1_Nl LET OP Explosiegevaar wanneer de batterij verkeerd wordt geplaatst Vervang alleen door hetzelfde of een vergelijkbaar type aanbevolen door de fabrikant D3 4 2 3 2_A1_Nl WAARSCHUWING Gebruik of bewaar batte...

Page 68: ...de wisselstroomadapter geheel in het stopcontact Als de tanden niet volledig zijn ingestoken kan hittevorming ontstaan wat kan leiden tot brand Daarbij kan contact met de aangesloten tanden van de adapter leiden tot elektrocutie Steek de wisselstroomadapter niet in een contactdoos waarvan de aansluiting los zit ook al zijn de tanden geheel in het stopcontact ingestoken Hitte kan zich ophopen en di...

Page 69: ...ting van de iPod iPhone FM radio beluisteren 13 De AUX ingang gebruiken 14 Het alarm gebruiken 15 Het alarm instellen Op de alarmmodus inschakelen Als het alarm afgaat De klok instellen Bijkomende informatie 16 Problemen oplossen Specificaties Er volgt geen nader bericht op deze gids ingeval van wijzigingen in het ontwerp of het product zelf Hartelijk dank voor de aanschaf van dit product van Pion...

Page 70: ...d aan het eerste gebruik Als de batterij moet worden vervangen opent u de batterijschuiflade in de richting zoals aangegeven in afbeelding b 3 Controleren van de klokbatterij Verwijder het isolatiemateriaal voorafgaand aan het eerste gebruik 4 Schakelende voedingsadapter Schuif de netstekker over de geleidingsrails van de wisselstroomadapter zoals aangegeven op onderstaande afbeelding totdat u een...

Page 71: ...omsteker van de adapter in de poort DC in van het apparaat sluit de adapterkop aan op de netspanning Na aansluiting gaat het apparaat over op stand by en wordt de kloktijd getoond Gebruik alleen de in dit pakket meegeleverde voedingsadapter gebruik geen voedingsadapter van een ander type DC AUX IN Voordat u begint ...

Page 72: ...f BUZZ standaard A iPod A FM A alarm uit Off 6 Previous 7 ENTER de handelingen op de iPod iPhone invoeren of bevestigen 8 Next 9 Volume 10 Play Pause 11 Up de lijst van de iPod iPhone naar boven scrollen 12 Volume 13 FUNC schakelen tussen bronnen FM A AUX A iPod 14 Down de lijst van de iPod iPhone naar beneden scrollen 15 Snooze Afstandsbediening 1 2 3 4 5 6 7 8 9 10 11 12 14 13 15 ...

Page 73: ... bronnen van muziekingangen selecteren FUNC toets herhalen om door de verschillende bronnen te lopen 2 Standby On 3 Volume 4 Volume 5 DC in aansluiting voor de voedingsadapter 6 AUX in extra ingang voor apparatuur met een steker van 3 5 mm 7 iPod iPhone dock 8 FM antenne X DS301 Apparaat ...

Page 74: ...dt 0 05 MHz Hiermee wordt gewoonlijk de tijd aangegeven Zodra de volgende handeling is voltooid wordt de tijd weer op de display getoond Bij gebruik van de VOL toets wordt het volume 00 30 aangegeven Als de bron FM is worden afhankelijk van de handeling de frequentie en het voorkeurstationnummer P01 P20 getoond Als het alarm of de tijd wordt ingesteld wordt de tijd die wordt ingesteld getoond Gebr...

Page 75: ...hone een beschermframe of hoes heeft moet deze worden verwijderd 4 Gebruik een vinger of instrument om het palletje op de dockcover los te krijgen teneinde de dockadapter te verwijderen of te vervangen Adapter identificatietabel Adaptersymbool iPod classic 80 GB C 160 GB 2007 D 160 GB 2009 C nano 2de generatie A 3de generatie B 4de generatie A 5de generatie B touch 1ste generatie E 2de generatie 3...

Page 76: ...et iPod iPhone menu te maken 3 Druk op van de afstandsbediening om handelingen in te voeren of te bevestigen OPMERKING Als u de bediening rechtstreeks vanaf de iPod iPhone uitvoert houd dan de iPod iPhone in de andere hand om een los zittende aansluiting te vermijden iPod iPhone begint met opladen zodra hij wordt gedockt Hij wordt tevens geladen in stand by Wanneer de iPod iPhone is gedockt speelt...

Page 77: ... automatisch meer beschikbare stations te zoeken Handmatige instelling Houd vorige en volgende op de afstandsbediening ingedrukt om de radio handmatig in te stellen 3 Stations opslaan Er kunnen maximaal 20 voorkeurstations worden opgeslagen Opslaan van stations 1 Druk op FUNC om de FM bron te wijzigen 2 Selecteren van radiostations 3 Druk op Memory om het menu voor het opslaan van voorkeurstations...

Page 78: ...AUX bron is geselecteerd verschijnt AUX op het scherm OPMERKING Als muziek via de AUX bron wordt afgespeeld dan varieert het geluidsvolume afhankelijk van het volume van de muziekspeler Indien er zich vervorming voordoet bij maximaal volume verlaag dan het volume van de muziekspeler om vervorming te voorkomen De AUX ingang gebruiken AUX audiokabel van 3 5 mm niet meegeleverd Muziekspeler ...

Page 79: ...BUZZ standaardgeluid A iPod A FM A geluid alarm uit Systeem Als het systeem op STANDBY staat houd dan de Powertoets ingedrukt om het alarmgeluid te wijzigen BUZZ standaardgeluid A iPod A FM A geluid alarm uit Als het alarm afgaat 1 Druk op SNOOZE van de afstandsbediening het alarm wordt stopgezet en gaat vervolgens iedere 10 minuten af 2 Druk op POWER om het alarm uit te zetten De klok instellen S...

Page 80: ...nsluiting om er zeker van te zijn dat deze op juiste wijze is gedockt Controleer de bronnen om er zeker van te zijn dat uw audio ingang op de juiste bron is ingeschakeld Het apparaat gaat niet aan Gebruik de netadapter en sluit het apparaat aan op een wandstopcontact De afstandsbediening doet het niet Vervang de batterijen De juiste tijd is niet voor de klok ingesteld Vervang de batterijen Stel de...

Page 81: ... met respectievelijk een iPod of iPhone en door de maker gewaarborgd is als conform de Apple werkingsnormen Apple is niet verantwoordelijk voor de werking van dit apparaat en voor het voldoen aan de veiligheidsnormen en wettelijke normen Houd er rekening mee dat het gebruik van dit accessoire met iPod of iPhone invloed kan hebben op de draadloze prestatie Deze apparatuur is compatible met de audio...

Page 82: ... piezas pequeñas fuera del alcance de los niños y bebés En caso de ingestión accidental acuda de inmediato al médico Entorno de funcionamiento Temperatura y humedad del entorno de funcionamiento 5 C a 35 C menos del 85 de humedad relativa rejillas de refrigeración no obstruidas No instale este aparato en un lugar mal ventilado ni en lugares expuestos a alta humedad o a la luz directa del sol o de ...

Page 83: ... baterías Cuando tenga que desembarazarse de las baterías usadas por favor respete los reglamentos gubernamentales o las disposiciones de las instituciones públicas de protección del medio ambiente en vigor en su país o región D3 4 2 3 1_B1_Es PRECAUCIÓN Si las pilas se colocan incorrectamente se correrá el peligro de que exploten Reemplácelas sólo por otras del mismo tipo u otro equivalente recom...

Page 84: ...do Una introducción parcial del enchufe podría generar calor y provocar un incendio Además si alguien tocara las clavijas conectadas del adaptador podría recibir una descarga eléctrica No enchufe el adaptador de CA en una toma de corriente en la que pese a haberse introducido el enchufe hasta el fondo éste no ha quedado firmemente sujeto Podría generarse calor y producirse un incendio Consulte con...

Page 85: ...one Cómo escuchar la radio FM 13 Cómo utilizar una entrada auxiliar 14 Cómo utilizar la alarma 15 Configuración de la alarma Cómo cambiar el modo de alarma Cuando suene la alarma Configuración del reloj Información adicional 16 Detección y solución de problemas Especificaciones En el caso de producirse alguna modificación en el diseño del producto no se incluirá ninguna notificación adicional en e...

Page 86: ...o tal y como se muestra en la ilustración a Para sustituir la pila abra el compartimiento en la dirección indicada en la ilustración b 3 Comprobación de la pila del reloj Antes de utilizarlo por primera vez retire la pestaña de aislamiento 4 Adaptador de corriente de tipo conmutado Deslice el enchufe de alimentación a lo largo de las guías del adaptador de CA tal y como se indica en la figura infe...

Page 87: ... la unidad Enchufe el cabezal del adaptador en la toma de corriente Cuando esté conectado el sistema entrará en el modo de espera y en la pantalla se mostrará el reloj Utilice únicamente el adaptador de corriente incluido con esta unidad No utilice un adaptador de corriente de especificaciones distintas DC AUX IN Antes de empezar ...

Page 88: ...do A iPod A FM A Alarma desactivada 6 Anterior 7 ENTER para introducir o confirmar las acciones en el iPod iPhone 8 Siguiente 9 Volumen 10 Reproducir Pausa 11 Arriba para desplazarse hacia arriba por la lista del iPod iPhone 12 Volumen 13 FUNC para cambiar de una fuente a otra FM A AUX A iPod 14 Abajo para desplazarse hacia abajo por la lista del iPod iPhone 15 Botón de repetición de alarma Mando ...

Page 89: ... música y desplazarse de una fuente a otra pulse el botón FUNC varias veces 2 Modo de espera Encendido 3 Volumen 4 Volumen 5 DC in para conectar el adaptador de corriente 6 AUX in entrada auxiliar para cualquier dispositivo equipado con un conector de 3 5 mm 7 Estación de acoplamiento de iPod iPhone 8 Antena FM Unidad X DS301 ...

Page 90: ...ada 0 05 MHz Por lo general muestra la hora Cuando la siguiente operación haya concluido volverá a mostrar la hora Cuando se emplea la tecla VOL muestra el volumen 00 30 Cuando la fuente es FM muestra la frecuencia y el número preestablecido P01 P20 según la operación Cuando se esté configurando la alarma o la hora se mostrará la hora que se esté configurando Cómo utilizar la antena FM La antena s...

Page 91: ...ado Deberá retirar el IPod iPhone de cualquier tipo de funda protectora o cubierta 4 Para retirar o reemplazar el adaptador de la estación de acoplamiento levante la pestaña de la cubierta de la estación con la punta del dedo o con algún objeto puntiagudo Tabla para la identificación de adaptadores Símbolo del adaptador iPod classic 80 GB C 160 GB 2007 D 160 GB 2009 C nano 2a generación A 3a gener...

Page 92: ... el menú del iPod iPhone 3 Pulse en el mando a distancia para introducir o confirmar acciones NOTA Cuando haga funcionar directamente el iPod iPhone sujete el dispositivo con la otra mano a fin de garantizar una conexión adecuada El iPod iPhone empezará a cargarse cuando esté en la estación de acoplamiento También se cargará cuando esté en el modo de espera El iPod iPhone no se reproducirá de form...

Page 93: ...sos para buscar automáticamente más estaciones disponibles Sintonización manual Pulse anterior y siguiente en el mando a distancia para sintonizar la radio de forma manual 3 Cómo guardar emisoras de radio Puede guardar hasta 20 emisoras presintonizadas Para guardar las emisoras de radio 1 Pulse FUNC para cambiar a la fuente FM 2 Cómo seleccionar emisoras de radio 3 Pulse Memory para acceder al mod...

Page 94: ...haya seleccionado la fuente AUX en la pantalla se mostrará AUX NOTA Cuando reproduzca música a través de la fuente AUX el volumen variará en función del volumen del reproductor de música Si se produjera una distorsión del sonido cuando el volumen esté al máximo disminuya el volumen del reproductor de música Empleo de la entrada auxiliar Cable auxiliar de audio de 3 5 mm no incluido Reproductor de ...

Page 95: ...ado A iPod A FM A sonido alarma desactivada Sistema Cuando el sistema esté en el modo STANDBY presione y mantenga pulsado Power para alternar entre distintos sonidos de alarma BUZZ sonido predeterminado A iPod A FM A sonido alarma desactivada Cuando suene la alarma 1 Pulse SNOOZE en el mando a distancia la alarma se detendrá y volverá a sonar cada 10 minutos 2 Para apagar la alarma pulse POWER Con...

Page 96: ...rese de que está correctamente colocado en la estación de acoplamiento Compruebe las diversas fuentes asegúrese de que la entrada de audio está conectada a la fuente correcta El equipo no se enciende Utilice el adaptador de CA y conecte el dispositivo a una toma de corriente mural El mando a distancia no funciona Reemplace las pilas El reloj no está ajustado a la hora correcta Reemplace las pilas ...

Page 97: ...od o a un iPhone respectivamente y ha sido homologado por quien lo desarrolló para cumplir con las normas de funcionamiento de Apple Apple no es responsable del funcionamiento de este aparato ni de que cumpla con las normas de seguridad y reguladoras Tenga presente que el empleo de este accesorio con un iPod o iPhone puede afectar la operación inalámbrica Este equipo es compatible con el audio del...

Page 98: ...ortinas nem utilizar o aparelho sobre uma carpete espessa ou uma cama D3 4 2 1 7b _A1_Pt AVISO Guarde peças pequenas longe do alcance de crianças e bebés Se alguma for engolida por acidente contacte imediatamente um médico Ambiente de funcionamento Temperatura e humidade do ambiente de funcionamento 5 C a 35 C humidade relativa inferior a 85 respiradouros de refrigeração não bloqueados Não instale...

Page 99: ...s para pilhas e baterias Ao desfazer se de pilhas gastas observe as disposições governamentais ou as regras ambientais públicas em vigor no seu país ou na sua zona D3 4 2 3 1_B1_Pt CUIDADO A substituição incorrecta da pilha pode comportar perigo de rebentamento Substitua a por uma pilha do mesmo tipo ou de outro recomendado pelo fabricante D3 4 2 3 2_A1_Pt AVISO Não utilize nem guarde as pilhas so...

Page 100: ...or de CA na tomada de corrente Se a ligação não ficar bem feita pode gerar se calor e consequentemente um incêndio Além disso o contacto com os bornes ligados do adaptador pode provocar electrocussão Não introduza o cabo de alimentação do adaptador de CA numa tomada de corrente em que fique frouxo embora os bornes fiquem completamente introduzidos Pode gerar se calor o que poderá provocar um incên...

Page 101: ...a partir de iPod iPhone 11 Ligar um iPod iPhone Ouvir rádio FM 13 Utilizar a entrada auxiliar 14 Utilizar o alarme 15 Definir o alarme Alterar o modo do alarme Quando soa o alarme Acertar o relógio Informações adicionais 16 Resolução de problemas Especificações Não haverá notificações adicionais a este manual se houver alterações de desenho do produto Agradecemos a aquisição deste produto Pioneer ...

Page 102: ...como indica a figura a antes de utilizar pela primeira vez Para substituir a pilha abra o respectivo compartimento no sentido indicado na figura b 3 Verificar a pilha do relógio Remova a película de isolamento antes de utilizar pela primeira vez 4 Adaptador de corrente do tipo comutado Faça deslizar a ficha de alimentação pelas ranhuras do adaptador de CA como indica a figura abaixo até ouvir um c...

Page 103: ...do adaptador de CC na porta DC in da unidade e a cabeça do adaptador numa tomada de corrente Quando ligado o sistema entrará em modo de espera e o visor indicará a hora do relógio Utilize apenas o adaptador de alimentação incluído neste fornecimento não utilize adaptadores com outras especificações DC AUX IN Antes de começar ...

Page 104: ...Z predefinido A iPod A FM A Alarme desligado 6 Anterior 7 ENTER Para introduzir ou confirmar acções no iPod iPhone 8 Seguinte 9 Volume 10 Reproduzir Interromper 11 Up Para pesquisar para cima na lista do iPod iPhone 12 Volume 13 FUNC Para alternar entre fontes FM A AUX A iPod 14 Down Para pesquisar para baixo na lista do iPod iPhone 15 Adiar o alarme Controlo remoto 1 2 3 4 5 6 7 8 9 10 11 12 14 1...

Page 105: ...e entrada de música prima repetidamente o botão FUNC para se deslocar entre as várias fontes 2 Modo de espera Ligado 3 Volume 4 Volume 5 DC in Para ligar o adaptador de alimentação 6 AUX in Entrada auxiliar para qualquer dispositivo com um terminal tipo jack de 3 5 mm 7 Doca iPod iPhone 8 Antena FM Unidade X DS301 ...

Page 106: ...tualmente indica a hora Quando a operação seguinte estiver concluída voltará a indicar a hora Quanto se utiliza o botão VOL indicará o volume 00 30 Quanto a fonte é FM a frequência e o número predefinido P01 P20 serão apresentados dependendo da operação Durante a definição do alarme ou da hora será apresentada a hora que estiver a ser definida Como utilizar a antena FM A antena que se encontra na ...

Page 107: ... iPhone O iPod iPhone deve ser retirado de qualquer tipo de cobertura ou moldura protectora 4 Para retirar ou substituir o adaptador de doca utilize um dedo ou uma ferramenta para levantar a cobertura da doca Tabela de identificação de adaptadores Símbolo do adaptador iPod classic 80 GB C 160 GB 2007 D 160 GB 2009 C nano 2a geração A 3a geração B 4a geração A 5a geração B touch 1a geração E 2a ger...

Page 108: ... no menu do iPod iPhone 3 Prima no controlo remoto para introduzir ou confirmar acções NOTA Ao comandar directamente a partir do iPod iPhone segure o iPod iPhone com a outra mão para evitar uma ligação deficiente O iPod iPhone começará a carregar quando instalado na doca Também começará a carregar em modo de espera A reprodução a partir de iPod iPhone não se iniciará automaticamente quando o iPod ...

Page 109: ...aticamente mais estações disponíveis Sintonia manual Prima o botão anterior seguinte no controlo remoto para sintonizar o rádio manualmente 3 Guardar estações É possível guardar até 20 estações predefinidas Para guardar estações 1 Prima FUNC para mudar para a fonte FM 2 Seleccionar estações de rádio 3 Prima Memory para entrar no modo de memorização de estações predefinidas 4 Prima o botão para cim...

Page 110: ...o a fonte AUX estiver seleccionada o visor apresentará a indicação AUX NOTA Ao reproduzir música através da fonte AUX o volume da música variará consoante o volume do leitor Se se verificar distorção quando o volume estiver no máximo baixe o volume do leitor de música para a evitar Utilizar a entrada auxiliar Cabo de áudio auxiliar de 3 5 mm não incluído Leitor de música ...

Page 111: ...BUZZ som predefinido A iPod A FM A som alarme desligado Sistema Com o sistema em modo de espera prima durante alguns instantes o botão alimentação para alternar entre diversos sons de alarme BUZZ som predefinido A iPod A FM A som alarme desligado Quando soa o alarme 1 Prima SNOOZE no controlo remoto O alarme parará e voltará a soar de 10 em 10 minutos 2 Press alimentação para desligar o alarme Ace...

Page 112: ...amente ligado Verifique se o iPod iPhone está correctamente ligado à doca Verifique as fontes e certifique se de que a entrada de áudio está definida para a fonte correcta Não há alimentação de energia Use o adaptador AC e ligue o dispositivo à tomada de energia na parede O controlo remoto não funciona Substitua as pilhas O relógio não está certo Substitua as pilhas Volte a acertar o relógio Espec...

Page 113: ...iPod ou a um iPhone e que foi certificado pelo seu fabricante como correspondendo às normas de desempenho da Apple A Apple não se responsabiliza pelo funcionamento deste dispositivo ou pela sua conformidade com os padrões de segurança e normativos Tenha em atenção que a utilização deste acessório com o iPod ou iPhone pode afectar o desempenho da função sem fios Este equipamento é compatível com o ...

Page 114: ......

Page 115: ......

Page 116: ...ELECTRONICS OF CANADA INC 340 Ferrier Street Unit 2 Markham Ontario L3R 2Z5 Canada TEL 1 877 283 5901 905 479 4411 PIONEER EUROPE NV Haven 1087 Keetberglaan 1 B 9120 Melsele Belgium TEL 03 570 05 11 PIONEER ELECTRONICS ASIACENTRE PTE LTD 253 Alexandra Road 04 01 Singapore 159936 TEL 65 6472 7555 PIONEER ELECTRONICS AUSTRALIA PTY LTD 5 Arco Lane Heatherton Victoria 3202 Australia TEL 03 9586 6300 P...

Reviews: