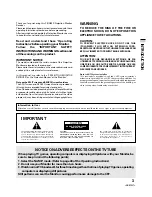
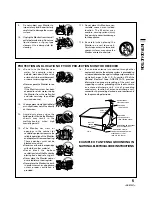
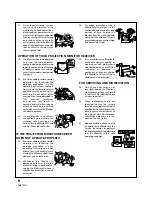
background image

Operating Instructions

PROJECTION MONITOR RECEIVER

PRO-610HD
PRO-510HD

Summary of Contents for Elite PRO 510HD

Page 1: ...Operating Instructions PROJECTION MONITOR RECEIVER PRO 610HD PRO 510HD ...

Page 2: ...inted Protective Screen The accompanying protective screen is tinted not only to protect the screen but to allow viewers to enjoy high contrast images Pioneer s PURECINEMA Format Converter An advanced and exclusive I P Interlace Progressive format converter developed by Pioneer called PURECINEMA delivers a high resolution progressive picture It reproduces film material in a very smooth and film li...

Page 3: ...NLESSTHEBLADESCAN BE FULLY INSERTED TO PREVENT BLADE EXPOSURE ATTENTION POUR EVITER UNE DECHARGE ELECTRIQUE NE PAS UTILISERCETTEPRISE POLARISEE AVECUNERALLONGE UNE PRISE OU UNE AUTRE SORTIE A MOINS QUE LES LAMESPUISSENTETRECOMPLETEMENTINTRODUITESET NE SOIENT PAS EXPOSEES Note to CATV system installer This reminder is provided to call the CATV system installer s attention to Article 820 40 of NEC t...

Page 4: ...his may result in electrical or fire hazard 5 Do not attempt to service this Monitor yourself as opening or removingcoversmayexposeyou to dangerous voltage or other hazards Refer all servicing to qualified personnel 6 Neverpushtheobjectsofanykind into this Monitor through cabinet slots as they may touch dangerousvoltagepointsorshort out parts that could result in a fire orelectricshock Neverspilll...

Page 5: ... in the cabinet for ventilationpurposestoensurethe reliable operation of the Monitor andtoprotectitfromoverheating These openings must not be blocked or covered Nevercovertheslotsoropenings with cloth or other material Never block the bottom ventilationslotsoftheMonitorby placing it on a bed sofa rug etc Never place the Monitor near or over a radiator or heat register NeverplacetheMonitorinabuilt ...

Page 6: ...peration 21 If your Monitor is to remain unused for a period of time for instance when you go on a holiday turntheMonitor off and unplug it from the wall outlet 24 It is normal for some Monitor to make occasional snapping or popping sounds particularly whenbeingturnedonoroff Ifthe snapping or popping is continuous or frequent unplug the Monitor and consult your dealer or service technician IF THE ...

Page 7: ...USTMENT 30 BASIC FUNCTIONS PROGRAM BLOCK V CHIP FUNCTION 32 CHANGING PASSWORD 36 CHANGING SCREEN SIZE 38 MULTI SCREEN FUNCTION 40 CLOSED CAPTION DECODE FUNCTION 42 CHANGING CHANNEL SET UP 43 PICTURE ADJUSTMENTS 48 SOUND ADJUSTMENTS 55 DPO FUNCTION 59 MULTI POINT CONVERGENCE ADJUSTMENT 60 VARIOUS FUNCTIONS CONNECTION WITH RECEIVER 1 62 CONNECTION WITH RECEIVER 2 63 CONNECTING THE SYSTEM REMOTE CONT...

Page 8: ...OGRAM B L OC K CHANG E P A S SWORD SET ENTER 4 Select AUTO CHANNEL PRESET 1 Select TV 2 3 5 SET ENTER CHANN E L S E AU T O CHANN CHANN E L F A VOR I E C T E T L AD P D R E D S E E L T HA U NN E L P E X I T USE END MENU SET UP SET ENTER NOTE The CHANNEL SET UP cannot be selected unless the function is set up for TV 2 3 SET ENTER 5 AU T O CHANN AN T E NNA A B T V C A B L E E L M P O R D E E S E T C ...

Page 9: ...n reflective materials carpet rugs wallpaper etc OPERATING PRECAUTIONS Optimum viewing distance 10 to 23 feet is the range recommended for viewing comfort Adjust room illumination Excessively bright or dim lighting may strain your eyes Draw the curtains if necessary to shut out direct sunlight CARE OF YOUR PROJECTION MONITOR DO NOT Donotusestrongcleansers solvents polishes orchemically treated clo...

Page 10: ...LY Attach upper and lower panel frames as indicated then follow step 5 on HOW TO ATTACH THE PROTECTIVE SCREEN HOW TO ATTACH THE PROVIDED PROTECTIVE SCREEN WE RECOMMEND ATTACHING THE PROTECTIVE SCREEN BEFORE USING THE MONITOR CAUTION BEFORE ATTACHING THE PROTECTIVE SCREEN Do not handle the screen by yourself Have someone assist you when attaching or carrying the screen to prevent any accidents Usea...

Page 11: ...me and remove the upper panel frame 3 Remove the protective screen from the lower panel frame andremovethelowerpanelframe Reattachpanelframes andframecoversasindicatedinHOWTOATTACHUPPER AND LOWER TRIM ONLY NOTES FOR CARE AND CLEANING OF SCREEN Donothitorthrowanythingontotheprotectivescreen asa damaged protective screen may cause injury If the protective screen surface is dirty wipe it with a cloth...

Page 12: ...tothe AC wall socket Turn on the MAIN POWER switch When the MAIN POWER is on the red STANDBY ON indicator lights up In this state the POWER STANDBY ON button or the POWER button of the remote control unit can be used to turn on and off the Monitor ConnectthecablesoftheVHFantenna andUHFantennatotheANTENNAA terminal See pages 14 and 15 Red indicator For viewing DTV broadcasts the SH D09 digital tune...

Page 13: ...te control operation range has reduced When replacing the batteries prepare new batteries before removing the old batteries Be sure to close the battery case cover after battery replacement NOTE Even when batteries are removed learned commands remain in memory for about 15 minutes If you remove the batteries and press a button the memory is erased in a few seconds Remote control operation range Tw...

Page 14: ... TV or have a central antenna for your building you will not need an external antenna Connecting VHF UHF antenna Connect the TV signal source to your Monitor properly Use a 75 ohm coaxial cable with an F type connector and connect the cable as shown in the illustration Connecting VHF UHF antenna with VCR ANTENNA CABLE A B UHF antenna UHF VHF VHF antenna U V mixer ANTENNA CABLE A B Antenna or Cable...

Page 15: ...TV converter with VCR Connecting VHF UHF antenna and CATV converter CONNECTING THE ANTENNA ANTENNA CABLE A B VCR VCR ANTENNA OUT IN Splitter CATV converter Cable TV ANTENNA CABLE A B UHF antenna UHF VHF VHF antenna U V mixer CATV converter Cable TV ...

Page 16: ...om the AC outlet If both the VIDEO terminal pin jack type and S VIDEO terminal are connected the signals from the S VIDEO terminal will have priority OnlytheINPUT1andINPUT2jackscaninputthecomponent video signal When the component signal and other signals are input to the INPUT 1 or INPUT 2 jacks the component signal will be given priority B ÙÛ B ÙÛ VCR VCR VCR SAT tuner or Digital tuner VCR DVD LD...

Page 17: ...UT INPUT INPUT 1 VIDEO INPUT 3 SELECT S VIDEO VIDEO RGB OUTPUT VIDEO S VIDEO AUDIO R L VCR OUTPUT VIDEO S VIDEO AUDIO R L V R L V R L V V R L R L V R L V L R CONNECTING VIDEO AUDIO EQUIPMENT DVD LD player VCR SAT tuner Rear panel Use this terminal to input signals from an DVD LD player which has a BNC video output terminal SIGNAL Use these terminals to input signals from a DVD player which has com...

Page 18: ...m the MONITOR OUTPUT jack the output signal will be a composite of Y and C COMPONENT VIDEO INPUT jack Inputsthreesignals Y PB CB andPR CR outputfromDVD players and the like DVD player etc 480 i 15 734 kHz 60 Hz 1080 i 33 75 kHz 60 Hz Digital tuner etc 480 p 31 468 kHz 60 Hz Horizontal Vertical Format frequency frequency RGB INPUT jack Inputs five signals R G B H and V output from digital tuners an...

Page 19: ...L R Y PB PR CONTROL INPUT 3 SELECT S VIDEO VIDEO RGB IN OUT INPUT 3 INPUT RGB INPUT 3 SELECT S VIDEO VIDEO RGB R L AUDIO R L R L RGB OUTPUT Rear panel SIGNAL SIGNAL Digital tuner NOTE Setting the INPUT 3 SELECT switch to RGB will cause all S Video and composite images input from the INPUT 3 jack to be suppressed Similarly setting the INPUT 3 SELECT switch to S VIDEO VIDEO will cause all images inp...

Page 20: ...tect the room brightness 4 MAIN POWER switch Pressoncetoturnonthemainpower STANDBYmode Press again to turn off the main power 5 POWER button STANDBY ON Press once to turn on the Monitor Press again to turn off the Monitor 6 INPUT SELECTOR button Press to select your program source Each press of the INPUT SELECTOR changes the selection to the next source In some cases the door may only open slightl...

Page 21: ...hen the audio source to be connected is monaural connect the source to the L MONO jack CAUTION Do not press any operation button on the Projection Monitor or the remote control unit while recording Signals from the MONITOR OUTPUT jacks may be temporarily interrupted when a button is pressed ATTENTION The Projection Monitor Receiver will not function properly in the following cases An electrical di...

Page 22: ...hannels can be tuned in using these buttons 7 MUTING button Presstotemporarilyturnoffthesound Pressagaintoreturn to the previous volume level 8 Select Adjust Set buttons SET ENTER 2 3 5 2 3 5 Press to select or adjust items on the menu screen SET ENTER Press to activate the selected function 9 FAVORITE CH buttons Thesebuttonscallupthechannelsthathavebeenassigned to them EDIT LEARN DTV SOURCE INFO ...

Page 23: ...gandother screen indicators for a few seconds CH ENTER button Fix the selected channel with the direct channel selection buttons CH RETURN channel return button Press to switch between the current channel and the channel you were watching immediately before VOL volume buttons Press plus button to increase the volume press minus button to decrease it Volume level will appear on the screen as number...

Page 24: ...it 1 Turn on the POWER The green STANDBY ON indicator lights up 3 Select antenna A or B Check the input signals at the ANTENNA A and B terminals Control panel of the monitor Remote control unit POWER TV ANT Remote control unit Control panel of the monitor 140 45 STANDBY ON POWER STANDBY ON STANDBY ON Green indicator 2 Set the mode switch to TV DTV and then press the TV button Remote control unit T...

Page 25: ... CHANNEL ASSIGNMENT TABLE Inthecabletuningmode channelscanonlybeassigned to numbers 01 to 125 The specific channel number assignments and the corresponding alphabet designation are shown at the bottom left of the channel table For example Channel number 14 corresponds to midband cable channel A NOTE Cable CATV services can vary according to area The channel number assignments shown in the channel ...

Page 26: ...PUT VOL GUIDE 8 LEARN POWER POWER POWER VCR REC FAVORITE CH 1 7 3 DTV SAT DTV DVD TOP DTV SAT TV SAT DVD 2 3 5 SET ENTER SET ENTER MENU TV SAT DVD USE END MENU PICTURE SOUND SCREEN SET UP CC PICTURE MOD E US E R MOV I E CON T RA S T 0 5 2 3 0 1 1 B L A C K L V L CO L OR T I N T SHARP O T H E R E X I T USE END MENU PICTURE adjustment menu See page 48 PICTURE 3 D Y C L E V E L 3 3 D NR L E V E L 3 C...

Page 27: ...SE END MENU PICTURE SOUND SCREEN SET UP CC SCREEN setting menu See page 39 SET ENTER I C N EMA W I D E V POS I T I ON 1 0 E X I T USE END MENU SCREEN Closed Caption menu See page 42 C C O MOD E C C F F 2 E X I T USE END MENU CC 2 3 5 SET ENTER PICTURE SOUND SCREEN SET UP CC USE END MENU SET ENTER SET UP menu See pages 28 30 33 36 43 59 62 and 83 CHANN E L S E T UP E X I T USE END MENU SET UP CONV ...

Page 28: ...ET ENTER Refer to page 26 3 Select CHANNELSETUP inthesameway 2 3 5 SET ENTER CHANN E L S E T UP E X I T USE END MENU SET UP CONV E RG E NC DPO O F F S Y S T EM I N E OU T PROGRAM B L OC K CHANG E P A S SWORD SET ENTER 4 Select AUTO CHANNEL PRESET 1 Select TV 2 3 5 SET ENTER CHANN E L S E AU T O CHANN CHANN E L F A VOR I E C T E T L AD P D R E D S E E L T HA U NN E L P E X I T USE END MENU SET UP S...

Page 29: ...hen select thebroadcastsystemtobereceivedfrom AIR CATVSTD CATVHRCorCATVIRC Ask your dealer or cable service station for the mode of your local CATV system 2 3 5 SET ENTER AU T O CHANN AN T E NNA A T V C A B L E E L M P O R D E E S E T C A T V S T D AU T O PR E S E T S T AR T E X I T USE END MENU SET UP SET ENTER 2 3 5 SET ENTER AU T O CHANN T V C A B L E E L M P O R D E E S E T A I R C A T V S T D...

Page 30: ...5or buttonandthenpressingSET ENTER Refer to page 26 2 Select CONVERGENCE inthesameway 2 3 5 SET ENTER E X I T USE END MENU SET UP CHANN E L S E T UP CONV E RG E NC DPO O F F S Y S T EM I N E OU T PROGRAM B L OC K CHANG E P A S SWORD SET ENTER 3 Select screen mode 2 3 5 SET ENTER NA T URA L W I CONV E RG E NC C I N EMA Z OOM D E F U L L A D 4 3 N F U L L F W I D E E N OR HD ORMA L E X I T USE END M...

Page 31: ...DTV DVD TOP DTV SAT TV SAT DVD SCREEN TV Move the horizontal line C J D A ONV E RG E NC E USE END MENU 2 3 SET ENTER 5 2 3 5 SET ENTER C J D A ONV E RG E NC E USE END MENU C J D A ONV E RG E NC E USE END MENU C J D A ONV E RG E NC E USE END MENU 5 2 3 SET ENTER CONV E RG E NC AD J C E N NA T URA L W I D E E AD J MU T I PO I T E R L N T PO I N T E X I T USE END MENU SET UP When ADJ CENTER POINT is ...

Page 32: ...more of the following D Some suggestive dialogue L Infrequent coarse language V Moderate violence S Some sexual situations TV 14 Parents Strongly Cautioned This program contains some material that many parents would find unsuitable for children under 14 years of age This program contains one or more of the following D Intensely suggestive dialogue L Strong coarse language S Intense sexual situatio...

Page 33: ...NU SETTING THE PROGRAM BLOCKING LEVEL 1 PressMENUandselect SETUP byusing the5or buttonandthenpressingSET ENTER Refer to page 26 2 Select PROGRAM BLOCK in the same way 2 3 5 SET ENTER E X I T USE END MENU SET UP CHANN E L S E T UP CONV E RG E NC DPO O F F S Y S T EM I N E OU T PROGRAM B L OC K CHANG E P A S SWORD SET ENTER Enter password Press numeric buttons 0 through 9 to enter a four digit passw...

Page 34: ... T I NG S Y S T EM SET ENTER 7 Select and then confirm the rank of the MPAA RATING 2 3 5 SET ENTER E X I T USE END MENU SET UP G PG 3 PG R 1 W V I E W V I E W V I E W V I E W V I E W V I E NC X 1 7 NR MP A A RA T I NG K L B OC SET ENTER 2 3 SET ENTER 5 E X I T USE END MENU SET UP G PG 3 PG R 1 W V I E W V I E W V I E W V I E W V I E K L B OC K L B OC W V I E NC X 1 7 NR MP A A RA T I NG SET ENTER ...

Page 35: ... Blocked screen will appear REMOVING BLOCKING IN MULTI SCREEN MODE Just as in normal single screen mode programs are blocked in SPLIT screen and SEARCH screen mode see pages40and41 butblockingmayberemovedonlyfrom the Main picture To remove blocking from a Sub picture or Search picture screen switch to the Main picture for that channel and then remove blocking When viewing in FREEZE screen p 40 mod...

Page 36: ...be changed after purchase Note that this password is also used as the password required for the SH D09 digital tuner sold separately 1 PressMENUandselect SETUP byusing the5or buttonandthenpressingSET ENTER Refer to page 26 2 Select CHANGEPASSWORD inthesame way 2 3 5 SET ENTER E X I T USE END MENU SET UP CHANN E L S E T UP CONV E RG E NC DPO O F F S Y S T EM I N E OU T PROGRAM B L OC K CHANG E P A ...

Page 37: ...8 6 9 2 3 0 5 After setting press MENU to turn the menu off MENU TV SAT DVD SUB CH SELECT FREEZE SPLIT MENU DTV EDIT SOURCE INFO INPUT RECEIVER 4 PROJECTION MONITOR RECEIVER REMOTE CONTROL UNIT Î MENU VOL INPUT VOL MODE AUDIO DISPLAY 1 2 3 4 TV DTV GUIDE 8 LEARN CH RETURN POWER POWER POWER SEARCH ON OFF VCR REC CH TV VOL TV DTV CBL SAT DVD LD VCR MUTING ANT POWER POWER CH ENTER FAVORITE CH 1 7 3 D...

Page 38: ...nt signals or RGB signals are input SCREEN MODE will be limited to FULL For watching a DTV broadcast see the SH D09 digital tuner sold separately operating instructions for SCREEN MODE Continuous operation for extended periods in 4 3 NORMAL mode may burn out the screen We thus recommend that this mode be used only in conjunction with another SCREEN mode Press the SCREEN MODE button NATURAL WIDE CI...

Page 39: ... USE END MENU V POS I T I ON 1 0 SET ENTER After adjusting press MENU to turn the menu off CHANGING SCREEN SIZE TO ADJUST THE SCREEN POSITION IntheCINEMAWIDEorZOOMmode thescreenpositioncanbeadjusted to the top or bottom 1 PressMENUandselect SCREEN byusing the5or buttonandthenpressingSET ENTER Refer to page 26 2 Select V POSITION in the same way 2 3 5 SET ENTER I C N EMA W I D E V POS I T I ON 1 0 ...

Page 40: ...menu on screen These functions cannot be used while watching a DTV broadcast using the SH D09 digital tuner sold separately These functions cannot be used when INPUT 1 or INPUT 2 is receiving a 1080i or 480p component signal or the signals might not be received or noise might be generated When a TV broadcast is being received the screen on the right will not show the antenna B signal RGB signals i...

Page 41: ...or a TV game etc is entered to the left screen during 9 SEARCH screen or 3 SEARCH screen modes the screen may be disrupted SEARCHING FOR A PROGRAM ON A DIFFERENT CHANNEL SEARCH screen Thescreenontherightsidecanbemadeintonineorthreedifferentscreens making it possible to search for programs or enjoy multiple images Press the SEARCH button Normal screen SPLIT screen 3 SEARCH screen 9 SEARCH screen 1 ...

Page 42: ...F 2 E X I T USE END MENU CC SET ENTER Set CC to ON 4 Select MODE 2 3 5 SET ENTER SET ENTER NOTES When a video cassette or Video Disc carrying the CC mark etc is played the closed caption signal may not be output depending on the VCR or Video disc player During TV broadcast reception closed caption signal may not be decoded properly if the receiving broadcast signal is weak Closed caption signal ma...

Page 43: ...t are not required for reception The deletedchannelscanbeskippedwhenselectingchannels with the and CH channel buttons Perform the following after completing AUTO CHANNEL PRESET 1 PressMENUandselect SETUP byusing the5or buttonandthenpressingSET ENTER Refer to page 26 2 Select CHANNELSETUP inthesameway 2 3 5 SET ENTER CHANN E L S E T UP E X I T USE END MENU SET UP CONV E RG E NC DPO O F F S Y S T EM...

Page 44: ...NEL thenselectachannel 2 3 5 SET ENTER AN T E NA A CHANN E L S E T T I N D G ADD D E L CHAN N N E L 1 2 5 D L A B E L B A CD A E X I T USE END MENU SET UP SET ENTER AN T E NA A CHANN E L S E T T I N D G ADD D E L CHAN N N E L 1 2 5 D L A B E L B A CD A E X I T USE END MENU SET UP SET ENTER 6 Select SETTING then select ADD addition or DEL deletion 2 3 5 SET ENTER AN T E NA A CHANN E L S E T T I N D...

Page 45: ...ted in step 6 a label of 4 characters can be input for the added channel 2 3 5 SET ENTER AN T E NA A CHANN E L S E T T I N D G ADD D E L CHAN N N E L 1 2 5 D L A B E L B A CD A E X I T USE END MENU SET UP SET ENTER AN T E NA A CHANN E L S E T T I N D G ADD D E A H O V 3 0 B I P W 4 C J Q X 5 D K R Y 6 _ E L S Z 7 F M T 1 8 G N U 2 9 L CHAN N N E L 1 2 5 D L A B E L B A CD A E X I T USE END MENU SE...

Page 46: ...ur channels can be assigned to each button making it possible to set a total of 16 channels 2 Select CHANNELSETUP inthesameway 2 3 5 SET ENTER CHANN E L S E T UP E X I T USE END MENU SET UP CONV E RG E NC DPO O F F S Y S T EM I N E OU T PROGRAM B L OC K CHANG E P A S SWORD SET ENTER 3 Select FAVORITE CHANNEL 2 3 5 SET ENTER CHANN E L S E AU T O CHANN CHANN E L F A VOR I E C T E T L AD P D R E D S ...

Page 47: ... B B A A 1 1 5 2 4 6 3 5 E X I T USE END MENU SET UP SET ENTER 7 Select the channel Y E L L OW AN T CH 1 F A VOR I E C T HANN E L 2 3 4 B B A A 1 1 5 2 4 6 3 5 E X I T USE END MENU SET UP SET ENTER 2 3 SET ENTER 5 2 3 SET ENTER 5 8 Tosetanothernumber repeatsteps5to 7 Tosetabuttonofadifferentcolor repeat steps 4 to 7 To return to step 4 press either the 5 or the button to select EXIT and then press...

Page 48: ...sired setting 2 3 SET ENTER 5 MOD E STD MOV I E GAME USER USE END MENU SET ENTER STD Sets standard picture quality MOVIE Reduces contrast making dark images easier to see Effectiveformoviesthathavemanydarkimagessuch as night scenes etc GAME LowerstherelativecontrastofTVgameandpersonal computerimagestominimizediscomforttotheeyes Thiswillminimizebadeffectssuchasdiscoloredspots or stains on the CRT o...

Page 49: ...3 4 If VCR or DVD LD has been selected start playback for the relevant device 2 Press MENU and select PICTURE 2 3 5 SET ENTER USE END MENU PICTURE SOUND SCREEN SET UP CC SET ENTER 3 Adjust the desired picture quality Refer to steps 2 and 3 on page 50 Ifanymode STD MOVIE orGAME isadjusted USERmode will be entered The last mode that was adjusted will become the USER sub mode indicated in parentheses...

Page 50: ...T I N T SHARP O T H E R E X I T USE END MENU SET ENTER 3 Adjust by pressing 2 or 3 The adjusting range is 30 to 30 The numerical value comes down to press 2 and comes up to press 3 USE CON T RA S T 0 1 END MENU SET ENTER NOTES The COLOR TINT and SHARP settings may not be changed when receiving RGB input When DPO is on CONTRAST BLACK LEVEL and COLOR cannot be adjusted See page 59 When picture quali...

Page 51: ...TURE Refer to page 26 2 Select OTHER 2 3 5 SET ENTER PICTURE MOD E US E R MOV I E CON T RA S T 0 5 2 3 0 1 1 B L A C K L V L CO L OR T I N T SHARP O T H E R E X I T USE END MENU SET ENTER 3 1 To adjust 3D Y C LEVEL Perform this adjustment when noises appear at the color borders of the image NOTE This function can be used only when viewing a source that has been connected to the antenna or composit...

Page 52: ...al Select 3D NR LEVEL 2 3 5 SET ENTER PICTURE O T H E R E X I T USE END MENU 3 D Y C L E V E L 3 3 D NR L E V E L 3 CO L O F L E SH S VM H R I T G T O H E N M E P O S N T D PUR E C I N EMA HQ SET ENTER Select the desired level 2 3 SET ENTER 5 3 D NR L E V 3 L E USE END MENU SET ENTER 1 2 3 4 5 Low noise reduction High noise reduction 3 To adjust COLOR TEMPERATURE This function enables the image to...

Page 53: ... H E R E X I T USE END MENU 3 D Y C L E V E L 3 3 D NR L E V E L 3 CO L O F L E SH S VM H R I T G T O H E N M E P O S N T D PUR E C I N EMA HQ SET ENTER 2 3 SET ENTER 5 F L E SH T ON E O N O F F USE END MENU SET ENTER Set FLESH TONE to ON PICTURE ADJUSTMENTS 5 To adjust PURECINEMA Thisfunctionautomaticallydetectsmoviefilmrecordedat24frames per second and converts it into a high quality progressive...

Page 54: ...tion cannot be used when SCREEN MODE is 4 3 NORMAL or PICTURE MODE is GAME Select SVM 2 3 5 SET ENTER PICTURE O T H E R E X I T USE END MENU 3 D Y C L E V E L 3 3 D NR L E V E L 3 CO L O F L E SH S VM H R I T G T O H E N M E P O S N T D PUR E C I N EMA HQ SET ENTER Select the desired SVM mode 2 3 SET ENTER 5 S V M I H GH USE END MENU SET ENTER OFF Provides a soft picture MID Provides a picture wit...

Page 55: ...or SAP is received 1 PressMENUandselect SOUND byusing the5or buttonandthenpressingSET ENTER Refer to page 26 2 Select MTS in the same way 2 3 5 SET ENTER MT S MA I N B A S S 0 5 2 R 1 T R E B L E B A L ANC E SURROUND E X I T USE END MENU SOUND O F F SUP E R A S B S O F F SET ENTER 3 Select the desired audio mode 2 3 SET ENTER 5 MT S MA I N S A P MONO B A S S 0 5 2 R 1 T R E B L E B A L ANC E E X I...

Page 56: ... be adjusted 1 Press MENU and select SOUND Refer to page 26 2 Select the adjustment item 2 3 5 SET ENTER MT S MA I N B A S S 0 5 2 R 1 T R E B L E B A L ANC E E X I T USE END MENU SOUND SURROUND O F F SUP E R A S B S O F F SET ENTER 3 2 3 SET ENTER 5 MT S MA I N B A S S 0 5 2 R 1 T R E B L E B A L ANC E E X I T END MENU SOUND USE SURROUND O F F SUP E R A S B S O F F SET ENTER 4 Adjust by pressing ...

Page 57: ...urround effect cannot be obtained with mono sound In some cases the surround effect may be minimal After setting press MENU to turn the menu off SOUND ADJUSTMENTS TO SELECT THE DESIRED SURROUND MODE Surround can be selected as desired 1 Press MENU and select SOUND Refer to page 26 2 Select SURROUND 2 3 5 SET ENTER MT S MA I N B A S S 0 5 2 R 1 T R E B L E B A L ANC E E X I T USE END MENU SOUND SUR...

Page 58: ...ISPLAY ANT DTV SAT DTV DVD TOP DTV SAT TV SAT DVD SCREEN TV TO ADJUST SUPER BASS Use this function to enjoy powerful bass sounds 1 Press MENU and select SOUND Refer to page 26 2 3 5 SET ENTER MT S MA I N B A S S 0 5 2 R 1 T R E B L E B A L ANC E E X I T USE END MENU SOUND SURROUND O F F SUP E R A S B S O F F SET ENTER 3 2 3 SET ENTER 5 SET ENTER 4 Set SUPER BASS to ON After adjusting press MENU to...

Page 59: ...c Picture Optimizer on the TV front panel determines brightness and adjusts the CONTRAST BLACK LEVEL brightness and COLOR automatically 2 Select DPO in the same way 2 3 5 SET ENTER E X I T USE END MENU SET UP CHANN E L S E T UP CONV E RG E NC DPO O F F S Y S T EM I N E OU T PROGRAM B L OC K CHANG E P A S SWORD SET ENTER 3 Set DPO to ON ON O F F E X I T USE END MENU SET UP CHANN E L S E T UP CONV E...

Page 60: ...TUP byusing the5or buttonandthenpressingSET ENTER Refer to page 26 3 Select ADJ MULTI POINT 2 3 5 SET ENTER CONV E RG E NC AD J C E N NA T URA L W I D E E AD J MU T I PO I T E R L N T PO I N T E X I T USE END MENU SET UP SET ENTER 4 Select the adjust point E T S S E L E T C A T PO I N T USE END MENU SET ENTER 5 2 3 SET ENTER 5 Adjust the red line E T S B L U E PO I N T D J A MU L T I PO I N T USE ...

Page 61: ... SAT DVD LD VCR 1 3 2 4 6 5 7 9 8 0 MUTING POWER POWER CH ENTER FAVORITE CH 1 7 3 2 3 MODE DISPLAY ANT DTV SAT DTV DVD TOP DTV SAT TV SAT DVD SCREEN TV The brackets which shows the adjusting point will move in order Move to the next point to be adjusted and repeat steps 4 to 6 7 After completing the convergence adjustment press MENU to turn the menu off MULTI POINT CONVERGENCE ADJUSTMENT 6 Adjust ...

Page 62: ...d to the CENTER OUT terminal of the receiver the speaker of this monitor can be used as the center speaker Rear panel AUDIO SIGNAL AUDIO SIGNAL Receiver Speaker Speaker Before making or changing connections set the power switch to off and unplug the power cord from the AC outlet For details of connecting DVD LD player VCR SAT tuner etc refer to page 16 After completing connections perform the SPEA...

Page 63: ...R Refer to page 26 2 Select SYSTEMIN OUT inthesameway 2 3 5 SET ENTER CHANN E L S E S Y S T EM I N T OU U T P E X I T USE END MENU SET UP CONV E RG E NC DPO O F F E PROGRAM B L OC K CHANG E P A S SWORD SET ENTER Select the SPEAKER mode 2 3 5 SET ENTER NOTE After the speaker mode is set to CENTER IN the volume of the center speaker should be controlled from this monitor SPEAKER and AUDIO OUT settin...

Page 64: ...DE AUDIO DISPLAY 1 2 3 4 TV DTV GUIDE 8 LEARN CH RETURN POWER POWER POWER SEARCH ON OFF VCR REC CH TV VOL TV DTV CBL SAT DVD LD VCR 1 3 2 4 6 5 7 9 8 0 MUTING ANT POWER POWER CH ENTER FAVORITE CH 1 7 3 DTV SAT DTV DVD TOP DTV SAT TV SAT DVD SCREEN FIXED SignalsoutputfromtheAUDIOOUTPUTterminal will not change even if the Monitor s volume is adjusted VAR variable Sound signals output will change as ...

Page 65: ...monitorforthereceiverwhenthis unit is connected to the receiver When this unit is connected to the CENTER OUT terminal of the receiver the speaker of this unit can be used as the center speaker SIGNAL Mixer CATV converter Speaker Speaker DVD LD player VCR SAT tuner Before making or changing connections set the power switch to off and unplug the power cord from the AC outlet Connect the DVD LD play...

Page 66: ...ONV E RG E NC DPO O F F E PROGRAM B L OC K CHANG E P A S SWORD SET ENTER Switch the SYSTEM MODE 3 Select SYSTEM MODE 2 3 5 SET ENTER S P E A K E R NO AUD I O OU T S Y S T EM MOD E O F S Y S T EM I N RM F I X E OU A T L F D E X I T USE END MENU SET UP SET ENTER ON TheMonitorinputisfixedtoINPUT1andtheimagesof the input source selected by the receiver will be displayed OFF Normal setting 5 After sett...

Page 67: ...g the Î mark NOTES When the Pioneer unit with Î mark is connected to the CONTROL IN terminal of the projection monitor the remote sensor of the projection monitor does not accept signals from the remote control unit In this case point the remote control at the first device in the chain the equipment with no CONTROL IN connection To connect the control cord use the commercially available mini plug ...

Page 68: ...ethods of setting remote control signals For calling the other manufacturers remote control signals preset to this remote control unit For learning other manufacturers remote control signals CALLING OTHER MANUFACTURERS REMOTE CONTROL SIGNALS PRESET NOTES To stop the EDIT mode in the middle press the EDIT button once more If mode switch is switched while in EDIT mode EDIT mode will be canceled Afte...

Page 69: ...None None None None None None None None None None PIONEER FISHER FISHER FISHER GOLD STAR HITACHI HITACHI 2 HITACHI 3 MAGNAVOX 2 MITSUBISHI MITSUBISHI 2 MITSUBISHI 3 MITSUBISHI 4 MITSUBISHI 5 MITSUBISHI 6 PANASONIC PANASONIC 2 PANASONIC 3 RCA RCA 2 RCA 3 SANYO SANYO 2 SANYO 3 SHARP SHARP 2 SHARP 3 SONY BETA SONY VHS SONY 8mm TOSHIBA JVC JVC 2 JVC 3 JVC 4 JVC 5 ZENITH PIONEER DVD PANASONIC DVD SAMSU...

Page 70: ...RN REMOTE CONTROL SIGNALS To operate other manufacturers remote control signals not preset using the remote control unit have the remote control unit learn these signals Example To learn the VCR power to turn on Before operation TosetthemodeswitchtoVCRwhenavideocassetterecorderisconnected see page 16 1 At the same time press the LEARN button and number button 2 LEARN EDIT 2 INPUT 1 2 3 4 TV DTV ON...

Page 71: ... control units 0 8 to 2 0 inch 2 to 5 cm VCR POWER If blinks once return to step2forotherbuttons Flashes four times it indicates an error has occurred This ends learn Repeat steps 2 and 3 for learning pertaining to other VCR devices If the remote control unit s LED blink four times it means that learning capacity has reached its maximum and no more learning will be possible 4 When the LEARN button...

Page 72: ...henanothercompany sreceiverisconnectedtotheMonitor have the signals for 4 to 6 learned see page 70 4 RECEIVER POWER button STANDBY ON Turns receiver power on and off 5 RECEIVER INPUT button Selects the input source connected to the receiver 6 RECEIVER VOL volume buttons Adjusts receiver volume level Press the plus button to increase the volume and the minus button to decrease it 7 RECEIVER MUTING ...

Page 73: ...tiaudio broadcasts 3 Direct channel selection buttons Press the button or buttons that corresponds to the channel that you wish to watch 4 button Used in channel selection 5 CH channel button Press plus or minus to tune in a higher or lower channel 6 Select Set buttons SET ENTER 2 3 5 2 3 5 Press the button to select items on the DTV MENU screen SET ENTER Press to activate the selected function 7 ...

Page 74: ...3 SOURCE POWER button Turns the power of the cable converter on and off 4 CH ENTER button Fix the selected channel with the direct channel selection buttons 5 CH RETURN channel return button Press to switch between the current channel and the channel you were watching immediately before Some manufacturers do not preset CH ENTER and CH RETURN Use these buttons to learn if necessary EDIT LEARN INPUT...

Page 75: ...uttons SET ENTER 2 3 5 2 3 5 Press the button to select items on the SAT GUIDE screen or SAT MENU screen SET ENTER Press to activate the selected function 4 CH ENTER button Fix the selected channel with the direct channel selection buttons Use this button to learn if necessary 5 SAT MENU button When this button is pressed the satellite broadcasting menu screen will be displayed 6 SAT GUIDE button ...

Page 76: ...R button Turns the power of the VCR on and off 3 8 PAUSE STILL button Set pauses and still pictures 4 1 REW button Rewinds the tape and allows picture search 5 7 STOP button Stop the tape transport 6 8 VCR REC record button Press both buttons at the same time to start recording 7 FF button Rapidly advances the tape and allows picture search 8 3 PLAY button Selects playback EDIT LEARN 1 3 2 4 6 5 7...

Page 77: ...kers and are not preset can also be operated using the remote control unit if buttons 1 to have learnt the functions see page 70 1 CHAPTER SEARCH button Pressing quickly once takes you to the start of the next chapter Each time you press it you move ahead to the start of the next chapter 2 4 CHAPTER SEARCH button Pressing quickly once takes you to the start of the chapter currently playing Each ti...

Page 78: ...source 1 When you use the digital tuner for the first time the Initial Setup screen will initially appear CH ENTER EDIT SOURCE INFO RECEIVER 4 MENU MENU VOL INPUT VOL GUIDE 8 LEARN CH RETURN POWER POWER POWER 1 1 7 3 FAVORITE CH 4 7 5 8 6 9 2 3 0 CH VCR REC 5 2 3 SET ENTER VOL MUTING DTV AUDIO DISPLAY DTV SAT DTV DVD TOP DTV SAT TV SAT DVD YELLOW RED BLUE GREEN 2 Press the YELLOW button The screen...

Page 79: ...ource and the CATV Mode When you select Air as the Input Source it not necessary to set the CATV Mode 8 Press the RED button The screen to the right will appear in a few seconds DTV ON OFF TV TV POWER POWER CH ENTER EDIT SOURCE INFO SUB CH INPUT RECEIVER 4 PROJECTION MONITOR RECEIVER REMOTE CONTROL UNIT Î MENU MENU VOL INPUT VOL SELECT SPLIT 1 2 3 4 GUIDE 8 LEARN CH RETURN POWER POWER POWER 1 1 7 ...

Page 80: ...singleprogram High Definition Television HDTV or multiple Standard Definition Television SDTV programs Digital television HDTV 1080I 1 or 720P 2 signal is transmitted over a single channel at 1 million pixels per 1 60th of a second SDTV 480P or 480I signals can be transmitted over many channelssimultaneously 480Pathalfamillionpixels per 1 60th of a second 480I at a quarter of a million pixels per ...

Page 81: ... 6 7 Press the button between the main and sub channels 2 Select using the CH button Use channel filtering to specify any channels you wish to filter out 3 Select using the FAVORITE CH button Select your desired channel from the 4 in the memory of each button blue green red and yellow Each time the button is pressed the channel will be changed in order of the 4 channels in that button s memory For...

Page 82: ...4 3 The following is the relationship between the picture size of the DTV broadcast that is received and the signal output from DTV OUTPUTS During 16 9 broadcast reception Letter Box During 4 3 broadcast reception Normal Letter Box Normal When recording a broadcast with a picture size of 16 9 on a VCR and viewing it with this monitor it is possible to see its original aspect by setting SCREEN mode...

Page 83: ...Y S T EM I N E OU T PROGRAM B L OC K CHANG E P A S SWORD D T V OU T O F F SET ENTER 6 After setting press MENU to turn the menu off 7 Signals will then be output from the MONITOR DTV OUTPUT jack Turn on the power to your VCR and then begin recording 2 3 5 SET ENTER 2 3 SET ENTER 5 NOTES The DTV OUT settings screen is displayed when an SH D09 digital tuner is connected Turning DTV OUT ON will make ...

Page 84: ...Rear panel Digital tuner SIGNAL SIGNAL SIGNAL SIGNAL SIGNAL Mixer CATV converter Splitter Splitter INPUT 2 ANTENNA AUDIO OUT DIGITAL DOLBY D I G I T A L Connect the VHF UHF signal to the digital tuner CONNECTION WITH RECEIVER Before making or changing connections set the power switch to off and unplug the power cord from the AC outlet Aftercompletingconnections performthe SYSTEMMODE setting operat...

Page 85: ... the input source selected by the receiver displayed To watch TV switch the receiver input to where the monitor s TV OUTPUT signal connects Channels can be selected using the monitor s remote control EDIT SOURCE INFO SUB CH INPUT RECEIVER 4 PROJECTION MONITOR RECEIVER REMOTE CONTROL UNIT Î MENU MENU VOL INPUT VOL SELECT SPLIT 1 2 3 4 DTV 5 2 3 GUIDE 8 LEARN CH RETURN POWER POWER POWER 1 1 7 3 FAVO...

Page 86: ...UP CC USE END MENU PICTURE 3 D Y C L E V E L 3 3 D NR L E V E L 3 CO L O F L E SH R T T O S VM H I GH E N M E P O S N T D PUR E I C N EMA HQ O T H E R E X I T USE END MENU MT S MA I N B A S S 0 0 0 T R E B L E B A L ANC E SURROUND E X I T USE END MENU SOUND O F F SUP E R B A S S O F F A N T URA L W I D E V POS I T I ON E X I T USE END MENU SCREEN T US E D O N C C O MOD E C C F F 1 E X I T USE END ...

Page 87: ...E END MENU SET UP CONV E RG E NC AD J C E N NA T URA L W I D E E AD J MU T I PO I T E R L N T PO I N T E X I T USE END MENU SET UP CHANN E L S E AU T O CHANN CHANN E L F A VOR I E C T E T L AD P D R E D S E E L T HA U NN E L P E X I T USE END MENU SET UP AN T E NA A CHANN E L S E T T I N D G ADD D E L CHAN N N E L 1 2 3 D L A B E L B A CD A E X I T USE END MENU SET UP B L U E GR E E N R E D F A VO...

Page 88: ...ymatching the and polarities The battery has worn out Strong lights striking the remote control sensor may cause the internal microcomputer to malfunction Adjust the picture quality The room is too bright Adjust the color convergence TV CATV MODE is set incorrectly The power will not turn on The Monitor is inoperative A TV broadcast station cannot be received No picture appears on the screen No so...

Page 89: ... rise buildings Influence of harmful waves produced by motor equipments such as hair dryers andvacuumcleaners ignitiondevicessuchascarsandmotorbikes flashingdevices such as thermostats and electricity discharge by transmission distribution lines Mixing of electric waves from TV stations FM stations amateur wireless public wireless simple wireless etc or nearby personal computer TV VCR audio equipm...

Page 90: ...ut Front both channels driven 10 W 10 W THD 1 1 kHz 8 ohms Built in speaker system 16 cm 6 5 16 in full range x 2 Tuner section Circuit type Video signal detection PLL full synchronous detection PLL digital synthesizer system Audio multiplex BTSC system Reception channels VHF CH2 CH13 UHF CH14 CH69 CATV STANDARD IRC or HRC CATV 1 125 CH Antenna terminals Antenna terminal 75 ohms UNBAL F type conne...

Page 91: ... ARB1527 91 OTHERS ...

Page 92: ...the above listed number for assistance PIONEER ELECTRONICS SERVICE INC CUSTOMER SERVICE DEPARTMENT P O BOX 1760 LONG BEACH CA 90801 1760 U S A For warranty information please see the Limited Warranty sheet included with your product Should this product require service in Canada please contact a Pioneer Canadian Authorized Dealer to locate the nearest Pioneer Authorized Service Company in Canada Al...

Reviews: