background image

EN

User manual

2

SP

Manual de utilizador 20

SJA9192/17

Summary of Contents for SJA9192

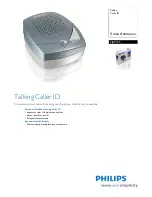
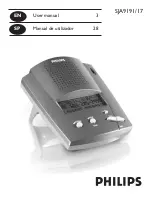
Page 1: ...EN User manual 2 SP Manual de utilizador 20 SJA9192 17 ...

Page 2: ...Special Features 3 Control Locations 4 Installation 5 Operation 7 LCD Prompts 13 Troubleshooting 14 Care Maintenance 15 Technical Support 16 Warranty 16 Contents EN 2 ...

Page 3: ...r shown on the LCD display Delete Button allows you to delete one or all Caller ID record DIALVM Button dials to your voice mail access number Languages English Spanish or French display prompts RealTime Clock shows the current time on the LCD display LCD Display Contrast Control allows you to adjust the display contrast Wall Mountable allows you to mount your caller ID unit on the wall Backlit LC...

Page 4: ...CallWaiting calls 9 TELEPHONE Jack connect line cord from your telephone into the jack labeled PHONE at the back of your caller ID unit 10 TEL LINE Cord Jack insert one end of the telephone line cord into the jack labeledTEL LINE and the other end into your wall jack 11 DC Jack the AC adapter must be connected for your Caller ID unit to operate Plug the adapter into the DC 9V jack at the back Inst...

Page 5: ... stored in your unit d If you do not plan to use your unit with batteries for a month or longer remove the batteries Batteries can leak chemicals that can destroy electronic parts e Dispose of old batteries promptly and properly Do not burn or bury them When the Low Battery icon appears replace the batteries 1 Disconnect the telephone line 2 Open the battery cover by inserting a sharp object such ...

Page 6: ...eAC adapter must be connected for your Caller ID unit to operate Plug the adapter s barrel plug into your Caller ID unit s DC 9V jack and plug the adapter into a standard AC outlet PLACING ONTHE DESK Insert the slots of the two Stand Studs into the matching tabs on the bottom cabinet respectively Then slide the Stand Studs along the tabs until they are locked to the bottom cabinet MOUNTING ONTHEWA...

Page 7: ...nch or Spanish 5 Press DIAL button to save your setting and REVIEW button to go to the next setting option SET AREA CODE Set Area Code Area codes of all incoming calls will be compared with the area code you entered to determine if it is a local call 1 Press DIAL button when SETAREA CODE appears on the LCD The first digit of the 3 digit area code will blink 2 Press REVIEW or REVIEW button to scrol...

Page 8: ...n SET CONTRAST appears on the LCD 2 Press REVIEW or REVIEW button to decrease or increase the LCD display contrast 3 Press DIAL button to save your setting 4 Press REVIEW button to go to the next setting option SET DIALVM Set DialVM Allows you to set your own voice mail access number 1 Press DIAL button when SET DIAL VM appears on the LCD The first digit of the voice mail access number will blink ...

Page 9: ...VATE CALL will be shown on the LCD display in such cases c If the area code of a caller s number matches your pre set local area code only the last 7 digits will be shown on the LCD display refer to the Set Area Code section on page 7 NEW CALL LIGHT INDICATOR Green When your caller ID unit receives a new incoming call the new call icon NEW appears on the LCD display and the New Call Light Indicato...

Page 10: ...age 8 to set the voice mail access number IMPORTANT Operation EN 10 a If the AC adapter is not connected the Message Waiting Light Indicator will flash every 3 seconds when you have new voice mail s LONG DISTANCE CALL If there is a long distance incoming call LONG DISTANCE appears alternatively with the caller s name DIALING FROM CALLER ID 1 When reviewing a Caller ID record press DIAL button to d...

Page 11: ... digits of the incoming number will be shown on the LCD display if it is a local call If it is not a local call 11digits 1 area code phone number will be shown when dialing back DELETING CALLER ID RECORD When the Caller ID record is full it automatically deletes the oldest Caller ID record as a new call comes in You can also delete individual call or all calls in the Caller ID record To DeleteA Ca...

Page 12: ...Operation EN 12 ...

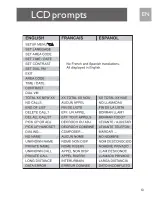
Page 13: ...13 LCD prompts EN ...

Page 14: ...isplay contrast refer to Set Contrast a Adjust the LCD display contrast refer to Set Contrast a Make sure you have subscribed to the Caller ID service b Wait until the phone rings twice before answering a call c Make sure telephone line cords are connected correctly refer to Connecting to a Telephone and or Answering Machine a Make sure you have subscribed to the Caller ID service including the CA...

Page 15: ... work improperly Use only fresh batteries of the required size and type Always remove old or weak batteries They can leak chemicals which can destroy elec tronic circuits Keep the Caller ID away from excessive dust and dirt which can cause premature wear of parts Wipe the unit with a damp cloth occasionally to keep it looking new Do not use harsh chemicals cleaning solvents or strong detergents to...

Page 16: ...e Philips limited warranty cover Philips Electronics warrants to the original purchaser of this product Consumer or you that the product and all accessories provided by Philips in original package Product are free from material defects in material and workmanship subject to the terms and conditions set forth below when installed and used normally and in accordance with operation instructions This ...

Page 17: ...ty This limited warranty does not cover 1 Product that has been subjected to misuse accident shipping or other physical damage improper installation abnormal operation or handling neglect inundation fire water or other liquid intrusion or 2 Product that has been damaged due to repair alteration or modi fication or 3 Problems caused by signal conditions network reliability or cable or antenna syste...

Page 18: ...n ty Philips will notify you and will request that you authorize the cost of replacement and return shipping costs for conditions not cov ered by this limited warranty What must you return with the Product to get warranty service 1 The entire original package and contents including the product and accessories along with a description of the malfunction or dif ficulty 2 Valid proof of purchase sale...

Page 19: ...tations on how long an implied warranty lasts so the above limitation may not apply to you In no event shall Philips be liable for any indirect special incidental con sequential or similar damages including but not limited to lost profits or revenue inability to use the product or other associated equipment the cost of substitute equipment and claims by third parties resulting from the use of the ...

Page 20: ...Características especiales 21 Controle las Ubicaciones 22 Instalación 23 Operación 25 LED 32 Localización de fallas 33 Cuide y Limpiar 34 Asistencia Técnica 35 Garantía 35 Contenido SP 20 ...

Page 21: ... desplazamiento desplace con facilidad los registros de identificación de llamada Botón de marcar marca el número que aparece en la pantalla de cristal líquido Botón para marcar correo de voz marca el número de acceso del correo de voz Idiomas instrucciones en inglés español o francés que aparecen en pantalla Reloj de tiempo real indica la hora actual en la pantalla de cristal líqui do Control de ...

Page 22: ...7 Botón DIAL marca el número que aparece en la pantalla También se usa este botón para ajustar el idioma el código de área la hora y fecha y el contraste de la pantalla de cristal líquido 8 Botón FLASH activa las multiconferencias con 3 participantes o las llamadas en espera 9 Ficha telefónica conecte el cable de línea proveniente del teléfono en la ficha rotulada PHONE que está situada en la part...

Page 23: ...e línea telefónica 1 pieza d Cable corto de línea telefónica 1 pieza INSTALACIÓN DE LAS PILAS Instale 4 pilas AAA se recomiendan las pilas alcalinas para retener los registros de identificación de llamada y mantener el funcionamien to continuo del reloj de tiempo real en caso de haber un corte de energía IMPORTANTE a Use solamente pilas nuevas del tamaño requerido y del tipo recomendado b No combi...

Page 24: ...da almacenados en la unidad CONEXIÓN DE LA UNIDADA UNTELÉFONOY O CON TESTADOR AUTOMÁTICO Luego de instalar las 4 pilas AAA conecte un extremo del cable de línea provisto en el enchufe de la unidad de identificación de llamadas rotuladoTEL LINE y conecte el otro extremo en el enchufe telefóni co de pared Conecte el cable de línea que tiene en el teléfono en el enchufe de la unidad de identificación...

Page 25: ...ificación de llamadas con los tornillos de soporte y deslice la unidad hacia abajo para fijarla Operación MODO DE INACTIVIDAD Cuando la unidad de identificación de llamadas esté en modo de inac tividad aparecen en la pantalla la condición de la llamada y el reloj MENÚ DE CONFIGURACIÓN El menú de configuración Setup tiene cinco opciones Set Language Fijar idioma Permite seleccionar las instruccione...

Page 26: ... área 5 Presione el botón DIAL para guardar el valor de ajuste y pulse el botón REVIEW para pasar a la siguiente opción SET TIME DATE Nota si desea cambiar el código de área repita los pasos 1 al 4 SetTime Date Ajustar hora y fecha Permite ajustar el reloj hora y minuto y la fecha mes y día También se actualizará el reloj con una identificación de llamada entrante si que está suscrito al servicio ...

Page 27: ...desplazar dígitos e ingresar el primero del número de acceso 3 Presione el botón DIAL para pasar al segundo dígito 4 Repita los pasos 2 y 3 hasta haber terminado de ingresar el número de acceso del correo de voz Ahora está listo para mar car el número de acceso del correo de voz presionando el botón DIALVM 5 Presione el botón DIAL para guardar el valor de ajuste y pulse el botón REVIEW para pasar ...

Page 28: ... identificación de llamada Aparecerán PRIVATE NAME o PRIVATE CALL en la pan talla en tales casos c Si el código de área del número de la persona que llama coincide con el código de área local predefinido aparecerán en la pantalla solamente los últimos 7 dígitos Consulte la sección Set Area Code Fijar código de área INDICADOR LUMINOSO DE LLAMADA NUEVA verde Cuando la unidad de identificación de lla...

Page 29: ...umpidamente cuando tiene mensajes de voz en el buzón y el icono aparece en la pantalla Luego de haber escuchado a los mensajes de voz se apagarán el indicador lumi noso de mensaje en esperay el icono Si desea escuchar los mensajes de voz presione el botón DIAL VM para marcar el número de acceso del correo de voz Aparece en pantalla PICK UP HANDSET Luego levante el auricular para marcar el número d...

Page 30: ... 1 código de área número telefónico 4 Levante el auricular para marcar el número mostrado IMPORTANTE a Debe guardar con anterioridad el código de área antes de poder ajustar el formato del número Consulte la sección Set Area Code Fijar código de área en la página 6 b Si ha ajustado el código de área local el código de área de todos los números entrantes será comparado con aquél para determinar si ...

Page 31: ... CALL 2 Presione nuevamente el botón DELETE para efectuar la supresión Si desea suprimir todos los registros de identificación de llamadas 1 Mientras revisa el registro de una llamada identificada pre sione y mantenga así el botón DELETE durante unos 3 segundos DEL ALL CALLS aparece en la pantalla de cristal líquido 2 Presione nuevamente el botón DELETE para suprimir todos los registros 31 Operaci...

Page 32: ...LED SP 32 ...

Page 33: ...ntraste de la pantalla véase Fijar Contraste a Ajuste el contraste de la pantalla LCD véase Fijar Contraste a Asegúrese de haberse suscrito al servicio de Identificador de Llamadas b Espere hasta que el teléfono suene dos veces antes de contestar una llamada c Asegúrese que los cables de la linea del teléfono estén conectados correctamente véase Conexión al Teléfono y o Contestadora a Asegúrese qu...

Page 34: ...cuidado pues si lo deja caer podrán dañarse las placas de circuitos y las cajas con lo que el telé fono dejará de funcionar correctamente Use solamente pilas nuevas del tamaño requerido y del tipo recomendado Quite siempre las pilas viejas o de poca carga pues pueden descargar sustancias químicas que pueden destruir los circuitos electrónicos Mantenga el Caller ID alejado del polvo y la suciedad e...

Page 35: ...ilips si el producto no está libre de defectos importantes de material y mano de obra durante el período de la garantía limitada en adelante producto con defectos importantes Durante el período de la garantía limitada Philips reemplazará sin cargo alguno todo producto que presente defectos importantes Philips devolverá en buenas condiciones de funcionamiento los productos reparados o reemplazados ...

Page 36: ...meros de serie electróni cos del producto o se los dejó ilegibles 6 El producto fue comprado usado o reparado fuera de los Estados Unidos o Canadá o se lo utilizó con fines comer ciales o institucionales entre otros con el propósito de alquilarlo 7 Se devolvió el producto sin un comprobante de compra váli do véase a continuación 8 Los cargos de instalación o configuración ajuste de controles del c...

Page 37: ...ciones exentas en esta garantía limitada Qué debe devolverse con el producto para obtener el servicio de garantía 1 El envase original y su contenido incluso el producto y los accesorios junto con una descripción del mal funcionamiento o dificultad 2 Un comprobante de compra válido recibo donde se iden tifique el producto adquirido modelo del producto y la fecha de compra o de recibo 3 El nombre l...

Page 38: ... en la duración de una garantía implícita en algunos esta dos quizá la limitación anterior no se aplique en su caso Philips no será tenido por responsable de los daños indirectos cuantificables incidentales o similares entre otros la pérdida de utilidades o ingresos la imposibilidad de utilizar el producto o equipos relacionados el costo de equipos de reemplazo y recla maciones de terceros que res...

Page 39: ...39 SP ...

Page 40: ...ons are subject to change without notice Trademarks are property of Philips Accessories and Computer Peripherals 2006 Philips Accessories and Computer Peripherals Ledgewood NJ USA Printed in China www philips com ...

Reviews: