background image

Micro Hi-Fi System

MC235B
MC235

User manual

MC235B_235_79_Eng 

13/2/07, 18:04

1

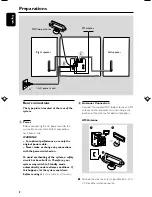
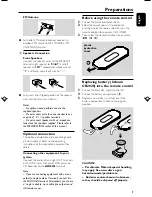
Summary of Contents for MC235B/79

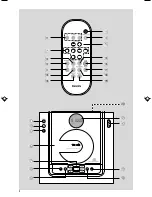
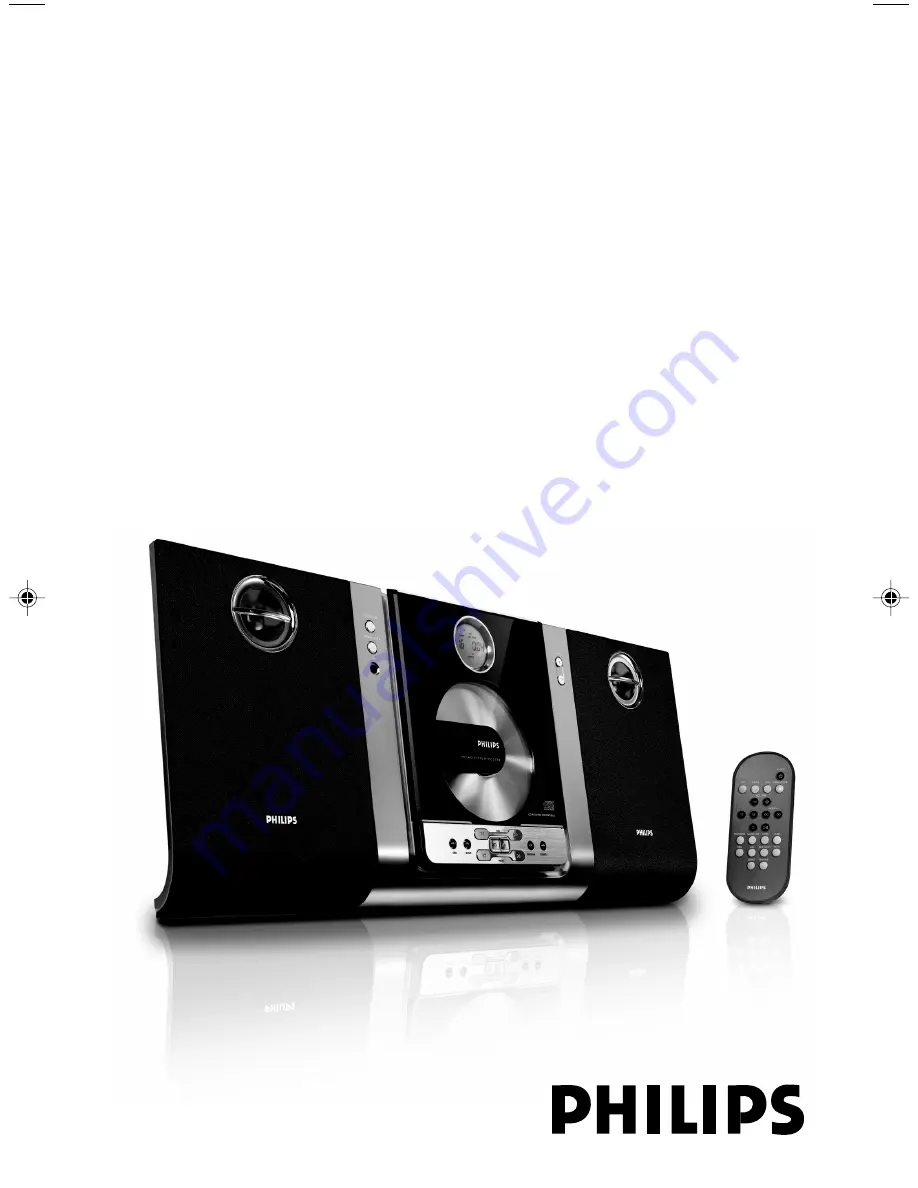
Page 1: ...Micro Hi Fi System MC235B MC235 User manual ...

Page 2: ...2 ...

Page 3: ...3 1 7 0 8 3 5 1 3 4 6 7 8 9 2 5 0 3 ...

Page 4: ...h a safe volume level Set your volume control at a low setting Slowly increase the sound until you can hear it comfortably and clearly without distortion Listen for reasonable periods of time Prolonged exposure to sound even at normally safe levels can also cause hearing loss Be sure to use your equipment reasonably and take appropriate breaks Be sure to observe the following guidelines when using...

Page 5: ...5 English Français Index English 6 CAUTION Use of controls or adjustments or performance of procedures other than herein may result in hazardous radiation exposure or other unsafe operation ...

Page 6: ...ume and sound 11 CD Operation Playing a disc 12 Selecting a different track 12 Finding a passage within a track 12 Different play modes Shuffle and Repeat 13 Programming track numbers 13 Reviewing the programme 13 Erasing the programme 13 Radio Reception Tuning to radio stations 14 Programming radio stations 14 Tuning to preset radio stations 14 Changing tuning grid 14 Clock Timer Setting the cloc...

Page 7: ...be easily reached The apparatus shall not be exposed to dripping or splashing Place the system in a location with adequate ventilation to prevent internal heat build up in your system Allow at least 10 cm 4 inches clearance from the rear and the top of the unit and 5 cm 2 inches from each side The ventilation should not be impeded by covering the ventilation openings with items such as newspapers ...

Page 8: ...has been built in Therefore your system may switch to Standby mode automatically under extreme conditions If this happens let the system cool down before reusing it not available for all versions B Antennas Connection Connect the supplied MW loop antenna and FM antenna to the respective terminals Adjust the position of the antenna for optimal reception AM Antenna Position the antenna as far as pos...

Page 9: ...nt to your system Connect the audio left and right OUT terminals of aTV VCR Laser Disc player DVD player or CD Recorder to the AUX IN terminals Note If you are connecting equipment with a mono output a single audio out terminal connect it to the AUX IN left terminal Alternatively you can use a single to double cinch cable the output sound still remain mono CAUTION Perchlorate Material special hand...

Page 10: ...me PLAYÉ Å starts or interrupts playback PRESET forTUNER selects a preset radio station for CD skips to the beginning of a current track previous subsequent track 8 DBB Dynamic Bass Boost enhances the bass 9 BAND selects a waveband 0 PROGRAM for CD programmes tracks and reviews the programme forTUNER programmes tuner stations SOURCE selects the respective sound source for CD TUNER AUX CLOCK SET se...

Page 11: ... volume level of 20 interactive sound settings source and tuner presets will be retained in the player s memory Adjusting volume and sound 1 Press the VOLUME 3 4 control to decrease or increase the volume Display shows the volume level VOL and a number from MIN1 2 30 31 MAX 2 Press DSC repeatedly to select the desired sound effect ROCK JAZZ POP CLASSIC 3 Press DBB to switch bass enhancement on or ...

Page 12: ...ber of tracks are displayed 4 PressÉ Åto start playback Current track number and elapsed playing time of the track are displayed during disc playback 5 To interrupt playback pressÉ Å PressÉ Å again to resume play 6 To stop disc playback press STOP 9 Note CD play will also stop when the CD door is opened the disc has reached the end you select another source TUNER AUX or standby Selecting a differe...

Page 13: ...numbers Programme in the STOP position to select and store your disc tracks in the desired sequence If you like store any track more than once Up to 40 tracks can be stored in the memory 1 Press PROGRAM to enter the programming mode A track number is shown and PROGRAM flashes 2 Use the í or ë to select your desired track number 3 Press PROGRAM to confirm the track number to be stored The number of...

Page 14: ... stations are programmed in order of waveband reception strength FM followed by AM The last preset automatically stored will then be played Manual programming 1 Tune to your desired station seeTuning to radio stations 2 Press PROGRAM to activate programming PROGRAM flashes in the display 3 Press PRESET or to allocate a number from 1 to 40 to this station 4 Press PROGRAM again to confirm the settin...

Page 15: ... select sound source Display sequence shows CD TUNER flashes 3 Press TIMER to confirm your desired mode 4 Press VOLUME to set the hours 5 Press TIMER again The clock digits for the minutes flash 6 Press VOLUME to set the minutes 7 Press TIMER to confirm the time The timer is now set and activated Activating and deactivating TIMER Press TIMER on the remote to turn off the timer or turn on to the la...

Page 16: ...t cloth slightly moistened with a mild detergent solution Do not use a solution containing alcohol spirits ammonia or abrasives Cleaning Discs When a disc becomes dirty clean it with a cleaning cloth Wipe the disc from the center out Do not use solvents such as benzene thinner commercially available cleaners or antistatic spray intended for analog records SPEAKERS Bass reflex system Dimensions w x...

Page 17: ...em and yourTV orVCR GENERAL The system does not react when buttons Remove and reconnect the AC power plug and are pressed switch on the system again Sound cannot be heard or is of poor Adjust the volume quality Disconnect the headphones Check that the speakers are connected correctly Check if the stripped speaker wire is clamped The left and right sound outputs are Check the speaker connections an...

Page 18: ...r the above listed Consumer Electronics products if used in commercial applications 6 Philips may at its discretion choose to replace rather than repair any product covered by this warranty 7 Product accessories are covered by the same warranty period Please contact the PhilipsTechnology Care Centre for free replacement of faulty accessories 8 This Manufacturers Warranty is neither transferable no...

Page 19: ... the product or repair by an unauthorised technician 4 Reasonable evidence in the form of a sales docket must be supplied to indicate that the product was purchased no more than 12 months prior to the date of your claim 5 In the event of a failure Philips shall be under no liability for any injury or any loss or damage caused to property or products other than the product under guarantee This guar...

Page 20: ...English Français CLASS 1 LASER PRODUCT MC235B MC235 Meet Philips at the Internet http www philips com usasupport Printed In China PDCC JH 0708 ...

Reviews: