English
1 Important
Read these instructions for use carefully before using the appliance and save them for future
reference.
Danger
•
Do not immerse the motor unit in water nor rinse
it under the tap.
•
Do not connect the appliance to a timer switch.
Warning
•
Before you connect the appliance to the power,
make sure that the voltage indicated on the bottom
of the appliance corresponds to the local power
voltage.
•
If the power cord, the plug, or other parts are
damaged, do not use the appliance.
•
If the power cord is damaged, you must have it
replaced by Philips, a service center authorized by
Philips, or a similarly qualiied person to avoid a
hazard.
•
This appliance is not intended for use by persons
(including children) with reduced physical, sensory
or mental capabilities, or lack of experience and
knowledge, unless they have been given supervision
or instruction concerning use of the appliance by a
person responsible for their safety.
•
For their safety, do not allow children to play with
the appliance.
•
Be very careful when you handle the cutter,
especially when you remove it from the worm shaft
and during cleaning. The cutting edges are very
sharp!
•
Before you remove any accessory, switch the
appliance off and unplug it.
•
Do not use your ingers or an object (e.g. a spatula)
to push ingredients into the hopper while the
appliance is running. Only the pushers are to be
used for this purpose.
•
Do not insert your ingers in the metal drum while
the appliance is running.
•
Make sure you fully assemble and lock the hopper
before putting in the worm shaft, blade and screen
into the hopper.
Caution
•
The appliance is intended for household use only.
•
Before you connect the appliance to the mains,
make sure that the appliance is assembled correctly.
•
Never use any accessories or parts from other
manufacturers or that Philips does not speciically
recommend. If you use such accessories or parts,
your guarantee becomes invalid.
•
Always switch the appliance off by turning the
switch knob to .
•
Do not let the appliance run unattended.
•
Do not exceed the maximum operating time of
4 minutes under heavy load applications. Let the
appliance cool down to room temperature before
next operation.
•
Do not use the button with the plastic hopper.
•
Noise level: Lc = 87 dB [A]
Safety system (Fig. 9)
This appliance is equipped with overheat protection. If the appliance overheats, it switches
off automatically. Unplug the appliance and let it cool down until room temperature. Then,
put the mains plug back into the power outlet and switch on the appliance again. Please
contact your Philips dealer or an authorized Philips service center if the overheat protection
is activated too often.
The appliance is itted with a safety feature which safeguards against overloading. In case the
appliance is overloaded, it automatically activates the overload protection and switches off.
If this occurs, set the switch knob to , unplug the appliance and let it cool down for
15 minutes. Remove the residue inside the hopper and then press the overload reset button
on the bottom of the motor unit (Fig. 9).
Electromagnetic ields (EMF)
This Philips appliance complies with all standards regarding electromagnetic ields (EMF). If
handled properly and according to the instructions in this user manual, the appliance is safe
to use based on scientiic evidence available today.
Recycling
Your product is designed and manufactured with high quality materials and
components, which can be recycled and reused.
When you see the crossed-out wheel bin symbol attached to a product, it means the
product is covered by the European Directive 2002/96/EC:
Never dispose of your product with other household waste. Please inform yourself
about the local rules on the separate collection of electrical and electronic products.
The correct disposal of your old product helps prevent potentially negative
consequences on the environment and human health.
2 Introduction
Congratulations on your purchase and welcome to Philips! To fully beneit from the support
that Philips offers, register your product at www.philips.com.
With this meat mincer, you can
•
mince meat
•
make sausages
•
make kebbe
•
cut vegetables
Tip
•
For more recipes, go to www.kitchen.philips.com.
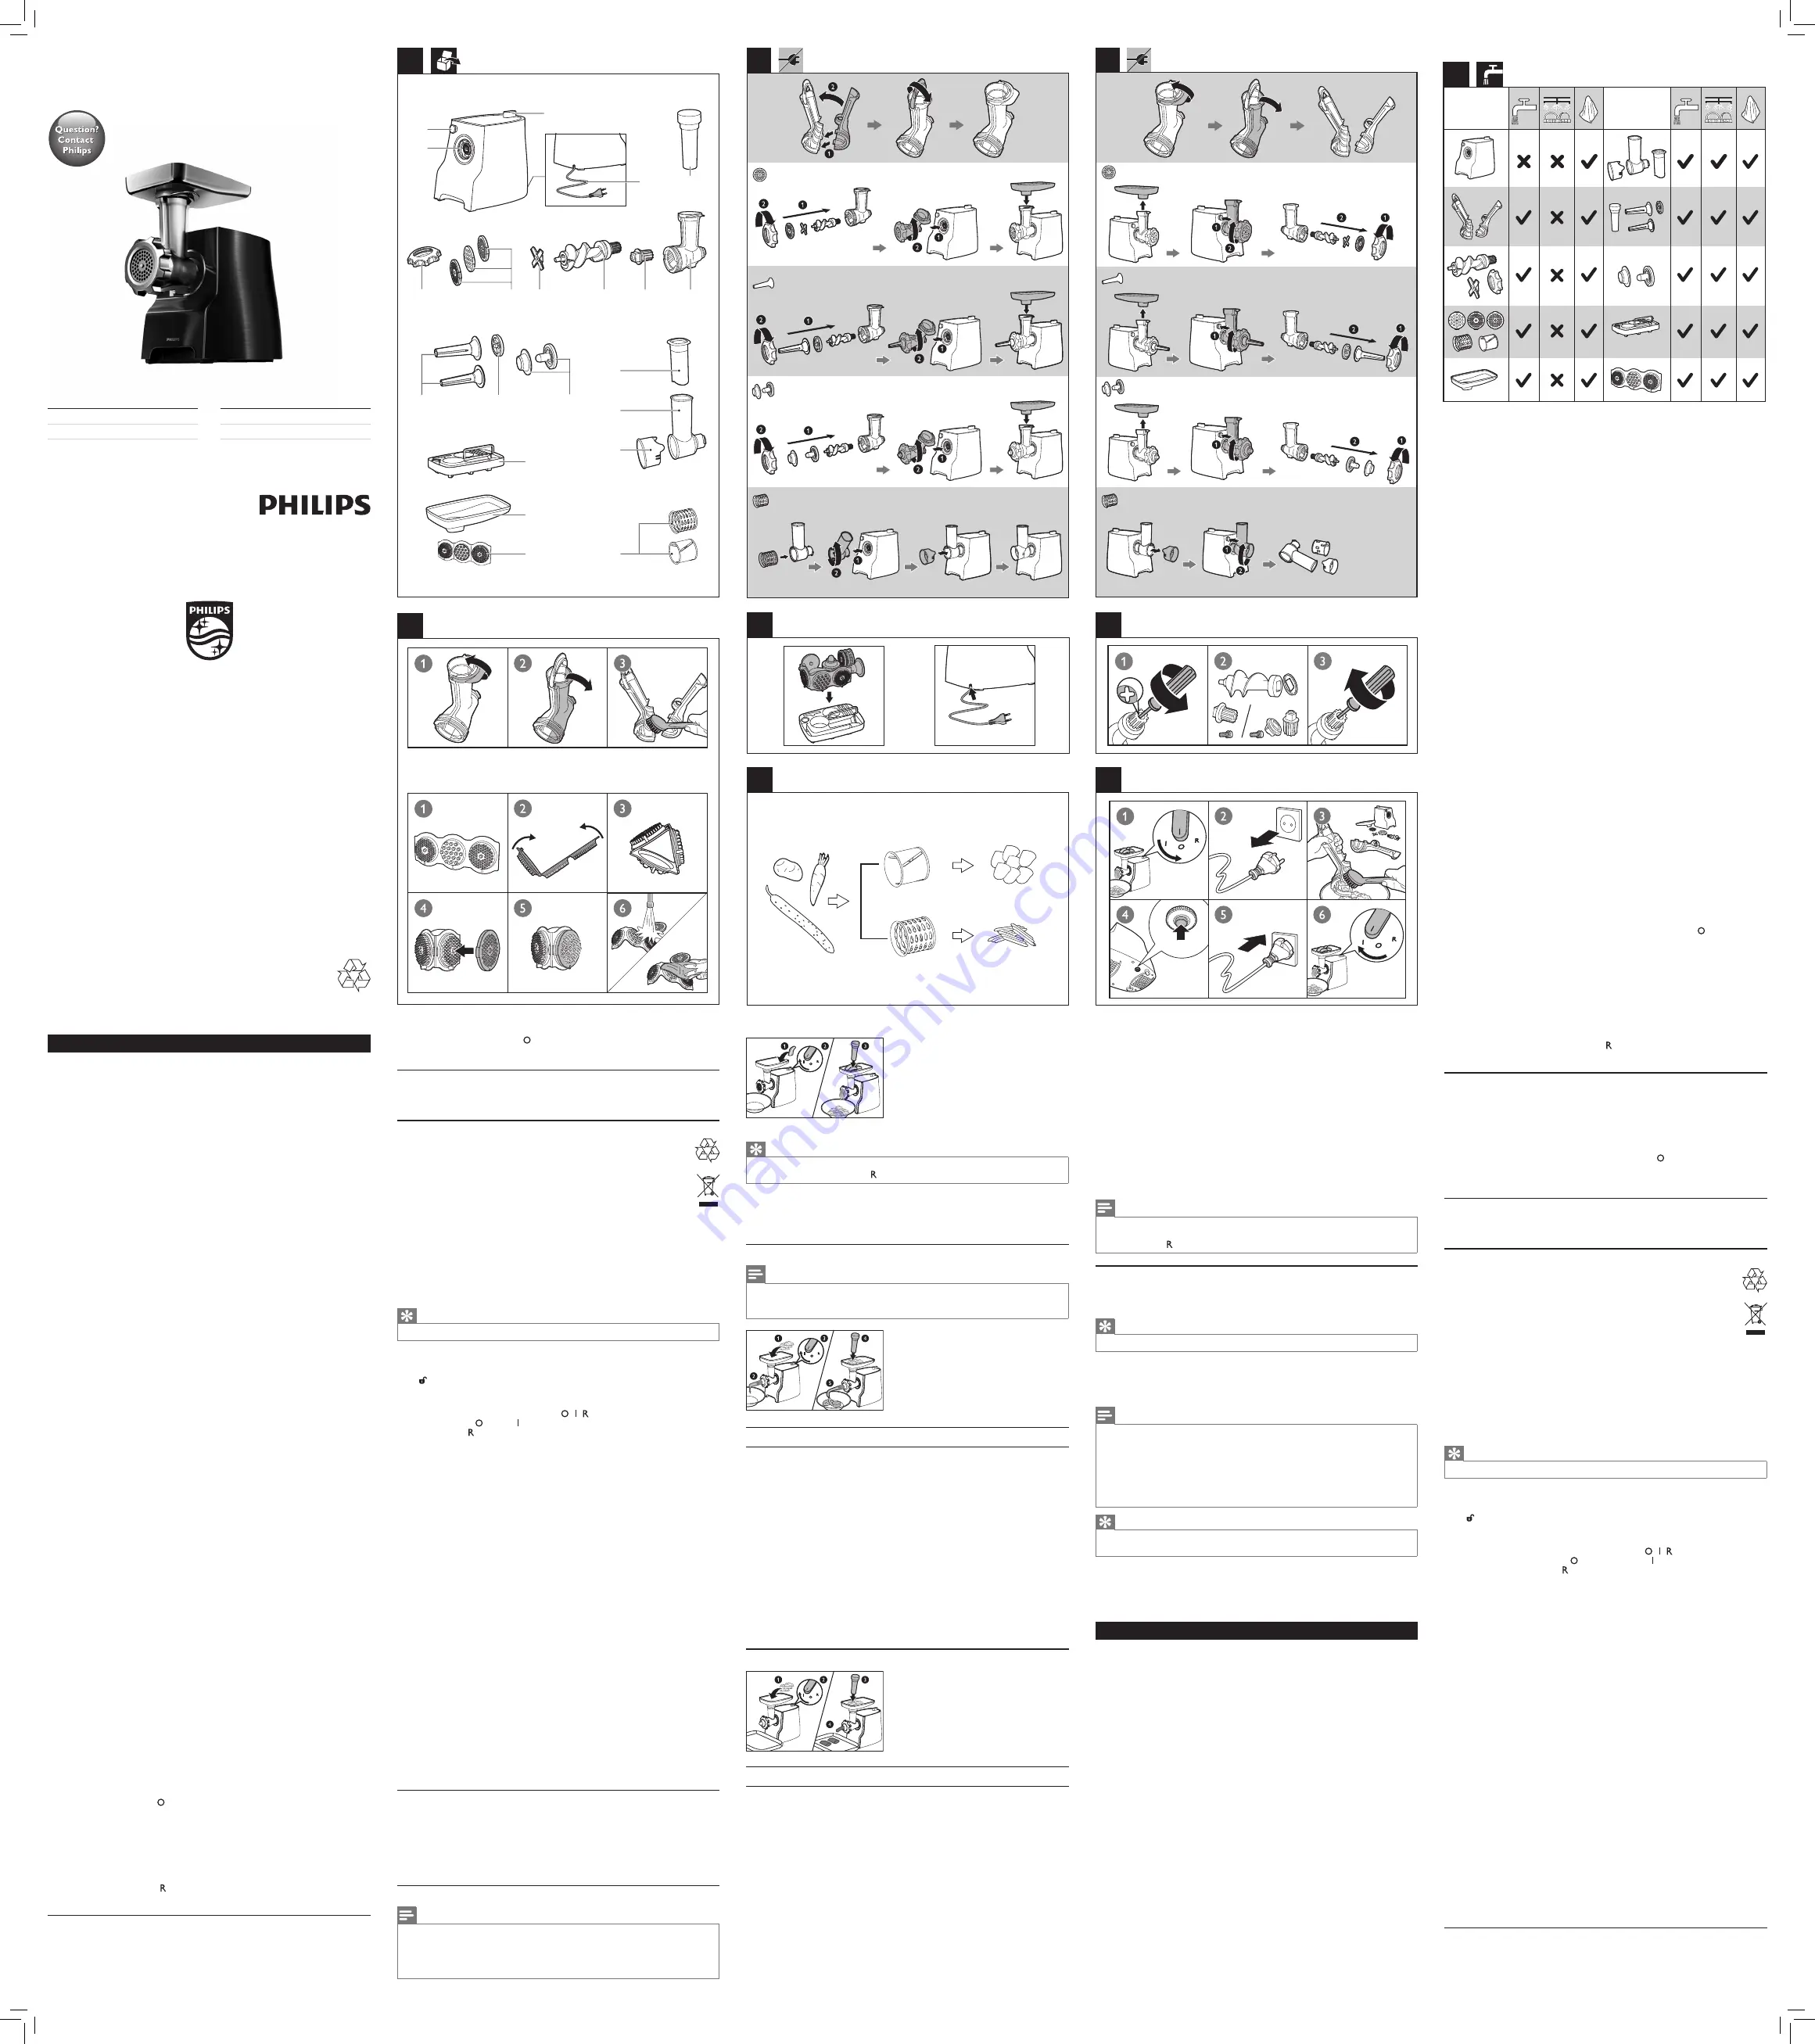
3 What’s in the box (Fig. 1)
a
Hopper release button
•
Press and hold it when you remove the hopper.
b
Motor unit
c
Switch knob for power and reverse modes
/ /
•
Switch off ( ) or on ( ) the meat mincer.
•
Switch to to reverse the motor.
d
Power cord
e
Pusher for the IntraClean hopper
f
IntraClean hopper
g
Extra gear for the worm shaft
h
Worm shaft
i
Cutter/Knife
j
Hygienic stainless steel grinding discs
•
A
: Coarse grinding disc (diameter of 8 mm)
•
B
: Medium grinding disc (diameter of 5 mm)
•
C
: Fine grinding disc (diameter of 3 mm)
k
Screw ring
l
Sausage horns
•
A
: Large sausage horn (diameter of 22 mm)
•
B
: Small sausage horn (diameter of 12 mm)
m
Sausage separator
n
Kebbe maker
•
A: Kebbe separator
•
B: Kebbe shaper
o
Pusher for the plastic hopper
p
Plastic hopper
q
Shield
r
Metal drums
• A: Coarse grater drum
•
B: Slicer drum
s
Accessories tray (HR2745 only)
t
Metal meat tray
u
Innovative cleaning tool
4 Before first use
Before you use the appliance and accessories for the irst time, thoroughly clean the parts
that come into contact with food. (See “Cleaning” in Fig. 4 and Fig. 5).
Clean the IntraClean hopper (Fig. 5)
The new innovative IntraClean technology allows you to get 100% access to all parts of the
metal hopper, so that you can fully and easily clean it even from inside.
Make sure you clean the IntraClean hopper according to Fig. 5.
5 Mince meat
Before you start, make sure you assemble according to Fig. 2-1.
For disassembly, refer to Fig. 3-1.
Mince meat
Note
•
Never grind bones, nuts, or other hard items.
• Never use frozen meat! Before you grind the meat, defrost it irst.
•
Do not overload the appliance by pushing too much meat into the hopper.
•
Depending on the granularity of minced meat, select the proper grinding disc. You can also
grind for more than once for iner texture.
Tip
•
Remove bones, gristle, and sinews out of the meat as much as possible.
•
If the hopper is blocked, switch to to reverse the motor and clear the leftover meat.
6 Make sausages
Before you start, make sure you assemble according to Fig. 2-2.
For disassembly, refer to Fig. 3-2.
Make sausages
Note
•
Do not block the air outlet grooves of the sausage horn.
•
Do not make the sausages too thick in case the sausage skin is overstretched.
•
Keep the sausage skin wet to prevent it from sticking on the sausage horn.
Recipe
Sausages
Ingredients:
•
800 g pork belly
•
1.6 kg pork shoulder
•
4 m of pork sausage skin (wet)
•
Seasoning such as Salt, pepper, spices and herbs of your choice
Directions:
1
Chop pork into pieces to it the hopper of the meat mincer.
2
Grind the pork belly and shoulder together using the coarse screen.
3
Add seasoning and mix well (tip: fry a spoonful of the mixture to check the taste).
4
Apply the wet sausage skin to the sausage horn, and attach to the meat mincer (no
blade needed).
5
Leave adequate sausage skin at the beginning before turning on the meat mincer.
7 Make kebbe
Before you start, make sure you assemble according to Fig. 2-3.
For disassembly, refer to Fig. 3-3.
Make kebbe
Recipe
Kebbe
Yield
: 5-8 servings
Ingredients:
•
Outer casing
• 500 g lamb or fat-free mutton, cut into strips
• 500 g bulgur wheat, washed and drained
•
1 small onion and cooked
•
Filling
• 400 g lamb, cut into strips
•
15 ml oil
• 2 medium onions, inely chopped
• 5-10 ml ground allspice
• 15 ml plain lour
•
salt and pepper
Directions:
•
Outer casing
1)
Mince the meat, wheat, and onion together with the ine grinding disc.
2)
Thoroughly mix the minced ingredients, and then mince the mixture twice again.
3)
Use the kebbe maker to shape the mixture into kebbe casing.
•
Filling
1)
Mince the meat with the medium grinding disc.
2)
Fry the onion chops until they turn golden brown.
3)
Add the minced meat and other ingredients in, and then cook for 1-2 minutes.
4)
Drain off excessive fat and cool the illing down.
•
Cooking
1)
Push some illing into the outer casing, and then pinch both ends to seal it.
2)
Heat the oil for deep frying (190°C).
3)
Deep fry the kebbe for 3-4 minutes, or until it turns golden brown.
8 Cut vegetables
Before you use the appliance for the irst time, thoroughly clean the parts that come into
contact with food.
Before you start, make sure you assemble according to Fig. 2-4.
For disassembly, refer to Fig. 3-4.
Fig. 7 indicates the foods that each drum is applicable to and the cutting shapes.
Note
•
Only use the plastic hopper in combination with the metal drums and the pusher for plastic
hopper.
•
Do not press the button during use of the plastic hopper.
Cut vegetables
Cut vegetables into pieces or strips that can be easily pushed into the hopper.
1
Switch on the appliance.
2
Push the vegetables into the hopper.
Tip
•
You can also grate cheese.
9 Cleaning and maintenance (Fig. 4, Fig. 5 and
Fig. 6)
Note
•
Before you remove accessories or clean the motor unit, switch off and unplug the appliance.
•
Do not immerse the motor unit in water nor rinse it under the tap.
•
Do not clean the metal parts in a dishwasher.
• Clean the main unit with a moist cloth.
•
Wash removable parts with a soft brush in soapy water, rinse them with clear water, and then
dry them with soft cloth or tissues immediately.
•
Lightly brush the metal parts with fat or oil to prevent rusting.
• Store the accessories according to Fig. 6.
Tip
•
Use the innovative cleaning tool to remove the remains stuck in the grinding discs. Rinse them
with clear water, and then dry them with soft cloth or tissues immediately.
10 Replace the gear (Fig. 8)
When you mince sticky or fatty meat, use the supplied plastic coupling. For instructions on
how to replace the coupling, see Fig 8.
1
,
,
.
•
.
•
.
•
,
.
•
,
,
.
•
,
,
Philips
,
Philips
.
•
,
,
(
)
.
HR2743
HR2745
EN
User manual
KK
RU
UK
Specifications are subject to change without notice
© 2014 Koninklijke Philips N.V.
All rights reserved.
4240 002 01081
3-1
3-2
3-4
3
2
2-1
2-2
1
8
9
6
5
7
2-4
2-3
3-3
A
B
A
B
C
i
B
A
A
B
l
p
q
o
u
t
m
k
j
h
g
e
d
c
b
a
s
f
r
n
(HR2745)
4
(HR2745)
•
.
•
,
,
.
!
•
,
,
.
•
,
(
,
)
.
.
•
,
.
•
,
,
.
•
.
•
,
.
•
Philips
.
,
.
•
.
•
.
•
4
.
.
•
.
•
: Lc = 87 [A]
(
: 9)
.
,
.
,
.
,
,
.
, Philips
Philips
.
.
,
.
,
,
15
.
,
(
: 9).
(
)
Philips
(EMF)
.
,
.
,
.
,
2002/96/EC
.
.
.
.
2
Philips
!
Philips
,
www.philips.com
.
:
•
;
•
;
•
;
•
•
, www.kitchen.philips.com
.
3
(1-
-
).
a
•
.
b
c
/ /
•
( )
(
).
•
.
d
e
IntraClean
f
IntraClean
g
h
i
/
j
•
A
:
(
: 8 )
•
B
:
(
: 5 )
•
C
:
(
3 )
k
l
•
A
:
(
: 22 )
•
B
:
(
: 12 )
m
n
• A:
• B:
o
p
q
r
• A:
• B:
s
(
HR2745
)
t
u
4
,
(«
»
. 4
5-
).
IntraClean
( 5-
)
IntraClean
100%
,
.
IntraClean
5-
5.
Always there to help you
Register your product and get support at
www.philips.com/welcome