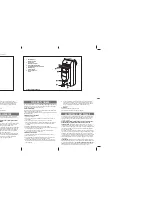
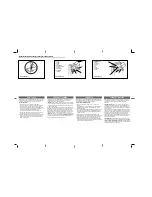
General description
(fig. 1)
A
Lever (for keeping cans in position and switching
on/off)
B
Magnet (can be placed on the lid to hold it after
opening the can)
C
Cutter
D
Drive wheel
E
Can support
Opening a can
Cans of many different shapes can be opened with this
appliance.
- Plug the cord into a mains outlet.
- Fig. 2. Take the can opener in your right hand. Raise
the lever (A) with your thumb. Position the can with
your left hand.
It is advisable to let large-sized cans rest on a table-
top or sink.
- Fig. 3. The rim of the can should be resting on the
drive wheel (D).
- Fig. 4. While still holding the can, move the lever
downwards.
- Fig. 5. You can move the swing-out arm of the
magnet (B) as indicated to position the magnet on the
lid.
- Fig. 6. Press the lever firmly. The motor will start
running.
Now you can release the can.
The drive wheel will make the can rotate, while the
cutter (C) is cutting loose the lid.
The appliance will switch off automatically when the
cutting is completed.
As long as the lever is in down-position the can will
be held by the appliance.
- Fig. 7. Take the can in your left hand. Raise the lever
with the thumb of your right hand.
Now you can remove the can. The lid will be held by
the magnet.
- Fig. 8. Take the loose lid carefully from the magnet:
the edge may be sharp!
- Fig. 9. Swing the arm of the magnet back and replace
the magnet.
Cleaning
- Remove the plug from the mains socket.
- Fig. 10. Move the lever upwards until it stops. Now
you can pull the lever out of the can-opener. Pull in
the direction of the arrow.
- Fig. 11. Move the arm holding the magnet into most
upright position and pull the arm directly from the
appliance. Move in the direction of the arrow.
Now you can rinse or wash the lever and arm. Do not
forget to dry these two parts.
- You can clean the can-opener with a damp cloth.
Neither immerge the appliance in water nor rinse it
under the tap.
- After cleaning you can reassemble the swing-out arm
and lever reversing the above procedure.
HR 2475
English
Important
• Read the instructions for use carefully
together with the illustrations before using the
appliance.
• Check if the voltage indicated on the
appliance corresponds to the mains voltage in
your home.
• Never immerse the appliance in water or
another liquid. Do not rinse either.
You can clean the appliance with a damp cloth
after removing the plug from the mains
socket.
• Do not operate the appliance with a damaged
cord or plug.
• Do not switch on without a can being in
position as this could damage the cutter.
• Take care: the cutter and the edges of
removed lids are sharp!
• Do not open cans which are under pressure
(e.g. cans containing fizzy drinks) with this
appliance as the contents may squirt from the
can and enter the appliance.
• Do not open cans with inflammable contents
with this appliance as the contents could be
ignited by a small spark from the switch.
Description générale
(Fig. 1)
A
Levier (pour maintenir la boîte et faire le contact
marche/arrêt)
B
Aimant (à positionner sur le couvercle pour le
retenir après ouverture de la boîte)
C
Couteau
D
Roue d’entraînement
E
Support des boîtes
Utilisation
Toutes sortes de boîtes peuvent etre ouvertes avec cet
ouvre-boîtes.
- Branchez l’appareil.
- Fig. 2. Prenez l’appareil dans la main droite puis levez
le levier (A) avec le pouce. Tenez la boîte de la main
gauche. Il est pratique de laisser les grosses boîtes
en appui sur la table ou sur l’évier.
- Fig. 3. Appuyez le bord de la boîte sur la roue
d’entraînement (D).
- Fig. 4. Tout en retenant la boîte, appuyez sur le levier.
- Fig. 5. Faites pivoter le bras support de l’aimant (B)
pour qu’il vienne se coller sur le couvercle.
- Fig. 6. Appuyez fermement sur le levier.
Le moteur se met en marche.
Maintenant, vous pouvez lâcher la boîte.
La roue d’entraînement fait tourner la boîte et le
couteau (C) coupe le couvercle. Lorsque la boîte est
complètement ouverte, I’appareil s’arrête
automatiquement.
Tant que le levier n’est pas relevé, la boîte est
retenue par l’appareil.
- Fig. 7. Tenez la boîte et relevez le levier avec le
pouce pour la libérer.
Le couvercle est retenu par l’aimant.
- Fig. 8. Faites très attention en retirant le couvercle
de l’aimant car les bords sont très coupants.
- Fig. 9. Repliez le bras-support de l’aimant.
Entretien
- Débranchez l’appareil avant tout entretien.
- Fig. 10. Relevez le levier en position maximum pour
pouvoir le démonter, puis tirez-le dans le sens de la
flèche.
- Fig. 11. Amenez le bras-support de l’aimant en
position verticale puis tirez-le dans le sens de la
flèche pour le démonter.
Lavez puis essuyez le levier et le bras.
- Nettoyez l’appareil avec un chiffon humide. Ne le
plongez jamais dans l’eau. Ne le rincez jamais sous le
robinet.
- Après le nettoyage, remontez votre ouvre-boîtes en
exécutant la manoeuvre inverse.
Français
Important
• Lisez attentivement ce mode d’emploi et
regardez bien les illustrations avant de vous
servir de votre appareil.
• Vériflez que la tension et la fréquence
indiquées sur l’appareil correspondent à celle
de votre réseau électrique.
• Ne plongez jamais votre appareil dans I’eau.
Ne pas le rincer.
Pour nettoyer votre ouvre-boîtes, essuyez-le
avec une éponge humide apres l’avoir
débranché.
• N’utilisez pas votre appareil si le cordon ou la
fiche sont endommagés.
• Ne faites pas fonctionner l’appareil à vide.
• Faites très attention: le couteau et le bord du
couvercle sont très coupants.
• N’ouvrez pas de boîte contenant des produits
inflammables car ils peuvent prendre feu avec
les étincelles produites par I’interrupteur.
• N’ouvrez pas de boîte sous pression (par
exemple des boîtes de boissons gazeuses) car
le contenu peut jaillir et s’infiltrer dans I’ouvre-
boîtes.
1
2
E
D
C
A
3
4
5
6
7
8
9
10
11
B
Algemene beschrijving
(zie fig. 1)
A
Hendel (voor het vastzetten van blikken en aan/uit-
schakelen)
B
Magneet (Deze kan op het deksel van het blik
worden gezet om dit na het openen vast te houden.)
C
Snijmes
D
Aandrijfwieltje
E
Bliksteun
Het openen van een blik
Met deze blikopener kunnen blikken van allerlei vorm
worden geopend.
- Steek de stekker in het stopcontact.
- Fig. 2. Neem de blikopener in de rechter hand en druk
de hendel (A) met de duim naar boven.
Breng met de linker hand het te openen blik op zijn
plaats.
Grote blikken kunt u het best op een (tafel- of
aanrecht-) blad laten rusten.
- Fig. 3. De rand van het blik dient op het aandrijfwieltje
(D) te liggen.
- Fig. 4. Druk met de duim de hendel omlaag.
- Fig. 5. U kunt nu het zwenkarmpje bewegen zoals in
de tekening is aangegeven, en de magneet (B) op het
deksel zetten.
- Fig. 6. Druk de hendel stevig in. De motor wordt
hierdoor ingeschakeld.
U kunt nu het blik loslaten.
Het aandrijfwieltje laat het blik ronddraaien, terwijl het
snijmes (C) het deksel lossnijdt.
Zodra het deksel geheel is losgesneden, wordt de
motor automatisch uitgeschakeld.
Zolang de hendel in de onderste stand staat, wordt
het blik door het apparaat vastgehouden.
- Fig. 7. Pak het blik vast met de linkerhand. Beweeg
met de duim van de rechterhand de hendel naar
boven.
U kunt het blik nu uit het apparaat nemen. Het deksel
wordt vastgehou den door de magneet.
- Fig. 8. Neem het losse deksel voorzichtig van de
magneet: de rand kan scherp zijn!
- Fig. 9. Beweeg het zwenkarmpje van de magneet
terug en zet de magneet weer op zijn plaats.
Schoonmaken
- Neem de stekker uit het stopcontact.
- Fig. 10. Beweeg de hendel omhoog totdat deze stopt.
Nu kunt u de hendel in de richting van de pijl uit het
apparaat trekken.
- Fig. 11. Draai het zwenkarmpje van de magneet
omhoog. Trek het vervolgens in de richting van de pijl
uit het apparaat.
U kunt nu de hendel en het zwenkarmpje afspoelen.
Droog beide onder delen vervolgens af.
- U kunt het apparaat schoonmaken met een vochtige
doek. Dompel het apparaat niet in water en spoel het
niet af.
- Na het schoonmaken kunt u het zwenkarmpje van de
magneet en de hendel in omgekeerde richting weer
aan het apparaat bevestigen.
Nederlands
Belangrijk
• Bekijk eerst alle tekeningen en lees de
gebruiksaanwijzing voordat u het apparaat in
gebruik neemt.
• Controleer of de op het apparaat aangeven
voltage overeenkomt met de netspanning in
uw woning.
• Dompel het apparaat nooit in water of in een
andere vloeistof. Spoel het ook niet af.
U kunt het apparaat schoonmaken met een
wat vochtige doek, nadat u de stekker uit het
stopcontact hebt genomen.
• Gebruik het aparaat niet wanneer het snoer of
de stekker beschadigd zijn.
• Schakel het apparaat niet in wanneer er geen
blik is ingeklemd, om beschadiging van het
snijmes te voorkomen.
• Let op: het snijmes en de randen van losse
deksels zijn scherp.
• Maak blikjes die onder druk staan (frisdranken
e.d.) niet met dit apparaat open. De inhoud
ervan zou in het apparaat kunnen spuiten.
• Open met dit apparaat ook geen blikjes
waarvan de inhoud ontvlambaar is. De inhoud
zou door een vonkje van de schakelaar in
brand kunnen vliegen.
Descrizione generale
(fig. 1)
A
Leva dell’impugnatura (per mantenere in
posizione la lattina e azionare l’interruttore)
B
Magnete (deve essere appoggiato sopra il
coperchio per trattenerlo dopo l’apertura della
lattina)
C
Lama
D
Ruota motrice
E
Supporto dei barattoli
Uso dell’apriscatole
Con questo apparecchio potete aprire lattine e barattoli
di diverse dimensioni.
- Inserite la spina in una presa di corrente.
- Fig. 2. Tenete l’apparecchio con la destra. Sollevate
la leva (A) con il pollice.
Con la sinistra mettete in posizione il barattolo
E’ consigliabile lasciare appoggiati su un tavolo o un
ripiano i barattoli di grandi dimensioni.
- Fig. 3. Il bordo del barattolo deve appoggiare alla
ruota motrice.
- Fig. 4. Mentre continuate a tenere il barattolo,
premete verso il basso la leva.
- Fig. 5. Spostate il braccio orientabile del magnete (B)
in modo da portare il magnete sopra al coperchio.
- Fig. 6. Premete a fondo la leva. Il motore comincierà a
girare.
Ora potete lasciare libero il barattolo.
La ruota motrice farà girare il barattolo, mentre la
lama (C) taglierà il coperchio.
L’apparecchio si spegnerà automaticamente quando il
taglio sarà terminato.
Il barattolo continuerà ad essere trattenuto
dall’apparecchio finché la leva resterà abbassata.
- Fig. 7. Prendete il barattolo con la sinistra. Sollevate
la leva con il pollice della destra. Il barattolo è libero,
mentre il coperchio viene trattenuto dal magnete.
- Fig. 8. Staccate il coperchio dal magnete con molta
cautela: i bordi del coperchio sono molto taglienti!
- Fig. 9. Rimettete a posto il braccio del magnete e il
magnete stesso.
Pulizia
- Staccate la spina dalla presa di corrente.
- Fig. 10. Spostate la leva verso l’alto fino all’arresto.
Potete staccare la leva dall’apparecchio tirandola
nella direzione della freccia.
- Fig. 11. Spostate la leva del magnete in posizione
verticale e staccatela dall’apparecchio tirandola nella
direzione della freccia.
Adesso potete sciacquare o lavare la leva e il braccio.
Asciugateli con cura.
- Pulite l’apparecchio con un panno umido. Non
immergete mai l’apriscatole nell’acqua né tantomeno
sciacquatelo sotto al rubinetto.
- Dopo la pulizia rimontate il braccio e la leva
eseguendo le operazioni in senso inverso.
Italiano
Importante
• Prima di usare l’apparecchio, leggete le
istruzioni d’uso e guardate le illustrazioni con
molta attenzione.
• Controllate che la tensione indicata
sull’apparecchio corrisponda a quella della
rete locale.
• Non immergete mai l’apparecchio in acqua o
in altri liquidi, né risciacquatelo. Potete invece
pulirlo con un panno umido dopo aver tolto la
spina dalla presa di corrente.
• Non usate l’apparecchio se il cavo di
alimentazione o la spina sono danneggiati.
• Non accendete l’apparecchio senza un
barattolo inserito1 perché si può rovinare la
lama.
• Attenzione: la lama e i bordi del coperchio
staccato sono taglienti.
• Non aprite lattine sotto pressione (es. bibite
gassate) perché il liquido può schizzare
attorno ed entrare nell’apparecchio.
• Non aprite lattine con liquidi infiammabili
perché una piccola scintilla può incendiare il
contenuto.
Español
Importante
• Antes de usar el aparato, lean cuidadosa-
mente estas instrucciones de uso conjunta-
mente con las ilustraciones.
• Comprueben si el voltaje indicado en el
aparato se corresponde con el de su hogar.
• No sumerjan nunca el aparato en agua ni en
otro líquido ni lo enjuaguen tampoco.
Pueden limpiar el aparato con un paño
húmedo después de desenchufar la clavija del
enchufe mural.
• No hagan funcionar el aparato con el cable de
red o la clavija deteriorados
• No pongan en marcha el aparato sin una lata
bien colocada ya que ello podría deteriorar la
cuchilla.
• ¡ Cuidado : La cuchilla y los bordes de las
tapas recortadas están afilados !
• Con este aparato no abran latas que estén
bajo presión (por ejemplo, las que contienen
bebidas efervescentes) ya que el contenido
puede salir a chorros de la lata y penetrar en
el aparato.
• Con este aparato no abran latas con
contenido inflamable ya que el contenido
podría inflamarse con una pequeña chispa del
interruptor.
Descripción general
(fig. 1)
A
Palanca (para sostener las latas en posición y para
poner en marcha y parar).
B
Imán (puede ponerse sobre la tapa para sostenerla
después de abrir la lata).
C
Cuchilla.
D
Rueda de arrastre.
E
Soporte para la lata.
Cómo abrir una lata
Con este aparato pueden abrir latas de muchos
modelos diferentes.
- Enchufen la clavija en un enchufe mural.
- Fig. 2. Cojan el abrelatas con su mano derecha.
Levanten la palanca (A) con su pulgar.
Coloquen la lata con su mano izquierda.
Es aconsejable dejar que las latas de gran tamaño
descansen sobre una mesa o un fregadero.
- Fig. 3. El reborde de la lata deberá descansar sobre
la rueda de arrastre (D).
- Fig. 4. Mientras todavía sostienen la lata, muevan la
palanca hacia abajo.
- Fig. 5. Pueden mover el brazo basculante del imán
(B) como se indica para colocar el imán sobre la tapa.
- Fig. 6. Presionen firmemente la palanca. El motor
empezará a funcionar y pueden, entonces, soltar la
lata.
La rueda de arrastre hará que la lata gire mientras la
cuchilla (C) va cortando la tapa.
El aparato se desconecta automáticamente cuando
se ha completado el corte.
Mientras la palanca esté bajada, la lata estará
sostenida por el aparato.
- Fig. 7. Tomen la lata con su mano izquierda.
Levanten la palanca con el pulgar de su mano
derecha.
Quiten la lata. La tapa quedará sujeta por el imán.
- Fig. 8. Cojan con cuidado la tapa suelta del imán.
¡ El borde puede ser cortante !
- Fig. 9. Vuelvan a levantar el brazo del imán y
coloquen de nuevo el imán.
Limpieza
- Desenchufen la clavija del enchufe mural.
- Fig.10. Levanten la palanca hacia arriba hasta el
límite.
Ahora pueden quitar la palanca del abrelatas. Estiren
en la dirección de la flecha.
- Fig. 11. Muevan el brazo basculante del imán a la
posición más alta y estiren el brazo directamente del
aparato.
Muevan en la dirección de la flecha.
Ahora pueden enjuagar o lavar la palanca y el brazo.
No olviden secar esas dos partes.
- Pueden limpiar el abrelatas con un paño húmedo
No sumerjan nunca el aparato en agua ni lo
enjuaguen bajo el grifo.
- Actuando de forma inversa, pueden volver a montar
el brazo basculante y la palanca.
Deutsch
Wichtige Hinweise
• Lesen Sie diese Gebrauchsanweisung
sorgfältig durch und sehen Sie sich die
Zeichnungen genau an, bevor Sie das Gerät
benutzen.
• Prüfen Sie, ob die Spannungsangabe auf dem
Gerät mit der Netzspannung in Ihrer Wohnung
übereinstimmt.
• Tauchen Sie das Gerät niemals in Wasser
oder in eine andere Flüssigkeit. Spülen Sie es
auch nicht ab. Reinigen Sie es mit einem
feuchten Tuch und ziehen Sie dazu vorher den
Netzstecker.
• Verwenden Sie das Gerät nicht mit
schadhafter Schnur oder defektem Stecker.
• Schalten Sie es nicht ohne Dose in der
Halterung ein, da dies die Messer beschä-
digen könnte.
• Vorsicht: Messer und Kanten der entfernten
Deckel slnd scharf.
• Öffnen Sie keine Dosen, die unter Druck
stehen (z.B. mit Getränken, die Kohlensäure
enthalten), da der Inhalt aus der Dose in das
Gerät spritzen könnte.
• Öffnen Sie keine Dosen mit aufflambarem
Inhalt, da dieser von einem kleinen Funken
vom Schalter entzündet werden könnte.
Allgemeine Beschreibung
(Abb. 1)
A
Hebel (hält die Dose und ist Ein- und Ausschalter)
B
Magnet (Halter für Dosendeckel)
C
Messer
D
Antriebsrad
E
Dosenhalter
Öffnen einer Dose
Dosen unterschiedlicher Formen können mit diesem
Gerät geöffnet werden.
- Stecken Sie den Stecker in die Steckdose.
- Abb. 2. Nehmen Sie den Dosenöffner in die rechte
Hand. Heben Sie den Hebel (A) mit dem Daumen an
und setzen Sie die Dose mit der linken Hand ein.
Große Dosen sollten auf die Arbeitsplatte oder Spüle
gestellt werden.
- Abb. 3. Der Dosenrand muß auf dem Antriebsrad
aufliegen (D).
- Abb. 4. Bewegen Sie, während Sie die Dose noch
halten, den Hebel nach unten.
- Abb. 5. Sie können den Schwingarm des Magneten
(B) wie angegeben bewegen und den Magneten auf
den Deckel setzen.
- Abb. 6. Drücken Sie den Hebel fester herunter und
der Motor beginnt zu laufen.
Jetzt können Sie die Dose loslassen.
Das Antriebsrad (D) dreht die Dose und das Messer
(C) schneidet den Deckel ab.
Das Gerät schaltet sich automatisch aus, wenn der
Schneidevorgang beendet ist. Solange der Hebel
unten ist, wird die Dose festgehalten.
- Abb. 7. Nehmen Sie die Dose in die linke Hand und
heben Sie den Hebel mit dem Daumen der rechten
Hand an. Jetzt können Sie die Dose entfernen.
Der Deckel wird vom Magneten gehalten.
- Abb. 8. Nehmen Sie den losen Deckel vorsichtig
ab - die Kanten können scharf sein.
- Abb. 9. Schwingen Sie den Magnetarm zurück und
setzen Sie den Magneten wieder auf.
Reinigung
- Stecker aus der Steckdose ziehen.
- Abb. 10. Bewegen Sie den Hebel bis zum Anschlag
nach oben. Jetzt können Sie den Hebel aus dem
Dosenöffner ziehen (in Pfeilrichtung).
- Abb. 11. Bewegen Sie den Schwingarm des
Magneten in seine höchste Stellung.
Ziehen Sie dann den Arm aus dem Gerät (in Pfeil-
richtung). Jetzt können Sie Hebel und Arm spülen
oder abwaschen.
Trocknen Sie beide Teile gut ab.
- Der Dosenöffner läßt sich mit einem feuchten Tuch
reinigen. Tauchen Sie ihn nie in Wasser und spülen
Sie ihn nicht unter dem Wasserhahn.
- Nach dem Reinigen Schwingarm und Hebel in
umgekehrter Folge wieder montieren.
4203 064 02459
;