background image

User manual

(AEH2900, AEH2110, AEH2120, AEH2130, AEH2310)

Summary of Contents for AEH2110

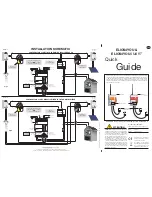
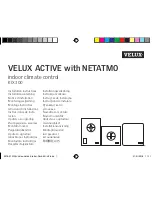
Page 1: ...User manual AEH2900 AEH2110 AEH2120 AEH2130 AEH2310 ...

Page 2: ......

Page 3: ...tice 5 Written Offer 6 2 Overview 7 Motion sensor 7 Door and window sensor 7 Temperature and humidity sensor 8 Intelligent switch 9 Status indicator 9 3 Setup 11 Join your Smart Home network 11 Install or replace batteries 12 Plug the Intelligent switch 14 Reset 15 Reset network connection 15 Restore factory settings 16 4 Place 18 ...

Page 4: ...3 Manage devices 24 Set the device 24 Check device status 24 Delete the device 25 Set the rules of home automation 26 Set the trigger 26 Set the action 26 Edit the rules 27 Access the devices remotely 28 6 Check for updates 29 7 Technical data 30 Sensors for indoor use only 30 Motion sensor 30 Door and window sensor 30 Temperature and humidity sensor 30 Intelligent switch 30 ...

Page 5: ...nding type power outlet Make sure that you use this Intelligent switch with a grounding type power outlet that has been properly installed by a qualified electrician Important Safety Instructions a Read these instructions b Keep these instructions c Heed all warnings d Follow all instructions e Clean only with dry cloth f The batteries shall not be exposed to excessive heat such as sunshine fire o...

Page 6: ...tion which can be determined by turning the equipment off and on the user is encouraged to try to correct the interference by one or more of the following measures Relocate the receiving antenna Increase the separation between equipment and receiver Connect the equipment into an outlet on a circuit different from that to which the receiver is connected Consult the dealer or an experienced radio TV...

Page 7: ...gulated due to environmental considerations For disposal or recycling information please contact your local authorities or visit www recycle philips com This product contains batteries Dispose of batteries properly Do not incinerate Batteries may explode if overheated Do not wrap in metal or aluminum foil Wrap in newspaper before discarding It is suggested that you contact your local town or city ...

Page 8: ...f you prefer not to use email or if you do not receive confirmation receipt within a week after mailing to this email address please write to Open SourceTeam Gibson Innovations Limited 5 F Philips Electronics Building 5 Science Park East Avenue Hong Kong Science Park Shatin NewTerritories Hong Kong If you do not receive timely confirmation of your letter please email to the email address above Spe...

Page 9: ...et rules to have the connected home appliance powered on or off automatically according to the changes Motion sensor The Motion sensor detects the movement of people at home a Status indicator b Detection lens Door and window sensor The Door and window sensor detects the opening closing of door or window at home a b AEH2110 ...

Page 10: ...8 EN a Status indicator b Alignment mark Temperature and humidity sensor TheTemperature and humidity sensor detects the temperature and humidity at home a Status indicator a b AEH2120 a AEH2130 ...

Page 11: ...cator d Setup button Status indicator Indicator Status of the device Start up From amber to red Ready for pairing for a device that has never been paired with the Bridge or a device that has been restored to factory settings Flashing amber Ready for re joining for a device that has been paired with the Bridge before Operation d b a c AEH2310 ...

Page 12: ...n one second An event that triggers notifications happens Flashing red Disconnected Flashing red and green alternately Firmware updating underway Low battery Solid red for three sec onds and then flashing red Battery to be replaced ...

Page 13: ... the Bridge as possible a Install the batteries Push to close the battery door On the Intelligent switch press the power button to switch on b Don t release the battery door until the status indicator turns from amber to red On the Intelligent switch press and hold the setup button until the status indicator turns from amber to red c On the Philips Smart Home app press the Search button When the s...

Page 14: ...e enter the pairing mode open the battery door and close it as described in Step 3 Install or replace batteries To install or replace batteries on your Smart Home devices do the following 1 2 Search All devices No device has connected Add devices Home Settings Rules 2 3 ...

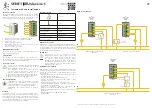
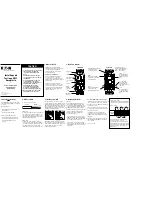
Page 15: ...13 EN Motion sensor Door and window sensor Temperature and humidity sensor 1 2 3 1 2 3 1 2 3 ...

Page 16: ...lligent switch To add the Intelligent switch to the Bridge do the following 1 Insert the Intelligent switch into a power outlet properly 2 Press and hold the Setup button until the status indicator turns from amber to red ...

Page 17: ... the device flashing red Network connection lost On the sensor do the following 1 Open the battery door 2 Push to close the battery door Release the door when the status indicator flashes in amber 3 With the Philips Smart Home app add the device to the Bridge see Join your Smart Home network on page 11 On the Intelligent switch do the following 1 Press and hold the Setup button until the status in...

Page 18: ...battery door 3 Push to close the battery door Don t release the door until the status indicator turns from amber to red 4 With the Philips Smart Home app add the device to the Bridge see Join your Smart Home network on page 11 On the Intelligent switch do the following 1 Delete the device from the Bridge see Delete the device on page 25 2 Press and hold the Setup button until the status indicator ...

Page 19: ...17 EN Tip If you press and hold the setup button for more than six seconds the status indicator turns off To restore factory settings re do Step 1 ...

Page 20: ... a person is expected to cross the range of detection To avoid false detection events select a location where the height and angle are right to keep non people objects out of detection such as pets Avoid locations that are exposed to sources of heat such as a heater or radiator or sources of strong air drafts such as fans or air conditioners Use the mounting kit With the supplied mounting kit for ...

Page 21: ...n Step 2 use the screw holder for a concrete wall or surface For a wooden surface you can the screw only Use the adhesive tape You can also use the adhesive tape mount the sensor as needed 1 3 4 a b 2 5mm 30mm ...

Page 22: ...oor and window sensor Avoid the exposure to moisture and direct sunlight Use the alignment marks to align the two components Mount the two components securely just in case any one of them may drop during movement 2 1 3 ...

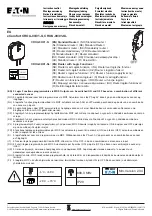
Page 23: ...21 EN 1 ...

Page 24: ...22 EN 2 ...

Page 25: ...nd continue to monitor changes and control the devices on a mobile device while you are away from home a Go to the Home screen b Find connected devices by type or location c Display connected devices in a view of grid or list d Set the device e Add a device f Go to the settings menu g Set or edit the rules of home automation a b c d e f g ...

Page 26: ... to edit the device information For the Motion sensor select the sensitivity level as needed You can select the unit of measurement for theTemperature and humidity sensor Fahrenheit degree or Celsius degree From the Home screen tap Unit Check device status Go to the Home screen to check the status of devices The list of events is displayed at the top ...

Page 27: ...he device when you want to remove the device from the Bridge you want to restore the factory settings of the device see Restore factory settings on page 16 1 From the Home Screen select the device 2 Tap the option to delete the device ...

Page 28: ...t detected by your Smart Home device or time or location detected by your mobile device To set a location as trigger you can also go to from the Home screen and select Geofencing Set the action Tap a icon to set an action An action can be power on off of the home appliance that has been plugged into the Intelligent switch or the push notification that you receive on your mobile device when the eve...

Page 29: ...27 EN Edit the rules From the Home screen tap Select a rule to edit or delete it ...

Page 30: ...28 EN Access the devices remotely To access your Smart Home devices remotely log in to the portal The first time you log in to the portal create your account ...

Page 31: ...29 EN 6 Check for updates For updates of your Smart Home devices and the Philips Smart Home app you can receive messages on your mobile device Follow the onscreen instructions to complete the updating ...

Page 32: ...indow sensor Operating temperature humidity 32 F to 104 F 0 C to 40 C 10 to 90 Temperature and humidity sensor Operating temperature humidity Temperature 32 F to 104 F 0 C to 40 C Humidity 10 to 95 Intelligent switch Grounding type power plug for indoor use only Model AEH2310 37 Output AC 120V 60 Hz 15 A 1800 W for use with resistive load only Connectivity Zigbee ...

Page 33: ...31 EN ...

Page 34: ...is sold under the responsibility of Gibson Innovations Ltd and Gibson Innovations Ltd is the warrantor in relation to this product Philips and the Philips Shield Emblem are registered trademarks of Koninklijke Philips N V and are used under license from Koninklijke Philips N V AEH2900_37_UM_V1 0 ...

Reviews: