background image

www.philips.com/welcome

User manual

Always there to help you

Register your product and get support at


AEA3100/17 
AEA3100/37 
AEA3000/07 
AEA3000/37 


Summary of Contents for AEA3000/07

Page 1: ...www philips com welcome User manual Always there to help you Register your product and get support at AEA3100 17 AEA3100 37 AEA3000 07 AEA3000 37 ...

Page 2: ......

Page 3: ...tooth docking speaker 8 Install replace microphone batteries 8 4 Play 10 Sing along through the wireless microphone 10 Play from a Bluetooth enabled device 11 Play and charge your iPad through the dock connector directly 12 Play from an external device 13 5 Product information 14 Specifications 14 6 Troubleshooting 15 MAV AEA7000 Troubleshooting Failed to set up connection between the microphone a...

Page 4: ...lation openings Install in accordance with the manufacturer s instructions h Do not install near any heat sources such as radiators heat registers stoves or other apparatus including amplifiers that produce heat i Do not defeat the safety purpose of the polarized or grounding type plug A polarized plug has two blades with one wider than the other A grounding type plug has two blades and a third gr...

Page 5: ...akage Only use the specified type of batteries Do not mix new and used batteries Do not mix different brands of batteries Observe correct polarity Remove batteries from products that are not in use for a longer period of time Store batteries in a dry place Risk of injury Wear gloves when handling leaking batteries Keep batteries out of reach of children and pets Risk of explosion Do not short circ...

Page 6: ... household waste Please inform yourself about the local rules on the separate collection of electrical and electronic products and batteries The correct disposal of these products helps prevent potentially negative consequences on the environment and human health Your product contains batteries which cannot be disposed of with normal household waste Please inform yourself about the local rules on ...

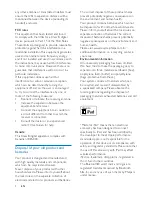
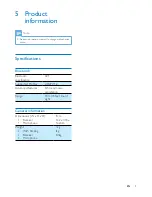
Page 7: ...5 EN Note The type plate is located on the back of the unit ...

Page 8: ...ver to both your iPad and existing audio system and sing along with music from the app StarMaker Karaoke Auto Tune through the wireless microphone What s in the box Check and identify the contents of your package Wireless microphone Wireless receiver 3 X AAA batteries Quick start guide Overview of the unit Wireless microphone a Line out socket To use the microphone separately connect to the MIC in...

Page 9: ...iscard batteries in fire Danger of explosion if batteries are incorrectly replaced Replace only with the same or equivalent type Batteries contain chemical substances so they should be disposed of properly 1 Open the battery compartment and take out the battery cartridge MP3 LINK LINE OUT 2 Insert 3 x AAA batteries supplied into the cartridge with correct polarity as indicated 3 Push back the batt...

Page 10: ...un StarMaker Karaoke Auto Tune on the iPad 4 Slide the ON OFF switch on the wireless microphone to the ON position The Bluetooth indicator on the wireless receiver flashes blue The wireless microphone starts to pair with the wireless receiver automatically After successful pairing and connection the Bluetooth indicator turns solid blue 5 Find and download a tutorial from StarMaker Karaoke Auto Tun...

Page 11: ... it on again you need to slide the ON OFF switch on the microphone to the OFF position and then back to the ON position You can use controls available on the app to adjust sound effects If you experience howling or echo try to increase the distance between the microphone and audio system or adjust the angle of the microphone towards the audio system ...

Page 12: ... Specifications Bluetooth Bluetooth specification V2 1 Supported Profiles AD2PV1 2 Advanced features Echo and noise cancelation Range 10 m 33 feet line of sight General information Dimensions W x H x D Receiver Microphone mm 162 x 333 x 162mm Weight With Packing Receiver Microphone kg kg 0 3kg ...

Page 13: ...ophone to the OFF position and then back to the ON position No sound or poor sound Adjust volume on the audio system connected to the wireless receiver Make sure that you have selected the correct source on the connected audio system Make sure that you have connected the wireless receiver to the audio system securely Check whether you have connected the iPad securely Check whether you have started...

Page 14: ......

Page 15: ...Specifications are subject to change without notice 2012 Koninklijke Philips Electronics N V All rights reserved Document order number 000000000000 ...

Reviews: