background image

Register your product and get support at

6300 series

www.philips.com/welcome

User Manual

40PFH6300

40PFT6300
40PFT6300

48PFH6300

48PFT6300
48PFT6300

55PFH6300

55PFT6300
55PFT6300

Summary of Contents for 40PFH6300

Page 1: ...Register your product and get support at 6300 series www philips com welcome User Manual 40PFH6300 40PFT6300 40PFT6300 48PFH6300 48PFT6300 48PFT6300 55PFH6300 55PFT6300 55PFT6300 ...

Page 2: ...or DVB C 23 7 4 Manual Installation 24 8 TV guide 26 8 1 What you need 26 8 2 Using the TV guide 26 9 Recording and pause TV 28 9 1 Recording 28 9 2 Pause TV 29 10 Sources 30 10 1 Switch to a device 30 10 2 From standby 30 10 3 EasyLink 30 11 Timers and clock 31 11 1 Sleep timer 31 11 2 Clock 31 11 3 Switch off timer 31 12 Videos Photos and Music 32 12 1 From a USB connection 32 12 2 Play your vid...

Page 3: ...V stores the broadcast on the USB Hard Drive You can start watching again later With a USB Hard Drive connected you can also record digital broadcasts You can record while you are watching a programme or schedule a recording of an upcoming programme 1 2 EasyLink With EasyLink you can operate a connected device like a Bluray Disc player with the remote control of the TV EasyLink uses HDMI CEC to co...

Page 4: ...unting the TV requires special skills and should only be performed by qualified personnel The TV wall mounting should meet safety standards according to the TV s weight Also read the safety precautions before positioning the TV TP Vision Europe B V bears no responsibility for improper mounting or any mounting that results in accident or injury 2 3 Tips on placement Position the TV where light does...

Page 5: ... your own antenna or an antenna signal from an antenna distribution system Use an IEC Coax 75 Ohm RF antenna connector Use this antenna connection for DVB T and DVB C input signals 2 6 Satellite dish For PHK PFK models Attach the satellite F type connector to the satellite connection SAT at the back of the TV 5 ...

Page 6: ...al that prevents copying content from a DVD disc or Blu ray Disc Also referred to as DRM Digital Rights Management HDMI ARC HDMI 1 connection on the TV have HDMI ARC Audio Return Channel If the device typically a Home Theatre System HTS also has the HDMI ARC connection connect it to HDMI 1 on this TV With the HDMI ARC connection you do not need to connect the extra audio cable that sends the sound...

Page 7: ...ff EasyLink remote control separately You can control multiple HDMI CEC compliant devices with your TV remote control In the EasyLink settings menu select EasyLink Remote Control and select Off DVI to HDMI If you still own a device that only has a DVI connection you can connect the device to any of the HDMI connection with a DVI to HDMI adapter Use a DVI to HDMI adapter if your device only has a D...

Page 8: ...e the card in the slot permanently It may take a few minutes before the CAM is activated Removing the CAM will deactivate the broadcast service on TV If a CAM is inserted and subscription fees are paid connection methods can differ you can watch the TV broadcast The inserted CAM is exclusively for your TV 3 3 Set top box STB Use 2 antenna cables to connect the antenna to the Set top box a digital ...

Page 9: ...n add an optical audio cable Toslink to send the sound of the TV picture to the Home Theatre System Audio to video synchronisation sync If the sound does not match the video on screen you can set a delay on most Home Theatre Systems with a disc player to match the sound with the video Audio Out settings Audio Out delay With a Home Theatre System HTS connected to the TV the picture on TV and the so...

Page 10: ...e 1 Press and select Setup and press OK 2 Select TV settings Sound Advanced Audio out leveling 3 If the volume difference is large select More If the volume difference is small select Less Press repeatedly if necessary to close the menu Audio Out leveling affects both the Audio Out Optical and HDMI ARC sound signals Problems with HTS sound Sound with loud noise If you watch a video from a plugged ...

Page 11: ... the other USB ports when formatting 2 Switch on the USB Hard Drive and the TV 3 When the TV is tuned to a digital TV channel press Pause Trying to pause will start the formatting Follow the instructions on screen When the USB Hard Drive is formatted leave it connected permanently Warning The USB Hard Drive is formatted exclusively for this TV you cannot use the stored recordings on another TV or ...

Page 12: ...ect your computer to the TV and use the TV as a PC monitor With HDMI Use an HDMI cable to connect the computer to the TV With DVI to HDMI Alternatively you can use a DVI to HDMI adapter to connect the PC to HDMI and an audio L R cable mini jack 3 5mm to AUDIO IN L R on the back of the TV Best Setting Ideal monitor setting If your computer is added as a Computer type of device in the Source menu th...

Page 13: ...ection is a mini jack 3 5mm You can adjust the volume of the headphones separately To adjust the volume 1 Press and select Setup and press OK 2 Select TV settings Sound Headphone volume and press OK 3 Press up or down to adjust the volume 4 Press repeatedly if necessay to close the menu 13 ...

Page 14: ...r previous channel Press up or down to go through the list of sources including the tuner selection 4 The menu will disappear automatically To switch the TV off select and press the joystick key 4 3 Sleep timer With the sleep timer you can set the TV to switch to standby automatically after a preset time To set the sleep timer 1 Press and select Setup and press OK 2 Select TV settings General sett...

Page 15: ... the previous channel you selected To close a menu without changing a setting 5 HOME To open or close the home menu 6 EXIT To switch back to watching TV 7 OPTIONS To open or close the Options menu 8 OK key To confirm a selection or setting 9 Arrow navigation keys To navigate up down left or right 10 LIST To open or close the channel list Bottom 1 Volume To adjust the volume level 2 Number keys and...

Page 16: ...with 2 type AAA LR03 1 5V batteries Make sure the and the ends of the batteries line up correctly 3 Reposition the battery door 4 Slide it back until it clicks Remove the batteries if you are not using the remote control for a long time Safely dispose of your old batteries according to the end of use directions 5 4 Cleaning Your remote control is treated with a scratch resistant coating To clean t...

Page 17: ...annels 1 While watching a TV channel press LIST to open the channel list 2 Press OPTIONS to open Option menu 3 Select List then you can select All Favourites Radio and New channels 6 2 Watching TV channels Watching channels Tune to a channel To watch TV channels press The TV tunes to the TV channel you last watched Switch channels To switch channels press or If you know the channel number type in ...

Page 18: ...igital or depending on the TV settings you made some options are available To open the options menu 1 While watching a channel press OPTIONS 2 Press OPTIONS again to close Subtitles and subtitle language Switch On To switch on Subtitles press SUBTITLE You can set subtitles to Subtitles off Subtitles on or Automatic Automatic If language information is part of the digital broadcast and the broadcas...

Page 19: ...btitles adapted for people who are hearing or visually impaired Video selection Digital TV channels can offer multi video signals multi feed broadcast different camera viewpoints or angles of the same event or different programmes on one TV channel The TV shows a message if any such TV channels are available Dual I II If an audio signal contains two audio languages but one language or both has no ...

Page 20: ...pages Search Text You can select a word and scan Text for all occurences of this word 1 Open a Text page and press OK 2 Select a word or number with the arrow keys 3 Press OK again to jump immediately to the next occurence of this word or number 4 Press OK again to jump to the subsequent occurence 5 To stop searching press up until nothing is selected Text from a connected device Some devices that...

Page 21: ...2 Press and select Setup and press OK 3 Select TV settings General settings Copy channel list Copy to USB and press OK To copy the channel list from this TV you might be asked to enter the Child lock code you entered during the installation 4 When copying is done unplug the USB memory device Now you can upload the copied channel list onto another Philips TV Upload channel list To not Installed TVs...

Page 22: ...the other TV 3 To start the channel list upload press and select Setup and press OK 4 Select TV settings General settings Copy channel list Copy to TV and press OK You might be asked to enter the Child lock code of this TV 5 The TV notifies you if the channel list is copied to the TV successfully Unplug the USB memory device 22 ...

Page 23: ...he TV is in standby New channels New channels added with the automatic channel update are easy to find in the channel list New The same new channels are also stored in the All or Radio channel list New channels are kept in the channel list New as long as you don t mark them as a favourite or tune to them 7 2 Reinstall channels Reinstall All Channels You can reinstall all channels and leave all oth...

Page 24: ...e channels Select Off Free Scrambled If you have a subscription and a CAM Conditional Access Module for pay TV services select Free scrambled If you did not subscribe to pay TV channels or services you can select Free channels only Reception Quality You can check the quality and signal strength of a digital channel If you have your own antenna you can reposition the antenna to try and improve the ...

Page 25: ... or If you want to store the channel found select Done and press OK Store You can store the channel on the current channel number or as a new channel number Select Store current channel or Store as new channel You can redo these steps until you found all available analogue TV channels 25 ...

Page 26: ...ails of the selected programme press INFO Change day The TV guide can show scheduled programmes for the upcoming days maximum up to 8 days If the TV guide information comes from the broadcaster you can press to view the schedule of one of the next days Press to go back to the previous day Alternatively you can press OPTIONS and select Change day Select Previous day Today or Next day and press OK t...

Page 27: ...gramme Set a Recording You can set a recording in the TV Guide In the TV Guide a programme set to be recorded is marked with To see the recording list press Recordings a programme set to be recorded is marked with a red dot on the front of the programme name To record a programme 1 Press TV GUIDE and select a future or ongoing programme 2 Press the colour key Record To cancel a recording 1 Press T...

Page 28: ...a channel Use the colour key Day to select the day you need 3 With the programme highlighted press the colour key Record The programme is scheduled for recording A warning will show automatically when overlapping recordings are scheduled If you plan to record a programme in your absence remember to leave the TV switched to Standby and the USB Hard Drive switched on List of recordings You can view ...

Page 29: ...a TV programme you need a connected USB Hard Drive formatted on this TV digital TV channels installed on this TV to receive channel information for the on screen TV Guide With the USB Hard Drive connected and formatted the TV continuously stores the TV broadcast you are watching When you switch to another channel the broadcast of the former channel is cleared Also when you switch the TV to standby...

Page 30: ...y To switch on both disc player and TV from standby and start playing the disc or programme immediately press play on the TV remote control The device should be connected with an HDMI cable and both TV and device must have HDMI CEC switched on Home Theatre System You can switch on your Home Theatre System to listen to an audio disc or a radio channel and leave the TV in standby To only switch on t...

Page 31: ...ht saving change might be ignored and the TV might show an incorrect time To correct the TV clock 1 Press and select Setup and press OK 2 Select TV settings General settings Clock Auto clock mode and select Country dependent 3 Select Daylight saving and select the appropriate setting 11 3 Switch off timer If you do not press a key on the remote control during a 4 hour period or if the TV receives ...

Page 32: ...l times to speed up 2x 4x 8x 16x 32x To jump to the next video in a folder press OK to pause and select on screen and press OK To stop the video playback press Stop To go back to the folder press Progress Bar To show the progress bar when a video is playing playhead position duration title date etc press INFO Press again to hide the info Video options During the video playback press OPTIONS to Sub...

Page 33: ...image Rotate photo Show info Display the picture name date size and next picture in the slide show Stop music Stop the music playing in the background 12 4 Play your music Play music How you open the list of your media files on TV depends on the type of device where the files are stored See the chapters above To play a song on TV Select Music and select the file name and press OK If there are seve...

Page 34: ...nd select the Picture Style you want to restore 3 Press OK The style is restored Home or Shop If the Picture style is switched back to Vivid every time you switch on the TV the TV location is set to Shop A setting meant for in store promotion To set the TV for Home use 1 Press and select Setup and press OK 2 Select TV settings General settings Location and press OK 3 Select Home and press OK 4 Pre...

Page 35: ...up and press OK 2 Select TV settings Picture Advanced Colour 3 Select Colour Temperature and press OK 3 Select Normal Warm or Cool Or select Custom if you want to customise a colour temperature yourself 4 Press repeatedly if necessary to close the menu Custom colour temperature With Custom colour temperature you can set a colour temperature yourself To set a custom colour temperature first select ...

Page 36: ...tch on or off 1 Press and select Setup and press OK 2 Select TV settings Picture Advanced Sharpness Super resolution 3 Select On or Off 4 Press repeatedly if necessary to close the menu Noise reduction With Noise reduction you can filter out and reduce the level of image noise To adjust the noise reduction 1 Press and select Setup and press OK 2 Select TV settings Picture Advanced Sharpness Noise ...

Page 37: ...sic Ideal for listening to music Game Ideal for gaming News IIdeal for speech Restore a style The selected style will store the changes you made We recommend to adjust the sound settings for the style Personal only The Sound Style Personal can save its settings for each individual connected device in Sources menu To restore the style to its original setting 1 Press and select Setup and press OK 2 ...

Page 38: ... speakers or device speakers in the Picture and sound menu To set the TV speakers 1 Press and select Setup and press OK 2 Select TV settings Sound Advanced TV speakers 3 Press right and select Off On EasyLink or EasyLink autostart 4 Press repeatedly if necessary to close the menu Clear sound With Clear sound you improve the sound for speech Ideal for news programmes You can switch the speech impro...

Page 39: ...und offset and press OK 4 Press repeatedly if necessary to close the menu 13 3 General settings Menu language To change the language of the TV menus and messages 1 Press and select Setup and press OK 2 Select TV settings General settings Menu language 3 Select on the language you need 4 Press repeatedly if necessary to close the menu Clock Date and Time Automatic In some countries digital broadcas...

Page 40: ...up and press OK 2 Select TV settings General settings Location and press OK 3 Select Home and press OK 4 Press repeatedly if necessary to close the menu TV placement As part of the first installation this setting is set to either On a TV stand or On the Wall If you have changed the placement of the TV since then adjust this setting accordingly for best sound reproduction 1 Press and select Setup a...

Page 41: ...ynamic The Ambilight mode must be set to Dynamic before you can adjust Dynamic speed To adjust the speed 1 Press and select Setup and press OK 2 Select TV settings Ambilight Dynamic 3 Press right and adjust the value with up or down 4 Press repeatedly if necessary to close the menu Advanced Ambilight settings Wall colour With Wall colour you can neutralise the influence of a coloured wall on the A...

Page 42: ...OK 2 Select Watch demos Active control Demo and press OK 3 Select a setting to check the corresponding values European energy label The European Energy Label informs you on the energy efficiency class of this product The greener the energy efficiency class of this product is the lower the energy it consumes On the label you can find the energy efficiency class the average power consumption of this...

Page 43: ...ls Aerial input 75 ohm coaxial IEC75 Tuner bands Hyperband S Channel UHF VHF DVB DVB T terrestrial antenna COFDM 2K 8K DVB T2 only for TV types T 12 DVB C cable QAM Analogue video playback NTSC SECAM PAL Digital video playback MPEG2 SD HD ISO IEC 13818 2 MPEG4 SD HD ISO IEC 14496 10 Digital audio playback ISO IEC 13818 3 14 3 Display Type For 6300 series Diagonal screen size 40Pxx6300 102 cm 40 in...

Page 44: ...t 20 5 kg 14 6 Connectivity For 6300 series For PxK6300 TV Rear HDMI 1 ARC HDMI Audio Return Channel HDMI 2 SERV U Service port SCART RGB CVBS SCART adaptor AUDIO IN DVI VGA Stereo 3 5mm mini jack DIGITAL AUDIO OUT SPDIF TV ANTENNA 75 ohm coaxial IEC Satellite TV Side CI Common Interface USB Headphones Stereo 3 5mm mini jack For PxH6300 PxT6300 TV Rear HDMI 1 ARC HDMI Audio Return Channel HDMI 2 S...

Page 45: ... 15 3 Open source software This television contains open source software TP Vision Europe B V hereby offers to deliver upon request a copy of the complete corresponding source code for the copyrighted open source software packages used in this product for which such offer is requested by the respective licences This offer is valid up to three years after product purchase to anyone in receipt of th...

Page 46: ...amebuffer Device It is a complete hardware abstraction layer with software fallbacks for every graphics operation that is not supported by the underlying hardware DirectFB adds graphical power to embedded systems and sets a new standard for graphics under Linux Source http directfb org libTomMath 0 42 0 LibTom Projects are open source libraries written in portable C under WTFPL The libraries suppo...

Page 47: ...ument like start tags Source http expat sourceforge net libdrm libdrm provides core library routines for the X Window System to directly interface with video hardware using the Linux kernel s Direct Rendering Manager DRM Source http dri freedesktop org libdrm FFMpeg 0 6 A complete cross platform solution to record convert and stream audio and video Source www ffmpeg org 47 ...

Page 48: ...with the TV The TV goes back to standby after showing the Philips startup screen When the TV is in standby a Philips startup screen is displayed then the TV returns to standby mode This is normal behaviour When the TV is disconnected and reconnected to the power supply the startup screen is displayed at the next startup To switch on the TV from standby press on the remote control or the TV The sta...

Page 49: ...e TV does not recognise the HDMI device and no picture is displayed switch the source from one device to another and back again If there are intermittent sound disruptions make sure that output settings from the HDMI device are correct If you use an HDMI to DVI adapter or HDMI to DVI cable make sure that an additional audio cable is connected to AUDIO IN mini jack only if available EasyLink does n...

Page 50: ...email You can download new TV software or the manual to read on your computer 16 5 Consumer Care Repair For support and repair call the Consumer Care hotline in your country Find the telephone number in the printed documentation that came with the TV Or consult our website www philips com support TV model number and serial number You might be asked to provide the TV product model number and serial...

Page 51: ... access to the power plug power cord and outlet socket at all times Risk of injury or damage to the TV Two people are required to lift and carry a TV that weighs more than 25 kg or 55 lbs If you mount the TV on a stand only use the supplied stand Secure the stand to the TV tightly Place the TV on a flat level surface that can support the weight of the TV and the stand When wall mounted ensure that...

Page 52: ...revent this do not expose the TV to direct sunlight heat or extreme humidity If condensation occurs it will disappear spontaneously while the TV is playing for a few hours The condensation moisture will not harm the TV or cause malfunction 17 2 Screen care Never touch push rub or strike the screen with any object Unplug the TV before cleaning Clean the TV and frame with a soft damp cloth and wipe ...

Page 53: ...e for service or repairs Any operation expressly prohibited in this manual or any adjustments and assembly procedures not recommended or authorised in this manual shall void the warranty Pixel characteristics This LCD LED product has a high number of colour pixels Although it has effective pixels of 99 999 or more black dots or bright points of light red green or blue may appear constantly on the ...

Page 54: ...o use interactive television features is owned by S T CLIENT SYSTEMS LIMITED the Owner You are permitted to use the Software only in conjunction with this product Kensington Kensington and Micro Saver are registered US trademarks of ACCO World Corporation with issued registrations and pending applications in other countries throughout the world Other trademarks All other registered and unregistere...

Page 55: ...Index 55 ...
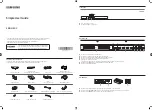
Page 56: ...Powered by TCPDF www tcpdf org 56 ...

Reviews: