background image

1.

CONNECT THE TV-VIDEO COMBI

4

. . . . . . . . . . . . . . . . . . .

Placing the batteries in the remote control

4

. . . . . . . . . . .

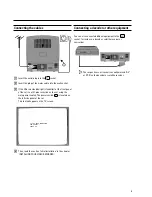
Connecting the cables

5

. . . . . . . . . . . . . . . . . . . . . . . . . . . . .

Connecting a decoder or other equipment

5

. . . . . . . . . . . .

2.

INSTALLATION

6

. . . . . . . . . . . . . . . . . . . . . . . . . . . . . . . . . . .

Initial installation

6

. . . . . . . . . . . . . . . . . . . . . . . . . . . . . . . . . .

Allocating a decoder

6

. . . . . . . . . . . . . . . . . . . . . . . . . . . . . .

Manual TV channel search

7

. . . . . . . . . . . . . . . . . . . . . . . . .

Satellite receiver

7

. . . . . . . . . . . . . . . . . . . . . . . . . . . . . . . . . .

Special installation functions

7

. . . . . . . . . . . . . . . . . . . . . . .

Automatic TV channel search (Autoinstall)

7

. . . . . . . . . . .

Sorting and clearing TV channels manually

8

. . . . . . . . . . .

Setting the time and date

9

. . . . . . . . . . . . . . . . . . . . . . . . . . .

3.

TV SET FUNCTIONS

10

. . . . . . . . . . . . . . . . . . . . . . . . . . . . . .

Selecting a TV channel

10

. . . . . . . . . . . . . . . . . . . . . . . . . . .

(Switch-on volume)

10

. . . . . . . . . . . . . . . . . . . . . . . . . . . . . . .

How do I read TELETEXT?

11

. . . . . . . . . . . . . . . . . . . . . . . . .

Wake up function (WAKE-UP)

11

. . . . . . . . . . . . . . . . . . . . .

Switch-off function (SLEEP TIMER)

12

. . . . . . . . . . . . . . . . .

4.

IMPORTANT NOTES FOR OPERATION

13

. . . . . . . . . . . . . .

General information

13

. . . . . . . . . . . . . . . . . . . . . . . . . . . . . .

Summary of user guide

14

. . . . . . . . . . . . . . . . . . . . . . . . . . .

User guide (OSD)

14

. . . . . . . . . . . . . . . . . . . . . . . . . . . . . . . . .

5.

PLAYBACK FUNCTIONS

15

. . . . . . . . . . . . . . . . . . . . . . . . . .

Playing a pre-recorded cassette

15

. . . . . . . . . . . . . . . . . . .

Playing NTSC cassettes

15

. . . . . . . . . . . . . . . . . . . . . . . . . . .

Tape position indication

15

. . . . . . . . . . . . . . . . . . . . . . . . . . .

Searching for tape position with the picture (picture
search)

15

. . . . . . . . . . . . . . . . . . . . . . . . . . . . . . . . . . . . . . . . .

Still picture

16

. . . . . . . . . . . . . . . . . . . . . . . . . . . . . . . . . . . . . .

Searching for tape position without the picture
(winding)

16

. . . . . . . . . . . . . . . . . . . . . . . . . . . . . . . . . . . . . . . .

’Instant View’ function

16

. . . . . . . . . . . . . . . . . . . . . . . . . . . .

Automatic search for a tape position (index search)

16

. .

Skipping commercials automatically

16

. . . . . . . . . . . . . . . .

Eliminating picture interference (tracking)

17

. . . . . . . . . . .

6.

MANUAL RECORDING

18

. . . . . . . . . . . . . . . . . . . . . . . . . . . .

Recording without automatic switch-off

18

. . . . . . . . . . . .

Recording with automatic switch-off (OTR
one-touch-recording)

18

. . . . . . . . . . . . . . . . . . . . . . . . . . . . .

Protecting your recordings

19

. . . . . . . . . . . . . . . . . . . . . . . .

Auto-assembling

19

. . . . . . . . . . . . . . . . . . . . . . . . . . . . . . . . .

Selecting the recording speed (SP/LP)

19

. . . . . . . . . . . . . .

7.

PROGRAMMED RECORDING (TIMER)

20

. . . . . . . . . . . . . . .

’VPS’ (Video Programming System) / ’PDC’
(Programme Delivery Control)

20

. . . . . . . . . . . . . . . . . . . . .

Programming a recording

20

. . . . . . . . . . . . . . . . . . . . . . . . .

How to check or change a programmed recording
(TIMER)

21

. . . . . . . . . . . . . . . . . . . . . . . . . . . . . . . . . . . . . . . . .

Clearing a programmed recording (TIMER)

21

. . . . . . . . . .

8.

ADDITIONAL FUNCTIONS

22

. . . . . . . . . . . . . . . . . . . . . . . . .

Parental control (Child lock)

22

. . . . . . . . . . . . . . . . . . . . . . .

Switching OSD information on/off

22

. . . . . . . . . . . . . . . . . .

Continuous playback of a cassette

23

. . . . . . . . . . . . . . . . .

9.

BEFORE YOU CALL AN ENGINEER

24

. . . . . . . . . . . . . . . . . .

10. GLOSSARY

25

. . . . . . . . . . . . . . . . . . . . . . . . . . . . . . . . . . . . . .

Technical terms used

25

. . . . . . . . . . . . . . . . . . . . . . . . . . . . .

CONTENTS

3

Summary of Contents for 14 202

Page 1: ...indication 15 Searching for tape position with the picture picture search 15 Still picture 16 Searching for tape position without the picture winding 16 Instant View function 16 Automatic search for a tape position index search 16 Skipping commercials automatically 16 Eliminating picture interference tracking 17 6 MANUAL RECORDING 18 Recording without automatic switch off 18 Recording with automat...

Page 2: ...lect TELETEXT function MENU Menu To call up or close the main menu TELETEXT e TELETEXT To switch TELETEXT on or off P q Select Next programme number in the menu next line P r Select Previous programme number in the menu previous line QSr Select Reduce volume in the menu to the left or to select settings values SqP Select Increase volume in the menu to the right or to select settings values OK Stor...

Page 3: ...essed the cassette will be ejected from the machine Sockets on the front white socket AUDIO Audio input socket To connect a camcorder or video games audio yellow socket VIDEO Video input socket To connect a camcorder or video games video small socket w socket for headphones To connect headphones Back of the set 2 Aerial input socket To connect the aerial cable EXT Scart socket To connect a satelli...

Page 4: ...ect the environment C This electronic equipment contains many materials that can be recycled Please inquire about the possibilities for recycling your old set So that you can identify your machine in the event of theft enter the serial number here You will find this serial number PROD NO on the model plate at the back of the machine MODEL NO 14PV202 07 PROD NO This product complies with the requir...

Page 5: ...lp line for the next step Enjoy the automatic channel search store If you would like to be woken up by the TV you can easily programme your TV Video Combi It will switch on at the desired time The tape speed for the recordings is cut in half thus you can record 8 hours onto a 4 hour cassette For playback the correct recording speed will automatically be selected With this set you can playback cass...

Page 6: ...13A socket elsewhere How to connect a plug The wires in the mains lead are coloured in accordance with the following code BLUE NEUTRAL N BROWN LIVE L d The BLUE wire must be connected to the terminal which is marked with the letter N or coloured BLACK e The BROWN wire must be connected to the terminal which is marked with the letter L or coloured RED f Do not connect either wires to the earth term...

Page 7: ...itch 8 is located on the left side panel of the set This text will appear on the TV screen IF YOU HAVE CONNECTED THE AERIAL PRESS OK d Then read the section Initial installation in the chapter INSTALLING YOUR VIDEO RECORDER Connecting a decoder or other equipment You can also connect additional equipment to the EXT socket for instance a decoder satellite receiver or camcorder DThe respective scart...

Page 8: ...ribed in the next section Allocating a decoder Some TV stations will send coded TV channels that you can only watch when you use a purchased or hired decoder You can connect such a decoder descrambler to your TV Video Combi With the following function the connected decoder will automatically be activated for the TV channel you want to watch a Select the TV channel for which you want to use the dec...

Page 9: ...ect ON using the button SqP g To store the TV channel press OK STORED will briefly appear on the TV screen DIf you would like to search for more TV channels start again at step b h To end press the MENU button Satellite receiver You can receive channels from the satellite receiver via the scart socket EXT a To do this select the channel number E1 using the button 0 on the remote control You will h...

Page 10: ...NU STORE OK d Use the buttons QSr or SqP to select the stored TV channel to which you wish to allocate the programme number P01 e Confirm this allocation with OK The following message will briefly appear on the TV screen STORED f After that the allocation for the next highest programme number will appear on the screen e g ALLOCATE ON P02 g Use the buttons QSr or SqP to select the stored TV channel...

Page 11: ...e with P q or P r e Check MONTH DATE and TIME in the same way f When all information is correct confirm with OK STORED will briefly appear on the display g To end press the MENU button Automatic time and date setting SMART CLOCK If a TV channel which transmits TELETEXT PDC information is stored under programme number P01 the time and date are automatically set by the TELETEXT PDC information DThe ...

Page 12: ...s the MUTE y button on the remote control When you press the MUTE y button again the sound will return at its original volume level DWhile the sound is turned off y will appear on the screen Picture settings The picture can be adjusted according to your personal preferences These settings are automatically stored after exiting the main menu a Press the MENU button The main menu appears b Confirm t...

Page 13: ...tion using QSr or SqP c Confirm with the OK button DTo call up a TELETEXT sub page enter the number of the sub page after confirming the entry with the button OK using the buttons 0 9 e g for sub page 5 enter 0005 Wake up function WAKE UP You can programme your TV Video Combi to switch on at a predetermined time and wake you up The TV Video Combi will switch on at the predetermined time playing th...

Page 14: ...l The screen will show the time remaining until switch off e g 0 15 b Press the button SLEEP repeatedly to extend the time until switch off in 15 minute increments DThe maximum time period to be set until switch off is 4 hours The machine now counts backwards to the switch off time DIf you would like to turn this function off push the SLEEP button on the remote control and then press CLEAR CL when...

Page 15: ... keep your TV Video Combi connected to the mains and keep the mains switch 8 on at all times to ensure that programmed recordings can be made and that the television works normally The power consumption will be low E Attention If you switch off the appliance using the power switch 8 make sure that you have removed the tape by pressing the button E If the TV Video Combi does not receive a signal fo...

Page 16: ...nge your selection With the 0 9 QSr or SqP button E To cancel With the STANDBY m button E Store confirm With the OK button E To close the main menu With the MENU button DIf the symbol X appears on the right end of the menu line instead of X the function of this line is not possible TV SETTINGS BRIGHTNESS W X COLOUR CONTRAST SHARPNESS START UP VOLUME EXIT MENU Chapter TV SET FUNCTIONS Picture setti...

Page 17: ...tion Selecting the recording speed SP LP in the chapter MANUAL RECORDING Playing NTSC cassettes With this TV Video Combi you can playback cassettes that have been recorded in NTSC standard on other video recorders e g American cassettes DDuring NTSC playback NTSC will briefly appear on the screen DSome special functions e g still picture are not possible during NTSC playback Tape position indicati...

Page 18: ...ideo Combi automatically switches back to wind and rewind Automatic search for a tape position index search At the start of each recording an index code is written on the tape a In order to search for the previous or next index code press the INDEX E button and then the H button for the previous code or the I button for the next code The following may appear on the screen for the next code 0 01 20...

Page 19: ... can manually adjust the tracking a Press and hold the button P q or P r during playback until the playback quality reaches its best T will appear on the screen when the button P q is pressed T will appear when you press the button P r This setting will remain until the cassette is removed 17 ...

Page 20: ...emote control or the button n on the TV Video Combi DDuring recording the recording lamp RECORD 5 on the front of the machine lights up The following will appear on the screen 0 01 20 P01 DUse the button OK to display the current tape position on the screen d Stop recording with the STOP h button DIf you would like to turn off the screen during the recording press the button STANDBY m DTo switch t...

Page 21: ... by pressing the RECORD n button on the remote control d Stop recording with the STOP h button Selecting the recording speed SP LP You can reduce the recording speed by half This makes it possible to record for example eight hours instead of four hours on an E240 four hour cassette a Press the MENU button on the remote control The main menu will appear b Select the line SPECIAL SETTINGS with the b...

Page 22: ...ll be highlighted b Press the TIMER k button The current information will appear on the screen TIMER PROGRAMMING VPS DATE PROG START PDC END 01 01 20 15 21 30 STORE OK c Use the buttons SqP or QSr to select different entry fields DATE Date PROG Programme number START Start time END End time Enter or change your information with P q or P r or with the number buttons 0 9 DUse the SELECT button in th...

Page 23: ...rt socket How to check or change a programmed recording TIMER a Press the TIMER k button on the remote control b Use the P r or P q buttons to select the programmed recording TIMER you wish to check or change c Press the TIMER k button d Select the entry field with the QSr or SqP button e Change any displayed information with the P r or P q button or with the 0 9 buttons f Confirm with the OK butt...

Page 24: ...he machine is pressed while parental control is active CHILD LOCK ACTIVE will appear on the screen for a few seconds The standby lamp STANDBY 5 blinks as long as a button on the front is pressed Switching OSD information on off You can tailor the on screen display OSD of the current mode e g playback record to your personal needs a Press the MENU button on the remote control The main menu will app...

Page 25: ...ce a cassette in the machine b Press the PLAY G button to start continuous playback c Hold the button SELECT down on the remote control until R appears on the screen continuous playback function switched on DIf you press a button while the continuous playback mode is activated R will appear on the screen simultaneously with the counter DIf you want to switch the continuous playback function off pr...

Page 26: ...ched off automatically Switch it back on using the P q button Switched to the programme number of an external source e g E1 for the scart socket EXT but the attached device is turned off Switch on external device or choose a different programme number A TV channel programme number has been chosen but there is no reception on this channel Select the correct TV channel No reception Have the aerial c...

Page 27: ...stem used by your television depends on which country you are in OTR One touch recording recording using one button This function enables you to select the switch off time in intervals of 30 minutes TXT TELETEXT Also known as Fasttext Videotext FLOF Standby Standby is an operating mode which you can activate by pressing the STANDBY m button remote control or the m button front of machine of your T...

Page 28: ...26 3103 166 28901 0494 011 14PV202 07 WwnnNNNwwnwNNnwnWwnNwNnWnNnwwN ...

Reviews: