background image

e


HELP

 English

Model No.

Summary of Contents for TX-48LZ1500B

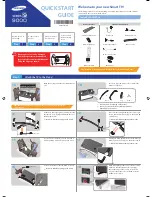
Page 1: ...eHELP English Model No ...

Page 2: ... 19 Dual Tuner 20 Easy Mirroring 21 Home Home Information 22 How to use 24 Pin to HOME 26 Option menu 27 Devices How to use 28 Option menu 29 Apps How to use 31 Option menu 32 Live TV How to use 33 Option menu 34 my Scenery How to use 36 Watching Basic Satellite connection 37 Basic connection 39 ...

Page 3: ...to Setting 63 Valid 4K format 64 External equipment External connection 65 Watching external input 69 Operating with TV s remote control 71 HDMI features 73 HDMI HDR Setting 75 HDMI Signal Power Link Setting 76 Valid input signals 77 For best picture Viewing Mode 78 Aspect 81 Aspect Control Signal 82 Basic settings 84 Ambient Sensor Settings 88 Noise reduction settings 89 Advanced Settings 90 Opti...

Page 4: ...de Freeview Play EPG UK 124 TV Guide 126 Timer Programming 128 Guide link programming 129 Teletext Digital text service 130 Viewing Teletext 131 Teletext mode 133 Teletext Character Set 134 Tuning and editing channels Setting menu 135 Channel List Editor 136 Favourites Editor 139 Auto Setup 141 Channel Sorting by Region 143 Manual Tuning 144 Update Channel List 146 Signal Condition 147 Add New Cha...

Page 5: ...ng Timer Programming 160 Note 161 Technical information USB HDD 162 Media Player Using Media Player Information 163 Selecting device mode 165 Easy List View Selecting file 166 Filtering files 168 Mix Folder View Selecting file 169 Filtering files 171 Sorting files 172 Playback Playback 173 Slideshow Settings 175 Video Setup 177 Audio output settings 178 Recorded TV mode Selecting content 179 ...

Page 6: ...eo format 189 Music format 192 Network Internet content Information 193 Selecting internet content 194 Note 195 Home network In House streaming 196 Preparations 199 Network connections Internet connection 200 Home network connection 201 Note 204 Network settings Network Connection 205 Custom Wireless 207 Custom Wired 209 Custom Wireless Access Point 211 Network Status 212 TV Name 213 TV Remote App...

Page 7: ...vice and Settings 225 Samba Interactive TV Settings 226 Photos Selecting file 227 Viewing photo 228 Using Slideshow 229 Videos Selecting file 230 Watching video 231 Video Setup 233 Audio output settings 235 Music Selecting file 237 Playing music 238 Music Setup 239 Supported format Photo format 240 Video format 241 Music format 244 Functions Menu How to use 245 Voice Control Information 246 ...

Page 8: ...k 257 Preparations 262 Easy playback 263 Power on Link 264 Power off Link 265 Standby Power Save 266 Intelligent Auto Standby 267 VIERA Link Control 268 Speaker Selection 270 Note 271 Child Lock Using Child Lock 272 PIN number 273 Parental Rating 274 Power LED Indicator Using Power LED Indicator 275 Data Service Application Using Data Service Application 276 Privacy Setting 277 Note 278 ...

Page 9: ...haracters Using Numeric buttons 285 Bluetooth devices Bluetooth Setup 286 Keyboard Keyboard 289 Settings Setting main menu How to use 290 Picture Viewing Mode 292 Basic settings 293 Ambient Sensor Settings 295 Noise reduction settings 296 Advanced Settings 297 Option Settings 298 Screen Settings 300 PICTURE Button Setting 301 Lock Settings 302 Copy Adjustment 303 Reset to Defaults 304 ...

Page 10: ...5 Network Status 316 TV Name 317 TV Remote App Settings 318 Network Link Settings 319 Smart Speaker Settings 320 Mirroring Settings 321 Control4 Settings 322 Other settings 323 Timer On Timer 324 Off Timer 325 Timer Programming 326 Time Zone 327 Auto Standby 328 No signal Power off 329 Setup Voice Control 330 Eco Navigation 331 USB Device Setup 332 Recording Setup 333 Bluetooth Setup 334 Child Loc...

Page 11: ...A Link Settings 343 Data Service Application 344 Home Settings 345 System Menu 346 Other Settings 347 Support Help menu Using Help menu 348 FAQs Picture 349 Digital TV 351 Analogue TV 353 Sound 354 HDMI 355 Network 356 Other 358 Detailed information 361 Maintenance Care and Cleaning 362 ...

Page 12: ...page by pressing OK while the cursor is on the references Operation guide Note The design and specifications are subject to change without notice The images shown in this eHELP are for illustrative purposes only This eHELP covers all models however some features may not be available on certain models Refer to the paper manual and the actual menu in the TV etc to confirm your model s features 12 ...

Page 13: ...ngs Corporation is under license The terms HDMI HDMI High Definition Multimedia Interface and the HDMI Logo are trademarks or registered trademarks of HDMI Licensing Administrator Inc x v Colour is a trademark 2020 Advanced Micro Devices Inc All rights reserved AMD and FreeSync and combinations thereof are trademarks of Advanced Micro Devices Inc Dolby Dolby Vision Dolby Vision IQ Dolby Atmos Dolb...

Page 14: ...affect unprotected content or content protected by other content access technologies Content owners may require you to upgrade PlayReady to access their content If you decline an upgrade you will not be able to access content that requires the upgrade This product incorporates the following software 1 the software developed independently by or for Panasonic Entertainment Communication Co Ltd 2 the...

Page 15: ...rce code distribution a complete machine readable copy of the corresponding source code covered under GPL V2 0 LGPL V2 1 or the other licenses with the obligation to do so as well as the respective copyright notice thereof Contact Information oss cd request gg jp panasonic com The source code and the copyright notice are also available for free in our website below https panasonic net cns oss tv E...

Page 16: ...roperty privacy etc of the subject Pay attention to the privacy image rights etc of display images and use this unit at your own risk Keep your personal information password of broadband router etc safe to prevent such information from being stolen by a third party while you input or display the information on the TV screen 16 ...

Page 17: ...Features 4K resolution You can watch content in 4K format that has twice the horizontal and vertical resolution of the 1080p signal Watching 4K resolution 4K compatible equipment 17 ...

Page 18: ...Home Home is a gateway to the TV programmes applications and connected devices It provides you an easy way to access all the features Home Home Information 18 ...

Page 19: ...Freeview Play EPG Using the Freeview Play EPG enables you to select a programme easily view programme information etc Watching TV Guide Freeview Play EPG UK 19 ...

Page 20: ...Dual Tuner You can watch or record 2 programmes simultaneously watch a programme while recording another programme etc Functions Multi Window Multi Window 20 ...

Page 21: ...watch and display images of other devices smartphone etc on the TV screen using a mirroring function You can also start the mirroring function from the other devices without operating the TV Functions Mirroring How to use 21 ...

Page 22: ...and it provides you an easy way to access all the features as shown below example Home my Scenery Displays the photos or videos stored in this TV connected USB device etc Home my Scenery Live TV Gateway to TV programmes Home Live TV Devices Gateway to connected devices HDMI equipment USB device network equipment etc Home Devices 22 ...

Page 23: ...c Home Apps Note Be sure to update the software when a software update notice is displayed on the TV screen If the software is not updated you may not be able to use Home You can update the software later manually Network Network settings Software Update 23 ...

Page 24: ...t Live TV Example You can also select the content from the relevant programme information recommended content etc by pressing for each feature Note The design and specifications are subject to change without notice Search You can search for content from various sources Ireland only 1 Display Home with HOME 2 Select Search and press OK to access A search history may be displayed and you can select ...

Page 25: ...menu with MENU select Main Menu and press OK to access 2 Select Setup Home Settings Auto Pin and press OK to access 3 Select On Off and press OK to set Game Control Board You can set up the picture settings for playing games in HDMI input or check the setting status 1 Display Home with HOME 2 Select Apps and press OK to access 3 Select Game Control Board and press OK to access 4 Follow the on scre...

Page 26: ... Devices Apps Live TV and press OK to access 3 Select a feature device application TV programme 4 Display the option menu with OPTION 5 Select Pin to HOME and press OK to set 6 Select the position to add on Home and press OK to set To remove a shortcut from Home set Unpin from HOME Home Home Option menu 26 ...

Page 27: ...ON 2 Select one of the following items and press OK to access Unpin from HOME Move Sorting mode 3 Set the item and press OK to store Unpin from HOME Removes a shortcut from Home Move Arranges the position of the icons Sorting mode Sorts the channels displaying on Home 27 ...

Page 28: ...access Example To exit Devices EXIT To add a shortcut icon Home Home Pin to HOME 3 Select a device and press OK to access For external equipment Watching External equipment For USB device Media Player Using Media Player For network equipment Network Home network For mirroring function Functions Mirroring Note The design and specifications are subject to change without notice 28 ...

Page 29: ...the voice service for Voice Control function Functions Voice Control Settings Audio Description Narration settings for visually impaired users Watching For best audio Audio Description Dialogue Enhancement Enhances the intelligibility of dialogue and commentary Watching For best audio Volume settings Preferred Subtitle Type Selects the preferred subtitle type Watching Basic Subtitle Screen Display...

Page 30: ...Show Info Displays the information about the selected device 30 ...

Page 31: ... assign a favourite application to MY APP of the TV s remote control Home Apps Option menu 3 Select an application and press OK to access 4 Follow the on screen instructions Note The design and specifications are subject to change without notice Internet apps are provided by their service providers and may be changed interrupted or discontinued at any time A broadband network environment is requir...

Page 32: ...rite application to MY APP of the TV s remote control is displayed on the assigned application To change the assignment set Set as My App while the cursor is on another application Move Arranges the position of the applications Lock Unlock Locks unlocks a specific application to restrict access if available Child Lock PIN number is required to access to locked application Functions Child Lock PIN ...

Page 33: ...w to use Live TV is a gateway to the TV programmes 1 Display Home with HOME 2 Select Live TV 3 Press OK to access Example For details of watching TV Watching Basic To add a shortcut icon Home Home Pin to HOME 33 ...

Page 34: ...ects the voice service for Voice Control function Functions Voice Control Settings Audio Description Narration settings for visually impaired users Watching For best audio Audio Description Dialogue Enhancement Enhances the intelligibility of dialogue and commentary Watching For best audio Volume settings Preferred Subtitle Type Selects the preferred subtitle type Watching Basic Subtitle Screen Di...

Page 35: ...r viewing sound etc Watching Basic AV Options Menu items and selectable options vary depending on the TV mode Category Changes the category of channels for selecting a channel from the channel list information banner etc Ireland only 35 ...

Page 36: ...eration is performed for 15 minutes the luminance level is automatically adjusted to prevent panel image retention Settings You can set up the scenery selecting contents stored in this TV or connected device timer function background music etc and also view the guide screen 1 Press OK while my Scenery is displayed 2 Select the items and press OK to access 3 Follow the on screen instructions Menu i...

Page 37: ...or disconnecting any cables External equipment and cables shown are not supplied with this TV For Satellite Dual Tuner Connecting both satellite terminals IN 1 and IN 2 to a satellite dish allows you to watch or record 2 satellite programmes simultaneously Satellite IN 1 IN 2 terminals Satellite cables Satellite dish 37 ...

Page 38: ...sh Note To ensure your satellite dish is correctly installed please consult your local dealer Also consult the received satellite broadcasting companies for details Keep the TV away from electronic equipment video equipment etc or equipment with an infrared sensor otherwise distortion of image sound may occur or operation of other equipment may be affected Check the terminal type and cable plugs a...

Page 39: ...efore attaching or disconnecting any cables External equipment and cables shown are not supplied with this TV Aerial Terrestrial terminal RF cable Terrestrial aerial For digital analogue DVD Recorder Blu ray Recorder etc Terrestrial terminal RF cable DVD Recorder Blu ray Recorder etc Terrestrial aerial HDMI terminal HDMI cable 39 ...

Page 40: ...uipment video equipment etc or equipment with an infrared sensor otherwise distortion of image sound may occur or operation of other equipment may be affected Use a fully wired HDMI compliant cable Use a high speed HDMI cable for high resolution images Use a Premium High Speed HDMI cable for HDR images Use a Ultra High Speed HDMI cable and connect to HDMI1 or HDMI2 for 4K high frame rate 120 Hz im...

Page 41: ...and press OK to watch while the banner is displayed Watching Basic Information banner Watching Basic Freeview Play banner UK To select a channel using TV Guide 1 Display TV Guide with GUIDE 2 Select the current programme and press OK to access The current programme is displayed on the top left of the screen 3 Select Watch Now or View and press OK to watch For Ireland Watching TV Guide TV Guide For...

Page 42: ...with MENU select Main Menu and press OK to access 2 Select Setup Other Settings Power on Channel List and press OK to access 3 Select All Channel List Last and press OK to set To watch pay TV For details of the encrypted channels Functions Common Interface Using Common Interface Consult the operator broadcaster or CI module manufacturer for more information and conditions of the services 42 ...

Page 43: ...Press it again to hide the information For Satellite Analogue DVB Ireland only Example Channel position and name Channel type Radio HDTV etc Encrypted channel TV mode Programme Start time End time except Analogue Channel position etc Analogue Progress time indicator of the selected programme except Analogue Category To change the category DVB Home Live TV Option menu Date and time Features availab...

Page 44: ...roadcast UK only To display the extra information for details STTL Subtitle service available TEXT Text service available Multi Audio Multiple audio available Stereo Mono NICAM Audio mode 1 90 Off Timer remaining time Watching Basic Off Timer To confirm another tuned channel To watch the channel listed in the banner OK Information on the next programme DVB Extra information DVB Press again to hide...

Page 45: ...p Display Settings Banner Display Timeout and press OK to access 3 Set the item and press OK to store AD STTL TEXT Multi Audio indications are displayed as available on particular programmes but may not be available for all individual programmes being broadcast Display the extra information to confirm availability of these functions 45 ...

Page 46: ...it again to hide the information For Freeview Example Channel position and name Programme Date Start time End time Current date and time Event image when available Features available message meanings AD Audio Description service available This function can aid visually impaired viewers by providing an additional audio track to describe events on screen Watching For best audio Audio Description SD ...

Page 47: ... To hide the banner EXIT To adjust banner timeout set Banner Display Timeout 1 Display the menu with MENU select Main Menu and press OK to access 2 Select Setup Display Settings Banner Display Timeout and press OK to access 3 Set the item and press OK to store Note In Satellite the information banner will appear when pressing Watching Basic Satellite banner 47 ...

Page 48: ...de HDMI Press it again to hide the information For Satellite Example Channel position and name Programme Start time End time Progress time indicator of the selected programme Category Current time Features available message meanings AD Audio Description service available This function can aid visually impaired viewers by providing an additional audio track to describe events on screen Watching For...

Page 49: ...e Extra information Press again to hide the banner To hide the banner EXIT To adjust banner timeout set Banner Display Timeout 1 Display the menu with MENU select Main Menu and press OK to access 2 Select Setup Display Settings Banner Display Timeout and press OK to access 3 Set the item and press OK to store 49 ...

Page 50: ... if the programme has Audio Description service then you will hear an additional audio track to describe events on screen if available For digital To adjust the volume for Audio Description Watching For best audio Audio Description Not valid in multi window mode Multi Audio Selects between alternative language or Audio Description for sound tracks if available This setting is not stored and it ret...

Page 51: ...ramme Not valid in Analogue Not valid on the sub screen in multi window mode Teletext Character Set Sets the teletext language font Watching Teletext Teletext Character Set Ireland only Teletext Language Selects between alternative languages for teletext if available For digital Satellite NICAM Switches NICAM sound if available Watching For best audio Advanced settings For Analogue Volume Correcti...

Page 52: ...ccess 3 Select Standard Hard of Hearing and press OK to set Hard of Hearing provides aids in understanding and enjoyment with digital channel subtitles depending on the broadcaster Ireland only Preferred Subtitles 1 2 in Language are given priority Watching Basic Language Ireland only Analogue Display subtitles with STTL Hide subtitles with EXIT Note If you press STTL in Analogue the TV switches t...

Page 53: ...ut mode easily with last view button LAST VIEW Press again to return to the current view Note Switching channel may not be available depending on the condition Watching less than 10 seconds is not reflected in the previously viewed channel or input mode 53 ...

Page 54: ...K to access 2 Select Timer Off Timer and press OK to access 3 Select the time in 15 minute increments and press OK to set 90 75 60 45 30 15 Off minutes To cancel set to Off or turn the TV off The remaining time is displayed on the bottom right of the screen The remaining time will flash on the screen when less than 3 minutes 54 ...

Page 55: ... the recording On Timer 1 Display the menu with MENU select Main Menu and press OK to access 2 Select Timer On Timer and press OK to access 3 Set On Timer to Off to continue the settings 4 Set the item and press OK to store On Timer Automatically turns the TV on at the set time with the preset channel volume etc Set to Off to edit the timer details or disable this function LED lights orange in Sta...

Page 56: ...tches to Off after TV is turned on automatically This function is not available when the TV is turned off with Mains Power On Off switch Auto Standby 1 Display the menu with MENU select Main Menu and press OK to access 2 Select Timer Auto Standby and press OK to access 3 Select On Off and press OK to set Auto Standby On Off Automatically turns the TV to Standby mode for energy saving when no opera...

Page 57: ...inutes A notification message will appear 3 minutes before going into Standby mode Eco Navigation 1 Display the menu with MENU select Main Menu and press OK to access 2 Select Setup Eco Navigation and press OK to access 3 Select Set to Eco and press OK to set Eco Navigation Automatically sets the TV to the most suitable energy saving mode The concerned items and their current settings are displaye...

Page 58: ...set Radio Mode Sets the timer for turning off the screen automatically when a radio channel is selected 20 15 10 5 Off seconds Sound is active even if the screen is turned off This function is effective in reducing power consumption when listening to a radio channel Press any buttons except Standby On Off switch Volume Up Down or MUTE to turn the screen on Not valid in Analogue 58 ...

Page 59: ...the time data 1 Display the menu with MENU select Main Menu and press OK to access 2 Select Timer Time Zone and press OK to access 3 Set the item and press OK to store The time data are corrected based on GMT Ireland only 59 ...

Page 60: ...ding on the broadcaster UK only Preferred Audio 1 2 Selects the first and second preferred language for digital channel multi audio depending on the broadcaster Ireland only Preferred Subtitles 1 2 Selects the first and second preferred language for digital channel subtitles depending on the broadcaster To display subtitles Watching Basic Subtitle Ireland only Preferred Subtitles Selects the prefe...

Page 61: ...Preferred Teletext Selects the preferred language for digital channel teletext service depending on the broadcaster Ireland only 61 ...

Page 62: ...erminal using a 4K compatible cable and you can watch content in 4K format 4K compatible equipment HDMI terminal HDMI cable 4K compatible equipment Check the terminal type and cable plugs are correct for connection Use a fully wired HDMI compliant cable Use a high speed HDMI cable for high resolution images Use a Premium High Speed HDMI cable for HDR images Use a Ultra High Speed HDMI cable and co...

Page 63: ...ed properly Mode1 For high compatibility Set to Mode1 when the image or sound in HDMI input is not played properly Mode2 For the 4K compatible equipment that has the function to output the image precisely with the expanded colour gamut Mode3 For the 4K 120 Hz compatible equipment that has the function to output the high frame rate image This mode is available for HDMI1 HDMI2 Not valid when NVIDIA ...

Page 64: ...p 30p 25p 24p Aspect is fixed to 16 9 Note The above signals are reformatted for optimal viewing on your display Use HDMI1 HDMI2 for the following 4K format 4K UHD 50 Hz 60 Hz 4 4 4 10 bit 12 bit 4K UHD 100 Hz 120 Hz For details of aspect Watching For best picture Aspect 64 ...

Page 65: ...each piece of equipment For details of basic connection Watching Basic Basic connection To use the specific devices supporting Bluetooth wireless technology Functions Bluetooth devices Check the terminal type and cable plugs are correct for connection External equipment and cables shown are not supplied with this TV HDMI equipment HDMI terminal HDMI cable Recorder Player Cable TV box Camcorder Amp...

Page 66: ...e HDMI2 to connect the TV to an amplifier which has eARC Enhanced Audio Return Channel ARC Audio Return Channel function Use HDMI1 HDMI2 to connect the device that supports 4K high frame rate 120 Hz VRR Variable Refresh Rate AMD FreeSync Premium function AV devices connecting to TV with AV VIDEO adaptor not supplied AV IN VIDEO terminals AV VIDEO adaptor Shielded not supplied 1 L 2 Video 3 Ground ...

Page 67: ...e used with this TV You cannot connect any devices by using USB card reader Listening with external speakers DIGITAL AUDIO Optical digital audio cable Amplifier with speaker system To enjoy multi channel sound from external equipment e g Dolby Audio Dolby Digital 5 1ch connect the equipment to the amplifier For information about the connections read the manuals of the equipment and amplifier To se...

Page 68: ...ting Watching For best audio Volume settings Sub woofer Headphone Subwoofer jack Audio cable 3 5 mm stereo mini plug audio pin plug Sub woofer To use a sub woofer set Headphone Terminal Output to Sub Woofer Watching For best audio Headphone terminal output setting Do not connect headphones while Headphone Terminal Output is set to Sub Woofer To adjust the volume set Sub Woofer Adjustment Watching ...

Page 69: ... equipment Operating with TV s remote control To return to TV mode TV Note If the external equipment has an aspect adjustment function set it to 16 9 For details read the manual of the equipment or ask your local dealer Input Labels Accessing the input labels list allows you to change the input name or skip the input if unconnected improving identification and selection in the Input Selection bann...

Page 70: ... on the top right of the screen every 30 minutes 1 Display the menu with MENU select Main Menu and press OK to access 2 Select Setup Display Settings Playing Time Display and press OK to access 3 Select On Off and press OK to set This function is available when Input Lag is set to Fast 70 ...

Page 71: ...nd view the picture rapidly in reverse VCR Skip to the previous track title or chapter DVD video content Press and hold to search backward DVD video content Fast forward view the picture rapidly forward VCR Skip to the next track title or chapter DVD video content Press and hold to search forward DVD video content Pause Resume Press and hold to play at slow speed DVD One Touch Recording Recording ...

Page 72: ... Numeric buttons Codes for each product and features 70 DVD Recorder DVD Player Blu ray Disc Player 71 Player theatre Blu ray Disc theatre 72 VCR 73 default Using in USB HDD recording Media Player in house streaming or VIERA Link 3 Press to change Note Confirm if the remote control works correctly after changing the code The codes may be reset to defaults if batteries are replaced Some operations ...

Page 73: ...ction The HDMI logo is displayed on HDMI compliant equipment Applicable HDMI features Input audio signal LPCM Dolby Audio Dolby Digital Dolby Digital Plus Dolby TrueHD Dolby Atmos Audio settings can be made on HDMI Audio Format in the Sound Menu Watching For best audio Advanced settings Input video signal Matches the output setting of the digital equipment Watching External equipment Valid input s...

Page 74: ...ot supplied may be necessary to connect to the audio input terminals Enquire HDMI adaptor cable at your local digital equipment retailer shop Note Audio settings can be made on HDMI Audio Format HDMI Input in the Sound Menu Watching For best audio Advanced settings If the connected equipment has an aspect adjustment function set the aspect ratio to 16 9 These HDMI connectors are type A These HDMI ...

Page 75: ... This may occur in some cases such as compatibility with the connected device source images or with use of multi window function Image may disappear for a few seconds when the setting is changed For HDMI HDR Dynamic Setting HDR10 Functionality On Off Enables the HDR10 function for HDMI input signal Dolby Vision On Off On Allows Dolby Vision processing to occur either on the TV or the source device...

Page 76: ... Set the item and press OK to store HDMI Signal Power Link Setting Power on Link On Off When the connected equipment is operated the TV is automatically turned on Only when the TV is in Standby mode Power off Link On Off When the TV is set to Standby mode the connected equipment is also automatically set to Standby Link Terminal Selects HDMI terminal to use the power link function 76 ...

Page 77: ...0i 50i 1 125 1 080 120p 100p 60p 50p 24p 3 840 2 160 120p 100p 60p 50p 30p 25p 24p Note Signals other than those above may not be displayed properly The above signals are reformatted for optimal viewing on your display For details of valid 4K format Watching 4K resolution Valid 4K format 77 ...

Page 78: ...h input Dynamic Improves contrast and sharpness for viewing in a bright room Auto AI Adjusts the luminance colour temperature shades of black etc to suit your watching environment To adjust the effect level set Auto AI Picture Effect Level Normal Normal use for viewing in a normal lighting condition Professional Photo Reproduces the original image for photo For photo content Cinema Improves the pe...

Page 79: ...t to Game Watching For best picture Option Settings Dolby Vision Vivid Reproduces Dolby Vision content precisely in a bright room Dolby Vision IQ Automatically adjusts to reproduce Dolby Vision content according to the content lighting condition etc Dolby Vision Dark Reproduces Dolby Vision content precisely in a darkened room The following items can be adjusted and stored for each mode Luminance ...

Page 80: ...iewing Mode is set to Auto AI 1 Display the menu with MENU select Main Menu and press OK to access 2 Select Picture Auto AI Picture Effect Level and press OK to access 3 Set the item and press OK to store Auto AI Picture Effect Level is not available when 4K 120Hz Bypass Mode is set to On To change the viewing mode with PICTURE You can change the viewing mode easily only by pressing PICTURE 1 Disp...

Page 81: ...Control Signal 16 9 Directly displays the image at 16 9 without distortion anamorphic 4 3 Displays the image at the standard 4 3 without distortion Zoom Displays a 16 9 letterbox or 4 3 image without distortion 4 3 Full Displays a 4 3 image enlarged horizontally to fit the screen Note Display the image full screen to use this function completely Aspect mode can be stored separately for SD Standard...

Page 82: ... WSS or a Control signal through HDMI terminal is found The aspect switches to the appropriate ratio Watching For best picture Aspect Available conditions Terrestrial terminal WSS only Valid input signal format DVB PAL I Invalid input signal format PAL 525 60 6 0 MHz M NTSC 6 0 MHz Satellite terminal WSS only Valid input signal format Satellite AV IN VIDEO terminals Valid input signal format PAL P...

Page 83: ...60p 50p 24p 3 840 2 160 120p 100p 60p 50p 30p 25p 24p HDMI terminal does not receive WSS signal Note If the screen size looks unusual when a widescreen recorded programme is played back on a VCR adjust the tracking of the VCR Read the manual of the VCR For details of valid 4K format Watching 4K resolution Valid 4K format 83 ...

Page 84: ...t Sharpness Adjusts the levels of these options according to your personal preference Sharpness is not available when Viewing Mode is set to Dolby Vision IQ or 4K 120Hz Bypass Mode is set to On Colour Temperature Sets the overall colour tone of the picture bluer redder Not valid when Viewing Mode is set to Dolby Vision IQ Colour Remaster Max Min Off Displays the vivid images with the expanded colo...

Page 85: ... is set to Dolby Vision IQ 4K 120Hz Bypass Mode is set to On Dynamic Range Remaster On Off Enhances bright areas of the image closer to the original luminance making improved picture impact Not valid in the following conditions Multi window HDR video signal Viewing Mode is set to Sport or the mode of Dolby Vision 4K 120Hz Bypass Mode is set to On Dark Visibility Enhancer Adjusts the black level or...

Page 86: ...aults Resets items for Intelligent Frame Creation Not valid in the following conditions Input Lag is set to Fast 1080p Pure Direct is set to On 4K Pure Direct is set to On Photo content Viewing Mode is set to Dolby Vision IQ 120 Hz video signal from 120 Hz compatible equipment Auto AI Film Interlock Reproduces image more precisely for the film content Set to Off when the image looks unnatural Set ...

Page 87: ...set to On Photo content 120 Hz video signal from 120 Hz compatible equipment Black Frame Insertion Makes the blurring image clearer for video content etc When Input Lag is set to Fast in HDMI input with the equipment supporting VRR function the input lag may occur Not valid in the following conditions Photo content VRR is set to On Multi window 4K 120Hz Bypass Mode is set to On Clear Motion Makes ...

Page 88: ...the item and press OK to store Auto Brightness On Off Adjusts brightness automatically depending on ambient lighting conditions This function may not be available when Viewing Mode is set to the mode of Dolby Vision Auto White Balance On Off Adjusts the white balance depending on ambient lighting conditions This function may not be available when Viewing Mode is set to the mode of Dolby Vision 88 ...

Page 89: ...cture noise Not valid in the following conditions 1080p Pure Direct is set to On 4K Pure Direct is set to On Viewing Mode is set to Dolby Vision IQ 4K 120Hz Bypass Mode is set to On MPEG Remaster Auto Max Mid Min Off Reduces flicker noise in contoured parts of a picture and block noise Not valid in the following conditions 1080p Pure Direct is set to On 4K Pure Direct is set to On Viewing Mode is ...

Page 90: ...d press OK to access 3 Select Picture Viewing Mode and press OK to access 4 Select the mode and press OK to set Professional Photo Cinema Filmmaker True Cinema Custom Professional1 Professional2 Game Dolby Vision IQ Dolby Vision Bright Dolby Vision Dark Adjust the detailed picture settings 1 Display the menu with MENU select Main Menu and press OK to access 2 Select Picture Advanced Settings and p...

Page 91: ...wing conditions Viewing Mode is set to Filmmaker Tonemap clipping is set to Clipping 4K 120Hz Bypass Mode is set to On Contrast Control Setting Not valid when 4K 120Hz Bypass Mode is set to On Adaptive Gamma Control Adjusts the gamma curve to make the image brighter Black Expander Gradually adjusts the shades of black Reset to Defaults Resets items for Contrast Control Setting 91 ...

Page 92: ...SMPTE C Standard for NTSC EBU Standard for PAL Rec 2020 Provides the suitable colour gamut for Rec 2020 DCI P3 Provides the suitable colour gamut for DCI Set Colour Remaster to Off to use this function Set Rec 2020 Colour Remaster to Off to use this function for the Rec 2020 signal Not valid in the following conditions Viewing Mode is set to the mode of Dolby Vision 4K 120Hz Bypass Mode is set to ...

Page 93: ...ion 4K 120Hz Bypass Mode is set to On White Balance R Gain G Gain B Gain Adjusts the white balance of bright red green blue components R Cutoff G Cutoff B Cutoff Adjusts the white balance of dark red green blue components More Detailed Adjustment Adjusts more detailed items for White Balance Input Signal Level Adjusts the input signal level R Gain G Gain B Gain Adjusts the detailed white balance o...

Page 94: ...ure hue saturation luminance of blue areas More Detailed Adjustment Adjusts more detailed items for Colour Management C Hue M Hue Y Hue Adjusts the picture hue of cyan magenta yellow areas C Saturation M Saturation Y Saturation Adjusts the saturation of cyan magenta yellow areas C Luminance M Luminance Y Luminance Adjusts the luminance of cyan magenta yellow areas Reset to Defaults Resets items fo...

Page 95: ...the gain of gamma for selected signal level Reset to Defaults Resets items for More Detailed Adjustment Reset to Defaults Resets Gamma to the default settings Dynamic HDR Effect Dynamic HDR Effect On Off Automatically adjusts the luminance according to an HDR video signal Not valid in the following conditions Viewing Mode is set to the mode of Dolby Vision 4K 120Hz Bypass Mode is set to On Tonemap...

Page 96: ...ls tonemap with content meta data Not valid when Viewing Mode is set to Dolby Vision IQ or Dolby Vision Dark Clipping Threshold Adjust clipping luminance nit of tonemap Reset to Defaults Resets HDR Tonemap clipping to the default settings Reset to Defaults Reset to Defaults Resets Advanced Settings to the default settings 96 ...

Page 97: ...l Provides suitable images for fast response signals when playing games To display a continuous record of time spent using Game Mode set Playing Time Display Not valid in the following conditions TV mode 1080p Pure Direct is set to On 4K Pure Direct is set to On Viewing Mode is set to Game Input Lag is fixed to Fast Viewing Mode is set to Dolby Vision IQ 4K 120Hz Bypass Mode is set to On VRR is se...

Page 98: ... conditions Multi window HDMI Auto Setting is set to Mode1 or Mode2 NVIDIA Auto Game Mode is set to On and some of NVIDIA PC graphics cards supporting HDMI 2 1 VRR are detected ALLM is fixed to On Film Cadence Mode Auto On Off Improves vertical resolution for movie images This function is available for interlaced signals except in the mode of multi window Network services or when Input Lag is set ...

Page 99: ...image quality in detail for 4K 120 Hz signal Some picture menu items are not available when 4K 120Hz Bypass Mode is set to On For 4K 120 Hz signal HDMI1 HDMI2 Not valid in the following conditions Multi window Viewing Mode is set to the mode of Dolby Vision 60Hz Refresh Mode On Off Reduces the input lag when connecting 60Hz output game equipment For HDMI AV Not valid in the following conditions 10...

Page 100: ...e Auto Traditional gamma HLG PQ Selects the EOTF type for each HDMI input Set to Auto for general use For HDMI HDR10 function is available when HDMI EOTF Type is set to Auto Not valid when Viewing Mode is set to the mode of Dolby Vision EOTF Type Auto Traditional gamma HLG PQ Selects the EOTF type of broadcast or video content It works correctly only when the signal corresponds to each EOTF type S...

Page 101: ...ange Auto Full Normal Adjusts the black level of the image for each HDMI input When the black level is not suitable select Full For HDMI Not valid when Viewing Mode is set to the mode of Dolby Vision HDMI YCbCr Range Auto Full Normal Adjusts the black level of the image in the YCbCr signal for each HDMI input For HDMI Not valid when Viewing Mode is set to the mode of Dolby Vision 101 ...

Page 102: ...e 4 Set the item and press OK to store Aspect Changes the aspect ratio image size Watching For best picture Aspect 16 9 Overscan On Off Selects the screen area displaying the image for 16 9 aspect On Enlarges the image to hide the edge of the image Off Displays the image in the original size Set to On if noise occurs on the edge of the screen This function can be stored for SD Standard definition ...

Page 103: ...een on Pixel Orbiter On Off Sets the pixel shifting of the image to prevent panel image retention Logo Luminance Control Max Mid Min Adjusts the luminance level of the displayed logo to prevent panel image retention Panel Maintenance Turns the screen off and perform the maintenance to prevent the panel image retention It takes approx 10 minutes to finish the maintenance LED lights orange during ad...

Page 104: ...Enter the PIN number 4 digits with Numeric buttons Enter the PIN number twice at first setting Make a note of the PIN number in case you forget it 4 Select Adjustment Lock and press OK to access 5 Select On and press OK to set The following items can be locked Luminance Level Contrast Brightness Colour Tint Sharpness Colour Temperature Resolution Remaster Dynamic Range Remaster Black Frame Inserti...

Page 105: ...y the menu with MENU select Main Menu and press OK to access 2 Select Picture Copy Adjustment Destination Viewing Mode Destination Input and press OK to access 3 Select the destination to copy to and press OK to set 4 Select Copy Start and press OK to copy 5 When a confirmation screen is displayed select Yes and press OK to set Note Option Settings and Screen Settings are not copied You cannot cop...

Page 106: ...mproves sound quality for watching music videos etc Speech Improves sound quality for watching news drama etc Stadium Improves sound quality for watching sports etc The sound mode is automatically set to Stadium when Viewing Mode is set to Sport To cancel the linkage of the sound and viewing mode set Sport Link to Off Watching For best audio Basic settings User Adjusts the sounds manually using th...

Page 107: ...ovide a dynamic sound effect This function is available when Mode is set to Auto AI 1 Display the menu with MENU select Main Menu and press OK to access 2 Select Sound Auto AI Sound Effect Level and press OK to access 3 Set the item and press OK to store Auto AI Sound Effect Level is not available when 4K 120Hz Bypass Mode is set to On 107 ...

Page 108: ... suitable to turn the personal volume up in a group Area Provides the listening area in your environment It is suitable to output the sound to one of the connecting rooms Ambient Standardises the sound output of your room and provides the relaxing sound like a coffee shop s BGM The sound position can be adjusted in Sound Focus Positioning This function is effective only for the sound from TV speak...

Page 109: ...d output Not valid when Mode is set to Auto AI Treble Adjusts level to enhance or minimise sharper higher sound output Not valid when Mode is set to Auto AI Equaliser Adjusts the frequency level to suit your favourite sound quality This function is available when Mode is set to User Select the frequency and adjust the frequency level To enhance the bass sound raise the level of the lower frequency...

Page 110: ...sitioning Adjusts the position for Area The setting of adjusting position is stored Select Reset to Defaults to reset to the default position This function is available when Sound Focus Mode is set to Pinpoint Spot or Area Dolby Atmos On Off Provides the precise sound of Dolby Atmos when playing Dolby Atmos content Set to On for general use Not valid in the following conditions Mode is set to Auto...

Page 111: ... sound field Sport Provides the suitable sound field for sport and makes spacious stadium sound field Direct Through Provides the sound according to the content with the supported speakers All front line array speakers output assigned L or R sound when playing back the 2ch content All front line array speakers output assigned L C or R sound and the applied speakers output the sound when playing ba...

Page 112: ...ovides a suitable sound for watching a film by improving spatial effects Stadium Surround Provides a dynamic sound for watching sports by improving spatial effects This function is effective only for the sound from TV speakers Not valid for Dolby Atmos content Bass Boost On Off Enhances the effect of bass sounds This function is effective only for the sound from TV speakers Not valid when Mode is ...

Page 113: ...eaker Selection TV Speaker Setting Auto Gain Control Volume Correction Clear Sound Adjustment Dialogue Enhancement 4 Set the item and press OK to store Space Tune Setting Adjusts the sound quality automatically according to the installation location or room condition This function is effective only for the sound from TV speakers Space Tune On Off Enables the sound setting which has been adjusted b...

Page 114: ... Down and MUTE This function is available when the theatre speakers supporting VIERA Link function is connected to this TV TV Speaker Setting TV Speaker Headphone Off Selects the sound output to adjust the volume Sound from TV speaker turns off when Headphone or Off is selected Auto Gain Control On Off Automatically regulates large sound level differences between channels and inputs Volume Correct...

Page 115: ...Dialogue Enhancement On Off Enhances the intelligibility of dialogue and commentary Not valid when Mode is set to Auto AI 115 ...

Page 116: ...ne Sub Woofer Selects the sound output from the headphone terminal Headphone The sound outputs for using headphones Sub Woofer The sound outputs for using sub woofer Note Normally set Headphone Terminal Output to Headphone When Headphone Terminal Output is set to Sub Woofer the headphones cannot be used properly because only the low frequency sounds are output The volume of the sub woofer can be a...

Page 117: ...djust the volume Cut Off Frequency Adjusts the cut off frequency of sub woofer signal output The frequency output to the sub woofer is less than the set cut off frequency The frequency can be adjusted from 100 Hz to 400 Hz Confirm the actual sound volume from this TV and sub woofer and adjust the volume Reset to Defaults Resets Sub Woofer Adjustment to the default settings 117 ...

Page 118: ...n Off Set to On to enable voice guidance of the basic features on screen messages etc for visually impaired users Not valid in multi window mode Speed Fast Normal Slow Selects the readout speed for the voice guidance Volume Max Mid Min Selects the volume for the voice guidance User Level Beginner Expert Selects the level of verbosity for the voice guidance Web Browser On Off Set to On to enable vo...

Page 119: ... Volume 4 Set the item and press OK to store For digital Preferred Audio Type Audio Description Standard Narration settings for visually impaired users Set to Audio Description to activate the narration sound track when available on the broadcast The availability of audio description sound track is indicated by AD in the information banner Not valid in multi window mode Volume Adjusts the volume f...

Page 120: ...On Off Near Instantaneous Companded Audio Multiplex Reproduces NICAM stereo sound Set to Off if reception is poor FM monaural sound For Analogue Audio Preference Multichannel Stereo MPEG Selects the initial setting for audio tracks Multichannel The priority is given to multi channel audio track Stereo The priority is given to stereo 2ch audio track MPEG The priority is given to MPEG MPEG is an aud...

Page 121: ...uto Dolby Audio Dolby Digital Dolby Digital Plus Dolby AC 4 Dolby Atmos and HE AAC multi channel are output as Dolby Digital Bitstream MPEG is output as PCM Dolby Atmos may be output as Dolby Atmos Bitstream Dolby Digital Plus and Dolby AC 4 may be output as Dolby Digital Plus Bitstream from HDMI2 eARC ARC function terminal depending on the connected equipment PCM Digital output signal is fixed to...

Page 122: ...ignal is output as it is with pass through method Dolby Audio When the TV speakers are active Dolby Audio is output as Dolby Audio Bitstream Other digital audio output signals are output as PCM When the sound is delivered from theatre speakers Dolby Audio is output with transcoding method PCM Optical Level Adjusts the audio level of PCM output from DIGITAL AUDIO and HDMI2 eARC ARC function termina...

Page 123: ...the sound does not synchronise the image For digital Ireland only HDMI Input Digital Analogue Selects to fit the input signal Watching External equipment HDMI features Digital When sound is carried via the HDMI cable connection Analogue When sound is not carried via the HDMI DVI adaptor cable connection For HDMI 123 ...

Page 124: ... Freeview UK only A broadband network environment is required to fully use this function Ensure the network connections and network settings are completed Network Network connections Network Network settings 1 Select Freeview with TV 2 Display TV Guide with GUIDE Example TV screen Date and time Programme Channel position and name 124 ...

Page 125: ...of the programme 1 Select the programme 2 Press to view Press again to return to TV Guide To adjust the accessibility settings OPTION To exit TV Guide EXIT Note In Satellite the channel list will appear when pressing GUIDE Be sure to update the software when a software update notice is displayed on the TV screen If the software is not updated you may not be able to use the Freeview Play EPG You ca...

Page 126: ...valid in Analogue Ireland only 1 Select DVB with TV 2 Display TV Guide with GUIDE Example TV screen DVB Date Search Category Time Programme Channel position and name To watch the programme 1 Select the current programme and press OK to access The current programme is displayed on the top left of the screen 2 Select View and press OK to watch To use Timer Programming Watching TV Guide Timer Program...

Page 127: ...rrent programmes To view a channel list of the selected category 1 Display the category list with blue 2 Select the category and press OK to view To list favourite channels set Favourites Editor Watching Tuning and editing channels Favourites Editor To view more details of the programme 1 Select the programme 2 Press to view Press again to return to TV Guide To exit TV Guide EXIT Note When this TV...

Page 128: ... programme a confirmation screen asking whether you want to watch or record the programme appears Select Timer Programming and press OK to set USB HDD Rec to record from the time you finish the timer event setting Ireland only is displayed on the TV Guide screen when Timer Programming is set Ireland only is displayed on the TV Guide screen when Timer Programming is set UK only Note Not valid in An...

Page 129: ...the timer event will follow the change UK only is displayed on the timer event if the timer is set from the TV Guide Guide link programming Not valid in Analogue Note If you edit the start time or end time of a Guide link programming event by more than 10 minutes it will no longer follow the broadcaster s changes to the start or end time The start and end times will become fixed 129 ...

Page 130: ...remote control but because the commands available must apply to all manufacturers of digital equipment some on screen commands may not correspond exactly to the remote control buttons To exit a digital text service TEXT Note As soon as you switch to a digital channel with links to a digital text service software is downloaded in the background over air to enable the teletext function This means th...

Page 131: ...ast 1 Press MENU twice to display Contrast 2 Adjust and press OK to set To exit teletext EXIT Reveal hidden data 1 Press MENU 2 Reveal with red Press again to hide To view a favourite page stored Press STTL to view a favourite page Call up the page stored on blue List mode Factory setting is P888 subtitle service on blue List mode FULL TOP BOTTOM 1 Press MENU 2 Press green to change the layout Wat...

Page 132: ...oloured buttons to change 2 Enter a new page number with Numeric buttons 3 Press and hold OK View sub page The number of sub pages is displayed on the top of the screen Press to view sub page Only when teletext has more than one page The number of sub pages varies depending on the broadcaster up to 79 pages Searching may take time while you are watching TV To view a specific sub page 1 Press MENU ...

Page 133: ... Teletext and press OK to access 3 Select FASTEXT List and press OK to set FASTEXT mode In FASTEXT mode four differently coloured subjects are situated on the bottom of the screen To access more information about one of these subjects press the appropriate coloured button This facility enables fast access to information on the subjects shown List mode In List mode four differently coloured page nu...

Page 134: ...ss 2 Select Setup Display Settings Teletext Character Set and press OK to access 3 Select the font and press OK to set West English French German Greek Italian Spanish Swedish Turkish etc East1 Czech English Estonian Lettish Rumanian Russian Ukrainian etc East2 Czech Hungarian Lettish Polish Rumanian etc Ireland only 134 ...

Page 135: ...t Main Menu and press OK to access 3 Select Setup Tuning Menu and press OK to access Freeview Tuning Menu DVB Tuning Menu Analogue Tuning Menu Satellite Tuning Menu The menu name varies depending on the TV mode 4 Select one of the functions and press OK to access Channel List Editor Favourites Editor Auto Setup Channel Sorting by Region Manual Tuning Update Channel List Auto Update Channel List Si...

Page 136: ...ss OK to set Reveal Hide skip Reveal Hide skip To reveal all channels if available yellow Edit DVB Ireland only Analogue Channels To swap the channel position number logical channel number 1 Press green to edit 2 Enter the new position number with Numeric buttons and press green to store To retune each channel Manual Tuning red Only for the revealed channels To rename the channel name Analogue 1 P...

Page 137: ... the content of all the found channels and exclude the duplicated channels or reduce the number of channels And then you can select your desired channels easily 1 Select Channel List Editor and press OK to access To swap move the channel position 1 Press green to edit 2 Set the new position with Cursor buttons or Numeric buttons and press green to store To delete the channel blue To delete all cha...

Page 138: ...els to the list at once if available 1 Press yellow 2 Make the channel block and press OK to add To change the category of Channels Found blue 2 Press BACK and OK to store During the operation remove USB devices other than the USB Flash Memory used for this function Note If a VCR is connected only with the RF cable in Analogue edit VCR 138 ...

Page 139: ...s Create your favourite channel lists from various broadcasters up to 4 Favourites 1 to 4 1 Select Favourites Editor and press OK to access 2 Select a channel to list from all DVB channels appears when the channel is encrypted To display other favourites green 3 Press OK to add it to favourites list To add all channels to the list if available 1 Press yellow 2 Press green to add all 4 Press BACK a...

Page 140: ... To delete the channel 1 Select the channel 2 Press OK to delete Press yellow to delete all channels To name the favourites 1 Press red 2 Enter characters maximum 10 characters with Cursor buttons or Numeric buttons and press OK to set 3 Press BACK to store Note Channel position numbers known as logical channel numbers can be swapped in Channel List Watching Tuning and editing channels Channel Lis...

Page 141: ...ct Auto Setup and press OK to access 2 A confirmation screen is displayed and press OK to start Auto Setup Settings are made automatically When the operation is completed the channel at the lowest position will be displayed Satellite To use dual tuner function set Dual Tuner Mode to On 1 Select Auto Setup and press OK to access 2 Select Search Mode Scan Mode and press OK to access 3 Set the item a...

Page 142: ...for 3 seconds to display the main menu 2 Set Auto Setup with following control panel buttons Move the cursor select from a range of options select the menu item Access the menu store settings after adjustments have been made or options have been set with INPUT OK HOLD for MENU button 142 ...

Page 143: ...y 1 Select the region and press OK to access 2 Select repeatedly until you reach the available region Normally you should select Best signal quality All Regions If you choose to select your preferred region you could find channels with a weaker signal appear nearer the top of your channel list If you have any image or sound problems select Best signal quality All Regions instead 143 ...

Page 144: ... Ireland only 1 Select a channel and adjust frequency for each channel Set where the level of Signal Quality becomes the maximum 2 Press OK to search Analogue Set Analogue channel manually after Auto Setup 1 Select the channel position with Numeric buttons 2 Select the channel with Channel Up Down 3 Set Manual Tuning 4 Select Store and press OK to set Use Fine Tuning to make small adjustments to t...

Page 145: ...or the required satellite details can usually be found in a satellite TV magazine Normally use Auto Setup or Add New Channels to retune Satellite channels Please consult the received satellite broadcasting companies for the setting 145 ...

Page 146: ...positions automatically The channel list is updated while keeping your settings in Channel List Editor Favourites Editor Child Lock etc Depending on the signal condition the update may not work properly To update the satellite channels set Search Mode and Scan Mode before updating 1 Select Search Mode Scan Mode and press OK to access 2 Set each item and press OK to store 3 After settings select St...

Page 147: ...and checks the signal condition with indicators A good Signal Strength is not an indication of suitable signal reception Vertical lines show the maximum signal value of the selected channel To change the channel Not valid in Analogue 147 ...

Page 148: ...o check the connection for your selected satellite Ensure that the Signal Lock status is shown as Locked If it is not locked the search cannot be executed If the status is shown as Not locked and Signal Quality Signal Strength have no indications please check the dish alignment 2 Select a search mode and press OK to start Add New Channels New channels can only be added to the existing channel list...

Page 149: ...Channel List On Off Selects whether or not broadcast changes are automatically updated in your channel list For digital Add TV Signal Adds the TV mode Allows you to add any TV mode which was skipped during initial Auto Setup 149 ...

Page 150: ... at 53 East Intelsat at 45 East Turksat at 42 East Hellas at 39 East Eutelsat at 36 East Eutelsat at 33 East Astra at 28 2 East Badr at 26 East Eutelsat at 25 5 East Astra at 23 5 East Eutelsat at 21 5 East Astra at 19 2 East Eutelsat at 16 East Hot Bird at 13 East Eutelsat at 10 East Eutelsat at 9 East Eutelsat at 7 East Astra at 4 8 East Thor at 0 8 West Intelsat at 1 West Amos at 4 West Eutelsa...

Page 151: ... use of recording with this TV Connect the USB HDD to the USB 1 port with the USB cable Be sure to connect the USB HDD to the mains socket To remove the USB HDD safely from the TV perform Safely remove USB in USB Device Setup Recording USB HDD setup Setting for USB HDD Check the terminal type and cable plugs are correct for connection USB port USB cable USB HDD Mains socket 151 ...

Page 152: ...ay back its content with another TV including the TV of the same model number or any equipment Do not turn the TV off pull out the mains plug or remove the USB HDD during operation formatting recording etc Doing so may cause malfunction of the device or damage the recorded data An electric outage may also be a cause of malfunction Note Analogue TV programme cannot be recorded on the USB HDD The da...

Page 153: ... start setup Some USB HDD may not be displayed To display information of the highlighted device 4 When the caution and confirmation screen for using USB HDD is displayed select Yes and press OK to proceed 5 When a confirmation screen of USB HDD name is displayed select Yes and press OK to set The name for the USB HDD is created automatically If you want to edit the name select Yes 1 Enter characte...

Page 154: ... back To change the mode OK To edit USB HDD name green To format red To remove the USB HDD safely from the TV yellow Note You can only select one USB HDD for recording at a time You cannot change the settings for the USB HDD while recording is in progress Ensure that Dual Tuner Mode is set to On in Tuning Menu to record 2 programmes simultaneously in Satellite 154 ...

Page 155: ...g time 30 60 90 120 180 minutes and press OK to set To start One Touch Recording Press to start To stop recording in progress Press to stop To play back or delete the recorded content Recorded TV programmes can be played back on Media Player 1 Display Home with HOME 2 Select Devices and press OK to access 3 Select USB HDD for recording and press OK to access Media Player Recorded TV mode Even if O...

Page 156: ...d press OK to access 3 Select Auto to start Rewind LIVE TV When you select Auto recording will start automatically This recording may not start if another recording is in progress TV signal condition is bad or there are no images displayed To operate Rewind LIVE TV To pause To search backward up to 90 minutes After pausing or searching backward the following buttons are available for operation Sea...

Page 157: ...s stopped and the recorded content is deleted automatically in the following conditions Even if Rewind LIVE TV stops for the following conditions as long as the setting is Auto a new recording starts automatically in a condition that makes the recording available Other channels selected Locked channel selected Invalid channel selected No TV signal External input selected When the full screen appli...

Page 158: ...3 Select Timer Timer Programming and press OK to access 4 Press OK to start making the settings USB HDD Rec Records the programme to the USB HDD 5 Select and set the item channel date start time end time and can also be entered with Numeric buttons Example Overlapped timer events Function USB HDD Rec TV mode For UK DVB Satellite For Ireland D DVB S Satellite You cannot change the mode within the m...

Page 159: ...time Duration automatic display 6 Store with OK Guide link programming Guide link programming Programmes according to the TV Guide signal Watching TV Guide Guide link programming UK only Guide link programming is Timer Programming which is controlled by information from the TV Guide if programme start and end times are changed by the broadcaster the timer event will follow the change 159 ...

Page 160: ... 2 Press OK to delete To stop recording 1 Press 2 Select the programme and press OK to access when 2 recordings are in progress 3 Select Yes and press OK to stop To play back or delete the recorded content Recorded TV programmes can be played back on Media Player 1 Display Home with HOME 2 Select Devices and press OK to access 3 Select USB HDD for recording and press OK to access Media Player Reco...

Page 161: ...mes the channel may be switched automatically and the video and audio signals may be output 2 minutes before the start time a reminder message may appear if you are watching TV To remove the message and start the programming press OK To cancel the programming press EXIT LED lights orange in Standby mode when Timer Programming is set identifies that three or more timer events are overlapped As for ...

Page 162: ... setup Setting for USB HDD Regarding performance not all USB HDDs are guaranteed Note Data modified with a PC may not be displayed Do not remove the device while the TV is accessing data Otherwise this can damage the device or TV Do not touch the pins on the device Do not subject the device to a high pressure or impact Insert the device in the correct direction Otherwise this can damage the device...

Page 163: ...d back During the operation audio signal is output from DIGITAL AUDIO and HDMI2 eARC ARC function terminals But no video signals are output To use HDMI2 with eARC ARC function connect an amplifier that has eARC ARC function and set to use theatre speakers Functions VIERA Link HDAVI Control Pictures may not appear correctly on this TV depending on the recording equipment used Displaying may take so...

Page 164: ... Display the menu with MENU select Main Menu and press OK to access 2 Select Setup USB Device Setup and press OK to access 3 Select the device and press yellow to set Note To connect the USB HDD Recording USB HDD setup Check the terminal type and devices are correct for connection For details of the devices Media Player Connected device For details of supported file formats Media Player Supported ...

Page 165: ... Folder View Recorded TV and press OK to access Easy List View Media Player Easy List View Mix Folder View Media Player Mix Folder View Recorded TV Media Player Recorded TV mode 6 The thumbnail view is displayed Example To display hide information of the highlighted content Note Recorded TV is available for content recorded on the USB HDD with this TV Select the appropriate device and content for ...

Page 166: ...r and press OK to access The preview will start when the title scene is highlighted in the thumbnail view if it supports a preview To turn off the preview set Video Preview to Off 1 Display the option menu with OPTION 2 Select and press OK to access 3 Select Video Setup Video Preview and press OK to access 4 Select On Off and press OK to set Images may not be displayed for an instant in the thumbn...

Page 167: ... access Play Select Repeat Shuffle 4 Set the item and press OK to store Play Select Settings for playback file selection Repeat Folder File Repeat Off Repeat the playback Folder Repeat the playback within the selected folder File Repeat Repeat the playback of the selected one file Shuffle On Off Files are played back at random 167 ...

Page 168: ...ontent type Photo Video 1 Display the option menu with OPTION 2 Select Filter and press OK to access 3 Select Photo Video and press OK to set 4 Select OK and press OK to change To select the music file Media Player Mix Folder View Filtering files 168 ...

Page 169: ... off the preview set Video Preview to Off 1 Display the option menu with OPTION 2 Select and press OK to access 3 Select Video Setup Video Preview and press OK to access 4 Select On Off and press OK to set Images may not be displayed for an instant in the thumbnail view Set the preview Off to solve this This function is available in the thumbnail view For details of supported file formats Media Pl...

Page 170: ... access Play Select Repeat Shuffle 4 Set the item and press OK to store Play Select Settings for playback file selection Repeat Folder File Repeat Off Repeat the playback Folder Repeat the playback within the selected folder File Repeat Repeat the playback of the selected one file Shuffle On Off Files are played back at random 170 ...

Page 171: ...can filter the files as the content type Photo Video Music 1 Display the option menu with OPTION 2 Select Filter and press OK to access 3 Select Photo Video Music and press OK to set 4 Select OK and press OK to change 171 ...

Page 172: ...files You can sort the files in alphabetical date order 1 Display the option menu with OPTION 2 Select Sort and press OK to access 3 Select Alphabet A Z Alphabet Z A Date 1 9 Date 9 1 and press OK to change 172 ...

Page 173: ...Playback Playback Photo playback To the previous photo To the next photo Stop OK Switch the playback mode Single view Slideshow blue Rotate Display hide the operation guide BACK Return to thumbnail 173 ...

Page 174: ...k bar is displayed Press Search approx 10 seconds Press and hold Search rapidly 3 Jump to the specified time point with OK red To the previous title scene track green To the next title scene track Display hide the operation guide BACK Return to thumbnail Note To set Repeat Shuffle for playback Media Player Easy List View Selecting file Media Player Mix Folder View Selecting file 174 ...

Page 175: ...creen e g portrait style picture Interval Long Normal Short Selects slideshow interval Back Ground Music Off Type1 Type2 Type3 Type4 Type5 User Auto Selects the background music during Photo mode Type1 5 Music files installed on this TV at the factory settings are played back Auto Music files stored in the current device are played back If there is no available music data no sound is played back U...

Page 176: ...he desired music file 2 Select File Folder and press OK to set File The selected music file is registered Folder All the music files in the folder which contains the selected music file are registered Note Picture quality may be degraded depending on the slideshow setting Picture setting may not work depending on the slideshow setting 176 ...

Page 177: ...several seconds to change the sound This function is available during playback Dual mono of Dolby Audio Dolby Digital Dolby Digital Plus is not supported Subtitle Settings Sets the subtitle setting This function is available during playback Subtitle Displays hides subtitles if available Subtitle Text Selects the font type to display subtitles correctly if available Subtitle Text Size Selects the f...

Page 178: ... Audio Dolby Digital Dolby Digital Plus Dolby AC 4 Dolby Atmos and HE AAC multi channel are output as Dolby Digital Bitstream MPEG is output as PCM Dolby Atmos may be output as Dolby Atmos Bitstream Dolby Digital Plus and Dolby AC 4 may be output as Dolby Digital Plus Bitstream from HDMI2 eARC ARC function terminal depending on the connected equipment PCM Digital output signal is fixed to PCM Dolb...

Page 179: ...t played back yet Once you play back the content this icon will disappear Protected content cannot be deleted Currently recording You can play back this recording content Group of content Programme with parental rating 2 Select the content and press OK to start playback If you have stopped the last playback halfway a confirmation screen may be displayed to select whether to start from where you st...

Page 180: ...d Press Search approx 10 seconds Press and hold Search rapidly 3 Jump to the specified time point with OK To display hide the operation guide and information banner To repeat between the starting point A and finishing point B blue Set A and B in order The points are reset by pressing again or by other operations To the previous next chapter red green A recorded content is automatically divided int...

Page 181: ...To confirm or change the current status if available Watching Basic AV Options To return to list BACK Note The recorded content may not be played back properly depending on the progress of recording 181 ...

Page 182: ... to release and then select Release Group To release several groups at once tick all the desired groups Exclude from Group Select the group and press OK to display the grouped content To exclude specific content from the group tick it and then select Exclude from Group To exclude some of the content at once tick all the desired content Change Protect Status Select the content to protect from delet...

Page 183: ...Deleting content 1 Select the content to edit and press blue to tick in the content list 2 Delete the content with red 3 When a confirmation screen is displayed select Yes and press OK to set 183 ...

Page 184: ...ect 1 Display the chapter list with yellow 2 Select the chapter and press OK to start playback Note The chapter list is not displayed while the selected content is being recorded Depending on the recorded programmes some playback operations may not work properly 184 ...

Page 185: ... Audio Dolby Digital Dolby Digital Plus Dolby AC 4 Dolby Atmos and HE AAC multi channel are output as Dolby Digital Bitstream MPEG is output as PCM Dolby Atmos may be output as Dolby Atmos Bitstream Dolby Digital Plus and Dolby AC 4 may be output as Dolby Digital Plus Bitstream from HDMI2 eARC ARC function terminal depending on the connected equipment PCM Digital output signal is fixed to PCM Dolb...

Page 186: ...t subject the device to a high pressure or impact Insert the device in the correct direction Otherwise this can damage the device or TV Electrical interference static electricity or erroneous operation may damage the data or device Back up the recorded data at regular intervals to prevent data deterioration data damage or erratic operation of the TV Panasonic is not liable for any deterioration or...

Page 187: ...Flash Memory format FAT16 FAT32 or exFAT USB HDDs formatted on a PC are not guaranteed to work in Media Player USB HDD The capacity of USB HDD that works with this TV is from 160 GB to 6 TB Connect the USB HDD to the mains socket to record and play back properly with this TV Use the USB HDD formatted with this TV Recording USB HDD setup Setting for USB HDD Regarding performance not all USB HDDs ar...

Page 188: ...n pixel 8 8 to 30 719 17 279 DCF and EXIF standards Progressive JPEG is not supported Note Some files may not be played back even if they fulfil these conditions Some files may not be played back correctly depending on the resolution etc Do not use multi byte characters or other special codes for file names Connected devices may become unusable with this TV if the file or folder names are changed ...

Page 189: ...by Digital Dolby Digital Plus Dolby AC 4 Dolby Atmos HE AAC MP3 This TV supports this container recorded with Panasonic products For details read the manual of the products MKV mkv Video codec H 264 H 265 HEVC MPEG1 MPEG2 MPEG4 Audio codec AAC Dolby Audio Dolby Digital Dolby Digital Plus HE AAC MP3 Vorbis ASF asf wmv Video codec MPEG4 VC 1 WMV9 Audio codec AAC Dolby Audio Dolby Digital Dolby Digit...

Page 190: ...ro Video codec H 264 MPEG1 MPEG2 VC 1 Audio codec AAC Dolby Audio Dolby Digital Dolby Digital Plus HE AAC LPCM MP3 TS mts m2ts tp trp ts tts Video codec H 264 H 265 HEVC MPEG1 MPEG2 VC 1 Audio codec AAC Dolby Audio Dolby Digital Dolby Digital Plus Dolby AC 4 Dolby Atmos HE AAC MP3 WebM webm Video codec VP9 Audio codec Vorbis 190 ...

Page 191: ...lowing order of priority srt sub txt Note Some files may not be played back even if they fulfil these conditions Some files may not be played back correctly depending on the resolution frame rate condition etc Some subtitles or chapter functions may not be available Do not use multi byte characters or other special codes for file names Connected devices may become unusable with this TV if the file...

Page 192: ...C flac WMA WMA Pro wma Copy protected files cannot be played back LPCM wav Note Some files may not be played back even if they fulfil these conditions Do not use multi byte characters or other special codes for file names Connected devices may become unusable with this TV if the file or folder names are changed 192 ...

Page 193: ...ation tools etc from Apps Example A broadband network environment is required to use this function Ensure the network connections and network settings are completed Network Network connections Network Network settings Browser You can browse websites Some internet services may not be available or may not be displayed properly depending on the website 193 ...

Page 194: ...ps Depending on the usage conditions it may take a while to read all the data 3 Select the desired item and press OK to access Example To exit Apps EXIT You can connect a keyboard for character input in the applications You can also use the keyboard for TV operation Functions Bluetooth devices Functions Keyboard 194 ...

Page 195: ... updated you may not be able to use Apps You can update the software later manually Network Network settings Software Update The services through Apps are operated by their service providers and such service may be discontinued either temporarily or permanently without notice Panasonic will make no warranty for the content or the continuity of the services Content may not be available depending on...

Page 196: ...e network environment such as office hotel room without router etc make sure to check the network connection Playback of sharing content stored in the media server Store photo video or music content into the media server connected to your home network And then you can enjoy the content on this TV Example For details of watching and operating content on this TV Network Home network Preparations For...

Page 197: ...twork Available content Photo video or music content of this TV Current digital TV programme TV programmes recorded on USB HDDs with this TV Available network equipment TV supporting home network function Smartphone etc To use this function with your smartphone you need to install the application for controlling this TV on your smartphone Support FAQs Detailed information For the operations refer ...

Page 198: ...ed off with Mains Power On Off switch This function may not be available in the following condition of this TV While the recording is in progress Selecting the channel or TV mode on your smartphone may not be available while the recording is in progress 198 ...

Page 199: ...display hide information of the highlighted media server 1 Display the option menu with OPTION 2 Select Show Info and press OK to access 4 Select the file and press OK to access Example Depending on the condition of media server you may need to select the folder before selecting the file To display hide information of the highlighted file Note Non playable files are also listed but cannot be selec...

Page 200: ... cannot be used Required speed effective at least 1 5 Mbps for SD Standard Definition and 6 Mbps for HD High Definition picture quality respectively If the transfer speed is not enough content may not be played back properly Wireless connection Built in wireless LAN Rear of the TV Access point Internet environment Wired connection ETHERNET terminal LAN cable Shielded Use Shielded Twist Pair STP LA...

Page 201: ...hout a broadband network environment A broadband network environment is required to use internet services Network Network connections Internet connection Wireless connection For home network and internet service Built in wireless LAN Rear of the TV Access point Hub Router Internet environment Smartphone etc Media server PC etc 201 ...

Page 202: ... Wired connection For home network and internet service ETHERNET terminal LAN cable Shielded Use Shielded Twist Pair STP LAN cable Hub Router Internet environment Media server PC etc 202 ...

Page 203: ... Wireless connection For home network TV To use the TV as a wireless access point Network Network settings Custom Wireless Access Point Media server PC etc Smartphone etc 203 ...

Page 204: ... Internet Service Provider ISP or telecommunications company for further assistance regarding the network equipment Confirm the terms and conditions of the contracts with your Internet Service Provider ISP or telecommunications company Depending on the contracts additional fees may be charged or multiple connections to the internet may be impossible Turn the TV off with Mains Power On Off switch t...

Page 205: ...able Wireless Networks are displayed automatically Encrypted access point For WPS Push button 1 Select Easy setup with Push button and press OK to access 2 Press the WPS button on the access point until the light flashes 3 Connect the TV with the access point with OK WPS Wi Fi Protected Setup If the connection fails check the settings and positions of your access point And then follow the on scree...

Page 206: ...s displayed Network Network settings Network Status 5 Select Exit and press OK to set To set manually Network Network settings Custom Wired Note To deactivate the wireless network perform the following procedure to turn off the wireless network 1 Display the menu with MENU select Main Menu and press OK to access 2 Select Network Network Connection Custom and set to Wired 3 Select Network Mirroring...

Page 207: ...ress red 2 Press the WPS button on the access point until the light flashes 3 Connect the TV with the access point with OK WPS Wi Fi Protected Setup If the connection fails check the settings and positions of your access point And then follow the on screen instructions For WPS PIN 1 Press green 2 Enter the PIN code to the access point 3 Connect the TV with the access point with OK For Manual 1 Pre...

Page 208: ...xy This is the address of the relay server which is connected between the browser and the target server to send data to the browser 1 Select Proxy and press OK to access 2 Enter the address with Cursor buttons or Numeric buttons and press OK to set 3 Press green to store Proxy Port This number is also specified by the provider with the proxy address 1 Select Proxy Port 2 Enter the number with Nume...

Page 209: ...Address Subnet Mask Default Gateway DNS Address Proxy Settings It is not required for normal household use Some internet services may not be available depending on the proxy setting Proxy This is the address of the relay server which is connected between the browser and the target server to send data to the browser 1 Select Proxy and press OK to access 2 Enter the address with Cursor buttons or Nu...

Page 210: ...OK to set Note To deactivate the wireless network perform the following procedure to turn off the wireless network 1 Display the menu with MENU select Main Menu and press OK to access 2 Select Network Network Connection Custom and set to Wired 3 Select Network Mirroring Settings Easy Mirroring and set to Off 210 ...

Page 211: ...button Set up the equipment for Push button For details read the manual of the equipment PIN code Enter the PIN code of the equipment If the connection fails check the settings and positions of the equipment And then follow the on screen instructions Change settings You can set up Network Name SSID Password Wireless type and Channel setting method manually Follow the on screen instructions and set...

Page 212: ... to access 3 Automatically testing is done and Network Status is displayed Try Again Performs automatic testing of the network connection for the TV and displays the current status again Status Details Displays the detailed network status SSID security settings etc Reset settings Resets the network settings and initialises to the default settings For information about the network connection select...

Page 213: ... and press OK to access 2 Select Network TV Name and press OK to access 3 Enter characters and press OK to set This name is used as the name of this TV on the screen of the other network equipment When you use two or more TVs in your network environment set the names of the TVs for each 213 ...

Page 214: ... the TV from the network equipment smartphone etc Powered On by Apps On Off Enables turning the TV on from the network equipment smartphone etc Depending on the network condition you may have to turn the TV on with Standby On Off switch of the TV s remote control Changing the default configuration may result in higher energy consumption of the product LED lights orange in Standby mode when Powered...

Page 215: ...ntent from the network equipment smartphone etc Delete All Pairings Delete the pairing information for all paired devices Note This function is not available when the TV is turned off with Mains Power On Off switch You need to install the application for controlling this TV on your smartphone Support FAQs Detailed information For the operations refer to the support information of the application D...

Page 216: ...to share Also read the manual of another TV To use this function with your smartphone you need to install the application for controlling this TV on your smartphone Support FAQs Detailed information For the operations refer to the support information of the application Changing the default configuration may result in higher energy consumption of the product LED lights orange in Standby mode when H...

Page 217: ... Note Depending on the area this function may not be available For details consult your local Panasonic dealer 217 ...

Page 218: ...ons and network settings are completed Network Network connections Network Network settings 1 Display the menu with MENU select Main Menu and press OK to access 2 Select Network Smart Speaker Settings and press OK to access 3 Follow the on screen instructions For the operations refer to the support information Support FAQs Detailed information 218 ...

Page 219: ...Mirroring Settings Settings for the mirroring function Functions Mirroring Mirroring Settings 219 ...

Page 220: ...o access 3 Select Control4 Discovery Send Identify and press OK to access 4 Set the item and press OK to store Control4 Discovery On Off Enables Control4 mode Send Identify Sends identifying message to Control4 controller This function is available when Control4 Discovery is set to On Note For details of the settings and operations consult your local Control4 dealer 220 ...

Page 221: ...u with MENU select Main Menu and press OK to access 2 Select Network VOD Content Refresh and press OK to access 3 Select On Off and press OK to access Changing the default configuration may result in higher energy consumption of the product LED lights orange while updating in Standby mode when VOD Content Refresh is set to On 221 ...

Page 222: ...updates are available 1 Display the menu with MENU select Main Menu and press OK to access 2 Select Network Software Update and press OK to access 3 Follow the on screen instructions A broadband network environment is required to use this function 222 ...

Page 223: ...ceive a notification message when new software is found via network or not 1 Display the menu with MENU select Main Menu and press OK to access 2 Select Network New Software Message and press OK to access 3 Select On Off and press OK to set 223 ...

Page 224: ...nu and press OK to access 2 Select Network IPv6 and press OK to access 3 Select On Off and press OK to set Note The IPv6 function may not be available for all combinations of an application and network If an application does not work properly set IPv6 to Off and turn the TV off then turn it on again 224 ...

Page 225: ...ings Displays the terms of service and settings 1 Display the menu with MENU select Main Menu and press OK to access 2 Select Network Terms of Service and Settings and press OK to access 3 Follow the on screen instructions 225 ...

Page 226: ... TV services 1 Display the menu with MENU select Main Menu and press OK to access 2 Select Network Samba Interactive TV Settings Settings and press OK to access 3 Follow the on screen instructions A broadband network environment is required to use this function 226 ...

Page 227: ...s OK to access 3 Select the media server and press OK to access To display hide information of the highlighted media server 1 Display the option menu with OPTION 2 Select Show Info and press OK to access 4 Select the file and press OK to access Depending on the condition of media server you may need to select the folder before selecting the file To display hide information of the highlighted file ...

Page 228: ...Viewing photo Playback To operate Single view To the previous photo To the next photo Stop return to list OK Slideshow To display hide the operation guide To rotate 90 blue To return to list BACK 228 ...

Page 229: ... for photo file operations on this TV 1 Display the option menu with OPTION 2 Select Slideshow Settings and press OK to access 3 Select one of the following items and press OK to access Interval Repeat Back Ground Music 4 Set the item and press OK to store Interval Long Normal Short Selects slideshow interval Repeat On Off Repeat the slideshow Back Ground Music Off Type1 Type2 Type3 Type4 Type5 Se...

Page 230: ...s OK to access 3 Select the media server and press OK to access To display hide information of the highlighted media server 1 Display the option menu with OPTION 2 Select Show Info and press OK to access 4 Select the file and press OK to access Depending on the condition of media server you may need to select the folder before selecting the file To display hide information of the highlighted file ...

Page 231: ...skip forward approx 30 seconds Rewind Fast forward Stop OK Pause displays the time seek bar slow playback Playback To jump to the specified time point 1 Display the time seek bar with OK 2 While the time seek bar is displayed Press Search approx 10 seconds Press and hold Search rapidly 3 Jump to the specified time point with OK To display hide the operation guide and information banner To the prev...

Page 232: ...ess 2 Select Picture Screen Settings Aspect and press OK to access 3 Select the mode and press OK to set Aspect1 Displays the content in original size Aspect2 Displays the content enlarged without distortion Aspect cannot be changed depending on the content To return to list BACK 232 ...

Page 233: ...tent 4 Set the item and press OK to store Video Preview On Off Sets to start the preview of the title or scene in the thumbnail view Images may not be displayed for an instant in the thumbnail view Set the preview Off to solve this Multi Audio Monaural Audio Dual Mono Audio Selects for selectable sound tracks if available It may take several seconds to change the sound This function is available d...

Page 234: ...lable Subtitle Text Selects the font type to display subtitles correctly if available Subtitle Text Size Selects the font size of subtitles Subtitle Text Colour Selects the colour of subtitles Subtitle Text Position Adjusts the position of subtitles on the screen Subtitle Text Delay Adjusts the delay time for the subtitles 234 ...

Page 235: ...dio Dolby Digital Dolby Digital Plus Dolby AC 4 Dolby Atmos and HE AAC multi channel are output as Dolby Digital Bitstream MPEG is output as PCM Dolby Atmos may be output as Dolby Atmos Bitstream Dolby Digital Plus and Dolby AC 4 may be output as Dolby Digital Plus Bitstream from HDMI2 eARC ARC function terminal depending on the connected equipment PCM Digital output signal is fixed to PCM Dolby A...

Page 236: ...put from DIGITAL AUDIO and HDMI2 eARC ARC function terminals But no video signals are output To use HDMI2 with eARC ARC function connect an amplifier that has eARC ARC function and set to use theatre speakers Functions VIERA Link HDAVI Control 236 ...

Page 237: ... OK to access 3 Select the media server and press OK to access To display hide information of the highlighted media server 1 Display the option menu with OPTION 2 Select Show Info and press OK to access 4 Select the file and press OK to access Depending on the condition of media server you may need to select the folder before selecting the file To display hide information of the highlighted file N...

Page 238: ...p to the specified time point 1 Display the time seek bar with OK 2 While the time seek bar is displayed Press Search approx 10 seconds Press and hold Search rapidly 3 Jump to the specified time point with OK To display hide the operation guide To the previous track red To the next track green To return to list BACK 238 ...

Page 239: ... operations on this TV 1 Display the option menu with OPTION 2 Select Music Setup Repeat with OK 3 Select Off Folder One and press OK to set Folder Repeat the playback within the selected folder One Repeat the playback of the selected one file 239 ...

Page 240: ...l 8 8 to 30 719 17 279 DCF and EXIF standards Progressive JPEG is not supported Note Some files may not be played back even if they fulfil these conditions Do not use multi byte characters or other special codes for file names Connected devices may become unusable with this TV if the file or folder names are changed 240 ...

Page 241: ...by Digital Dolby Digital Plus Dolby AC 4 Dolby Atmos HE AAC MP3 This TV supports this container recorded with Panasonic products For details read the manual of the products MKV mkv Video codec H 264 H 265 HEVC MPEG1 MPEG2 MPEG4 Audio codec AAC Dolby Audio Dolby Digital Dolby Digital Plus HE AAC MP3 Vorbis ASF asf wmv Video codec MPEG4 VC 1 WMV9 Audio codec AAC Dolby Audio Dolby Digital Dolby Digit...

Page 242: ...E AAC PS mod mpg mpeg vob vro Video codec MPEG1 MPEG2 Audio codec Dolby Audio Dolby Digital LPCM TS mts m2ts tp trp ts tts Video codec H 264 H 265 HEVC MPEG1 MPEG2 Audio codec AAC Dolby Audio Dolby Digital Dolby Digital Plus Dolby AC 4 Dolby Atmos HE AAC WebM webm Video codec VP9 Audio codec Vorbis 242 ...

Page 243: ...de the same folder they are displayed in the following order of priority srt sub txt Note Some files may not be played back even if they fulfil these conditions Some subtitles or chapter functions may not be available Do not use multi byte characters or other special codes for file names Connected devices may become unusable with this TV if the file or folder names are changed Supported formats ar...

Page 244: ... FLAC flac WMA wma Copy protected files cannot be played back LPCM wav Note Some files may not be played back even if they fulfil these conditions Do not use multi byte characters or other special codes for file names Connected devices may become unusable with this TV if the file or folder names are changed 244 ...

Page 245: ...btitles etc from the menu screen 1 Display the menu with MENU Example 2 Select a feature and press OK to access To set the main menu select Main Menu To edit move hide the menu select Edit To exit the menu press BACK Note The design and specifications are subject to change without notice 245 ...

Page 246: ... depending on the country area or broadcaster The Voice Control function service may be discontinued either temporarily or permanently without notice depending on the service provider Panasonic will make no warranty for the content or the continuity of the service A broadband network environment is required to use this function Ensure the network connections and network settings are completed Netw...

Page 247: ...How to use 1 Press 2 Say a key word to the microphone of the remote control Follow the on screen instructions 247 ...

Page 248: ...r Unpair the registered remote control and delete the Bluetooth information of the remote control Mode Setting Mode1 Mode2 Mode3 Mode4 Sets the remote control mode of the TV and remote control when using it with infrared Mode Error Indication On Off Displays an error message when the remote control mode does not work by infrared Please note the TV does not display an error message when Off is set ...

Page 249: ...for Voice Control function 1 Display the menu with MENU select Main Menu and press OK to access 2 Select Setup Voice Control and press OK to access 3 Select the service for Voice Control to use Select to disable the Voice Control function 249 ...

Page 250: ... etc A broadband network environment is required to use this function because this function accesses the speech recognition server with the internet connection Even if you have the internet environment this function may not be available depending on the proxy setting Please connect to the internet without proxy settings Proxy settings are not required for normal household use For details of the in...

Page 251: ...smartphone etc is registered once you use this function Easy Mirroring You can also start the mirroring function from the other devices smartphone etc when Easy Mirroring is set to On Functions Mirroring Mirroring Settings You cannot use Easy Mirroring function while the TV is set to Wireless Access Point Network Network settings Network Status Note This function is available with the other device...

Page 252: ...u with MENU select Main Menu and press OK to access 2 Select Network Network Connection Custom and set to Wired 3 Select Network Mirroring Settings Easy Mirroring and set to Off Not valid when the TV is set to Wireless Access Point Powered On by Easy Mirroring On Off Enables turning on the TV automatically when the mirroring function is activated from the other devices smartphone etc Changing the ...

Page 253: ...r external input AV HDMI as shown below example green Pre view Dual view OK Pre view Pre view Pre view is not available for OLED TV To swap windows OK Not valid while recording is in progress To exit multi window EXIT Note Not valid when VRR is set to On Watching For best picture Option Settings 253 ...

Page 254: ...gs Pre view Example Main screen TV mode Input mode Channel position and name for main screen TV mode Input mode for sub screen Press to select the TV mode input mode of the sub screen Current programme information if available for sub screen Press to select the programme of the sub screen Sub screen information screen Press blue to change the screen The sound comes only from the main screen Pre vi...

Page 255: ... select the sound 1 Display the option menu with OPTION 2 Select Sound Output and press OK to access 3 Select Main Sub and press OK to set displays on the screen To confirm or change the current status OPTION Menu items and selectable options vary between the main screen and sub screen Watching Basic AV Options To display hide the operation guide 255 ...

Page 256: ...ng For best picture Option Settings Data services are not available in multi window You cannot change the aspect ratio in multi window External input mode can only be displayed either on the main screen or sub screen HDMI is available for the main screen Some signals are reformatted for suitable viewing on your display Playback in fast forward or in reverse on the sub screen may affect the picture...

Page 257: ...his TV supports HDAVI Control 5 function Some functions are not available depending on the equipment s version of HDAVI Control Confirm the connected equipment s version of HDAVI Control VIERA Link HDAVI Control is a unique function that we have developed and added based on the control functions provided by HDMI which is an industry standard known as HDMI CEC Consumer Electronics Control As such i...

Page 258: ...h VIERA Link function DVD Recorder DVD Player Blu ray Disc Player HD Video Camera LUMIX Camera Available features HDMI connection DVD Recorder DVD Player Blu ray Disc Player Easy playback Power on Link Power off Link Standby Power Save 2 Intelligent Auto Standby 2 VIERA Link Control 1 HD Video Camera LUMIX Camera Easy playback Power on Link Power off Link VIERA Link Control 1 1 For equipment which...

Page 259: ...O HDMI cable DVD Recorder with VIERA Link function HDMI cable Optical digital audio cable Amplifier with VIERA Link function Speaker system Player theatre Blu ray Disc theatre with VIERA Link function HD Video Camera LUMIX Camera with VIERA Link function If the connected equipment has HDAVI Control 5 function you do not have to use this audio cable Optical digital audio cable In this case connect ...

Page 260: ...sc theatre Easy playback 3 Power on Link Power off Link Standby Power Save 2 Intelligent Auto Standby 2 4 VIERA Link Control 1 Speaker Selection Amplifier Power off Link Intelligent Auto Standby 2 Speaker Selection 1 For equipment which has HDAVI Control 2 or later function 2 For equipment which has HDAVI Control 4 or later function 3 While playing a disc 4 Except for watching a disc 260 ...

Page 261: ...he TV For example DVD Player connected to Amplifier which is connected to the TV via an HDMI cable Functions VIERA Link HDAVI Control VIERA Link Control Recorder Maximum 3 Player Maximum 3 DVD Player Blu ray Disc Player HD Video Camera LUMIX Camera Digital Camera Player theatre Blu ray Disc theatre etc Audio system Maximum 1 Player theatre Blu ray Disc theatre Amplifier etc Tuner Maximum 4 Set top...

Page 262: ...ected equipment Read the manual of the equipment Set VIERA Link to On in the Setup Menu Set up the TV After connection turn the equipment on and then switch the TV on Select the HDMI input from Input Selection with AV and make sure that an image is displayed correctly This setup should be done each time the following conditions occur First time operation Adding or reconnecting equipment Changing s...

Page 263: ...Easy playback Automatic input switching When the connected equipment is operated the input mode is switched automatically 263 ...

Page 264: ...Power on Link Set Power on Link to On in VIERA Link Settings to use this function When the connected equipment is operated the TV is automatically turned on Only when the TV is in Standby mode 264 ...

Page 265: ...VIERA Link Settings to use this function When the TV is set to Standby mode the connected equipment is also automatically set to Standby This function will work even if the TV enters Standby mode automatically by auto power standby function 265 ...

Page 266: ... mode the connected equipment is automatically set to Standby and the power consumption of the connected equipment is automatically minimised When the TV is turned on the connected equipment is still in Standby mode but the power consumption is increased to quickly start the connected equipment This function is effective if the connected equipment can change the power consumption in Standby mode a...

Page 267: ... non used connected equipment goes into Standby mode automatically to reduce the power consumption For example when the input mode is switched from HDMI or when Speaker Selection is changed to TV except for watching a disc This function may not work properly depending on the connected equipment In this case set to Off 267 ...

Page 268: ...e Blu ray Disc theatre or Recorder theatre Other means Tuner set top box 6 Follow the on screen instructions to operate the menu of the equipment Confirm the remote control code is 73 Watching External equipment Operating with TV s remote control To display the operation guide OPTION If other manufacturers product is accessed Setup Contents Selection menu may be displayed Available TV s remote con...

Page 269: ...of the connected equipment Note If you cannot operate the equipment check the settings and the equipment Functions VIERA Link HDAVI Control Summary of VIERA Link Some operations may not be available depending on the equipment In this case use the remote control of the connected equipment For details of the operations for the connected equipment read the manual of the equipment 269 ...

Page 270: ... When the equipment is turned off TV speakers will be activated You can use Volume Up Down and MUTE Multi channel sound If you want to enjoy the multi channel sound e g Dolby Audio Dolby Digital 5 1ch via an Amplifier connect it with an HDMI cable and Optical digital audio cable and then select Home Cinema If your Amplifier has the HDAVI Control 5 function you only need to connect it with an HDMI ...

Page 271: ...not be delivered for the first few seconds when the input mode is switched HDAVI Control 5 is the newest standard for HDAVI Control compatible equipment This standard is compatible with conventional HDAVI equipment To confirm the HDAVI Control version of this TV Support Help menu Using Help menu 271 ...

Page 272: ...gits with Numeric buttons Enter the PIN number twice at first setting Make a note of the PIN number in case you forget it 4 Select Child Lock List and press OK to access 5 Select the channel input and press OK to lock appears when the channel input is locked To cancel 1 Select the locked channel input 2 Press OK To lock all green To cancel all locks yellow To jump to the head of the next channel i...

Page 273: ...number You can change the PIN number 1 Select Change PIN and press OK to access 2 Enter a new PIN number twice with Numeric buttons Note Setting Shipping Condition erases the PIN number and all settings 273 ...

Page 274: ...n the selected age enter the PIN number depending on the broadcaster 1 Select Parental Rating and press OK to access 2 Select an age for the restriction of programmes and press OK to set Note Setting Shipping Condition erases the PIN number and all settings Ireland only 274 ...

Page 275: ...V is turned off with Standby On Off switch of the TV s remote control Off The power LED indicator is turned off Note The power LED indicator may light when switching the TV status or activating some functions The TV may not display any image on the screen depending upon the input source after setting This may make it impossible to know whether the TV is turned on or not In particular when Off is s...

Page 276: ...omatically starts the application Manual Start Starts the application by pressing red To sort channel names in alphabetical order red To set Auto Start for all channels green To disable the service for all channels yellow To set Manual Start for all channels blue 4 Press BACK to store A notification message will appear when the application is available Follow the on screen instructions is displaye...

Page 277: ...vice application leaves into the TV in order to recognise to use it again Delete Cookie Deletes all of technical information left by a data service application Do Not Track Setting Mode1 Mode2 Mode3 Sets to notify websites and some applications about tracking your browsing activities Mode1 Notifies websites that you want to be tracked Mode2 Notifies websites that you do not want to be tracked Mode...

Page 278: ... Network Network connections Network Network settings Not all the data services are available depending on the country area and broadcaster Not valid in multi window mode Depending on the connection environment the internet connection may be slow or may not be successful Operations may vary depending on the broadcaster Follow the on screen instructions On screen instructions may not correspond to ...

Page 279: ...ule If a smart card and a CI module come as a set first insert the CI module then insert the smart card into the CI module Insert or remove the CI module completely in the correct direction as shown Remove the CI module from the TV when placing the TV facing upward This may cause damages to the CI module and CI slot Note There might be some CI modules in the market with older firmware versions tha...

Page 280: ...hannels If encrypted channels do not appear perform the below to verify the card is recognised by the TV For details read the manual of the CI module or check with the content provider 1 Select DVB with TV 2 Display the menu with MENU select Main Menu and press OK to access 3 Select Setup System Menu Common Interface and press OK to access 4 Press OK and follow the on screen instructions To enter ...

Page 281: ...splay the menu with MENU select Main Menu and press OK to access 2 Select Setup System Menu Shipping Condition and press OK to access 3 When a confirmation screen is displayed select Yes and press OK to set 4 Follow the on screen instructions Auto Setup automatically starts Note To retune TV channels only e g after moving house set Auto Setup Watching Tuning and editing channels Auto Setup 281 ...

Page 282: ...In DVB a notification banner will appear when one of the BBC channels is turned to if a new available software is found To install new software select Standby Now and press OK to set Standby Installs new software in standby condition Now Installs new software now Note Software updating may result in higher energy consumption of the product 282 ...

Page 283: ...nd press OK to set Standby Installs new software in standby condition Now Installs new software now Ignore Cancel the software updating If System Update is performed the software will be updated TV functions may be changed If you do not want to do so set Auto Update Search in Standby to Off The automatic updating cannot be performed in the following conditions TV turned off with Mains Power On Off...

Page 284: ...ect Setup System Menu System Update System Update Search Now and press OK to access 3 Searches for an update for several minutes and displays a corresponding message if any 4 Download with OK Note Download may take a few hours During software download and update DO NOT perform any operations on the TV or switch Off the TV 284 ...

Page 285: ... the desired character 1 _ a b c 2 A B C d e f 3 D E F g h i 4 G H I j k l 5 J K L m n o 6 M N O p q r s 7 P Q R S t u v 8 T U V w x y z 9 W X Y Z Space 0 The character is set automatically if you leave for 1 second You can also set the character pressing OK or other Numeric buttons less than 1 second The characters may vary depending on the input item 285 ...

Page 286: ...ress OK to access 3 Select one of the following items and press OK to access Devices Bluetooth Audio Mode Setting Bluetooth Audio Settings 4 Set the item and press OK to store Devices Searches the available device and displays the status Place the device within 50 cm from the TV while registration is in progress Turn the device on for registering The setup for registration may be required dependin...

Page 287: ... only to mute the TV speakers automatically when using a Bluetooth audio device And you can adjust the volume of the device using Volume Up Down Sets to All to activate both TV speakers and Bluetooth audio device Volume Adjusts the volume of a Bluetooth audio device If the volume is low check the volume setting of the Bluetooth audio device Audio Control Sets to control a Panasonic Bluetooth audio...

Page 288: ...ded to use a device supporting Bluetooth 4 2 or later The encryption type depends on the connected device If using the 2 4 GHz band on the wireless router simultaneous use with Bluetooth device may result in connection interruptions If your wireless router supports 5 GHz band try using the 5 GHz band If you have a wired LAN connection try using the wired LAN connection Also try to set Unpair in Re...

Page 289: ...Select the language and press OK to set Characters may not be displayed correctly on the TV screen depending on the connected keyboard or the keyboard layout setting Some of the keys of keyboards may correspond to the operation of the remote control Keyboard Remote Control Enter OK Backspace BACK Esc EXIT 0 9 Character Numeric buttons F1 HOME F2 Displays Apps F3 MENU F4 AV F5 F6 Channel Down Up F7...

Page 290: ...vailable You can select from among alternatives with and press OK to set You can adjust using the slide bar with and press OK to set You can go to the next screen with OK You can enter names or numbers freely for some items 1 Enter characters one by one with Cursor buttons and press OK to set You can set characters using Numeric buttons Functions Setting characters Using Numeric buttons 2 Press gr...

Page 291: ...hipping Condition Functions Shipping Condition Depending on the model the initial setting value of Viewing Mode may differ between Home and Shop even when selecting the same viewing mode The setting value can be adjusted by pressing MENU and selecting Picture Using control panel buttons 1 Press and hold INPUT OK HOLD for MENU button for 3 seconds to display the main menu 2 Select and set with foll...

Page 292: ...Picture Viewing Mode Selects your favourite picture mode for each input Watching For best picture Viewing Mode 292 ...

Page 293: ...ing For best picture Basic settings Rec 2020 Colour Remaster Displays the vivid images with the suitable colour gamut Watching For best picture Basic settings Adaptive Backlight Control Automatically controls the level of backlight according to the images Watching For best picture Basic settings Resolution Remaster Enhances picture resolution to make the image sharper Watching For best picture Bas...

Page 294: ...Intelligent Frame Creation Automatically compensates the picture frame rate and removes juddering movements to make the images smooth Watching For best picture Basic settings 294 ...

Page 295: ...Ambient Sensor Settings Automatic Brightness Control function Adjusts picture settings automatically depending on ambient lighting condition Watching For best picture Ambient Sensor Settings 295 ...

Page 296: ... Reduction Reduces unwanted picture noise Watching For best picture Noise reduction settings MPEG Remaster Reduces flicker noise in contoured parts of a picture and block noise Watching For best picture Noise reduction settings 296 ...

Page 297: ...Advanced Settings You can adjust and set up the detailed picture settings Watching For best picture Advanced Settings 297 ...

Page 298: ...ame Mode Set to On to enable NVIDIA HDMI 2 1 gaming function Watching For best picture Option Settings VRR Provides smoother gaming experience with low latency and without image stuttering or tearing Watching For best picture Option Settings Film Cadence Mode Improves vertical resolution for movie images Watching For best picture Option Settings 1080p Pure Direct Reproduces the original image qual...

Page 299: ...e Watching For best picture Option Settings HDMI EOTF Type Selects the EOTF type for each HDMI input Set to Auto for general use Watching For best picture Option Settings EOTF Type Selects the EOTF type of broadcast or video content Watching For best picture Option Settings HDMI Colorimetry Type Selects the colourimetry type for each HDMI input Watching For best picture Option Settings HDMI RGB Ra...

Page 300: ...is set to Zoom Watching For best picture Screen Settings Screen Display Turns the screen off when you select Off Watching For best picture Screen Settings Pixel Orbiter Sets the pixel shifting of the image to prevent panel image retention Watching For best picture Screen Settings Logo Luminance Control Adjusts the luminance level of the displayed logo to prevent panel image retention Watching For ...

Page 301: ...PICTURE Button Setting Sets the viewing mode selection when pressing PICTURE Watching For best picture Viewing Mode 301 ...

Page 302: ...Lock Settings Locks the settings of Professional1 2 Dolby Vision IQ Dolby Vision Dark for each input Watching For best picture Lock Settings 302 ...

Page 303: ...cture settings of Filmmaker True Cinema Custom Professional1 Professional2 Game Dolby Vision IQ Dolby Vision Bright or Dolby Vision Dark to those of the other input mode or Viewing Mode Watching For best picture Copy Adjustment 303 ...

Page 304: ...Reset to Defaults Resets the current Picture Viewing Mode to the default settings 304 ...

Page 305: ...Sound Mode Selects your favourite sound mode for each input Watching For best audio Sound mode 305 ...

Page 306: ...io Basic settings Balance Adjusts the volume level of right and left speakers Watching For best audio Basic settings Sound Focus Mode Selects your favorite Sound Focus mode Watching For best audio Line Array Speaker Sound Focus settings Sound Focus Positioning Adjusts the sound focusing position and balance for line array speakers Watching For best audio Basic settings Dolby Atmos Provides the pre...

Page 307: ...g For best audio Basic settings Bass Boost Enhances the effect of bass sounds Watching For best audio Basic settings Sport Link Automatically sets the sound mode to Stadium when Viewing Mode is set to Sport Watching For best audio Basic settings 307 ...

Page 308: ...s TV Speaker Setting Selects the sound output to adjust the volume Watching For best audio Volume settings Auto Gain Control Automatically regulates large sound level differences between channels and inputs Watching For best audio Volume settings Volume Correction Adjusts the volume of each individual channel or input mode Watching For best audio Volume settings Clear Sound Adjustment If the sound...

Page 309: ...Headphone terminal output setting Sets the sound output from the headphone terminal Watching For best audio Headphone terminal output setting 309 ...

Page 310: ... for the voice guidance Watching For best audio Voice Guidance Settings Volume Selects the volume for the voice guidance Watching For best audio Voice Guidance Settings User Level Selects the level of verbosity for the voice guidance Watching For best audio Voice Guidance Settings Web Browser Set to On to enable voice guidance of the network content in web browser function Watching For best audio ...

Page 311: ...ription Preferred Audio Type Narration settings for visually impaired users Watching For best audio Audio Description Volume Adjusts the volume for Audio Description Watching For best audio Audio Description 311 ...

Page 312: ...ng for digital audio output signal from DIGITAL AUDIO and HDMI2 eARC ARC function terminals Watching For best audio Advanced settings HDMI Audio Format Selects the audio format for the HDMI input signal Watching For best audio Advanced settings PCM Optical Level Adjusts the audio level of PCM output from DIGITAL AUDIO and HDMI2 eARC ARC function terminals to equalise with that of the other audio t...

Page 313: ...sound output from DIGITAL AUDIO and HDMI2 eARC ARC function terminals if the sound does not synchronise the image Watching For best audio Advanced settings HDMI Input Selects to fit the input signal Watching For best audio Advanced settings 313 ...

Page 314: ...Reset to Defaults Resets the current Sound Mode to the default settings 314 ...

Page 315: ...Network Network Connection Sets the network setting to use this TV in your network environment Network Network settings Network Connection 315 ...

Page 316: ...Network Status Displays and checks the network status MAC Address current network settings etc Network Network settings Network Status 316 ...

Page 317: ...TV Name Sets your favourite name for this TV Network Network settings TV Name 317 ...

Page 318: ...TV Remote App Settings Sets to control the TV with the equipment smartphone etc connected to your network Network Network settings TV Remote App Settings 318 ...

Page 319: ...Network Link Settings Sets to control the TV with devices connected to the network Network Network settings Network Link Settings 319 ...

Page 320: ...Smart Speaker Settings Controls this TV such as selecting a channel changing volume etc with the smart speaker function Network Network settings Smart Speaker Settings 320 ...

Page 321: ...Mirroring Settings Settings for the mirroring function Functions Mirroring Mirroring Settings 321 ...

Page 322: ...Control4 Settings Settings for the Control4 function Network Network settings Control4 Settings 322 ...

Page 323: ...ssage Selects whether to receive a notification message when new software is found via network or not Network Network settings New Software Message IPv6 Enables the IPv6 function for the network connections Network Network settings IPv6 Terms of Service and Settings Displays the terms of service and settings Network Network settings Terms of Service and Settings Samba Interactive TV Settings Setti...

Page 324: ...Timer On Timer Automatically turns the TV on at the set time with the preset channel volume etc Watching Basic Energy saving functions 324 ...

Page 325: ...Off Timer Sets the duration of time until the TV automatically goes into Standby mode Watching Basic Off Timer 325 ...

Page 326: ...Timer Programming Sets a timer to record forthcoming programmes Recording Timer Programming Setting Timer Programming 326 ...

Page 327: ...Time Zone Adjusts the time data Watching Basic Adjusting time 327 ...

Page 328: ...Auto Standby Automatically turns the TV to Standby mode for energy saving when no operation is performed for 4 hours Watching Basic Energy saving functions 328 ...

Page 329: ...l Power off Automatically turns the TV to Standby mode to prevent unnecessary power consumption when no signal is received and no operation is performed for 10 minutes Watching Basic Energy saving functions 329 ...

Page 330: ...Setup Voice Control Selects the voice service for Voice Control function 330 ...

Page 331: ...Eco Navigation Automatically sets the TV to the most suitable energy saving mode Watching Basic Energy saving functions 331 ...

Page 332: ...USB Device Setup Formats the USB HDD or safely removes USB device Recording USB HDD setup Setting for USB HDD 332 ...

Page 333: ...Recording Setup Settings for the recording feature of the USB HDD Recording Recording current programme One Touch Recording Recording Recording current programme Rewind LIVE TV 333 ...

Page 334: ...Bluetooth Setup Settings for the specific devices supporting Bluetooth wireless technology Functions Bluetooth devices Bluetooth Setup 334 ...

Page 335: ...Child Lock Applies access control for channels or inputs to prevent unwanted access Functions Child Lock Using Child Lock 335 ...

Page 336: ...sorts tuned channels according to the available region Watching Tuning and editing channels Channel Sorting by Region Manual Tuning Searches for channels manually Watching Tuning and editing channels Manual Tuning Update Channel List Updates the channel list while keeping your settings Watching Tuning and editing channels Update Channel List Auto Update Channel List Selects whether or not broadcas...

Page 337: ...annels to the channel list Watching Tuning and editing channels Add New Channels Add TV Signal Adds the TV mode Watching Tuning and editing channels Other settings Note The settings in Tuning Menu are applicable only for the selected TV mode The menu name varies depending on the TV mode and country you select Freeview Tuning Menu DVB Tuning Menu Analogue Tuning Menu Satellite Tuning Menu 337 ...

Page 338: ...roadcaster Watching Basic Language Preferred Subtitles 1 2 Selects the first and second preferred language for digital channel subtitles depending on the broadcaster Watching Basic Language Preferred Subtitles Selects the preferred language for digital channel subtitles depending on the broadcaster Watching Basic Language Preferred Teletext Selects the preferred language for digital channel telete...

Page 339: ...oving identification and selection in the Input Selection banner Watching External equipment Watching external input Banner Display Timeout Sets how long the information banner stays on screen Watching Basic Information banner Watching Basic Freeview Play banner UK Playing Time Display Set to On to display a time period of continuous use in Game Mode on the top right of the screen every 30 minutes...

Page 340: ...Notification On Off Displays a notification message Dolby Notification On Off Displays a Dolby notification 340 ...

Page 341: ...HDMI Auto Setting Set to Mode1 when the image or sound in HDMI input is not played properly Watching 4K resolution HDMI Auto Setting 341 ...

Page 342: ...HDMI HDR Setting Settings for input signal from the connected HDR device Watching External equipment HDMI HDR Setting 342 ...

Page 343: ...k Sets to use Power off Link functions Functions VIERA Link HDAVI Control Power off Link Standby Power Save Controls the connected equipment to reduce power consumption in Standby Functions VIERA Link HDAVI Control Standby Power Save Intelligent Auto Standby Makes non watched or non used connected equipment go into Standby mode to reduce the power consumption Functions VIERA Link HDAVI Control Int...

Page 344: ... use Hybrid Broadcast Broadband TV application Functions Data Service Application Using Data Service Application Privacy Setting Settings for the privacy in the interactive data services Functions Data Service Application Privacy Setting 344 ...

Page 345: ...Home Settings Auto Pin Selects whether to automatically add a shortcut for a feature frequently used on Home Home Home How to use 345 ...

Page 346: ...trol Functions Voice Control Settings Shipping Condition Resets all settings to the original condition Functions Shipping Condition Shipping Condition Common Interface Sets to watch encrypted channels etc Functions Common Interface Using Common Interface System Update Downloads new software to this TV Functions Updating the TV Software Auto update Licence Menu Displays the software licence informa...

Page 347: ...g channel Power Save On Off Reduces brightness of the picture to economise on power consumption Power LED Indicator Selects the power LED indication mode Functions Power LED Indicator Using Power LED Indicator HDMI Signal Power Link Setting Setting for power link function for the connected HDMI devices Watching External equipment HDMI Signal Power Link Setting 347 ...

Page 348: ...press OK to access 3 Select TV Self Test System Information Device Information and press OK to access TV Self Test Makes a diagnosis of picture or sound problems Follow the on screen instructions System Information Displays the system information of this TV Device Information Displays the device information of this TV 348 ...

Page 349: ...ct Control Signal Set Aspect in the Picture Menu if you want to change the aspect ratio manually Watching For best picture Aspect Black and white picture Check that the output of the external equipment matches the input of the TV Chaotic image noisy Set Noise Reduction and MPEG Remaster in the Picture Menu to remove noise Watching For best picture Noise reduction settings Check nearby electrical e...

Page 350: ...input signal changes There may be white red blue green and black spots on the screen This is a characteristic of the panels and is not a problem The panel is built with very high precision technology giving you fine picture details Occasionally a few non active pixels may appear on the screen as a fixed point of white red green blue or black Please note this does not affect the performance of the ...

Page 351: ...eather conditions affect signal reception heavy rain snow etc in particular in poor reception areas Even during good weather the high pressure can cause poor reception of some channels Due to the digital reception technologies involved quality of the digital signals may be relatively low in some cases despite good reception of analogue channels Turn the TV off with Mains Power On Off switch then t...

Page 352: ...t by visiting www panasonic co uk freeview Contact the digital services provider to check for any local transmission issues by visiting www freeview co uk Consult an aerial engineer to check the alignment of your aerial Cannot find a channel you have previously watched The channel may broadcast for part of the day Check the channel in the TV Guide Watching TV Guide Channel position numbers may be ...

Page 353: ... channels cannot be tuned Check the position direction and connection of the aerial Weather conditions affect signal reception heavy rain snow etc in particular in poor reception areas Even during good weather the high pressure can cause poor reception of some channels Turn the TV off with Mains Power On Off switch then turn it on again If the problem persists consult your local dealer or service ...

Page 354: ... switch sound mute on or off Is the volume set to the minimum Check connections and setting of external equipment Watching External equipment Ensure that Speaker Selection is set to TV Watching For best audio Volume settings Functions VIERA Link HDAVI Control Speaker Selection Ensure that TV Speaker Setting is set to TV Speaker Watching For best audio Volume settings Sound level is low or sound is...

Page 355: ... sound connection Watching External equipment HDMI features Set HDMI Auto Setting in the Setup Menu to Mode1 Watching 4K resolution HDMI Auto Setting Pictures from external equipment are unusual when the equipment is connected via HDMI Check the HDMI cable is connected properly Watching External equipment External connection Turn the TV and equipment off then turn them on again Check an input sign...

Page 356: ... address set an IP address manually Network Network settings The router may be using MAC address filtering security setting Confirm the MAC Address of this TV and set the router to use it Network Network settings Network Status Reset the setting information of IP address and DNS address from Network Status and select Try Again Network Network settings Network Status If the problem persists consult...

Page 357: ...Cannot operate internet content Check the connections and settings Network Network connections Internet connection Network Network settings The server or connected line may be busy now 357 ...

Page 358: ...ed equipment on and then switch the TV on Functions VIERA Link HDAVI Control Parts of the TV become hot Parts of the TV may become hot These temperature rises do not pose any problems in terms of performance or quality Overcurrent error message appears The connected USB device may cause this error Remove the device and turn the TV off with Mains Power On Off switch then turn it on again Check fore...

Page 359: ...the Setup Menu to On Functions Power LED Indicator Using Power LED Indicator LED does not light red in Standby mode LED lights orange in Standby mode in the following conditions On Timer is set to On Recording is in progress Timer Programming is set Home Network Server is set to On Powered On by Apps is set to On Home Streaming is set to Always Powered On by Easy Mirroring is set to On VOD Content...

Page 360: ...When pushed with a finger the display panel moves slightly and makes a noise There is a little gap around the panel to prevent damage to the panel This is not a malfunction 360 ...

Page 361: ...Detailed information Support information about the application optional devices operation etc may be found on the following website https panasonic jp support global cs tv English only 361 ...

Page 362: ...he stubborn dirt 5 Finally wipe away all the moisture Caution Do not use a hard cloth or rub the surface too hard otherwise this may cause scratches on the surface Take care not to subject the surfaces to insect repellent solvent thinner or other volatile substances This may degrade surface quality or cause peeling of the paint The surface of the display panel is specially treated and may be easil...

Page 363: ...22EU A B _v 3 002 ...

Reviews: