background image

 Thank you for purchasing this Panasonic product.
 Please read these instructions carefully before operating this product and 
retain them for future reference.
 The images shown in this manual are for illustrative purposes only.

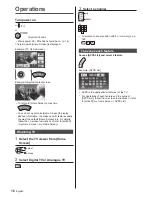
 For more detailed instructions, refer to [eHELP] 
(Built-in Operating Instructions).


 How to use [eHELP]   

(p. 17)

 M0914-0

 English

 Operating Instructions

 LED TV


 English


 Model No.


Australia


New Zealand

 TH-85X940A  TH-85X940Z


 TQBC2781

Summary of Contents for TH-85X940A Viera

Page 1: ...and retain them for future reference The images shown in this manual are for illustrative purposes only For more detailed instructions refer to eHELP Built in Operating Instructions How to use eHELP p...

Page 2: ...ontents Be Sure to Read Important Notice 3 Safety Precautions 4 Quick Start Guide Accessories 7 Connections 8 Identifying Controls 12 First time Auto Tuning 15 Using your VIERA Operations 16 How to Us...

Page 3: ...or other such rights in that content Panasonic has no authority to and does not grant you that permission and explicitly disclaims any right ability or intention to obtain such permission on your beha...

Page 4: ...es of heat To prevent the spread of fire keep candles or other open flames away from this product at all times Safety Precautions To help avoid risk of electrical shock fire damage or injury please fo...

Page 5: ...blecloths and curtains Whether you are using a pedestal or not always ensure the vents at the bottom of the TV are not blocked and there is sufficient space to enable adequate ventilation Dangerous pa...

Page 6: ...mages varies among different individuals Do not view 3D images if you have a history of oversensitivity to light heart problems or any other medical conditions When viewing 3D images your sense of dis...

Page 7: ...es Band 2 B Screw 2 C Wood screw 2 Screw B Band Wood screw C Accessories Remote Control p 12 N2QAYB000936 Touch Pad Controller p 13 N2QBYA000005 Batteries R6 2 For Remote Control p 13 R03 2 For Touch...

Page 8: ...entre or dealer may be able to assist you in obtaining the correct aerial system for your particular area and the accessories required Connections External equipment and cables shown are not supplied...

Page 9: ...on Internet environment Built in wireless LAN Access point Connections for 4K contents 4K compatible equipment TV or HDMI cable DisplayPort cable 4K compatible equipment To watch contents of 4K format...

Page 10: ...ions read the manuals of the equipment and amplifier TV HDMI cable Amplifier with speaker system External equipment DVD Player etc USB HDD for recording Use USB 3 for connecting the USB HDD For more i...

Page 11: ...ins lead together could cause distorted image Fix cables as necessary When using the optional accessory follow the option s assembly manual to fix cables Cable tie Attach the cable tie Insert the cabl...

Page 12: ...s Press again to turn off the button lights 15 Input mode selection TV switches to Digital TV Analogue TV AV switches to AV input mode from Input Selection list 16 Exit Returns to Home Screen 17 HOME...

Page 13: ...l open Hook Note the correct polarity or Close Touch Pad Controller Touch Pad Controller is designed for the convenient operations especially on Home Screen or internet contents You can operate the TV...

Page 14: ...p Down when in the menu system 10 Volume Up Down Cursor Left Right when in the menu system 11 Mains power On Off switch Use to switch the mains power Installing Removing batteries Slide open Note the...

Page 15: ...u Setup Menu To add the available TV signal mode later Add TV Signal in Tuning Menu Setup Menu To initialise all settings Shipping Condition in System Menu Setup Menu First time Auto Tuning Automatica...

Page 16: ...Operations Turn power on TV or Remote Control Mains power On Off switch should be on p 14 The last viewed Home Screen is displayed Example TV Home Screen Example Selected content screen To return to H...

Page 17: ...on The lamp lights for about 2 seconds and then flashes The 3D Eyewear will be turned on and start registration Place the 3D Eyewear within 50 cm from the TV while registration in progress 3 After th...

Page 18: ...n status and battery status are displayed on the bottom right of the screen 2 View the 3D images Safety precautions will be displayed when you first watch the 3D image Select Yes or No to continue to...

Page 19: ...s may be running low Replace them with new ones Point the remote control directly at the TV s remote control signal receiver within about 7 m and a 30 degree angle of the signal receiver Situate the T...

Page 20: ...not enter the TV inside May lead to product failure 4 Finally wipe away all the moisture Caution Do not use a hard cloth or rub the surface too hard otherwise this may cause scratches on the surface T...

Page 21: ...ation time Approx 75 hours in continuous use of the battery made by Panasonic HDMI 1 2 3 4 input TYPE A Connectors HDMI1 3 4 4K 3D 3D content of 4K format is not supported Content Type Deep Colour x v...

Page 22: ...ormation of the open source software refer to eHELP Support Licence When using the wall hanging bracket Choosing to wall mount the TV shall be done at the owner s risk Always use a qualified installer...

Page 23: ...for the name address of the nearest Authorised Service Centre Send or take the product to a Panasonic Authorised Service Centre together with your proof of purchase receipt as a proof of purchase date...

Page 24: ...ic net Panasonic Corporation 2014 English Printed in Japan New Zealand WARRANTY New Zealand only Distributed in New Zealand by Panasonic New Zealand Limited 350 Te Irirangi Drive East Tamaki Private B...

Reviews: