background image

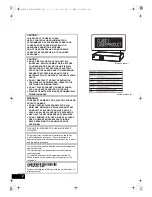
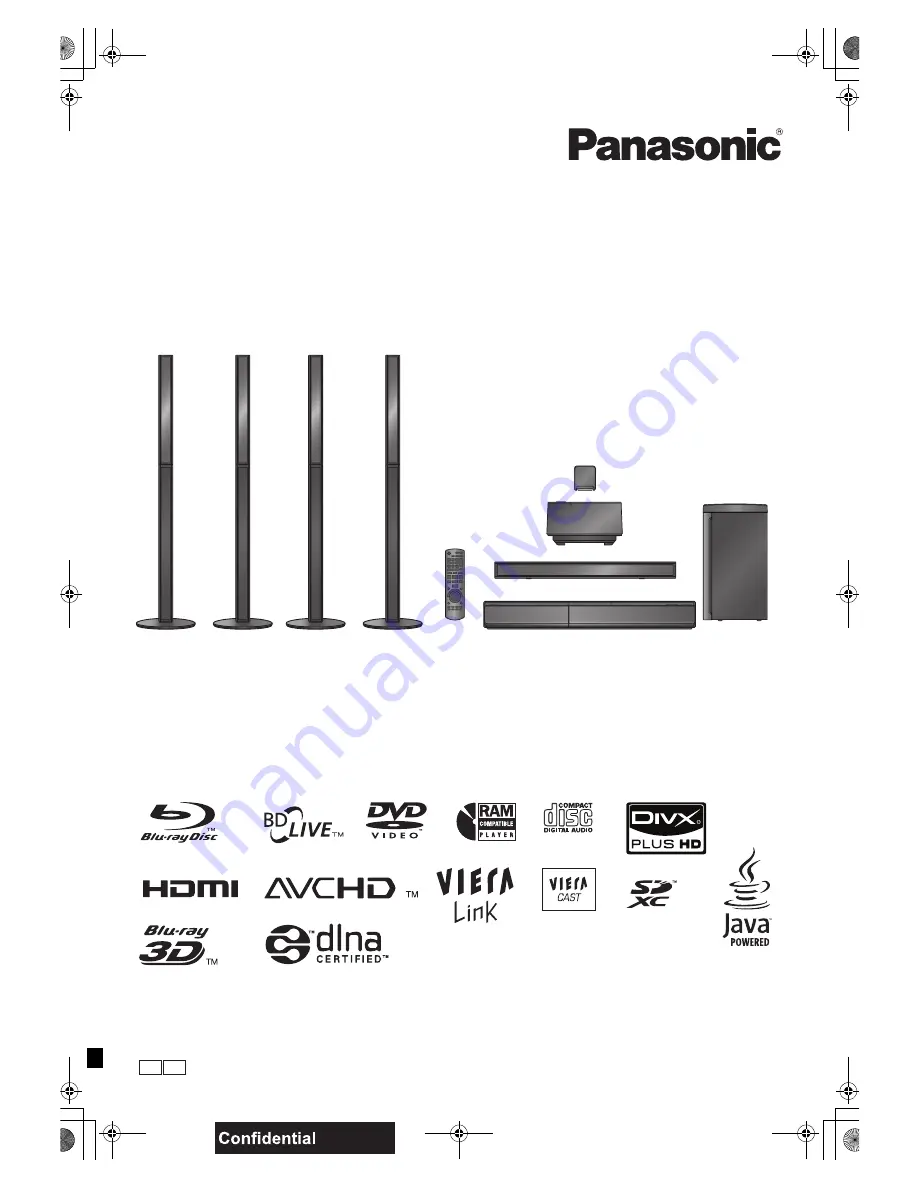
Operating Instructions

Blu-ray Disc Home Theater Sound System

Model No. 

SC-BTT755
SC-BTT350

Dear customer

Thank you for purchasing this product.
For optimum performance and safety, please read these instructions carefully.

Before connecting, operating or adjusting this product, please read the instructions completely.
Please keep this manual for future reference.

The illustration shows the image of SC-BTT755 
for Australia and New Zealand.

EB GN

VQT2W23

Model number suffix “EB” denotes UK model.

until 
2010/07/13

SCBTT755_350EBGN_VQT2W23.book  1 ページ  2010年6月18日 金曜日 午後4時58分

Summary of Contents for SCBTT350 - 3D BLU-RAY HOME THEATRE

Page 1: ...ase read these instructions carefully Before connecting operating or adjusting this product please read the instructions completely Please keep this manual for future reference The illustration shows the image of SC BTT755 for Australia and New Zealand EB GN VQT2W23 Model number suffix EB denotes UK model until 2010 07 13 SCBTT755_350EBGN_VQT2W23 book 1 ページ 2010年6月18日 金曜日 午後4時58分 ...

Page 2: ...IRE ELECTRIC SHOCK OR PRODUCT DAMAGE DO NOT EXPOSE THIS APPARATUS TO RAIN MOISTURE DRIPPING OR SPLASHING AND THAT NO OBJECTS FILLED WITH LIQUIDS SUCH AS VASES SHALL BE PLACED ON THE APPARATUS USE ONLY THE RECOMMENDED ACCESSORIES DO NOT REMOVE THE COVER OR BACK THERE ARE NO USER SERVICEABLE PARTS INSIDE REFER SERVICING TO QUALIFIED SERVICE PERSONNEL THIS UNIT IS INTENDED FOR USE IN MODERATE CLIMATE...

Page 3: ...kings identifying the terminals in your plug proceed as follows The wire which is coloured Blue must be connected to the terminal which is marked with the letter N or coloured Black or Blue The wire which is coloured Brown must be connected to the terminal which is marked with the letter L or coloured Brown or Red WARNING DO NOT CONNECT EITHER WIRE TO THE EARTH TERMINAL WHICH IS MARKED WITH THE LE...

Page 4: ...g the unit from the power source if it is not to be used for a long time Placement Voltage AC mains lead protection Foreign matter Service Information for Users on Collection and Disposal of Old Equipment and used Batteries These symbols on the products packaging and or accompanying documents mean that used electrical and electronic products and batteries should not be mixed with general household...

Page 5: ...ices Using the iPod iPhone 34 iPod iPhone Connection 34 iPod iPhone Playback 35 Advanced operations Enjoying VIERA CAST 36 Playback menu 36 DLNA feature 38 Setup menu 39 Speaker settings 43 Optional speaker settings Speaker installation option 44 Reference Troubleshooting guide 45 Messages 48 About MP3 JPEG DivX AVCHD MPEG2 files 49 Supplemental information 50 Glossary 52 Specifications 53 Index 5...

Page 6: ...Speaker system Front speakers SB HF730 SB HF230 Centre speaker SB HC730 SB HC350 Surround speakers SB HS735 SB HS230 Subwoofer SB HW330 SB HW480 For Australia and New Zealand Wireless system with a digital transmitter SH FX71 1 Remote control N2QAKB000090 2 Batteries for remote control 1 Video cable K2KA2BA00001 1 FM indoor antenna RSAX0002 Speaker cable REEX1154 1 with green connector 1 Sheet of ...

Page 7: ...ry may be recorded in the memory of this unit Using the remote control Insert so the poles i and j match those in the remote control Point it at remote control signal sensor on this unit 9 Mishandling of batteries can cause electrolyte leakage which can damage items the fluid contacts and may cause a fire Do not mix old and new batteries or different types at the same time Do not heat or expose to...

Page 8: ... on To cancel press the button again or adjust the volume Muting is cancelled if the unit is turned off 16 Switch on off Secondary Video Picture in picture 28 17 Select the source BD SD Select disc drive or SD card drive 25 iPod Select iPod iPhone as the source 25 35 RADIO EXT IN Select FM tuner USB or external audio as the source 25 31 32 18 Select radio stations manually 31 19 Exit the menu scre...

Page 9: ...ot on the unit 2 Push the hook firmly towards the unit until it clicks into place Then push the succeeding hooks one by one until all have clicked into place 3 Check that the cover now moves correctly If it does not remove it and repeat the above procedure 1 AC IN terminal 20 2 Speaker terminals 15 3 Cooling fan 4 HDMI AV OUT terminal 17 5 LAN port 19 6 USB port for optional wireless adaptor 19 7 ...

Page 10: ...deo Video DVD RAM Video AVCHD JPEG DVD R Video AVCHD DivX MP3 JPEG DVD R DL DVD RW Video AVCHD R RW R DL CD Music CD Music CD DA CD R CD RW DivX Music CD DA MP3 JPEG SD SD Memory Card 8 MB to 2 GB SDHC Memory Card 4 GB to 32 GB SDXC Memory Card 48 GB 64 GB Compatible with both mini and micro types as of December 2009 MPEG2 AVCHD JPEG USB USB device up to 128 GB DivX MP3 JPEG SCBTT755_350EBGN_VQT2W...

Page 11: ...pecifications copy control CDs etc cannot be guaranteed SD card MiniSD Cards microSD Cards microSDHC Cards and microSDXC Cards can be used but must be used with an adaptor card These are usually supplied with such cards or otherwise customer provided Keep the Memory Card out of reach of children to prevent swallowing To protect the card s contents move the record prevention tab on the SD card to L...

Page 12: ...and may result in the risk of fire Consult a qualified service person if damage has occurred or if you experience a sudden change in performance Do not attempt to attach these speakers to walls using methods other than those described in this manual Do not touch the front netted area of the speakers Hold by the sides Assembling the speakers 2 Front speakers 2 Surround speakers 4 Stands with cables...

Page 13: ...r concerning the appropriate procedure when attaching to a concrete wall or a surface that may not have strong enough support Improper attachment may result in damage to the wall or speakers Use a string of less than 2 0 mm which is capable of supporting over 10 kg A String not supplied Thread from the wall to the speaker and tie tightly B Rear of the speaker C Screw eye not supplied D Wall E Appr...

Page 14: ... operation of the product working to assure the best possible performance of your home theatre system If the interference persists try moving the other devices to another location outside the range of the wireless system or move the wireless system nearer to the main unit Upgrade your system to 7 1 channel system The main unit is designed to enjoy the 7 1ch surround sound By connecting 2 units of ...

Page 15: ... The surround selector switch must be set in the centre position 6 PURPLE Subwoofer 5 GREEN Centre speaker 2 RED Front speaker Rch 1 WHITE Front speaker Lch Wireless system 3 BLUE Surround speaker Lch 4 GREY Surround speaker Rch Do not connect the surround speaker cables to the main unit when using the wireless system 5 2 1 3 6 6 FRONT CENTER SUBWOOFER R L 4 3 3 SURROUND R L 6 Main unit 6 PURPLE S...

Page 16: ...c Audio will be output through the system s speakers when Off is selected in HDMI Audio Output 41 Connection to a TV Basic connection AUX L R VIDEO OUT L VIDEO IN R AUDIO IN L R AUDIO OUT VIDEO OUT AUX TV A Audio cable not supplied B Video cable supplied To enjoy TV audio from this home theatre system s speakers 1 Connect TV and main unit with Audio cable not supplied 2 Select AUX TV as a source 2...

Page 17: ...digital audio cable not supplied For the TV audio an audio cable not supplied can be also used by connecting the AUX terminal with the AUDIO OUT terminal on the TV To enjoy TV audio from this home theatre system s speakers 1 Connect TV and main unit with Optical digital audio cable not supplied 2 Select DIGITAL IN TV or D IN as a source 21 Connection with Set Top Box etc L R OPTICAL DIGITAL AUDIO ...

Page 18: ...ital transmitter connection Ω 75 FM ANT Main unit A FM outdoor antenna Using a TV antenna not supplied The antenna should be installed by a competent technician B 75 coaxial cable not supplied C Antenna plug adaptor United Kingdom and Republic of Ireland only Keep the adaptor out of reach of children to prevent swallowing DIGITAL TRANSMITTER Insert fully until you hear a click Do not insert or rem...

Page 19: ...ss router Access point etc C Internet Use shielded LAN cables when connecting to peripheral devices Inserting any cable other than a LAN cable in the LAN terminal can damage the unit Only the Wireless LAN Adaptor DY WL10 optional can be used Read the operating instructions for the Wireless LAN Adaptor DY WL10 optional thoroughly when using it For up to date compatibility information on your Wirele...

Page 20: ...cept the supplied one STEP 5 Preparing the wireless system BTT755 for Australia and New Zealand Turn on the wireless system after all connections are complete For the United Kingdom and Republic of Ireland only BE SURE TO READ THE CAUTION FOR THE AC MAINS LEAD ON PAGE 4 BEFORE CONNECTION AC IN AC IN Main unit BTT755 for Australia and New Zealand Wireless system WIRELESS LINK WIRELESS LINK indicato...

Page 21: ... specify the current settings Speakers position Specify the positioning of the surround speakers Speaker check Check if the connection to each speaker is valid Speaker Output Make surround sound setting for speaker output TV Audio Select the audio input connection from your TV item with TV Quick Start Speed of startup from standby mode is increased 3 Press OK several times to finish the Easy setup...

Page 22: ...s router Access point Access Point Connection Setting Network Easy Setting OK RETURN Network Easy Setting Connection Test Wired Wireless Select a connection mode Current setting Wired LAN cable connection Connect a LAN cable to the unit and select Wired Wireless LAN connection Connect the Wireless LAN Adaptor DY WL10 to the USB port and select Wireless Access Point Connection Setting Select a conn...

Page 23: ...or perform any operation while the update takes place After the firmware is installed FINISH will be displayed on the unit s display Unit will restart and the following screen will be displayed You can perform updates anytime by selecting Firmware Update in the Setup menu 42 Downloading will require several minutes It may take longer or may not work properly depending on the connection environment...

Page 24: ...ess OK To change the code on the remote control 1 While pressing OK Press and hold the numbered button 1 or 2 which has the same number you selected in the step 6 for more than 5 seconds 2 Press OK Inserting or removing media When inserting a media item ensure that it is facing the right way up While the reading indicator is displayed do not turn off the unit or remove the media Such action may re...

Page 25: ...IGITAL IN 1 When using an Optical digital audio cable To enjoy sound from other devices 32 DIGITAL IN 2 When using an Optical digital audio cable 1 TV is displayed next to items set for TV AUDIO input 2 CABLE SAT is displayed next to DIGITAL IN when set for CABLE SATELLITE AUDIO input Sound Equalizer 26 OK RETURN Home Cinema START BD Video To Others Playback Top Menu Input Selection Sound Equalize...

Page 26: ...ound speaker left SW Subwoofer The channels not included in the playing audio will not be displayed subwoofer is displayed even if it is not included 3 Press 3 increase or 4 decrease to adjust the speaker level for each speaker s6 dB to r6 dB Changing the sound modes 1 Press SOUND several times to select the mode The selected mode will only be displayed on the main unit 2 While the selected mode i...

Page 27: ...ropped copied and pasted to the media These functions may not work depending on the media and contents Press STOP The stopped position is memorised Resume play function Press 1 PLAY to restart from this position The position is cleared if the tray is opened or you press STOP several times to display STOP on the unit s display On BD Video discs including BD J 52 the resume play function does not wo...

Page 28: ...e network 19 2 Insert an SD card with 1 GB or more free space SD card is used as the local storage 52 3 Insert the disc Deleting data Formatting SD cards There are various functions in BD Video that you can enjoy by copying data to the SD card Local Storage If you no longer need data recorded on the SD card you can delete data with the following operation 1 Insert an SD card 2 Press START 3 Press ...

Page 29: ...pped etc Set Subtitle in Disc 36 DivX video files that do not display Text do not contain subtitle text If the subtitles text is not displayed correctly try changing the language settings 40 You may not display subtitle text depending on a file Enjoying Blu ray 3DTM video BD You can enjoy powerful videos with realistic sensations of the Blu ray 3DTM compatible video software by connecting this uni...

Page 30: ...GATOR Album View DVD RAM VR OPTION OK RETURN OPTION DIRECT NAVIGATOR Picture View DVD RAM VR Video Picture Play RETURN 2006 9 12 Page 001 001 0001 0005 0009 0006 0007 0008 0002 0003 0004 Date 11 12 2007 Total 3 9 e g JPEG on DVD RAM Shooting date Useful functions While Album View or Picture View screen is displayed Start Slideshow You can display still pictures one by one at a constant interval Sl...

Page 31: ... is displayed when the stations are set and the radio tunes to the last preset station ERROR is displayed when automatic presetting is unsuccessful Preset the stations manually Preparation Select a radio broadcast 1 Press RADIO to select FM 2 Press SEARCH6 or SEARCH5 to select the frequency To start automatic tuning press and hold SEARCH6 SEARCH5 until the frequency starts scrolling Tuning stops w...

Page 32: ...r more detailed information on this operation please refer to the Changing the sound modes section on page 26 Select to suit the type of audio from the DIGITAL AUDIO IN terminals on the main unit Press EXT IN several times to select D IN DIGITAL IN Press AUDIO M1 M2 M1rM2 stereo audio Only works with Dolby Dual Mono M1 or M2 is not available if On is selected in Digital Audio Input 40 Press STATUS...

Page 33: ...nufacturers equipment supporting VIERA Link function You can turn on this unit and the TV and start play with a single press of a button While the unit and the TV are in standby mode Press 1 PLAY You can select whether audio is output from the unit s speakers or the TV speakers by using the TV menu settings Home Cinema This unit s speakers are active When this unit is in standby mode changing the ...

Page 34: ...ew photos videos from the iPod iPhone 1 Push to open the iPod iPhone lid 2 Connect the iPod iPhone not supplied firmly About recharging the battery iPod iPhone will start recharging regardless of whether this unit is on or off IPOD will be shown on the main unit s display during iPod iPhone charging in main unit standby mode Once fully recharged additional recharging will not occur Compatible iPod...

Page 35: ...ote control to operate the iPod iPhone menu The operation may vary among iPod iPhone models 3 4 To navigate menu items OK To go to the next menu RETURN To return to the previous menu 1 Press START 2 Press 3 4 to select Menu and then press OK 3 Press 3 4 to select Play Mode and then press OK 4 Press 3 4 to select an item and press OK Shuffle For music playback only Songs Play all songs on iPod iPho...

Page 36: ...ntinuity of the services All features of websites or content of the service may not be available Some content may be inappropriate for some viewers Some content may only be available for specific countries and may be presented in specific languages Playback menu 1 Press BD SD to select BD DVD 2 Press DISPLAY e g BD Video 3 Press 3 4 to select the menu and press 1 4 Press 3 4 2 1 to select the item...

Page 37: ...ck 24p Movies and other material recorded on DVD Video at 24p are output at 24p Only when you have selected On in 24p Output 41 and play discs recorded at a rate of 60 fields per second Sound Effects 1 2 Discs recorded at 48 kHz or less This feature gives you brighter sound by increasing the high frequency portion of the audio Dialog Enhancer 1 The volume of the centre channel is raised to make di...

Page 38: ...rk right A Broadband router Wireless router Access point etc B LAN Cable Straight C Internet D DLNA Certified media server 1 Press START 2 Press 3 4 to select Network and press OK 3 Press 3 4 to select Home Network DLNA and press OK A list of equipment connected via the network is displayed This list can be updated by pressing the red button on the remote control 4 Press 3 4 to select the equipmen...

Page 39: ...the 4 digit password with the number buttons when the password screen is shown BD Video Ratings Set an age limit of BD Video play Follow the on screen instructions Enter the 4 digit password with the number buttons when the password screen is shown Playback method for 3D disc Select the playback method of 3D compatible video software 3D Playback Message Set to display or hide the 3D viewing warnin...

Page 40: ...en the connected equipment cannot decode the respective audio format Not making the proper settings may result in noise BD Video Secondary Audio Select whether to mix or not mix the primary audio and secondary audio including the button click sound 28 If Off is selected the unit outputs the primary audio only Digital Audio Input Select whether to receive the digital sound as PCM or the original so...

Page 41: ...Video set to On and then set 24p in Picture 37 to On When BD Video images other than 24p are played images are output at 60p HDMI Colour Mode This setting is for selecting colour space conversion of the image signal when the unit is connected using an HDMI cable HDMI Audio Output This setting selects whether or not to output audio from HDMI Audio will be output through the system s speakers when O...

Page 42: ...ng the time zone it is possible to set the unit s time to match your location Some VIERA CAST contents require the time zone to be set Set the time zone if necessary Summer Time Select On when using Daylight Saving time MAC Address Displays the MAC address of this unit Remote Control Change the remote control code if other Panasonic products react to this remote control Quick Start Speed of startu...

Page 43: ...peaker volume respectively No signal is output for the subwoofer To adjust its volume see page 26 Adjusting speaker level during play 3 Press OK The test signal stops To finish the speaker setting Press 3 4 2 1 to select Complete and press OK Speaker settings A B C Primary listening distance A Approximate room dimensions B Actual speaker position C Ideal speaker position D Circle of constant prima...

Page 44: ...base and the stand BTT350 Front speaker Surround speaker F 97 mm G 210 mm to 212 mm H 26 mm BTT755 Centre speaker BTT350 Centre speaker I 18 8 mm J 117 mm K 209 mm to 211 mm L 97 mm M 17 mm N 99 mm to 101 mm To avoid speaker dropping BTT755 Front speaker Centre speaker Surround speaker Consult a qualified building contractor to avoid damage to the wall or speakers Use a string of less than 2 0 mm ...

Page 45: ...s selected as a source press and hold SKIP on the remote control and 1 Play on the unit at the same time for more than 5 seconds The ratings level returns to the factory preset No power Insert the AC mains lead securely into a household mains socket 20 The unit switches to standby mode When the time set for the sleep timer has passed the power will be turned off 8 One of the unit s safety devices ...

Page 46: ...s original multi channel form jIf the device has an optical audio output terminal connect the device to this unit s OPTICAL terminal 17 32 TR No surround sound Press SURROUND to select a surround effect 26 BTT755 for Australia and New Zealand Ensure that the surround selector switch is set in the centre position Then turn the wireless system off and then back on When using the 7 1ch speaker system...

Page 47: ... the Access Point Connection Setting screen 42 the continuous lighting of at least 4 Reception indicators is the target for a stable connection If 3 or fewer indicators are lit or the connection is being interrupted change the position or angle of your Wireless router Access point and see if the connection state improves If there is no improvement connect to a wired network and perform the Network...

Page 48: ...ff jDisconnect the HDMI cable between the player and the TV HDMI ONLY Some BD Video discs can only be output with HDMI NET Displays while VIERA CAST is starting up No PLAY There is a viewing restriction on a BD Video or DVD Video 39 No READ The media is dirty or badly scratched The unit cannot play PLEASE WAIT The unit is carrying out internal process This is not a malfunction You cannot operate t...

Page 49: ...v or MKV Picture resolution Up to 1920k1080 pixels Reference DivX certified to play DivX video up to HD 1080p including premium content Video jNumber of stream Up to 1 jCodec MPEG 4 SP Simple Profile MPEG 4 ASP Advanced Simple Profile jFPS Frame Per Second Up to 60 fps Audio jNumber of stream Up to 8 jFormat MP3 MPEG Dolby Digital jMulti channel Dolby Digital is possible MPEG multi is 2 ch convers...

Page 50: ...eHD DTS DTS ES Mtrx DTS ES Dscrt DTS 96 DTS 96 ES Mtrx DTS HD HI RES DTS HD MSTR MPEG Signal type ch channel Number of channels k kHz Sampling frequency b bit Number of bits Language Code Language Code Language Code ENG FRA DEU ITA ESP NLD SVE NOR DAN POR RUS English French German Italian Spanish Dutch Swedish Norwegian Danish Portuguese Russian ARA HIN PER IND MRI BUL RUM GRE TUR JPN CHI KOR MAL ...

Page 51: ...3D and Blu ray 3D logo are trademarks of Blu ray Disc Association Made for iPod and Made for iPhone mean that an electronic accessory has been designed to connect specifically to iPod or iPhone respectively and has been certified by the developer to meet Apple performance standards Apple is not responsible for the operation of this device or its compliance with safety and regulatory standards iPho...

Page 52: ...vious DTS DTS ES and DTS 96 24 formats It is compatible with sampling frequency 96 kHz 48 kHz BD Video supports up to 7 1 channel output DTS HD Master Audio Essential This is a lossless audio format and compatible with 96 kHz 7 1 ch and 192 kHz 2 ch or less In addition faithful reproduction of the master audio is enabled using lossless audio encoding technology BD Video supports up to 7 1 channel ...

Page 53: ...T 90 W per ch 3 CENTRE 115 W per ch 6 SURROUND 90 W per ch 3 100 Hz 1 0 total harmonic distortion SUBWOOFER 115 W per ch 6 FM TUNER SECTION Preset memory 30 stations Frequency range 87 50 MHz to 108 00 MHz 50 kHz step Antenna terminals 75 unbalanced SPEAKER SECTION FRONT SPEAKERS BTT755 SB HF730 Type 2 WAY 3 SPEAKER Bass ref Woofer 3 5 cm k 10 cm CONE TYPEk 2 Tweeter 2 5 cm SEMI DOME TYPE Impedanc...

Page 54: ...rt power Max 500 mA Bit rate Up to 4 Mbps DivX Rear USB 2 0 Use for Wireless LAN Adaptor only Ethernet 10BASE T 100BASE TX 1 system SD card slot Connector 1 system Audio Input AUX k 1 Digital Audio Input Optical k 1 Sampling frequency 32 kHz 44 1 kHz 48 kHz Audio Format PCM Dolby Digital VIDEO SECTION Signal system PAL625 50 PAL525 60 NTSC Video output Output level 1 0 Vp p 75 Output connector Pin...

Page 55: ...Clarity Sound 37 40 I iPod iPhone 34 IP address 42 J JPEG 49 L LAN 19 Language Audio 40 Code list 50 Menu 40 On Screen 41 Soundtrack 36 Subtitle 36 40 Local storage 52 LPCM 52 M Menu Playback 36 Pop up 27 Setup 39 MPEG2 49 MP3 49 Mute the sound 8 O On Screen Language 41 Status Message 27 P Picture in picture 28 Playback AVCHD 27 DivX 29 JPEG 30 MPEG2 27 MP3 31 Playlists 25 Pop up menu 27 Product D...

Page 56: ...o uk Direct Sales at Panasonic UK For customers 0844 844 3856 Order accessory and consumable items for your product with ease and confidence by phoning our Customer Care Centre Monday Thursday 9 00 a m 5 30 p m Friday 9 30 a m 5 30 p m Excluding public holidays Or go on line through our Internet Accessory ordering application at www pas europe com Most major credit and debit cards accepted All enq...

Reviews: