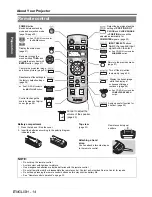
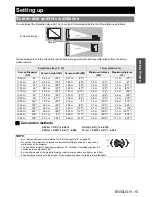
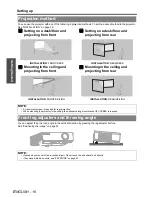
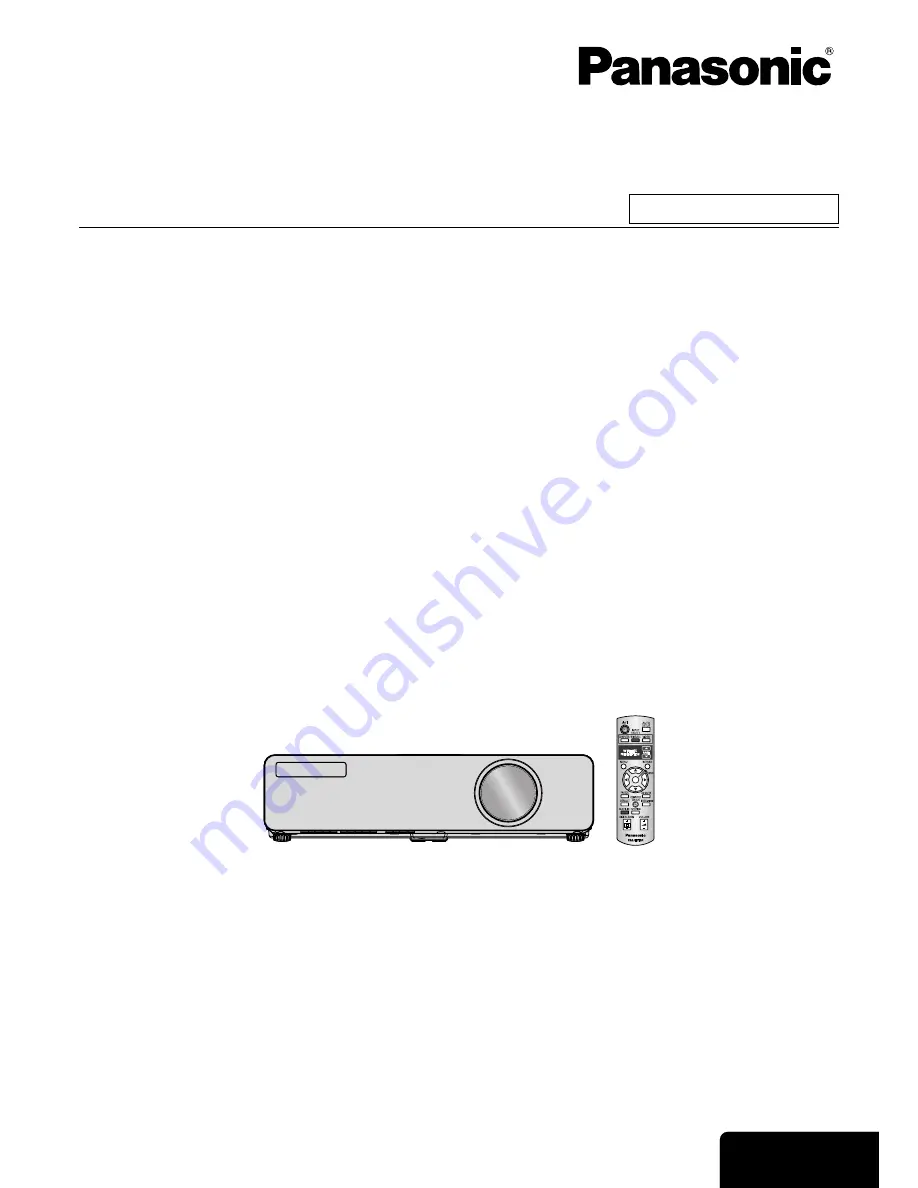
background image

E

NGLISH 

Operating Instructions

LCD Projector 

Model No.

PT-LW80NTU

Before operating this product, please read the instructions carefully and save this manual for future use.

TQBJ0260

Commercial Use

Summary of Contents for PTLW80NTU - LCD PROJECTOR - MULTI LANGUAGE

Page 1: ...ENGLISH Operating Instructions LCD Projector Model No PT LW80NTU Before operating this product please read the instructions carefully and save this manual for future use TQBJ0260 Commercial Use ...

Page 2: ...ill need to obtain a separate 250 V power cord If you use the accessory cord in such situations fire may result The lightning flash with arrowhead symbol within an equilateral triangle is intended to alert the user to the presence of uninsulated dangerous voltage within the product s enclosure that may be of sufficient magnitude to constitute a risk of electric shock to persons The exclamation poi...

Page 3: ...and use only shielded interface cables when connecting to computer and or peripheral devices Any changes or modifications not expressly approved by Panasonic Corp of North America could void the user s authority to operate this device FCC RF Exposure Warning if provided with wireless device This equipment complied with FCC radiation exposure limits set forth for an uncontrolled environment This eq...

Page 4: ...ting the input signal 22 Positioning the image 22 Remote control operation 23 Operating range 23 Setting up the image position automatically 23 Switching the input signal 24 Capturing an image 24 Stopping the projection temporary 24 Resetting to the factory default settings 24 Projecting an image in INDEX WINDOW mode 25 Using an assigned function 25 Controlling the volume of the speaker 25 Enlargi...

Page 5: ... SCREEN FORMAT 37 CLOSED CAPTION SETTING 37 FUNCTION BUTTON 37 TEST PATTERN 37 DETAILED SETUP 37 SECURITY menu 39 INPUT PASSWORD 39 PASSWORD CHANGE 39 TEXT DISPLAY 39 TEXT CHANGE 40 WIRELESS menu 41 Items in WIRELESS menu 41 LAMP and TEMP Indicators 42 Managing the indicated problems 42 Care and Replacement 43 Cleaning the projector 43 Replacing the Lamp unit 44 Troubleshooting 46 Technical Inform...

Page 6: ... out from the wall outlet and wipe it with a dry cloth If not using the projector for an extended period of time pull the power plug out from the wall outlet Do not handle the power plug with wet hands Failure to observe this may result in electric shocks Insert the power plug securely into the wall outlet If the plug is not inserted correctly electric shocks or overheating could result Do not use...

Page 7: ...e lamp allow it to cool for at least one hour before handling it The lamp cover gets very hot and touching it can cause burns Before replacing the lamp be sure to disconnect the power plug from the wall outlet Electric shocks or explosions can result if this is not done Do not allow infants or pets to touch the remote control unit Keep the remote control unit out of the reach of infants and pets a...

Page 8: ...sult in fire If the lamp has broken ventilate the room immediately Do not touch or bring your face close to the broken pieces Failure to observe this may cause the user to absorb the gas which was released when the lamp broke and which contains nearly the same amount of mercury as fluorescent lamps and the broken pieces may cause injury If you believe that you have absorbed the gas or that the gas...

Page 9: ... to remove it See TEST PATTERN on page 37 The liquid crystal panel of the projector is built with very high precision technology to provide fine picture details Occasionally a few stuck pixels may appear on the screen as fixed points of blue green or red It is recommended to switch off the projector once and try after 1 hour later again Please note that this does not affect the performance of your...

Page 10: ...ucts such as a plug cover or foam cartons must be treated properly Contact to an Authorized Service Center for lost accessories Accessories Remote control for PT LW80NTU x1 N2QAYB000260 AA batteries for Remote control x2 Power cord secure lock x1 TTRA0185 Power cord x1 K2CG3DR00007 CD ROM x1 TQBH9011 Carrying bag x1 TPEP021 RGB signal cable x1 1 8 m 5 10 K1HA15DA0002 ...

Page 11: ...TUDE If you use the projector at high elevation the ALTITUDE setting need to be HIGH to set the fan speed high Press I H to select the required option If you need to return to the INSTALLATION press F LOW The fan speed is low HIGH The fan speed is high Press the ENTER button to start the projection Once you finish the minimum requirement setting it will not be displayed again unless the projector ...

Page 12: ...T RELEASE RELEASE INPUT SELECT button Switch to cycle through the input method page 22 COMPUTER1 COMPUTER2 S VIDEO VIDEO WIRELESS COMPUTER1 POWER button Switch between stand by mode and projection mode page 19 page 20 FUNCTION button Assign a useful function for shortcut page 25 RETURN button Return to the previous menu page 27 RELEASE button Press to release the locked POWER button when turning o...

Page 13: ...dio signal corresponding to VIDEO IN S VIDEO IN COMPUTER AUDIO IN Connect audio cables for inputting audio signals corresponding to COMPUTER1 IN and or COMPUTER2 IN 1 OUT VARIABLE AUDIO OUT Connect an audio cables for outputting audio signals to the connected equipment AC IN Connect the power cord to supply electronic power to the projector page 18 Air filter compartment page 43 Font leg adjusters...

Page 14: ...ents the MULTI LIVE button Control to adjust the volume of the speaker page 25 Return to the previous menu page 27 Capture the projected image as a frozen picture page 24 Detect the input signal and the setting of POSITION DOT CLOCK and CLOCK PHASE in POSITION menu will be adjusted automatically for COMPUTER signals page 23 See CD ROM contents the COMPUTER SEARCH button Control to change the scale...

Page 15: ... m 8 2 2 03 m 80 1 08 m 3 6 1 72 m 5 7 2 5 m 8 2 2 9 m 9 6 2 29 m 90 1 21 m 3 11 1 94 m 6 4 2 8 m 9 2 3 3 m 10 9 2 54 m 100 1 35 m 4 5 2 15 m 7 3 1 m 10 2 3 6 m 11 9 3 05 m 120 1 62 m 5 3 2 58 m 8 5 3 7 m 12 1 4 4 m 14 5 3 81 m 150 2 02 m 6 7 3 23 m 10 7 4 7 m 15 5 5 5 m 18 5 08 m 200 2 69 m 8 9 4 31 m 14 1 6 2 m 20 4 7 3 m 23 11 6 35 m 250 3 37 m 11 5 38 m 17 7 7 8 m 25 7 9 2 m 30 2 7 62 m 300 4 ...

Page 16: ...etting on a desk floor and projecting from rear INSTALLATION FRONT DESK INSTALLATION REAR DESK J Mounting in the ceiling and projecting from front J Mounting in the ceiling and projecting from rear INSTALLATION FRONT CEILING INSTALLATION REAR CEILING NOTE A translucent screen is required for rear projection When mounting the projector in the ceiling the optional ceiling mount bracket ET PKB80 is r...

Page 17: ...o signals See List of compatible signals on page 47 When you connect more than one AV equipment switch the audio connection manually J Connecting with VIDEO IN S VIDEO IN Before connection to the projector Connecting example AV equipment Connecting example Computers NOTE When COMPUTER2 SELECT in the OPTION menu is set to OUTPUT do not connect any input signals Outputting signals from the COMPUTER ...

Page 18: ...cover off 3 Slide the power cord secure lock up along the side guide rail and remove 4 Hold the plug and unplug the power cord from the AC IN terminal on the back of the projector POWER indicator lights in orange if the internal cooling fan is still operating by internal power supply J Direct power off function You can switch off the electric power supply any time by unplugging the power plug from...

Page 19: ... The POWER indicator flashes in green several times 3 The POWER indicator lights in green and displays the startup logo for 30 seconds When the STARTUP LOGO in OPTION menu is set to OFF the startup logo will not be displayed See STARTUP LOGO on page 35 Q By direct power on function You can switch on the projector by connecting the power cord See Direct power on function on page 18 Switching on the...

Page 20: ... to the projection 2 Press the POWER button again in 10 seconds 3 The POWER indicator will flash in orange The projector is cooling the lamp 4 The POWER and POWER LOCK indicator light red J By direct power off function You can switch off the projector by disconnecting the power cord See Direct power off function on page 18 Switching off the projector FUNCTION MENU RETURN INPUT SELECT RELEASE RELEA...

Page 21: ... unlocked The power is on Red Lit The POWER button is locked Flashing Pressing the locked POWER button Indicator status Status No illumination or flashing No power is supplied and the internal cooling fan is not operating Red Lit The power is supplied and in standby mode 1 and the POWER button is locked 1 The electric consumption in standby mode is 4 0 W Flashing Network connection standby Only wh...

Page 22: ...justed effect with the TEST PATTERN in OPTION menu See TEST PATTERN on page 37 5 Close the Zoom Focus ring cover See Zoom Focus ring cover on page 12 Selecting the input signal NOTE If the SIGNAL SEARCH in OPTION menu is deactivated select the required input method by pressing the INPUT SELECT buttons of the remote control or the INPUT SELECT button of the projector several times See SIGNAL SEARCH...

Page 23: ...ect a RGB signal by SIGNAL SEARCH system and adjust the setting of POSITION DOT CLOCK and CLOCK PHASE in POSITION menu automatically Operating range NOTE See About Your Projector on page 12 to confirm the position of the remote control signal emitter and receptor Do not let strong light shine onto the signal receptor The remote control may malfunction under strong light such as fluorescent If ther...

Page 24: ...ng electrical power Press the AV MUTE button again to escape You can reset most of the customized settings to the factory defaults by pressing the DEFAULT button of the remote control Display the required sub menu or the menu items and press the DEFAULT button again See Main menu and Sub menu on page 28 Switching the input signal COMPUTER1 COMPUTER2 NOTE Only when the COMPUTER2 SELECT is set to IN...

Page 25: ...page 37 for assigning procedure You can control the volume of the built in speakers and output audio sound Press side of the VOLUME button to increase and to decrease Projecting an image in INDEX WINDOW mode Projected image Frozen image Continuing image Frozen image Continuing image Continuing image Frozen image NOTE If you change the window size the aspect ratio of the image is changed and become...

Page 26: ...teps of 0 1 Q Shifting the center point Press F G I H to shift the center point Enlarging the centered area Press Press NOTE When the COMPUTER signal is projected the enlargement range will be changed to 1x to 3x When the FRAME LOCK in POSITION menu is set to ON the enlargement range is 1x to 2x See FRAME LOCK on page 34 When the input signal is changed while the DIGITAL ZOOM is activated the DIGI...

Page 27: ...e is a lower level the next level will be displayed 3 Press I H to adjust the bar scale or select the required option Called up item will be disappear after 5 seconds without any operation and return to the menu mode For items indicated in bar scale type the current settings are displayed on the left of the bar You can cycle through the options of an item by pressing I H 4 Press MENU or RETURN but...

Page 28: ...0 STANDARD LOW HIGH DAYLIGHT VIEW page 30 AUTO OFF ON DETAILED SETUP page 31 Not available with wireless connection TV SYSTEM AUTO NTSC NTSC 4 43 PAL PAL M PAL N SECAM STILL MODE OFF ON NOISE REDUCTION OFF ON WHITE BALANCE RED Default 0 WHITE BALANCE GREEN Default 0 WHITE BALANCE BLUE Default 0 REALTIME KEYSTONE page 32 ON OFF KEYSTONE page 32 Not available with wireless connection Default 0 POSIT...

Page 29: ...RONT CEILING REAR DESK REAR CEILING ALTITUDE page 36 LOW HIGH SCREEN FORMAT page 37 16 10 16 9 CLOSED CAPTION SETTING page 37 CLOSED CAPTION OFF ON MODE CC1 CC2 CC3 CC4 FUNCTION BUTTON page 37 AV MUTE FREEZE AUTO SETUP INDEX WINDOW ASPECT PICTURE MODE WIDE MODE CLOSED CAPTION SETTING TEST PATTERN page 37 DETAILED SETUP page 37 OSD DESIGN TYPE1 TYPE2 TYPE3 SXGA MODE SXGA SXGA BLACKBOARD ON OFF BACK...

Page 30: ... vivid even in well lit rooms where the ambient light sources cannot be controlled such as when a door opens or when window coverings fail to block out sunlight AUTO Automatic adjustment ON Active OFF Deactive PICTURE MODE NATURAL Reproduces the original color of the image STANDARD Setting for a general image DYNAMIC Bright and sharp setting BLACKBOARD Setting for when projecting on a blackboard S...

Page 31: ...ive ON Active Q NOISE REDUCTION You can switch the automatic noise reduction system on off Press I H to select the required setting OFF No noise reduction ON Automatic noise reduction J For RGB signals You can adjust the white balance more properly in 3 colors temperature by pressing I H WHITE BALANCE RED WHITE BALANCE GREEN WHITE BALANCE BLUE DETAILED SETUP AUTO SECAM NTSC PAL N NTSC 4 43 PAL M P...

Page 32: ...requency Available with signals of RGB only If you require further adjustment for the same reason as the DOT CLOCK adjustment you can fine adjust the timing of the clock Press I H to adjust Available with signals of RGB YPBPR only REALTIME KEYSTONE KEYSTONE Image Operation NOTE You can correct the distortion 30 degrees from the plane For a better quality image installing the projector with a minim...

Page 33: ...tical limit of the SCREEN FORMAT setting size with preserving original ratio and the horizontal edge will be cropped Q HV FIT The image will be stretched to the vertical and horizontal limit of the SCREEN FORMAT setting size without preserving original ratio and the vertical and horizontal edge will not be cropped Q THROUGH The image will be projected without any size adjustment ASPECT NOTE WIDE M...

Page 34: ...ailable with signals of RGB only OFF Deactive ON Active SCREEN FORMAT menu ASPECT menu VIDEO S VIDEO COMPONENT 16 10 AUTO IH 4 3 IH 16 9 IH H FIT IH HV FIT 16 9 AUTO IH 4 3 IH H FIT IH HV FIT 1 080 50i 1 080 60i 720 50p 720 60p 16 10 16 9 IH V FIT IH HV FIT IH 4 3 16 9 Not available COMPUTER 16 10 4 3 IH 16 9 IH H FIT IH HV FIT 16 9 4 3 IH H FIT IH HV FIT WXGA768 16 10 16 9 IH V FIT IH HV FIT IH 4...

Page 35: ...ntered text in a box Press G and edit the TEXT2 if you need to and repeat the step 3 5 Select CANCEL or press the MENU RETURN button to return to the previous menu without setting You can switch the function of the COMPUTER2 IN 1 OUT terminal INPUT COMPUTER2 IN OUTPUT COMPUTER1 OUT The projector will detect the signal from the COMPUTER1 IN or COMPUTER2 IN 1 OUT terminal if the signal is RGB or YPB...

Page 36: ...rn off the auto signal detecting system ON Detect the input signal from the terminals and project the image OFF Deactive When installing the projector select the projection method according to the projector position Press I H to cycle through the options See Projection method on page 16 If you use the projector at high elevation the ALTITUDE setting need to be HIGH to set the fan speed high Press ...

Page 37: ...l Press I H to select the required option J BLACKBOARD You can exclude the BLACKBOARD in the menu items of PICTURE MODE in PICTURE menu Press I H to select the required option ON Include the BLACKBOARD in menu items OFF Exclude the BLACKBOARD in menu items J BACK COLOR You can choose a BLUE or BLACK screen for when the projector is idle Press I H to select the required option J VOLUME You can adju...

Page 38: ...t all of the customized settings to the factory defaults except WIRELESS and LAMP RUNTIME menu settings 1 Press the ENTER button 2 Turn off the projector by pressing the POWER button 3 Reset the projector by unplugging and plugging the power cord from the wall outlet 4 The minimum required setting screen will be displayed See Minimum required setting screen on page 11 NOTE The security system is d...

Page 39: ...ries of button operation is incorrect you will be asked to perform again 4 Press the ENTER button You can set your original text such as company name or URL information to display regularly at the bottom of the projected image while projecting OFF Deactive ON Active NOTE The factory default password is valid until you change the password in PASSWORD CHANGE menu The entered password operations will...

Page 40: ...rs move the cursor to ALL DELETE and press the ENTER button To insert a character in the entered text line move the cursor to the text box to select the required place and press G and return to the character field To delete a character press the DEFAULT button or move the cursor to the required character then press the DEFAULT button 3 Select OK and press the ENTER button to set the entered text S...

Page 41: ...TIALIZE NOTE See the wireless connecting information in the contents of the CD ROM which is provided with the projector When INPUT PASSWORD in SECURITY menu is activated perform the correct password operation to initialize the projector via network MENU RETURN Remote control Control panel See Navigating through the MENU on page 27 See Main menu and Sub menu on page 28 Items in WIRELESS menu ...

Page 42: ... replaced The projector is switched on again too soon LAMP circuit failure abnormal function Lamp unit is damaged Remedy See Replacing the Lamp unit on page 44 Let the lamp unit cool down and turn on the projector after 90 seconds Switch off the projector and contact an Authorized Service Center See Replacing the Lamp unit on page 44 Indicator Illuminating red while projecting and the alert will b...

Page 43: ...ojected onto a screen J Cleaning the air filter If the air filter is excessively dirty the internal temperature of the projector increases and may cause malfunction Clean the air filter regularly every 100 hours of usage 1 Turn the projector upside down and place it gently on a soft cloth 2 Press the tab and slightly slide up the air filter to remove 3 Vacuum dirt and dust from the air filter Do n...

Page 44: ...and the surroundings are cooled enough Prepare a Phillips head screwdriver When the projector is mounted in the ceiling do not work directly under the projector or put your face closer to the projector Replacing the Lamp unit Indication On screen LAMP indicator Over 2 800 hours Displays REPLACE LAMP on the upper left of the screen for 30 seconds Illuminates red Over 3 000 hours Displays REPLACE LA...

Page 45: ...ps head screwdriver Q Resetting the LAMP RUNTIME 1 Connect the power cord to a wall outlet and switch on the projector 2 Press the MENU button to display the menu 3 Press F G to select OPTION and press ENTER 4 Press F G to select LAMP RUNTIME 5 Press and hold the ENTER button for approximately 3 seconds 6 The confirmation screen will be displayed and select OK 7 Reset the projector by unplugging a...

Page 46: ...onnected to the VARIABLE AUDIO OUT terminal The volume adjustment may be at the lowest possible setting 17 13 25 The control buttons of the projector do not operate CONTROL PANEL in OPTION menu is invalidated If you have a loss of the remote control while the CONTROL PANEL is invalidated press and hold the MENU button for 2 seconds with pressing the ENTER button 36 The Remote control does not oper...

Page 47: ... 5 59 9 25 2 A 640 x 480 35 0 66 7 30 2 A 640 x 480 37 9 72 8 31 5 A 640 x 480 37 5 75 0 31 5 A 640 x 480 43 3 85 0 36 0 A SVGA 800 x 600 35 2 56 3 36 0 A 800 x 600 37 9 60 3 40 0 A 800 x 600 48 1 72 2 50 0 A 800 x 600 46 9 75 0 49 5 A 800 x 600 53 7 85 1 56 3 A MAC 832 x 624 49 7 74 6 57 3 A XGA 1 024 x 768 39 6 50 1 51 9 A 1 024 x 768 48 4 60 0 65 0 A 1 024 x 768 56 5 70 1 75 0 A 1 024 x 768 60 ...

Page 48: ...ext command When a command which does not require parameters to be sent the colon is not required If an incorrect command is sent from the personal computer the ER401 command will be sent from the projector to the personal computer Serial terminal Pin No Signal name Contents A NC B TXD Transmitted data C RXD Received data D NC E GND Earth F NC G RTS Connected internally H CTS I NC Signal level RS ...

Page 49: ...after the lamp has switched off the lamp is not turned back on again straight away in order to protect the lamp AVL Volume Parameter 000 063 Adjustment value 0 63 IIS Input Parameter VID VIDEO RG1 COMPUTER1 SVD S VIDEO RG2 COMPUTER2 NWP WIRELESS Q S Lamp condition query Call back 0 Standby 1 Lamp on control active 2 Lamp on 3 Lamp off control active OSH AV mute Turning off the projection and sound...

Page 50: ...nvironment Temperature 0 C 40 C 32 F 104 F When the ALTITUDE page 36 is set to HIGH 0 C 35 C 32 F 95 F Humidity 20 80 no condensation Scanning frequency 2 for RGB signal 2 See List of compatible signals on page 47 for available signals Horizontal scanning frequency 15 kHz 91 kHz Vertical scanning frequency 50 Hz 85 Hz Dot clock frequency Less than 110 MHz COMPONENT YPBPR signals 525i 480i 525p 480...

Page 51: ...utput stereo compatible 0 V rms 2 0 V rms variable SERIAL D sub 9 pin RS 232C compatible Wireless LAN Compatible IEEE802 11b IEEE802 11g Wireless LAN standard protocol Wireless channel IEEE802 11b IEEE802 11g 1 11 channels Distance 30 m 98 5 Depends on the usage environment Cabinet Moulded plastic PC ABS Dimensions Width 368 mm 14 15 32 Height 97 mm 3 13 16 Length 233 mm 9 5 32 not including surfa...

Page 52: ...100 1 25 m 4 1 2 21 m 7 3 3 2 m 10 5 3 7 m 12 1 3 05 m 120 1 49 m 4 10 2 66 m 8 8 3 9 m 12 9 4 5 m 14 9 3 81 m 150 1 87 m 6 1 3 32 m 10 10 4 8 m 15 8 5 6 m 18 4 5 08 m 200 2 49 m 8 2 4 43 m 14 6 6 4 m 20 11 7 6 m 24 11 6 35 m 250 3 11 m 10 2 5 53 m 18 1 8 0 m 26 2 9 5 m 31 2 7 62 m 300 3 74 m 12 3 6 64 m 21 9 9 6 m 31 5 11 4 m 37 4 Projection size 4 3 Throw distance L Screen Diagonal SD Screen hei...

Page 53: ...edia Interface are trademarks or registered trademarks of HDMI Licensing LLC The font used in the on screen displays is a Ricoh bitmap font which is manufactured and sold by Ricoh Company Ltd All other trademarks are the property of the various trademark owners Dimensions Trademark acknowledgements 233 9 5 32 97 3 13 16 88 3 7 16 93 3 21 32 3 16 5 4 5 32 9 11 32 2 1 8 54 5 3 3 32 368 14 15 32 3 15...

Page 54: ... Buttons 12 Menu 36 D DAYLIGHT VIEW 30 DEFAULT Remote control 24 Remote control button 14 DETAILED SETUP OPTION menu 37 PICTURE menu 31 DIGITAL ZOOM Remote control 26 Remote control button 14 Dimensions 53 Direct power off 18 DIRECT POWER ON Function 18 Menu 36 DOT CLOCK 32 E ENTER Control panel button 12 Remote control button 14 F Focus ring 12 22 FRAME LOCK 34 FREEZE Remote control 24 Remote con...

Page 55: ...Remote control 27 Remote control button 14 RGB YPBPR 35 S SCREEN FORMAT 37 Screen size 16 10 15 16 9 52 4 3 52 Security 9 Security lock 13 SECURITY menu 39 SERIAL 13 Basic format 48 Cable specifications 49 Communication settings 48 Connection 48 Control commands 49 Pin assignments 48 SHARPNESS 30 SIGNAL SEARCH 36 Signals 47 Speaker 13 Specifications 50 STARTUP LOGO 35 STILL MODE 31 Sub menu 28 S V...

Page 56: ...t se procurer un autre cordon d alimentation de 250 V Si on utilise le cordon fourni sous ces conditions risque de provoquer un incendie Le symbole de la flèche en forme d éclair dans un triangle avertit l usager de la présence de tensions dangereuses à l intérieur du produit qui peuvent être de force suffisante pour constituer un risque de choc électrique aux personnes Le point d exclamation dans...

Page 57: ...r la bonne conformité utilisez uniquement des câbles d interface blindés lorsque vous connectez des ordinateurs ou des périphériques Toute modification non autorisée de cet équipement annulera le droit de l utilisateur à utiliser cet équipement Tout changement ou modification non autorisé à cet équipement annule l autorité de faire fonctionner cet appareil Avertissement de la FCC relative à l expo...

Page 58: ...le rouler en boule Si le cordon d alimentation est endommagé cela peut entraîner un incendie et des chocs électriques Si le cordon d alimentation est endommagé le faire réparer par un center technique agréé Nettoyer la fiche du cordon d alimentation régulière ment afin d éviter toute accumulation de poussière Si de la poussière s accumule sur la fiche du cordon d alimentation l humidité peut endom...

Page 59: ...te lumière elle risque de causer des blessures et de graves lésions aux yeux Veiller particulièrement à ce que les enfants ne regar dent pas dans l objectif En outre éteindre le project eur si on le laisse sans surveillance Le remplacement de la lampe ne doit être effectué que par un technicien qualifié La lampe a une pression interne élevée Si elle est manipulée incorrectement une explosion peut ...

Page 60: ...la télécom mande pourrait causer une détérioration de l isola tion des fuites de courant ou même une explosion ce qui pourrait entraîner un incendie Ne pas placer d objets lourds sur le projecteur Cela peut déséquilibrer le projecteur et le faire tomber ce qui peut entraîner des dommages ou des blessures Si la lampe s est cassée ventiler immédiatement la pièce Ne pas toucher ni approcher le visage...

Page 61: ...n utilisant une technologie de haute précision afin d offrir une image très détaillée Il est possible que parfois quelques pixels figés apparaissent sur l écran sous forme de points fixes bleus verts ou rouges Il est alors recommandé d éteindre le project eur puis de le rallumer environ 1 heure après Bien noter que ceci n affecte pas le bon fonctionnement de votre LCD Ce projecteur est équipé d un...

Page 62: ...érifier que l unité de lampe et les composants à proximité ont refroidi suff isamment Préparer un tournevis cruciforme En cas d installation du projecteur au plafond ne jamais travailler directement dessous et éloigner le visage du projecteur Indication A l écran Indicateur LAMP Plus de 2 800 heures Affiche LAMPE DE REMPLACEMENT dans la partie supérieure gauche de l écran pendant 30 secondes S all...

Page 63: ... Brancher le cordon d alimentation à une prise et mettre le projecteur sous tension 2 Appuyer sur la touche MENU pour afficher le menu 3 Appuyer sur F G pour sélectionner OPTION et sur VALIDER 4 Appuyer sur F G pour sélectionner DURÉE DE LA LAMPE 5 Maintenir enfoncée la touche VALIDER pendant environ 3 secondes 6 Dans l écran de confirmation qui s affiche sélec tionner OUI 7 Réinitialiser le proje...

Page 64: ...rdouswaste perchlorate Panasonic Projector Systems Company Unit of Panasonic Corporation of North America One Panasonic Way Secaucus NJ 07094 201 392 6591 Technical Support 888 411 1996 FAX 201 348 7523 E Mail projectorsupport us panasonic com 2008 Matsushita Electric Industrial Co Ltd All Rights Reserved Printed in Japan S0508 1068B Projectors ...

Reviews: