background image

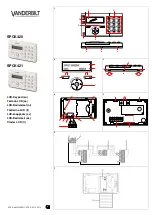
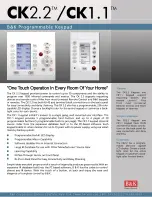
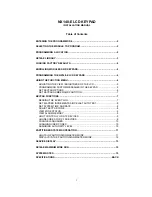
Operating Instructions

Home Network System

Access Keypad

Model No.    

KX-HNK101AZ

Thank you for purchasing a Panasonic product.

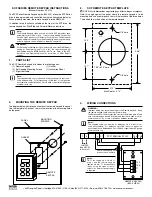
This document explains how to operate the access keypad properly.
For details about how to use the system, refer to the User’s Guide
(page 17).

Please read this document before using the unit and save it for future
reference.

KX-HNK101AZ_(en_en)_0202_ver.102.pdf   1

2017/02/02   19:10:48

Summary of Contents for KX-HNK101AZ

Page 1: ...ng a Panasonic product This document explains how to operate the access keypad properly For details about how to use the system refer to the User s Guide page 17 Please read this document before using the unit and save it for future reference KX HNK101AZ_ en_en _0202_ver 102 pdf 1 2017 02 02 19 10 48 ...

Page 2: ...t performance 6 Other information 7 Setup Part names and functions 8 Touchpanel buttons 8 LED indicator 9 Setup overview 9 Registering the keypad 9 Confirming the usage area 10 Installation 11 Appendix Using the keypad 16 Features available when using the Home Network app 16 Accessing the User s Guide 17 Specifications 17 2 Table of Contents KX HNK101AZ_ en_en _0202_ver 102 pdf 2 2017 02 02 19 10 ...

Page 3: ...ice R The illustrations in these instructions may vary slightly from the actual product Trademarks R iPhone and iPad are trademarks of Apple Inc registered in the U S and other countries R Android is a trademark of Google Inc R Microsoft Windows and Internet Explorer are either registered trademarks or trademarks of Microsoft Corporation in the United States and or other countries R All other trad...

Page 4: ...ich protection against electric shock relies on Double Insulation or Reinforced Insulation Direct current D C ON power Protective earth OFF power Protective bonding earth Stand by power Functional earth ON OFF power push push For indoor use only Caution risk of electric shock 4 Important Information KX HNK101AZ_ en_en _0202_ver 102 pdf 4 2017 02 02 19 10 49 ...

Page 5: ...ted dust may cause an insulation defect from moisture etc resulting in a fire R Unplug the product from power outlets if it emits smoke an abnormal smell or makes an unusual noise These conditions can cause fire or electric shock Confirm that smoke has stopped emitting and contact an authorised service centre R Unplug from power outlets and never touch the inside of the product if its casing has b...

Page 6: ...aptor is used as the main disconnect device Ensure that the AC outlet is installed near the product and is easily accessible General notices R This equipment will be inoperable when mains power fails R When a failure occurs which results in the internal parts becoming accessible disconnect the power supply cord immediately and return this unit to an authorised service centre R To minimise the poss...

Page 7: ...d be kept away from heat sources such as radiators cookers etc It should not be placed in rooms where the temperature is less than 0 C or greater than 40 C Damp basements should also be avoided R Operating the product near electrical appliances may cause interference Move away from the electrical appliances Other information Routine care R Wipe the outer surface of the product with a soft moist cl...

Page 8: ... tap the touchpanel the arm mode buttons light for 10 seconds During this time you can tap an arm mode button to switch to the corresponding arm mode Button Status None displayed No power or buttons are turned off 1 lit Normal operation Arm At Home mode is selected lit Normal operation Arm Away mode is selected lit Normal operation Disarm mode is selected Current arm mode button blinking slowly Al...

Page 9: ...stering the keypad This procedure is not required for devices that were included as part of a bundle Before you can use the keypad it must be registered to the hub If you purchased devices separately i e not as part of a bundle you must register each device to the hub You can register each device by using the registration buttons or the Home Network app Note R Before registering the keypad make su...

Page 10: ...n separate floors or in different buildings Note R The keypad s LED indicator blinks in red if it is out of range of the hub In this case confirm all connections including those of the hub Usage area cautions Using the keypad in the following areas may cause deformation malfunction or operational failure R In direct sunlight R Areas exposed to grease or steam such as kitchens R Near fire or heatin...

Page 11: ...out strength of the installation area must be at least 29 4 N 3 kgf Determining the installation location Note R Make sure there is at least 20 cm of space to the left of the keypad when mounted so that the buttons on the side of the keypad can be accessed 1 Remove the mounting bracket R Place the keypad face down on a flat surface slide the bracket toward the bottom of the keypad A by pushing it ...

Page 12: ...nformation below The dotted lines indicate where the edges of the keypad will be in relation to the mounting bracket C B D A C 16 mm 59 mm 19 mm Screw openings 60 mm apart 3 Drill pilot holes where you marked the screw openings in the previous step R The screw openings must be 60 mm apart 12 Setup KX HNK101AZ_ en_en _0202_ver 102 pdf 12 2017 02 02 19 10 49 ...

Page 13: ...ing upwards 1 1 Installing the mounting bracket on gypsum board ALC autoclaved lightweight cellular concrete or concrete blocks Use the supplied anchors and screws to mount the mounting bracket to the wall Note R Supplied anchors ø 5 mm 25 mm R Supplied screws ø 4 mm 25 mm 1 Mark the hole depth 1 on the drill bit at 35 mm and then drill the hole R Use a 4 8 mm drill bit 1 2 Remove debris 13 Setup ...

Page 14: ... and tighten each screw R Use the supplied screws 2 R Place the bracket with the UP mark facing upwards 2 2 Installing the keypad to the mounting bracket Attach the keypad to the bracket R Insert the grooves on the keypad to the 4 tabs on the bracket and then push down the keypad 14 Setup KX HNK101AZ_ en_en _0202_ver 102 pdf 14 2017 02 02 19 10 49 ...

Page 15: ...on R The AC adaptor must remain connected at all times It is normal for the adaptor to feel warm during use R The AC adaptor should be connected to a vertically oriented or floor mounted AC outlet Do not connect the AC adaptor to a ceiling mounted AC outlet as the weight of the adaptor may cause it to become disconnected Power failure R The keypad will not work during a power failure 15 Setup KX H...

Page 16: ...riggered the keypad sounds an alert and the current arm mode button blinks slowly Use the following procedure to stop the alert To cancel the trigger tap the touchpanel enter the disarm PIN default 0000 and then tap MOKN Talking notification feature This feature allows you to get information about a triggered sensor When a sensor is triggered the keypad can announce the location of the sensor dete...

Page 17: ...ou can also access the User s Guide at the web page listed below www panasonic net pcc support tel homenetwork manual Specifications R Standards DECT Digital Enhanced Cordless Telecommunications R Frequency range DECT 1 88 GHz 1 90 GHz R RF transmission power Approx 10 mW average power per channel R Power source 220 240 V AC 50 60 Hz R Power consumption Standby Approx 0 6 W Maximum Approx 2 0 W R ...

Page 18: ...18 Notes KX HNK101AZ_ en_en _0202_ver 102 pdf 18 2017 02 02 19 10 49 ...

Page 19: ...19 Notes KX HNK101AZ_ en_en _0202_ver 102 pdf 19 2017 02 02 19 10 49 ...

Page 20: ...Care Centre Tel No 132600 or website www panasonic com au For New Zealand Customer Care Centre Tel No 09 272 0178 or website www panasonic com nz Sales Department 18 Sir Woolf Fisher Drive Highbrook East Tamaki Auckland New Zealand Phone 09 272 0100 Fax 09 272 0137 Sales Department 1 Innovation Road Macquarie Park NSW 2113 Australia Panasonic Corporation 2016 PNQX7361YA PNQX7361YA PNQX7361YA CC051...

Reviews: