background image

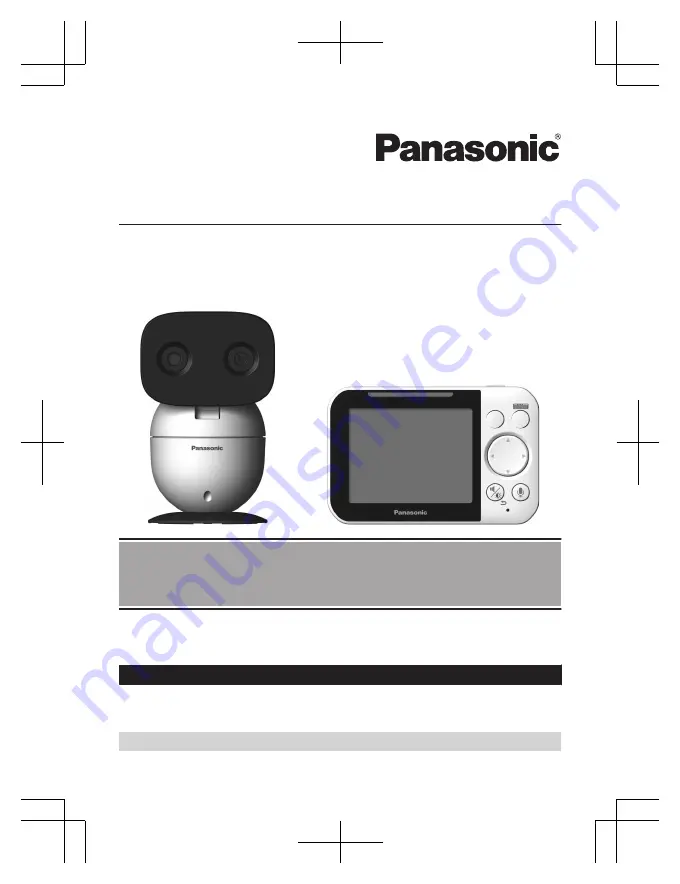
Operating Instructions

Baby Monitor

Model No.    

KX-HN3001

Before initial use, see “Getting Started”
on page 9.

Thank you for purchasing a Panasonic product.

Please read these operating instructions before using the unit and save them for
future reference.

Consulte  “Guía Rápida Española”, página 32.

For assistance, please contact us at 1-800-272-7033 or visit our Web site: 

http://shop.panasonic.com/support

 for customers in the U.S.A.

Please register your product: http://shop.panasonic.com/support

HN3001_(en_en)_0110_ver.410.pdf   1

2018/01/10   11:43:20

Summary of Contents for KX-HN3001

Page 1: ... operating instructions before using the unit and save them for future reference Consulte Guía Rápida Española página 32 For assistance please contact us at 1 800 272 7033 or visit our Web site http shop panasonic com support for customers in the U S A Please register your product http shop panasonic com support HN3001_ en_en _0110_ver 410 pdf 1 2018 01 10 11 43 20 ...

Page 2: ...ystem 17 Using the Baby Monitor Baby monitor 19 Viewing live camera images 19 Listening talking to the camera unit 19 Adjusting the speaker volume 20 Adjusting the chime beep volume 20 Adjusting the brightness of camera images 20 Adjusting the sleep mode 20 Configuring the temperature sensor 20 Playing canceling lullabies manually 21 Selecting camera units using auto scan 21 Programming Menu list ...

Page 3: ...ures give you peace of mind to go about your day For example you can use auto lullaby page 26 to play a lullaby automatically when your baby is crying and smart notification page 26 to display notifications on the monitor unit when your baby wakes or cries Model composition Model No Monitor unit Camera unit Part No Part No Quantity KX HN3001 KX HNM300 KX HNC300 1 Accessory information Supplied acc...

Page 4: ...mera units 3 max to the monitor unit Other information R Design and specifications are subject to change without notice R The illustrations in these instructions may vary slightly from the actual product 4 For assistance please visit http shop panasonic com support Introduction HN3001_ en_en _0110_ver 410 pdf 4 2018 01 10 11 43 20 ...

Page 5: ... eventuality R The system s wireless features are subject to interference therefore functionality in all situations cannot be guaranteed Panasonic will not be held responsible for injury or damage to property that occurs in the event of wireless communication error or failure R If a power failure occurs or the power is disconnected the temperature will not be accurate for up to an hour For your sa...

Page 6: ... risk of swallowing In the event they are swallowed seek medical advice immediately Operating safeguards R Unplug the product from power outlets before cleaning Do not use liquid or aerosol cleaners R Do not disassemble the product R Never put metal objects inside the product If metal objects enter the product turn off the circuit breaker and contact an authorized service center Medical R Consult ...

Page 7: ...and or the conductive material to overheat and cause burns R Do not put any conductive materials such as coins or hairpins onto the battery terminals This can result in the risk of overheating R Charge the battery provided with or identified for use with this product only in accordance with the instructions and limitations specified in this manual Attention The lithium ion polymer battery you have...

Page 8: ...c It should not be placed in rooms where the temperature is less than 0 C 32 F or greater than 40 C 104 F Damp basements should also be avoided R Operating the product near electrical appliances may cause interference Move away from the electrical appliances Other information Routine care R Wipe the outer surface of the product with a soft moist cloth R Do not use benzine thinner or any abrasive p...

Page 9: ... secure the camera base page 13 or wall mounting adaptor to the camera unit page 12 LED indicator You can use the LED indicator to confirm the camera unit s status Check the color of the LED indicator after connecting the camera unit page 12 Indicator Status Off No power Green lit Normal operation Green blinking slowly Registration mode Green blinking quickly Device malfunction For assistance plea...

Page 10: ...htness M N Back J Antenna K Speaker L micro USB connector M Battery cover N Stand Setting up the camera unit Information about pan tilt range The pan tilt can be used to adjust the area viewable from the camera unit by using MFN MEN MDN or MCN on the monitor unit If the area that you wish to view is not visible even after adjusting the pan tilt change the location or position of the camera unit so...

Page 11: ...era image are monitored for motion detection Temperature sensor The sensor is triggered when the set temperature range is exceeded Note R The temperature sensor may not detect temperature accurately if the camera unit is exposed to warm or cool breezes from heating cooling systems R If a power failure occurs or the power is disconnected the temperature will not be accurate for up to an hour R You ...

Page 12: ...e the supplied screw that is attached to the camera base when attaching the wall mounting adaptor to the camera unit Do not use user supplied screws This may cause the camera unit to become loose from the wall mounting adaptor R Mount the camera unit on the stable location where the unit can be adequately supported when installing R Use a string or wire to prevent the camera unit from falling and ...

Page 13: ...31 mm 1 7 32 inches 4 5 6 Adjust the angle of the camera unit by using MFN MEN MDN or MCN on the monitor unit Reattaching the camera base 1 Take the camera unit off from the wall 2 Remove the screw and then remove the wall mounting adaptor from the camera unit 1 1 Supplied screw page 9 3 Attach the camera base to the camera unit 4 Drive the supplied screw into the camera unit 1 1 Supplied screw pa...

Page 14: ...sert the AC adaptor plug A firmly into the monitor unit s micro USB connector 2 Connect the AC adaptor B to the power outlet A B Charge for about 8 hours Note R Use only the supplied AC adaptor S006AKU0500100 R When the AC adaptor plug is connected to the monitor unit s micro USB connector is displayed on the screen R It is normal for the monitor unit to feel warm during charging R The monitor uni...

Page 15: ...over B 2 1 6 Drive the screw into the battery cover Battery level Icon Battery level High Medium Low Needs charging 1 1 Two beeps sound from the monitor unit every 3 minutes when the battery needs charging Lithium Ion Li Ion Polymer battery performance supplied battery Operation Operating time In continuous use 5 hours max Not in use standby 13 hours max For assistance please visit http shop panas...

Page 16: ...r also lights when temperature is detected outside of the specified limits page 20 Smart LED indicator color Display icon color Status Off Off No detections Off White only Normal operations Smart LED indicator color Display icon color Status Green Green Motion or sound detected at the lower threshold level Example When your baby makes small movements or cries quietly Amber Amber R Motion or sound ...

Page 17: ... unit is out of range Usage area cautions Using the monitor unit in the following areas may cause deformation malfunction or operational failure R In direct sunlight R Areas exposed to grease or steam such as kitchens R Near fire or heating devices R Near magnetic fields such as near microwaves and magnets R Areas subject to extreme temperature changes such as next to air conditioners R Areas with...

Page 18: ... 27 Testing the camera unit s microphone To test the camera unit s microphone speak loudly and clearly into the microphone while a monitor unit user is viewing live images from the camera unit Testing the camera unit s speaker To test the camera unit s speaker press and hold M N and talk into the monitor unit while someone is listening to the camera unit Note R Make sure to adjust the camera unit ...

Page 19: ... MDN to adjust the tilt range Note R The sound sensor and motion sensor do not function during and for 5 seconds after pan tilt operations R Only adjust the pan tilt with operations from the monitor unit Do not adjust the pan tilt of the camera unit by hand Camera zoom The camera zoom can be used to zoom in on images displayed on the monitor unit 1 MSMARTN 2 MCN Select the desired setting a MMENUN...

Page 20: ...ecified period of time You can select how long the monitor unit is inactive for before it enters sleep mode or turn off sleep mode 1 MMENUN 2 MbN Monitor Settings a MOKN 3 MbN Sleep Mode a MOKN 4 MbN Select the desired setting R To turn off sleep mode MbN OFF 5 MOKN a MMENUN repeatedly to exit Configuring the temperature sensor You can specify how the temperature units Celsius or Fahrenheit are di...

Page 21: ...camera unit for the specified time Selecting a lullaby play time You can specify the time that lullabies play for 1 MMENUN 2 MbN Lullaby a MOKN 3 MbN Play Time a MOKN 4 MbN Select the desired play time 5 MOKN a MMENUN repeatedly to exit Selecting camera units using auto scan If there are multiple camera units registered to the monitor unit you can select which camera unit s images to view and also...

Page 22: ...ng Display the menu tree Main menu Sub menu 1 Sub menu 2 Settings Page Camera Zoom 1X 2X 19 Lullaby 1 Sound List 1 Lullaby1 10 Heart beat OFF 21 Play Time 5 min 120 min 15 min 21 Smart Notification Sound Notification Screen lit Notify Screen lit only OFF 26 Motion Notification Screen lit Notify Screen lit only OFF 26 Auto Lullaby Sound List 1 Lullaby1 10 Heart beat Random OFF 26 Sound Detect Level...

Page 23: ... Sub menu 2 Settings Page Timer Once 1H 2H 3H 4H 5H 6H 28 Repeat 1H 2H 3H 4H 5H 6H 28 OFF 28 For assistance please visit http shop panasonic com support 23 Programming HN3001_ en_en _0110_ver 410 pdf 23 2018 01 10 11 43 21 ...

Page 24: ... 4 High baby sounds 5 Mid baby sounds 5 Low baby sounds 4 5 27 Temperature Sensor Units C F 20 Alert Range Upper Limit 33 104 F 1 40 C 80 F 27 C 20 Lower Limit 32 103 F 0 39 C 60 F 16 C 20 Camera Speaker Vol Level 1 6 3 OFF 20 Camera Brightness Level 1 5 3 20 Camera Management Add Camera 28 Delete Camera Yes No 28 Reset Yes No 28 24 For assistance please visit http shop panasonic com support Progr...

Page 25: ...mber 5 Reduces false detections from sounds other than your baby s voice by reducing these sounds from the surrounding area If your baby s voice is not detected when using these settings select a baby sounds setting with a higher sensitivity If your baby s voice is still not detected select an all sounds setting 6 Can only be selected when there are multiple camera units registered to the monitor ...

Page 26: ...ions MbN OFF 5 MOKN a MMENUN repeatedly to exit Auto lullaby You can configure lullabies to be played automatically from the camera unit when sound is detected Note R Make sure to check the camera unit s speaker volume before playing lullabies page 20 R Auto lullaby does not function during the following while using or for 5 seconds after using the pan tilt while talking to the camera unit while c...

Page 27: ... the motion sensor sensitivity Motion sensor sensitivity is configured using a combination of the following the distance from the camera unit to your baby the age of your baby in months Change the settings in accordance with the growth of your baby 1 MMENUN 2 MbN Sensor Settings a MOKN 3 MbN Motion Sensor a MOKN 4 MbN Sensitivity a MOKN R A message is displayed Press MOKN to continue 5 MbN Select ...

Page 28: ...OKN to continue R Complete the following step within 90 seconds Camera unit 1 Press and hold M N for 3 seconds until the LED indicator starts blinking Note R A message is displayed on the monitor unit to show if the registration was successful or not and a beep sounds Resetting the settings for a camera unit The camera unit settings saved on a monitor unit can be reset Note R All camera unit setti...

Page 29: ... display language setting page 16 is displayed R The monitor unit is too far from the camera unit Move the monitor unit closer to the camera unit R The camera unit s AC adaptor is not properly connected Reconnect the AC adaptor to the camera unit R The camera unit has not been registered to the monitor unit Register the camera unit page 28 The monitor unit display is blank R The monitor unit is in...

Page 30: ...e charging conditions is too low or too high Charge the battery within the specified charging condition range page 31 R The battery may not be installed Install the battery page 14 R The battery may be deteriorated Please visit http shop panasonic com support 30 For assistance please visit http shop panasonic com support Useful Information HN3001_ en_en _0110_ver 410 pdf 30 2018 01 10 11 43 22 ...

Page 31: ... Angular field of view camera angle Horizontal approx 37 Vertical approx 28 R Motion detection method Visual sensor R Detection range Motion sensor Horizontal approx 37 Vertical approx 28 R Adjustable mounting angles Horizontal 136 Vertical facing forward facing down approx 0 to 44 movable range with the pan tilt R Dimensions height width depth Camera unit Approx 123 mm 77 mm 69 mm 4 13 16 inches ...

Page 32: ...ada Carga de la batería de la unidad del monitor 1 Inserte el enchufe del adaptador de corriente 1 firmemente en el conector micro USB de la unidad del monitor 2 Conecte el adaptador de corriente 2 a la toma de corriente Cargue aproximadamente durante 8 horas Conexiones de la unidad de cámara 1 32 Para obtener ayuda visite http shop panasonic com support solo en inglés Guía Rápida Española HN3001_...

Page 33: ...r el zoom 1 MENU s Seleccione la configuración deseada s N Para ajustar el brillo Presione s Seleccione la configuración deseada s OK b 1 LED indicador inteligente 2 Pantalla 3 c Alimentación Presione para apagar la pantalla de manera temporal o presione durante aproximadamente 2 segundos para apagar o encender la unidad del monitor 4 MENU 5 SMART OK Utilice SMART para acceder al menú de acceso rá...

Page 34: ...a canción de cuna 1 MENU 2 r Canción de cuna s OK 3 r Lista de sonidos s OK 4 r Seleccione la canción de cuna deseada Para cancelar una canción de cuna r OFF 5 OK s MENU repetidamente para salir b OK Seleccione la configuración deseada Mientras ve las imágenes de la unidad de la cámara mantenga presionado para hablar en la unidad del monitor Suelte para terminar de hablar Preguntas frecuentes Preg...

Page 35: ...ión de la unidad del monitor y utilice la cámara lejos de fuentes de interferencia Por qué no se escucha sonido de la unidad del monitor o de la cámara L El volumen del altavoz está apagado Ajuste el volumen del altavoz La unidad del monitor se encuentra en modo de reposo Presione cualquier botón en la unidad del monitor para activar la pantalla La unidad del monitor no está encendida Encienda la ...

Page 36: ... the receiver is connected Consult the dealer or an experienced radio TV technician for help Some devices operate at frequencies that may cause interference to nearby TVs and VCRs To minimize or prevent such interference this device should not be placed near or on top of a TV or VCR If interference is experienced move this device further away from the TV or VCR This will often reduce or eliminate ...

Page 37: ...r Panasonic products Accessories Parts for your Camera Phone A V products TV Computers Networking Personal Care Home Appliances Headphones Ba eries Backup Chargers more For Product Informa on Opera ng Assistance Parts Owner s Manuals Dealer and Service info go to http shop panasonic com support For the hearing or speech impaired TTY 1 877 833 8855 As of June 2015 For assistance please visit http s...

Page 38: ...atteries antennas and cosmetic parts cabinet This warranty only applies to products purchased and serviced in the United States This warranty is extended only to the original purchaser of a new product which was not sold as is Home Network System Products microSD card Included model only 90 days N A When shipping the unit carefully pack include all supplied accessories listed in the Owner s Manual...

Page 39: ...s attributable to acts of God THERE ARE NO EXPRESS WARRANTIES EXCEPT AS LISTED UNDER LIMITED WARRANTY COVERAGE THE WARRANTOR IS NOT LIABLE FOR INCIDENTAL OR CONSEQUENTIAL DAMAGES RESULTING FROM THE USE OF THIS PRODUCT OR ARISING OUT OF ANY BREACH OF THIS WARRANTY ALL EXPRESS AND IMPLIED WARRANTIES INCLUDING THE WARRANTY OF MERCHANTABILITY ARE LIMITED TO THE PERIOD OF THE LIMITED WARRANTY PARTS AND...

Page 40: ...d then reinsert the monitor unit s battery Turn the monitor unit on For your future reference We recommend keeping a record of the following information to assist with any repair under warranty Serial No Date of purchase found on the rear of the unit Name and address of dealer Attach your purchase receipt here Two Riverfront Plaza Newark NJ 07102 5490 Panasonic Corporation 2017 Printed in China PN...

Reviews: