background image

Basic Operating Instructions
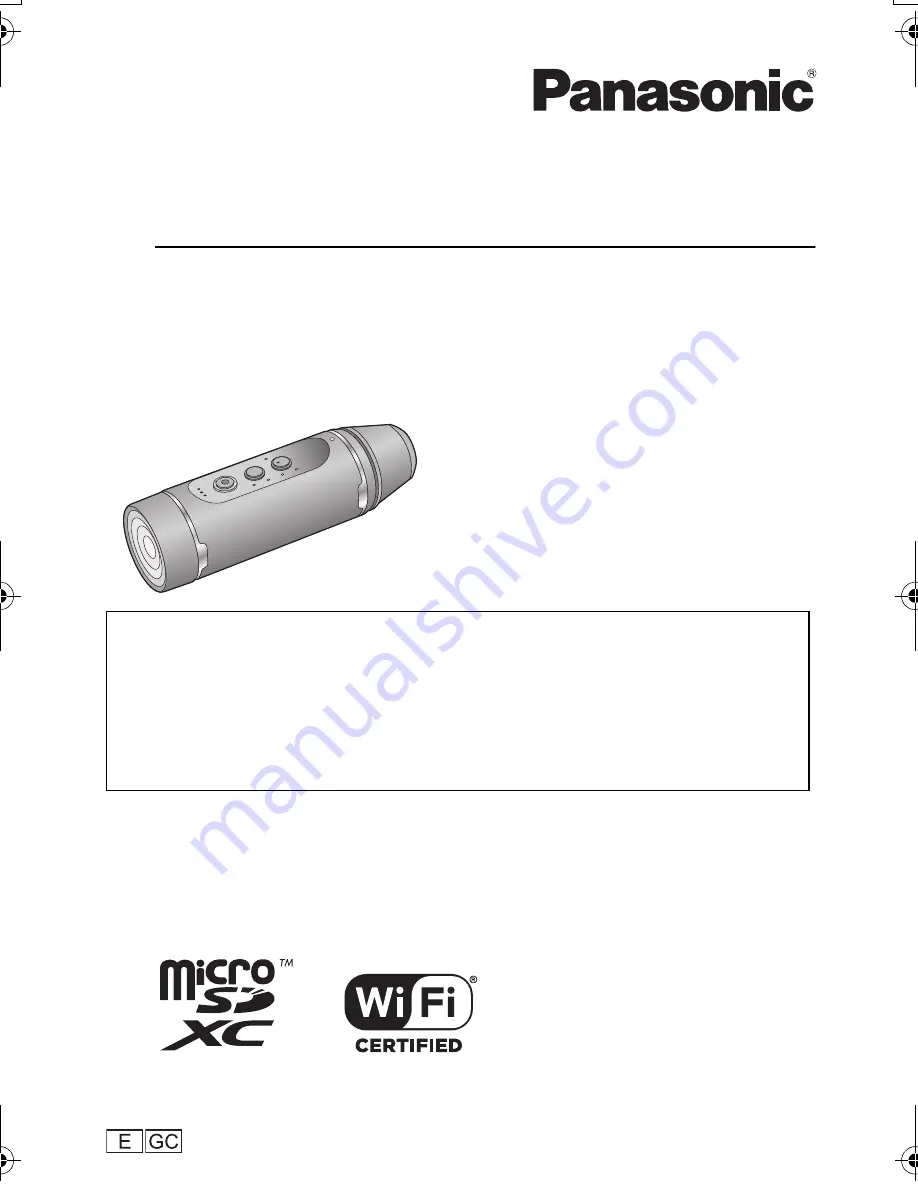
Wearable Camera

Model No.

HX-A1M

More detailed operating instructions are available in “Operating Instructions (PDF format)”. To 
read it, download it from the website.

https://eww.pavc.panasonic.co.jp/hdw/oi/A1/

Click the desired language.

* You will need Adobe Reader to browse or print the Operating Instructions (PDF format).

You can download and install a version of Adobe Reader that you can use with your OS from 
the following website. (As of March 2015)

http://www.adobe.com/products/acrobat/readstep2.html

SQT0886

until 

2015/4/20

Please read these instructions carefully before using 
this product, and save this manual for future use.

HX-A1M-SQT0886_mst.book  1 ページ  2015年4月6日 月曜日 午前9時46分

Summary of Contents for HX-A1M

Page 1: ...jp hdw oi A1 Click the desired language You will need Adobe Reader to browse or print the Operating Instructions PDF format You can download and install a version of Adobe Reader that you can use wit...

Page 2: ...rd near radio transmitters or high voltage lines the recorded pictures and or sound may be adversely affected About connecting to a PC Do not use any other USB cables except the supplied one Informati...

Page 3: ...s remove the card from this unit When storing this unit for an extended time it is recommended that you charge it once every year The battery discharges slowly even if this unit is not used The remain...

Page 4: ...ination with a chemical symbol In this case it complies with the requirement set by the Directive for the chemical involved For Singapore only For Thailand only For India only For Korea only This wire...

Page 5: ...n off 16 About overheat detection 16 About battery level indications 16 Wi Fi function 17 Install the Image App 18 Connecting to a smartphone 19 Setting up a Wi Fi connection to a smartphone 19 Settin...

Page 6: ...s are not waterproof Do not handle with a wet hand Also do not insert wet card into this unit Do not attach remove the terminal cover waterproof or glasscover when your hands are wet or water droplets...

Page 7: ...a warm room Please be careful as it may cause the lens to become soiled moldy or damaged When taking the unit to a place which has a different temperature if the unit is accustomed to the room temper...

Page 8: ...shallow container for about 10 minutes 2 Drain water by holding this unit and shaking it lightly a few times After using this unit at the seaside or underwater or after washing it water will remain at...

Page 9: ...g period of time The performance of the battery recording time operating time may decrease temporarily when using in a temperature between j10 oC and 0 oC cold places such as ski resorts or places at...

Page 10: ...mware version you are using captured screens described in these operating instructions may differ from the actual screens Names icons contents and services of applications may be changed with no prior...

Page 11: ...d Tripod Mount refer to page 21 4 These accessories come standard with the Multi Mount 5 This is attached to the Multi Mount at the time of purchase Preparation Accessories Glasscover night mode SFC03...

Page 12: ...omer Communications Centre For customers within the UK 0344 844 3899 For customers within lreland 01 289 8333 Monday Friday 9 00 am 5 00 pm Excluding public holidays For further support on your produc...

Page 13: ...an interval of 2 seconds approximately 1 second on 1 second off indicating that charging has begun It will turn off when the charging is completed When the charging is complete disconnect the USB cab...

Page 14: ...SB terminals of this unit or the connecting device such as PC are not dirty or covered with a foreign object and reconnect correctly If a foreign object or dirt is present turn off this unit before re...

Page 15: ...tion of the arrow to remove it Preparation Recording to a card For the latest information on the cards that have been confirmed to operate with this unit check the support website below http panasonic...

Page 16: ...nit rises during use warning beeps will be heard and the power lamp will flash fast This unit will then turn off automatically To use this unit again wait until it cools down This unit cannot be used...

Page 17: ...tions There is the risk that data sent and received via radio waves may be intercepted Please note that there is the risk that data sent and received via radio waves may be intercepted by a third part...

Page 18: ...nly When downloading the app on a mobile network high packet communication fees may be incurred depending on the details of your contract About the Image App The Image App is an application provided b...

Page 19: ...et up a Wi Fi connection between this unit and the smartphone 2 Start up the smartphone application Image App If a connection attempt to this unit fails turn off and on the Wi Fi function using the se...

Page 20: ...e setting will be stored for approximately 4 months The setting range from 1 January 2000 through 31 December 2039 is available for time synchronisation with the smartphone Initialising the network se...

Page 21: ...will not come in contact with a helmet shield etc 3 Pass the fastener that has a softer texture loop fastener through the Multi Mount so that the soft fabric side will face down Preparation Attaching...

Page 22: ...ing the tape unusable When attaching the Multi Mount check if the hook and loop fastener is fastened securely and the adhesion of the double sided tape has weakened Before attaching the Multi Mount re...

Page 23: ...ing nut A towards UNLOCK 3 Pass this unit through the adjustment belt C so that this unit is in the position shown in the figure 4 While holding the adjustment knob B tighten the adjustment belt C by...

Page 24: ...unit is fastened securely While holding the adjustment knob B loosen the tightening nut A by rotating it towards UNLOCK and pull out this unit Using a Tripod Mount The tripod mounting hole A of the tr...

Page 25: ...belt with hands Do not apply too much force Do not rotate the tightening nut more than necessary after fastening this unit Check the direction of this unit after attaching it To correct the left righ...

Page 26: ...f you tap the screen while recording the screen will be displayed again for approximately 30 seconds Also outputs sound from the microphone of this unit Still pictures will be recorded with a picture...

Page 27: ...stop While data is being recorded the access lamp will flash Do not remove the microSD card until the access lamp goes off In Still Picture Recording Mode Recording still pictures In Interval rec mod...

Page 28: ...nt to play back The playback screen will be displayed If you have tapped a still picture you can play back the previous or next picture by dragging swiping the screen left or right 4 For playing back...

Page 29: ...or a hall set the White Balance setting to Indoor 2 If you cannot record clearly with the Indoor 2 set it with Custom Recorded motion pictures flicker Horizontal lines appear in recorded images If yo...

Page 30: ...pins etc Do not heat in microwaves or ovens etc Do not charge use or leave in hot places such as next to fires or in extremely hot weather Do not put into water This may cause leaking overheating fire...

Page 31: ...el off the label on the terminal with a sharp object Use a cross slot screwdriver commercially available 3 Pull out the inner unit 4 Remove the five screws shown in the figure below and remove the fra...

Page 32: ...microSDHC card 4 GB 8 GB 16 GB 32 GB microSDXC card 48 GB 64 GB 128 GB Image sensor 1 3 type 1 3z 1MOS image sensor Total Approx 3540 K Effective pixels Motion picture Approx 2870 K 16 9 Still picture...

Page 33: ...names of systems and products mentioned in these instructions are usually the registered trademarks or trademarks of the manufacturers who developed the system or product concerned This product is lic...

Page 34: ...t is connected to a computer within the applicable operating procedures for this product For at least three 3 years from delivery of this product Panasonic will give to any third party who contacts us...

Page 35: ...o below and use the Service Centre Locator for the name address of the nearest Authorised Service Centre Send or take the product to a Panasonic Authorised Service Centre together with your proof of p...

Page 36: ...www panasonic com Panasonic Corporation 2015 Manufactured by Panasonic Corporation Kadoma Osaka Japan Importer for Europe Panasonic Marketing Europe GmbH Panasonic Testing Centre Winsbergring 15 22525...

Reviews: