
Service Manual
Philips Consumer Lifestyle
Published by Philips Consumer Lifestyle
Printed in the Netherlands
© Copyright reserved
Subject to modification
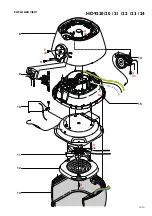
Air Fryer
HD9220/20
HD9220/21
HD9220/22
HD9220/23
HD9220/24
12/10
PRODUCT INFORMATION
Safety info
-
This product meets the requirements regarding
interference suppression on radio and TV.
-
After the product has been repaired, it should function
properly and has to meet the safety requirements as
officially laid down at this moment.
-
SAP coding : HD9220/20
HD9220/21
HD9220/22
HD9220/23
HD9220/24
OPTIONAL (accessories)
-
Baking dish 4222 459 52761
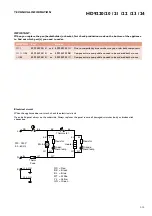
TECHNICAL INFORMATION
-
Product dimensions (W x H x D) : 287 x 315 x 384 mm
-
Cord length
: 0.8 meter
-
Materials : Outer skin
: Plastic (PP)
: Pan
: Aluminized steel
: Basket
: Aluminized steel
: Basket mesh
: Stainless steel
: Coating
: PTFE coating
-
Capacity
: 2.2 liter
(till max indicator)
-
Weight
: 7.0 kg
-
Coloursetting
: Black
-
Temperature
: 80 till 200 °C
-
Fuse cut-off temp. Motor
: 145 °C
TCO
: 190 °C
Voltage
Frequency
Power
consumption
WEU, EEU, SEU, Nordic,TR
220 - 240 V
50 Hz
1425 W
UK, DB, SGP, HK, MY, IN, TH, AU, NZ, ZA
220 - 240 V
50 Hz
1425 W
AR
220 V
50 Hz
1425 W
CN
220 V
50 Hz
1300 W
TW
110 V
60 Hz
1425 W
SA, KR
220 V
60 Hz
1425 W


