background image

POS Cradle (Model No. FZ-VEBG12 series)

(014_16)

Names and Functions of Parts

Connecting/Disconnecting the Computer

Adjusting the angle

Using powered serial device

Names and Functions of Parts

The cradle allows your peripheral devices to function exactly as if they were connected directly to the computer. (Refer to “Description of Parts” in the
“Operating Instructions” accompanying the computer.)

C A U T I O N

n

Do not touch the expansion bus connector or pins of the cradle.

n

Turn off the computer when disconnecting the devices.
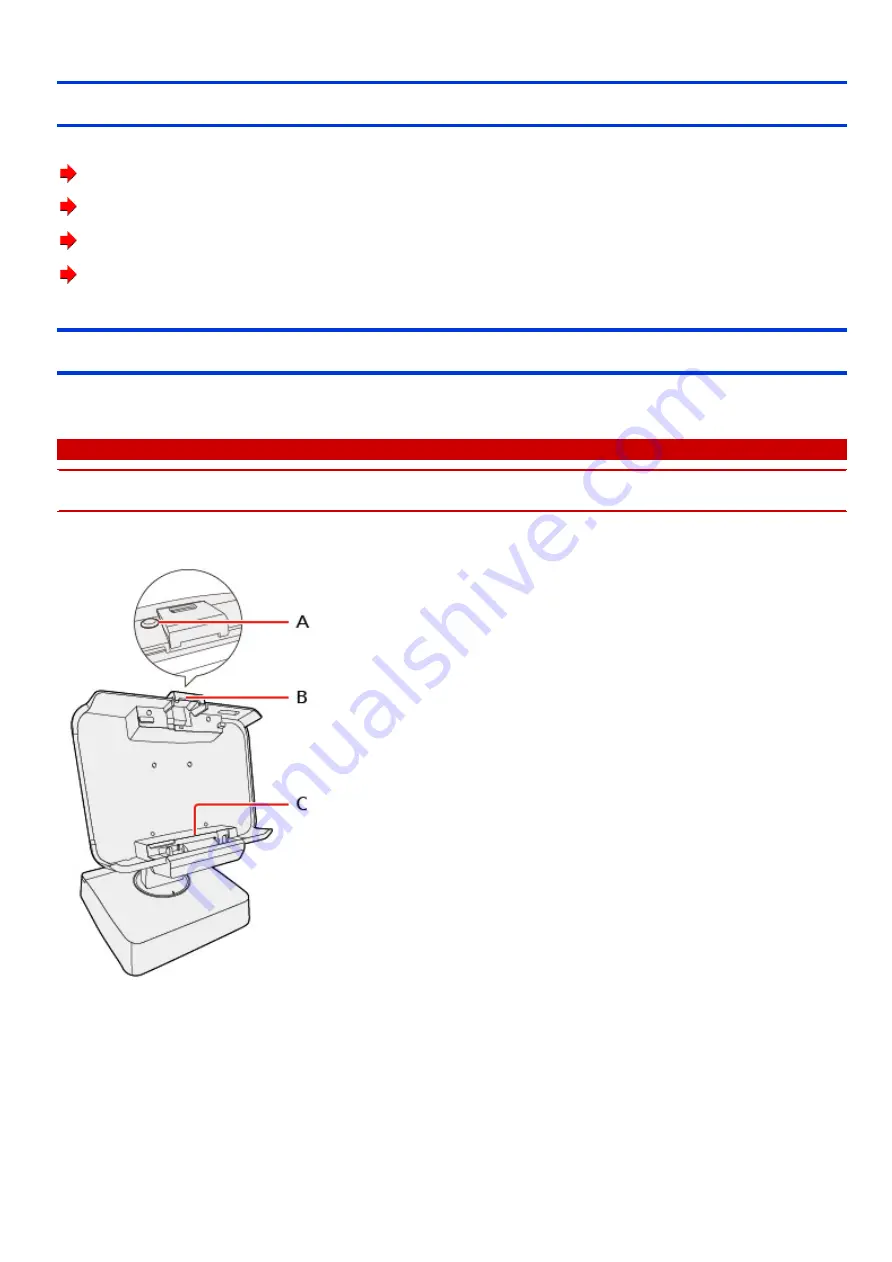
<Front>

A.

Latch lock keyhole

With the Latch lock key, you can lock the latch.

B.

Latch

C.

Expansion Bus Connector

This connects to the expansion bus connector on the bottom of the computer.

<Rear>

Summary of Contents for FZ-VEBG12 Series

Page 1: ...f they were connected directly to the computer Refer to Description of Parts in the Operating Instructions accompanying the computer C A U T I O N n Do not touch the expansion bus connector or pins of the cradle n Turn off the computer when disconnecting the devices Front A Latch lock keyhole With the Latch lock key you can lock the latch B Latch C Expansion Bus Connector This connects to the expa...

Page 2: ...utput differ according to the specifications of the device connected For details refer to the specifications of the device connected G VGA Port H LAN Port I USB 3 0 Port x 2 J USB 2 0 Port x 2 K Serial Port A L Serial Port B It does not support serialmouse By changing the settings you can connect the serialdevices that require power supply M Powered USB Port 12 V N Powered USB Port 24 V O Power Sw...

Page 3: ...ernation mode Connecting 1 Turn off the computer 2 Connect the AC cord to AC IN jack of the cradle Connect the AC cord into an AC outlet 3 Turn on the cradle Switch the power switch 4 Connect the computer to the cradle 1 Lift up the latch if locked Move the latch upwards while pressing latch lock button 2 Insert the computer to the cradle from above 3 Push the computer to the back 4 Lock the latch...

Page 4: ...ected to the cradle has stopped remove the computer from the cradle and then reconnect it C A U T I O N n Firmly lock the latch as shown in the illustration n Do not disconnect when the computer is communicating with the cradle and other devices n When connecting USB devices HDMI compatible display headset or headphones to the computer connected to the cradle make sure that the computer does not c...

Page 5: ...t the computer 1 Move the latch upwards while pressing latch lock button 2 Pullthe computer to the front 3 Hold and lift up the computer Adjusting the angle C A U T I O N n Keep hands and fingers away from all moving parts when adjusting screen angle ...

Page 6: ...tention Customers Don t open the jumper switch cover by yourself The settings must be changed by qualified professionals When using powered serialdevices be sure to contact qualified professionals n Attention Qualified professionals Correctly perform the procedure in accordance below After setting change we recommend that you marking To use powered serialdevices perform the procedure below 1 Turn ...

Page 7: ...ngs 12V Compatible for 12V devices 5V Compatible for 5V devices RI Not support power supply Default setting 5 Close the Jumper switch cover C A U T I O N n When using a 12V or 5V mode do not connect serial devices that aren t requiring power supply Doing so may cause mal function of the devices ...

Page 8: ......

Page 9: ...ur Consultez la sec tion Description des pièces dans les Instructions d utilisation quiaccompagnent l ordinateur A T T E N T I O N n Ne touchez pas le connecteur de bus d extension ni les broches de la station d accueil n Éteignez l ordinateur lorsque vous débranchez les dispositifs Avant A Trou de verrouillage de la fermeture Ilest possible de verrouiller la fermeture avec le bouton de verrouilla...

Page 10: ...t être produite diffèrent en fonction des spécifications du périphérique connecté Pour plus de détails consultez les spécifications du périphérique connecté G Port pour VGA H Port LAN I Port USB 3 0 x 2 J Port USB 2 0 x 2 K Port Serial A L Port Serial B Ne prend pas en charge une souris série En modifiant les paramètres vous pouvez connecter les périphériques série quinécessitent une alimentation ...

Page 11: ...gée Connecion 1 Mettez l ordinateur hors tension 2 Connectez le cordon secteur fourni au connecteur AC IN Connectez le cordon secteur à une sortie 3 Tourner sur le station d accueil Mettez l interrupteur d alimentation 4 Connectez l ordinateur en station d accueil 1 Soulevez la fermeture sielle est fermée 2 Insérez l ordinateur en station d accueilen un mouvement de haut en bas 3 Poussez l ordinat...

Page 12: ...aît plus retirez l ordinateur du station d accueil puis raccordez le à nou veau A T T E N T I O N n Bloquez fermement la fermeture comme illustré n Ne débranchez pas lorsque l ordinateur est en communication avec la station d accueil et d autres dispositifs n Lorsque vous connectez des périphériques USB un affichage compatible HDMI un casque micro ou des casques à l ordinateur rac cordé au station...

Page 13: ...la fermeture vers le haut en appuyant sur le bouton de verrouillage de la fermeture 2 Tirez l ordinateur vers l avant 3 Maintenez et soulevez l ordinateur Réglage de l angle A T T E N T I O N n Éloignez les mains et les doigts des parties mobiles lorsque vous réglez l angle d affichage ...

Page 14: ...s clients Ne pas ouvrir le couvercle du cavalier par vous même Les paramètres doivent être modifiés par des professionnels qualifiés Lors de l utilisation des appareils de série à moteur assurez vous de communiquer avec des professionnels qualifiés n Mise en garde pour les professionnels qualifiés Effectuer correctement la procédure conformément ci dessous Après la modification des réglages nous v...

Page 15: ...ls 12V 5V Compatible pour les appareils 5V RI Non en charge l alimentation réglage par défaut 5 Fermez le couvercle du cavalier C A U T I O N n Lorsque vous utilisez un mode 12V ou 5V ne pas connecter des périphériques série qui ne sont pas nécessitant une ali mentation électrique Cela peut entraîner un dysfonctionnement des dispositifs ...

Page 16: ......

Reviews: