background image

Operating Instructions

(Household use) 

AC/Rechargeable Beard/Hair Trimmer

Model No.

 ER-GB62

Thank you for purchasing this Panasonic product.

Before operating this unit, please read these instructions completely and save them for future use.

Safety precautions........................... 2

Intended use ............................................... 6

Parts identification

 ..................................... 7

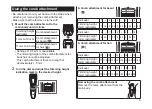
Charging the trimmer ................................. 7
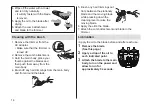
Using the trimmer ....................................... 8
Using the comb attachment ...................... 9
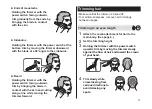
Trimming beard......................................... 10
Trimming hair ............................................ 11
Trimming body hair .................................. 13

Cleaning the trimmer................................ 13
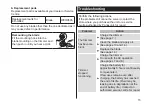
Troubleshooting ....................................... 15
Frequently asked questions .................... 16
Blade life.................................................... 16
Battery life ................................................. 17
Removing the built-in rechargeable 

battery........................................................ 17

Specifications

 ........................................... 18

Contents

Summary of Contents for ER-GB62

Page 1: ...pletely and save them for future use Safety precautions 2 Intended use 6 Parts identification 7 Charging the trimmer 7 Using the trimmer 8 Using the comb attachment 9 Trimming beard 10 Trimming hair 11 Trimming body hair 13 Cleaning the trimmer 13 Troubleshooting 15 Frequently asked questions 16 Blade life 16 Battery life 17 Removing the built in rechargeable battery 17 Specifications 18 Contents ...

Page 2: ...e followed in order to operate the unit safely WARNING Do not connect or disconnect the adaptor to a household outlet with a wet hand Doing so may cause electric shock or injury Never use the appliance if the AC adaptor is damaged or if the power plug fits loosely in a household outlet Do not damage or modify or forcefully bend pull or twist the cord Also do not place anything heavy on or pinch th...

Page 3: ... remove the AC adaptor if there is an abnormality or malfunction Failure to do so may cause fire electric shock or injury Abnormality or malfunction cases The main body or AC adaptor is deformed or abnormally hot The main body or AC adaptor smells of burning There is abnormal sound during use or charging of the main body or AC adaptor Immediately request inspection or repair at an authorized servi...

Page 4: ...e an accident or injury CAUTION Do not press the blade against the skin Do not use this product for any purpose other than trimming beard hair and body hair Do not directly apply the blades on ears or rough skin such as swellings injuries or blemishes Doing so may cause skin injury Do not allow pins or trash to adhere to the power plug or the appliance plug Doing so may cause electric shock or fir...

Page 5: ...njury CAUTION Disconnect the adaptor or the appliance plug by holding onto the adaptor or the appliance plug instead of the cord Failure to do so may cause electric shock or injury Handling of the removed battery when disposing DANGER The rechargeable battery is exclusively for use with this appliance Do not use the battery with other products Do not charge the battery after it has been removed fr...

Page 6: ... to do so may cause hair to be cut too short Apply the oil to the blade before and after each use See page 14 Failure to apply the oil may cause the following problems The blade has become blunt Shorter operating time Louder sound The trimmer may become warm during operation and or charging This is normal Clean the housing only with a soft cloth slightly dampened with tap water or soapy tap water ...

Page 7: ...t the appliance plug to the appliance socket 2 Plug in the adaptor into a household outlet Check that the charge status lamp glows Charging is completed after approx 1 hour 3 Disconnect the adaptor when the charge status lamp stops glowing Notes Recommended ambient temperature for charging is 0 C 35 C Battery performance may decrease outside of the recommended temperature A full charge supplies en...

Page 8: ...nds strongly on factors such as how it is used and stored AC operation If you connect the AC adaptor to the trimmer in the same way as for charging and turn on the power you can use it If the remaining battery is too low the blades may move slowly or stop even with the AC operation In this case charge the battery for 1 minute or more The battery will be discharged even with the AC operation Using ...

Page 9: ...b attachment from the main body Using the comb attachment Be careful not to cut your hand with the blade when attaching or removing the comb attachment Make sure that the trimmer is turned off 1 Mount the comb attachment to the main body until it clicks Trimming height estimate Comb attachment 1 mm to 10 mm Comb attachment for beard 11 mm to 20 mm Comb attachment for hair Setting of 10 5 mm is una...

Page 10: ...immer against the flow of the beard Hair trimmings may collect inside the attachment when a large volume of beard is cut so discard hair trimmings after each use Trimming without the comb attachment trimming the downy hair 1 Remove the comb attachment 2 Holding the trimmer with the power switch facing outwards trim by bringing the blade in contact with the skin The trimmer cannot trim hair to leng...

Page 11: ...im by bringing the blade in contact with the skin and cutting along a line while moving the trimmer forward Trimming hair Make sure that the trimmer is turned off To maintain sharpness remove hair trimmings between usages Trimming to an even length 1 Attach the comb attachment for hair to the main body See page 9 2 Set the trimming height 3 Holding the trimmer with the power switch upward trim by ...

Page 12: ... trimming the entire area to 12 mm use 9 mm as a rough standard trimming height for the neckline When trimming the entire area to 9 mm use 6 mm as a rough standard trimming height for the neckline Trimming the downy hair around the neckline 1 Remove the comb attachment 90 2 Holding the trimmer with the power switch at the bottom touching the blade perpendicular to the area of downy hair and move t...

Page 13: ...not be achieved if hair is too long In this case trim the hair to a length of about 10 mm before using the trimmer Cleaning the trimmer It is recommended to clean after every use 1 Remove the trimmer from the AC adaptor To remove light dirt To remove heavy dirt 2 Remove the comb attachment and turn the trimmer on 3 Run water down the water inlet at the front of the main body rinse thoroughly for a...

Page 14: ... then push them away from the main body 4 Brush off any hair trimmings from the main body and from around the blade 5 Brush any hair trimmings out from between the stationary blade and the moving blade while pressing down the cleaning lever to raise the moving blade 6 Apply the oil to the blade 7 Attach the comb attachment and blade to the trimmer Lubrication Apply the oil to the blade before and ...

Page 15: ...e pages 7 and 8 Charge the battery for approximately 8 hours continuously to rejuvenate it If few uses remain even after charging the battery has reached the end of its life Fluid may be leaking due to degradation at the end of battery life Contact an authorized service centre for repair Replacement parts Replacement part is available at your dealer or Service Centre Replacement parts for ER GB62 ...

Page 16: ...the blade life is approximately 3 years when using the trimmer for 5 minutes 10 times a month Replace the blades if cutting efficiency reduces substantially despite proper maintenance Problem Action The trimmer cannot be charged Push the appliance plug into the main body all the way and make sure the charge status lamp glows Charge within the recommended charging temperature of 0 C to 35 C Trimmer...

Page 17: ... only be used when disposing of the trimmer and must not be used to repair it If you dismantle the trimmer yourself it will no longer be waterproof which may cause it to malfunction Remove the trimmer from the AC adaptor Press the power switch to turn on the power and then keep the power on until the battery is completely discharged Perform steps 1 to q and lift the battery and then remove it Take...

Page 18: ...18 Specifications Power source See the name plate on the AC adaptor Motor voltage 1 2 V Charging time Approx 1 hour This product is intended for household use only ...

Page 19: ...19 MEMO ...

Page 20: ...Panasonic Corporation https www panasonic com Panasonic Corporation 2022 Y EN Printed in China ER9700GB621541 S0522 0 ...

Reviews: