© Panasonic Corporation 2012 Unauthorized copy-
ing and distribution is a violation of law.
Order Number PEWT1207A36CE
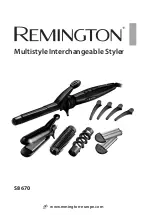
Compact Multi Straightener
Model No.
EH-HW17
Asia
TABLE OF CONTENTS
PAGE
PAGE
1 Warning
--------------------------------------------------------------
2 Specifications
-----------------------------------------------------
3 Troubleshooting Guide
-----------------------------------------
4 Disassembly and Assembly Instructions
----------------
4.1. Disassembly Instructions -------------------------------- 4
4.2. Assembly Instructions ------------------------------------ 6
5 Wiring Connection Diagram
----------------------------------
6 Schematic Diagram
----------------------------------------------
7 Exploded View and Replacement Parts List
------------
7.1. Exploded View --------------------------------------------- 9
7.2. Replacement Parts List ---------------------------------10