background image

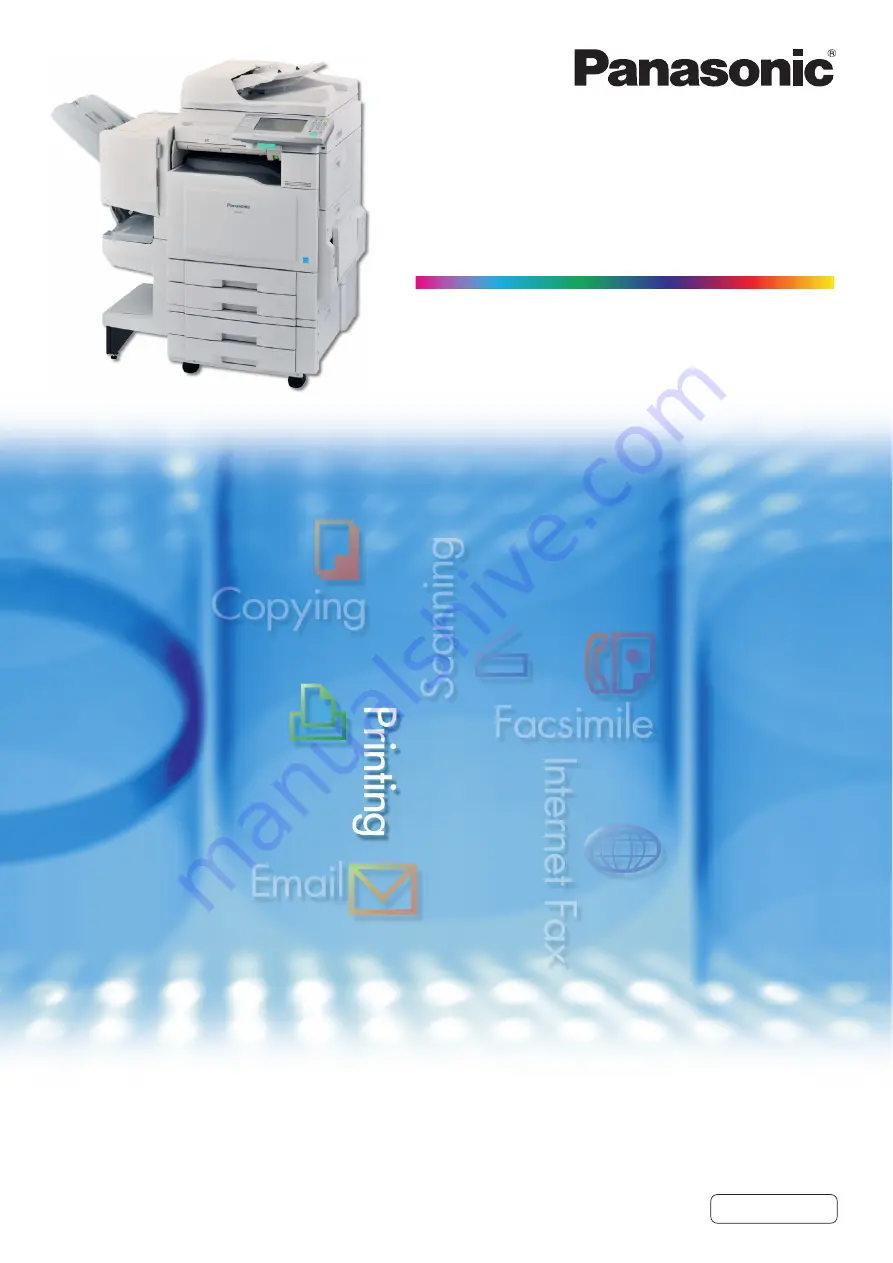
Digital Color Imaging Systems

Operating Instructions

Before operating this machine, please carefully read this manual
and keep this documentation in a safe place for future reference.
(Illustration shows optional accessories that may not be installed on your machine.)

English

(For Printer)

Model No. 

DP-C406 / C306 / C266

Summary of Contents for C266

Page 1: ...efore operating this machine please carefully read this manual and keep this documentation in a safe place for future reference Illustration shows optional accessories that may not be installed on your machine English For Printer Model No DP C406 C306 C266 ...

Page 2: ...uide For Administrator Describes how to set up the machine Setup Guide For User Describes how to install the printer driver and application software to client PC Copy Function Describes how to make a Color Copy with creative features Facsimile and Internet Fax Function The Facsimile function is available when the optional G3 Fax Communication Board is installed Describes how to send receive a Facs...

Page 3: ...nual Icon Description Indicates important information that must be read in detail Indicates reference information Notation Description For Keys and Buttons Hard buttons on the Control Panel are depicted as key and soft buttons on the Touch Panel Display are depicted as xxx Ex Press the Start key and select More Menus ...

Page 4: ...f Line 22 Canceling the Current Print Job Cancel Print 23 Confirming the Print Jobs in the Output Queue Output Queue 24 Chapter 2 SD Print Settings Selecting the Color Mode Color Mode 26 Quality Adjusting Quality Adj 27 Contrast Contrast 29 Brightness Brightness 30 Saturation Saturation 31 Tint Tint 32 Color Balance Color Balance 33 Sort Mode Sort Setting 34 Selecting the Frame Size for Individual...

Page 5: ...ting Operation Failure 46 Documents Not Printing Correctly 46 Error Messages 47 Checking Error Messages 47 Chapter 4 Appendix Combined Print Functions 48 File List Tab 48 Thumbnail Individual and Thumbnail Index Print Tabs 49 Specifications 50 PCL Printer Unit 50 ...

Page 6: ...iver to your PC refer to Installing the Printer Driver and Application Software in the Operating Instructions For User Setup of provided CD ROM zThe illustrations shown for the following steps are of WordPad on Windows XP The procedures for other applications and Windows operating systems are basically the same even though the screen displays may differ 1 Select Print from the File menu 2 Select t...

Page 7: ...7 Chapter 1 Print Operations 5 Click Print zWhen the desired size of paper is not set in the Paper Tray use the Sheet Bypass ...

Page 8: ...t for Exchangeable Image File a standard format used for storing interchange information in digital photography image files using JPEG compression Ex Dimensions Date Picture Taken Camera Model File Type Size SD Memory Card For printing pictures taken by a digital camera etc see page 11 Photo Images SD Memory Card Ex Digital Camera Individual Print Index Print Selecting thumbnails of files from the...

Page 9: ... time in the File List tab For more details refer to step 5 of Printing from USB Flash Memory see page 14 USB Flash Memory For printing files copied to the USB Flash Memory from PC see page 14 Internal Hard Disk Drive Mailbox For printing files saved in the machine from PC on the network see pages 16 and 17 PC USB Flash Memory Internal Hard Disk Drive Mailbox ...

Page 10: ... to 16 Mailbox Select when printing or deleting data saved in Mailbox see pages 17 to 21 Job Control Select when turning the printer on line or off line canceling the current print job or managing print data in the Output Queue see pages 22 to 24 zYou can confirm the progress information while printing in the message area of the Touch Panel Display by setting the Function Parameter 27 PC Print Pag...

Page 11: ...nting text graphic files in the PDF format zSome TIFF and PDF files cannot be printed directly from the SD Memory Card depending on the type of format zWhen the printing result differs from the actual photograph image set the Function Parameter 30 SD Print Settings 03 Auto Contrast Printer Settings General User Mode to On the initial setting of this function is On The machine will automatically ad...

Page 12: ...of Printing from USB Flash Memory see page 14 zThe default directory can be set to display either DCIM a folder for digital camera images or Scan Img by changing the setting of the Function Parameter 30 SD Print Settings 01 SD USB Memory Def Dir Printer Settings General User Mode For more details on this setting refer to Printer Settings in the Operating Instructions For Function Parameters of pro...

Page 13: ...y Selects the Paper Tray and Output Tray 7 Select Start 8 Push the SD Memory Card and then remove it zDo not remove the SD Memory Card while the Access Indicator is flashing 9 Close the Slot Cover zWhen re inserting the SD Memory Card into the slot pull it out completely once and then insert the card again zWhen canceling the operation press the Reset key on the Control Panel ...

Page 14: ... Parameter 70 SD USB Memory Function General Settings Key Operator Mode is set to No For more details on this setting refer to General Settings in the Operating Instructions For Function Parameters of provided CD ROM 1 Press the Print key if the machine is set to other function mode 2 Select SD Print 3 Connect the USB Flash Memory 4 Select File List 5 Press the button to display the USB Flash Memo...

Page 15: ... 41 Preset Jobs see page 42 Paper Output Tray Selects the Paper Tray and Output Tray 2 Sided Prints in the 2 Sided mode 7 Select Start 8 Remove the USB Flash Memory zDo not remove the USB Flash Memory while the Access Indicator is flashing 9 Close the Slot Cover zWhen canceling the operation press the Reset key on the Control Panel ...

Page 16: ... 2 Select SD Print 3 Select File List and then select an Image Box in the Hard Drive zWhen the SD Memory Card or USB Flash Memory has been inserted press the button to display the Hard Drive folder zOnly one Image Box can be selected at a time 4 Select the desired data zOnly one file can be selected at a time from the Image Box 5 Enter the desired number of prints 6 Select Start zWhen canceling th...

Page 17: ...ts zFor instructions on how to save printing data to Mailbox refer to Print Operation for Printer in the Document Management System Printer Driver of provided CD ROM 1 Press the Print key if the machine is set to other function mode 2 Select Mailbox 3 Enter the mailbox User ID up to 8 digits and then select OK zWhen print data is saved in only one of the mailboxes Check then Print Mailbox or Secur...

Page 18: ...All button zWhen the Function Parameter 16 Mailbox Print Qty Printer Settings Key Operator Mode is set to Yes the screen confirming the number of copies is displayed Enter the desired number and then select OK For more details refer to Printer Settings in the Operating Instructions For Function Parameters of provided CD ROM Check then Print Prints one proof set before printing multiple sets The do...

Page 19: ... more details refer to the Document Management System Printer Driver of provided CD ROM zWhen the Function Parameter 17 Secure MB Print Qty Printer Settings Key Operator Mode is set to Yes the screen confirming the number of copies is displayed Enter the desired number and select OK For more details refer to Printer Settings in the Operating Instructions For Function Parameters of provided CD ROM ...

Page 20: ...nly one of the mailboxes Check then Print Mailbox or Secure Mailbox the mailbox is opened In this case go to step 5 4 Select the desired mailbox 5 Select the desired data and then select Delete When Check then Print is selected zOnly one file can be selected at a time When Mailbox is selected zAll files can be selected at a time with the Select All button When Secure Mailbox is selected zOnly one ...

Page 21: ...s and then select OK zWhen saving print data in the Secure Mailbox of the machine set the password in more than 8 digits the machine does not accept the data with the password in less than 8 digits For more details refer to the Document Management System Printer Driver of provided CD ROM 6 Select Yes or No ...

Page 22: ...inter off line Cancel Print button Stops the current print job and deletes the job from the output queue Output Queue button Displays the current print jobs Turning the Printer On Line and Off Line You can turn the printer on line and off line from the Control Panel 1 Press the Print key if the machine is set to other function mode 2 Select Job Control 3 Select Off Line or On Line ...

Page 23: ...Current Print Job You can stop the current print job and delete the data from the output queue from the Control Panel 1 Press the Print key if the machine is set to other function mode 2 Select Job Control 3 Select Cancel Print 4 Select Yes or No ...

Page 24: ... Print key if the machine is set to other function mode 2 Select Job Control 3 Select Output Queue 4 Select Print 5 Enter the password 4 digits and then select OK 6 Select the desired print job and manage the job zYou can select all files at a time with the Select All button 7 Select Close Delete Deletes the selected data from the Output Queue Priority Sets the printing order of the selected print...

Page 25: ...25 Chapter 1 Print Operations Memo ...

Page 26: ... default settings under the following conditions If the Reset key is pressed If Auto Reset Time interval has lapsed default 1 min If the power is turned OFF 1 Select More Settings zTo display More Settings refer to steps 1 to 6 of Printing from SD Memory Card see page 11 or steps 1 to 6 of Printing from USB Flash Memory see page 14 2 Select Color Mode Ex When More Settings is selected in Thumbnail...

Page 27: ...arameters of provided CD ROM zUnder the following situations the Quality settings return to the standard settings If the Reset key is pressed If Auto Reset Time interval has lapsed default 1 min If the power is turned OFF 1 Select More Settings zTo display More Settings refer to steps 1 to 6 of Printing from SD Memory Card see page 11 or steps 1 to 6 of Printing from USB Flash Memory see page 14 2...

Page 28: ...28 Chapter 2 SD Print Settings 4 Select Close zFor the following procedure refer to steps 7 to 9 of Printing from SD Memory Card see page 13 or steps 7 to 9 of Printing from USB Flash Memory see page 15 ...

Page 29: ...or Higher and then select OK zThe screen will return to step 1 Select OK and then proceed to step 4 of Quality Adjusting see page 28 Higher Lower Lower Each time it is selected the contrast level decreases by 1 grade lower The distinction between brightness and darkness is reduced Higher Each time it is selected the contrast level increases by 1 grade higher The distinction between brightness and ...

Page 30: ...lity Adjusting see page 27 2 Adjust the brightness with Lower or Higher and then select OK zThe screen will return to step 1 Select OK and then proceed to step 4 of Quality Adjusting see page 28 Higher Lower Lower Each time it is selected the brightness level decreases by 1 grade lower Higher Each time it is selected the brightness level increases by 1 grade higher ...

Page 31: ...just the saturation with Lower or Higher and then select OK zThe screen will return to step 1 Select OK and then proceed to step 4 of Quality Adjusting see page 28 Higher Lower Lower Each time it is selected the saturation level decreases by 1 grade lower reducing the color saturation Higher Each time it is selected the saturation level increases by 1 grade higher increasing the color saturation ...

Page 32: ...More Blue and then select OK zThe screen will return to step 1 Select OK and then proceed to step 4 of Quality Adjusting see page 28 Reddish color accentuated Bluish color accentuated More Red Each time it is selected the level of reddish color increases by 1 grade The bluish color level decreases by 1 grade More Blue Each time it is selected the level of bluish color increases by 1 grade The redd...

Page 33: ...ity level is very narrow 1 Select Color Balance zTo display this screen refer to steps 1 and 2 of Quality Adjusting see page 27 2 Select Cyan and then adjust Darker Areas Medium Areas and Lighter Areas with or zThe density range from the darkest level 100 to the lightest level 0 is equally divided into three range areas 3 Select remaining colors and then adjust the Color Balance as shown in step 2...

Page 34: ...n alternate direction rotation of 90 degrees zThe default setting of Sort can be changed with the Function Parameter 30 SD Print Settings 11 Sort Priority Printer Settings General User Mode Refer to Printer Settings in the Operating Instructions For Function Parameters of provided CD ROM 1 Select More Settings zTo display More Settings refer to steps 1 to 6 of Printing from SD Memory Card see page...

Page 35: ...then select OK When the optional Finisher is not installed When the optional Finisher is installed 4 Select Close zFor the following procedure refer to steps 7 to 9 of Printing from SD Memory Card see page 13 or steps 7 to 9 of Printing from USB Flash Memory see page 15 ...

Page 36: ...the printed image size 1 Select More Settings zTo display this screen select the Thumbnail Individual tab in step 4 of Printing from SD Memory Card see page 12 2 Select Frame Settings 3 Select the orientation of the printed paper zThe default setting of Orientation can be changed with the Function Parameter 30 SD Print Settings 12 Individual Orientation Refer to Printer Settings in the Operating I...

Page 37: ...e Operating Instructions For Function Parameters of provided CD ROM 6 Select the desired Paper Tray and then select OK 7 Select Close zFor the following procedure refer to steps 7 to 9 of Printing from SD Memory Card see page 13 Select to set the horizontal and vertical frame size in the same ratio Select to set the horizontal frame size Select to set the vertical frame size 4 x 6 Horizontal 6 Ver...

Page 38: ...ings 14 Index Style Printer Settings General User Mode Refer to Printer Settings in the Operating Instructions For Function Parameters of provided CD ROM 1 Select More Settings zTo display this screen select the Thumbnail Index Print tab in step 4 of Printing from SD Memory Card see page 12 2 Select Index Settings 3 Select the desired print layout 4 Select whether to print numbers and then select ...

Page 39: ... not available when an image is selected in the File List tab 1 Select More Settings zTo display More Settings refer to steps 1 to 6 of Printing from SD Memory Card see page 11 2 Select Mirror and then select Close Ex When More Settings is selected in Thumbnail Index Print tab zFor the following procedure refer to steps 7 to 9 of Printing from SD Memory Card see page 13 ...

Page 40: ...gs General User Mode Refer to Printer Settings in the Operating Instructions For Function Parameters of provided CD ROM zSpecial papers such as cardboard cannot be used for the 2 Sided print 1 Select More Settings zTo display More Settings refer to steps 1 to 6 of Printing from SD Memory Card see page 11 2 Select 2 Sided Ex When More Settings is selected in Thumbnail Index Print tab 3 Select the b...

Page 41: ...an image is selected in the Thumbnail Individual tab 1 Select More Settings zTo display this screen select the Thumbnail Individual tab in step 4 of Printing from SD Memory Card see page 12 2 Select 1 to N 3 Select the desired number for image repeat and then select OK 4 Select Close zFor the following procedure refer to steps 7 to 9 of Printing from SD Memory Card see page 13 ...

Page 42: ...emory see page 44 1 Press the Print key if the machine is set to other function mode 2 Select SD Print 3 Insert the SD Memory Card or connect the USB Flash Memory zFor details on how to insert the SD Memory Card refer to step 2 of Printing from SD Memory Card see page 11 zFor details on how to connect the USB Flash Memory refer to step 3 of Printing from USB Flash Memory see page 14 4 Select the p...

Page 43: ...s can be entered zFor instructions on how to enter characters refer to Using the Keyboard in the Operating Instructions For Function Parameters of provided CD ROM zAfter completing the editing of the job name press the Reset key to return to the initial screen of the currently active mode ...

Page 44: ... Card see page 11 zFor details on how to connect the USB Flash Memory refer to step 3 of Printing from USB Flash Memory see page 14 4 Select the desired data 5 Select Preset Jobs 6 Select the desired preset job zJob buttons without names indicate that jobs have not been registered zIf the Confirmation screen is displayed select Close 7 To confirm the job settings select Confirm Settings and then s...

Page 45: ...s select Reset All zTo register the settings to Preset Job buttons select Preset Jobs For details refer to steps 7 to 8 of Storing a Job in Memory see page 42 zTo edit the settings select the button of the setting that you want to edit For details on each setting screen refer to the corresponding section see pages 26 to 41 Ex Changing the Sort mode to the Non Sort mode when optional Finisher is in...

Page 46: ...d on the device Symptom Possible Causes Solutions Refer to Incorrect printing position or print is missing at the edge The specified paper is not loaded in the machine Check the settings again or load the appropriate paper Operating Instructions For Maintenance The document margin is not sufficient Printing stops in the middle of run Check that papers are loaded properly in the paper tray of the d...

Page 47: ...he messages displayed on the Status column and then select Close Error Messages Possible Causes Solutions Print Parameter Error 001 The Duplex Unit does not function properly Contact to the Panasonic Authorized Dealer to maintain your machine Print Parameter Error 101 Paper size unable to print in 2 Sided is selected Duplex printing is not possible from the tray set with A5 in Landscape format Pri...

Page 48: ...ected 5 The Sort setting is automatically changed to Sort even if Rotate Sort has been initially selected 6 The Sort setting is automatically changed to Non Sort even if Rotate Group has been initially selected 7 When Black has been selected in Color Mode this function is invalid even if it is selected 8 When Black has been selected in Color Mode the settings of Cyan Magenta and Yellow are invalid...

Page 49: ...e Frame Settings Index Settings Mirror 2 Sided 1 to N Inner A A 1 A 1 Outer A A 2 A 2 Sort A A A A A Non Sort A A A A A Shift Sort A 3 A A A A A Shift Group A 4 A A A A A Rotate Sort A 5 A A A A A Rotate Group A 6 A A A A A Tint 7 Brightness Saturation 7 Color Balance 8 Contrast Color Mode 7 7 8 Frame Settings A A Index Settings A A Mirror A 2 Sided A 1 to N x A Newly Set Functions Initially Set F...

Page 50: ...notice Panasonic Communications Co Ltd reserves the right to make improvements in the product design without reservation and without notice Printing Speed Plain paper from Paper Tray 1 Color Up to 30 sheets minute DP C406 C306 Up to 26 sheets minute DP C266 B W Up to 40 sheets minute DP C406 Up to 30 sheets minute DP C306 Up to 26 sheets minute DP C266 Resolution dots per inch Max 1200 x 1200 dpi ...

Page 51: ...51 Chapter 4 Appendix Memo ...

Page 52: ...ither registered trademarks or trademarks of Adobe Systems Incorporated Itanium is a trademark of Intel Corporation and its subsidiaries Eudora is a registered trademark of QUALCOMM Incorporated PCL is a registered trademark of Hewlett Packard Company PEERLESSPage is a trademark of the PEERLESS Systems Corporation and PEERLESSPrint and Memory Reduction Technology are registered trademarks of PEERL...

Reviews: