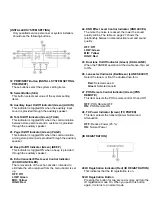
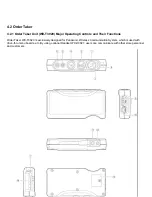
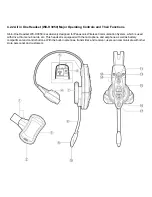
background image


WX-C3000 Series

Digital Wireless Communication System


Installation Instructions


Responsible Party: Panasonic Corporation of North America 

One Panasonic Way, Secaucus, NJ 07094


Summary of Contents for Attune WX-Z3040

Page 1: ...WX C3000 Series Digital Wireless Communication System Installation Instructions Responsible Party Panasonic Corporation of North America One Panasonic Way Secaucus NJ 07094 ...

Page 2: ...0 Major Operating Controls and Their Functions 14 4 2 3 Operating Procedures 17 4 2 4 ID Registration 18 4 2 5 Deletion of ID 19 4 3 Battery Loading Replacement 20 4 4 Battery Charger 21 4 4 1 Battery Charger Major Operating Controls and Their Functions 21 4 4 2 Battery Charger Preparation Installation 22 4 4 3 How to Charge Batteries 23 5 CENTER MODULE INSTALLATION 24 5 1 Tools Required 24 5 2 Si...

Page 3: ...4 1 Opening the Switch Compartment 40 6 4 2 Dip Switch Setting 40 6 4 3 Auto Talk Lock setup Only one headset 42 6 7 Manager Mode Only one headset 43 6 7 1 Canceling the Manager Mode 44 7 DOUBLE DRIVE THRU INSTALLATION 45 7 1 General Double Dual Drive Thru 45 7 2 Double Drive Thru Operating Procedures 45 8 SYSTEM INTERFACE 47 8 1 Connect to Speaker Post 47 8 2 Overview of Speaker Post 48 8 2 1 WX ...

Page 4: ...ed equipment and meets the FCC radio frequency RF Exposure Guidelines in Supplement C to OET65 This equipment should be installed and operated with at least 20 cm and more between the radiator and person s body excluding extremities hands wrists feet and legs FCC Warning To assure continued FCC emission limit compliance use only the provided power supply cord and shielded interface cable when conn...

Page 5: ...re disabled in this mode and range is boosted Up to four Order Takers or All in One Headsets communicate orders from outside into the stores Greeter When the customer approaches the menu board the voice message recorded in the Center Module is automatically output to the outside speaker The Center Module has two memories and you can select either message Manager Mode You can set one headset Order ...

Page 6: ...rder taker unit becomes wet Turn the power off and have the unit examined by qualified service personnel Do not expose the center module or order taker unit to rain or moisture Do not operate the equipment if it is wet 5 Follow normal safety precautions to avoid personal injury 6 Properly store the order taker unit WITH HEADSET PLUGGED IN in the order taker unit case to prevent damage to equipment...

Page 7: ...4 WX C3010 SERIES SYSTEM PARTS AND ACCESSORIES Note Illustrations may differ from actual products ...

Page 8: ...g Controls and Their Functions INSTALLER AREA Mounting Hole Mounting Hole ID REGISTRATION INSTALLED SYSTEM SETTING Antenna Antenna Through hole AC Inlet Terminal Board Cover USERS AREA 1 Power On Off Switch Control Indicator Communication Indicator Volume Control ...

Page 9: ...om the customer 10 Auxiliary Speaker Volume AUX SP This control sets the output level of auxiliary speaker 11 Auxiliary Microphone Volume AUX MIC This control sets the input level of gooseneck microphone 12 Vehicle Detector Beep Volume BEEP This control sets the vehicle detection beep tone for the Order Taker or the All in One Headset 13 POS Audio Volume POS AUDIO This control sets the input level...

Page 10: ...turns the vehicle detector Normal and Override On NORMAL The vehicle detector turns on only when vehicle is detected at the menu board 22 Talk Page Release Button T P RELEASE The button is used to release temporarily the talk page communication of the Order Taker or All in One Headset GREETER 23 Greeter On Off Indicator yellow GREETER ON This indicates that the greeter function has selected on 24 ...

Page 11: ...l of greeter According to the operations on the buttons the SELECT indicator changes the indication 32 Greeter Playback Button HEADSET PLAYBACK When this button is pressed Order Taker or All in One Headset plays back the message from selected greeter 33 Greeter Output Auxiliary Speaker Indicator Green DESTINATION AUX This indicator lights when the greeter message output is provided through the aux...

Page 12: ... Yellow HIGH Red 44 DNR Effect Level Control Indicator DNR LEVEL The more the noise is reduced the lower the sound quality will be The table on page 27 shows the relationship between noise reduction level and sound quality OFF Off LOW Green MID Yellow HIGH Red INSTALLED SYSTEM SETTING Only qualified service personnel or system installers should use the following buttons 49 ID Registration Indicato...

Page 13: ...g Controls and Their Functions Order Taker WX T3020 is exclusively designed for Panasonic Wireless Communication System which is used with drive thru menu boards etc By using optional Headset WX H3027 users can communicate with other store personnel and customers ...

Page 14: ... designed for Panasonic Wireless Communication System which is used with drive thru menu boards etc This headset is equipped with the microphone and earphone as well as battery compartment and control buttons With the built in antennas transmitter and receiver users can communicate with other store personnel and customers ...

Page 15: ...ional Function Button R This button is intended for functional extension When the Order Taker is set in the manager mode and this button is pressed operation cannot be forwarded for talking or paging At that time the Telephone Indicator of the Center Module lights To recover the talk or page operation press this button again The Telephone Indicator is turned OFF and the talk and page operation bec...

Page 16: ...table to your head by sliding the head pad 16 Battery Case Battery Optional accessory 17 Head Pad Cushion 18 Earphone Pad 19 Microphone Boom Adjust the microphone position to your mouth by rotating and bending the boom 20 Microphone ...

Page 17: ...n connecting the headset plug to this product hold the plug and push it straight into the earphone output jack and microphone input jack 2 Wear the headset 3 Adjust the head pad so that the earphone is placed on your ear 2 Hold down the power button 4 Rotate and bend the microphone boom so that the microphone is placed near your mouth ...

Page 18: ...ule You can hear Connecting center module A and the lane indicator will blink yellow Press the T2 button at double drive thru for other center modules You can hear Connecting center module B and the lane indicator will blink green When the ID Registration succeeds you will hear Registration complete and the headset number and the power indicator stops blinking and stays on 4 When IDs are registere...

Page 19: ...One Headset To delete an ID that is registered for LANE B keep pressing the T2 and C buttons simultaneously and start up the power of All in One Headset The power indicator then blinks in yellow 3 Press the P button while the power indicator keeps blinking in yellow The ID that is registered for LANE A or LANE B is deleted Order Taker Unit WX T3020 All in One Headset WX H3050 Order Taker Unit WX T...

Page 20: ...rder Taker Unit WX T3020 Insert the battery as shown in the figure Note Be sure to insert it until the lock clicks Loading When inserting the battery check the positive and negative sides Loading 1 Prepare a fully charged battery 2 Insert the battery as shown in the figure Note Be sure to insert it until the lock clicks Replacement Replacement 1 Slide the battery lock to the outside 2 Remove the b...

Page 21: ...battery exclusively designed for All in One Headset WX H3050 and Order Taker WXT3020 4 4 1 Battery Charger Major Operating Controls and Their Functions 1 LED indicator Off No battery Yellow Charging Green Ready Charge complete Yellow and green Blinking alternately Fault Error 2 DC jack Use the provided AC adaptor INPUT 100 V to 240 V AC 50 Hz 60 Hz OUTPUT 8 V DC 3 5 A 3 Cable rings Power cord and ...

Page 22: ... the Charger on the Wall IMPORTANT Securely clamp the DC cable to this battery charger and screw the DC cable to the wall using the provided cable clamper 1 Secure the provided mount bracket to the rear of charger by fastening the provided screws x4 Recommended tightening torque 0 78 N m 8kgf cm 2 Secure the mount bracket to the wall by locally procured screws x5 Procure 5 mounting screws accordin...

Page 23: ...o the AC outlet LED indicator will light yellow 3 When charging is complete the LED indicator will turn green 4 Remove the batteries from the charger CAUTION When an error occurs during charging the LED indicator will blink yellow and green alternately In such a case remove the batteries from the charger or change the slot to charge If the problem cannot be solved contact your dealer ...

Page 24: ...Center Module location high on wall not adjacent to metal walls and free from vibrators Conform A 120 AC duplex outlet with ground preferably dedicated provided within 6ft of Center Module Speaker Microphone Loop cable long enough to reach from Center module to speaker post 150ft Max Unobstructed conduit no cables containing AC voltage provide from Speaker post Menuboard to inside store near to Ce...

Page 25: ...r Center Module cables D The Center Module is set up from the two AC outlets within 6ft 2 Start charging batteries so they are useable for system testing Note Because of the many variations in store design consult with the construction engineer and store for proper locations of all equipment and conduits 3 Confirm the Center Module location and securely mount it to the wall A The clearance to the ...

Page 26: ...peaker box grill area It is important to pack acoustic installation around the microphone to prevent echo and feedback from the speaker Install the second WX C550 as speaker in the lower section of speaker post If possible pack acoustic insulation around the speaker Float the microphone in the acoustic material Do not let the speaker touch the speaker post housing C The larger WX C550 speaker is u...

Page 27: ...all directly Please be advised of the following IMPORTANT Procure 4 mounting screws according to the material of the installation area In this case wood screws and nails should not be used Recommended screw M4 x 25 mm Required pull out capacity of a single screw bolt is 118 N 12 kgf or more If a wall board is too weak to support the total weight the area shall be sufficiently reinforced ...

Page 28: ...attach the front cover to the main unit 3 Connect the wiring material to the terminal socket Use the minus screwdriver and loosen the screw located on the upper surface of the terminal socket Peel off the sheath from the tip of the wiring material and insert the cable tip in the terminal socket Firmly tighten the loosened screw by means of the minus screwdriver Repeat the above mentioned same proc...

Page 29: ...mp the power plug to this center module and screw the AC cable to the wall using the provided AC cable clamper 1 Insert an AC cable holder into the hole under the AC inlet 5 Lock the holder 2 Slide the holder to the backward by pushing down the clamp lever 6 Clamp the AC cable with the provided clamp and secure the AC cable clamper to the wall by fastening the screw locally procured ...

Page 30: ...een ON Select and OFF Select status The ON OFF status can be defined by the style of indicator blinking OFF Lighting time is short and unlighting time is long ON Lighting time is long and unlighting time is short 3 When the ON OFF is changed over the selected status is reflected on the system in real time 4 When the NEXT button is pressed the next setup item is selected The setup item selected wil...

Page 31: ... ECHO REDUCTION is off LOW LED is GREEN Lowest level of ECHO REDUCTION level at this position MID LED is yellow Mid level ECHO REDUCTION level at this position MAX LED is RED Maximum level of ECHO REDUCTION Recommended for most installations AUX IN TALK PAGE BEEP AUX SP ECHO CANCELLER DUAL LANE LANE SELECT DNR LEVEL POS REMOTE TX POWER RED MAX YELLOW MID GREEN LOW INSTALLED SYSTEM SETTING PREV SEL...

Page 32: ... DNR LEVEL DUAL LANE LANE SELECT POS REMOTE TX POWER INSTALLED SYSTEM SETTING PREV SEL NEXT RED MAX YELLOW MID GREEN LOW OFF OFF MID is used at sites with moderate to high levels of traffic wind and mechanical noise such as air conditioning compressor and aircraft Noise reduction level 13dB AUX IN TALK PAGE BEEP AUX SP ECHO CANCELLER DNR LEVEL DUAL LANE LANE SELECT POS REMOTE TX POWER INSTALLED SY...

Page 33: ...REE ID N LOW OFF OFF When there is car in only Lane B the greeter memory 1 output to the speaker of Lane B OFF DUAL LANE OFF ON DUAL LANE ON Green When there are cars in Lane A and B the greeter memory 2 is output to the speaker of Lane B When there is car in only Lane B the greeter message of the memory 1 or 2 is output to the speaker of Lane B When there are cars in Lane A and B the greeter mess...

Page 34: ...efault Green Lane B Note If lane setting is changed ID registration should be reset 6 1 6 POS Remote This setting is made when the POS Remote function is used ON Green POS Remote Control is enabled When ON is selected the following button settings for the Center Module become invalid SPEED TEAM VEHICLE DETECTOR BEEP DAY NIGHT OUTSIDE SP LEVEL DAY NIGHT TALK PAGE RELEASE 6 1 7 TX Power Setting The ...

Page 35: ... communicate by pressing the PAGE button 4 Press the PAGE button and communication can be performed in the PAGE LOCK mode Even if the PAGE button is set to PTP it operates by PAGE LOCK 5 Press the SPEED TEAM button of the Center Module again the SPEED TEAM mode will be released The Order Taker or All in One Headset allows the operator to hear the voice prompt of the SPEED TEAM OFF Note TALK is pro...

Page 36: ...to note that no button operation of the Beep Day Night is possible at the center module DAY mode When you are taking charge of lane A if the vehicle detector is on the lane A you will hear the beep A If the vehicle detector is on of the lane B you will not hear the beep B NIGHT mode When you are taking charge of lane A if the vehicle detector is on the lane A you will hear the beep A If the vehicl...

Page 37: ...Normal Override On setup can be made by button operation at the front panel of this unit When the Override On mode is set the V D Override indicator of the center module will light in yellow When the V D Override button is pressed the Normal mode is assumed and this indicator will disappear NORMAL The vehicle detector turns on only when a vehicle is detected at the menu board When the detector tur...

Page 38: ...tion of Talk Page Release is possible by button operation at the front panel of this unit Note If POS Remote is set for ON you have to note that no button operation of the Talk or Page Release is possible at the center module It is impossible to release the Talk or Page mode of the All in One Headset or Order Taker in the manager mode ...

Page 39: ... Notes At the time of shipment from the factory a message of Please pull forward is recorded in Message 1 If any recording is performed on Message 1 the original message will be overridden by the new message No recording is possible during Greeter reproduction It must be noted that the talking sound is also recorded if TALK operation is attempted during recording Output setting of Greeter 1 Press ...

Page 40: ...020 All in One Headset WX H3050 6 4 2 Dip Switch Setting An eight bit DIP Switch is provided for system setups The initial setting is marked with an asterisk Note Be sure to turn off the headset in Step 1 Otherwise the DIP Switch will not be activated until you turn the power off and on again SWITCH function Items ON OFF SW1 Auto TALK Lock setting ON OFF SW2 Auto TALK Lock Lane Select Lane B Lane ...

Page 41: ...selects Direct Lane Select Mode or Normal ON Direct Lane Select Mode When double drive thru the T1 button is for lane A the T2 button is for lane B OFF Normal For double drive thru the T2 button is A B Lane Selection SW 4 This switch selects Talk Lock or Press To Talk ON Talk Lock OFF PTT Press To Talk SW 5 This switch selects Page Lock or Press To Page ON PAGE Lock OFF PTP Press To Page SW 6 SW 7...

Page 42: ... headset is OFF Order Taker Unit WX T3020 All in One Headset WX H3050 2 Turn on the headset The message Hello Headset is the number of headset is output from the speaker of the headset and the power indicator blinks green and red alternately for 3 seconds While the indicator is blinking press the T1 or T2 button LANE A T1 button LANE B T2 button Auto Talk Lock will be set up The message Auto Talk ...

Page 43: ...r button for two seconds or more to turn off the headset 2 While holding R and T1 simultaneously press the power button to turn on the headset The headset enters manager setting mode where the indicators and buttons have different functions than in normal operation You can hear Connecting center module A and power indicator is an alternate blinking of red and green Also the Lane indicator A is bli...

Page 44: ...All in One Headset When LANE B is set in the manager mode keep pressing the R and T2 buttons simultaneously and start up the power of All in One Headset The power indicator then blinks reciprocally in red and green A message of Connecting Center Module A or B is heard from the All in One Headset speaker Order Taker Unit WX T3020 All in One Headset WX H3050 3 When canceling of the manager mode is c...

Page 45: ...r module of either Lane A or Lane B For Normal setup 1 When a connection is made to Lane A the lane indicator is lit in yellow Press the T2 button if you want to make a connection changeover to Lane B When connected to Lane B a voice of Lane B is heard from the speaker of the headset and the lane indicator is lit in green Order Taker Unit WX T3020 All in One Headset WX H3050 2 While a connection i...

Page 46: ...lit in green Order Taker Unit WX T3020 All in One Headset WX H3050 2 While a connection is maintained to Lane B the lane indicator is lit in green Press the T1 button if you want to make a connection changeover to Lane A When connected to Lane A a voice of Lane A is heard from the speaker of the headset and the lane indicator is lit in yellow When Direct Lane Select is set TALK is available by sel...

Page 47: ...8 SYSTEM INTERFACE 8 1 Connect to Speaker Post Center Module WX C3010 Microphone Menuboard or speaker post Speaker VEHICLE DETECTOR LOOP IN PAVEMENT Conduit 917 1S ...

Page 48: ...aker and microphone it isolate feedback Microphone Solder speaker connections Mount WX C1050 to outside of the speaker post If there is no install spot for the WX C550 Connect as speaker Install the WX C550 push up speaker flush with grill Insulate with acoustical insulation Connect as speaker Speaker Smaller 22 2 GA To speaker and microphone Larger 22 2 GA Twisted pair to loop coil Conduit to sto...

Page 49: ...ality and feedback may occur if not properly isolated 2 When using C550 for both a microphone and a speaker you should insert the acoustic glass wool between the microphone and the speaker 3 You should enlarge the hole of a speaker and a microphone portion as much as possible Small holes can reduce audio and cause feedback 1 Cushion 3 Hole Microphone 2 Acoustic glass wool Don t touch Speaker ...

Page 50: ... 2 Install Speaker Post Example Good example The example of installation Cushion Acoustic glass wool A hole is too small You should make the hole size equivalent to C550 Bad example The hole is plugged up ...

Page 51: ... 2 3 4 5 6 1 2 3 4 5 6 CONNECTOR 7 DDT INTERFACE DOUBLE DRIVE THRU Use a LAN cable CN1 1 2 2 is for GND CN1 3 4 4 is for GND CN1 5 6 7 7 is for Shield MARSH Signal Fault Power CN1 8 Yellow CN1 9 Blown ORANGE RED TO LOOP COIL Mic C Mic GND Mic PTT Mic COM CN2 1 CN2 2 CN2 3 Shield CN2 4 CN2 5 CN2 6 CN2 7 CONTROL H CONTROL COM Auxiliary Speaker Outside Speaker Outside Microphone Vehicle Detector Goos...

Page 52: ...4V POWER SUPPLY BLACK Gooseneck Microphone SHIELD RED BLACK WHITE GREEN MARSH Signal Fault Power CONNECTOR 1 ORDER INTERFACE AUX SP 8Ω AUX SP GND OUTSIDE SP 8Ω OUTSIDE SP GND OUTSIDE MIC OUTSIDE MIC OUTSIDE MIC GND V DET1 IN COM V DET2 IN 1 2 3 4 5 6 7 8 9 10 CONNECTOR 2 ORDER INTERFACE AUX MIC AUX MIC AUX MIC GND AUX MIC PTT COM DEVICE CONTROL COM N C 1 2 3 4 5 6 7 8 WHITE WHITE SHIELD ...

Page 53: ...EL AUDIO GND TEL AUDIO OUT TEL AUDIO IN CALL DROP RESERVED COM 1 2 3 4 5 6 TELOS SYSTEMS The LINK Intercom to Telephone Interface 9VDC PHONE LINE PHONE CONTROL CONTROL STATUS 8 7 6 5 4 3 2 1 15 14 13 12 11 10 9 5 4 3 2 1 9 8 7 6 TO INTERCOM MONITOR OUT ...

Page 54: ...ed with C button of All in One Headset or Order Taker Unit Center Module CONNECTOR 2 ORDER INTERFACE External operation 1 AUX MIC VDD 5VDC 2 AUX MIC 3 AUX MIC GND R 82 ohms or more 4 AUX MIC PTT 5 COM To micro computer To control circuit 6 DEVICE CONTROL Not active 5V Active 0V 7 COM 8 N C PS2532L VCE 300V max Ic 150mA Pc 300mW ...

Page 55: ...al SPEED TEAM 1 TALK LOCK RELEASE 2 MANAGER SELECT 3 PAGE SELECT 4 IN COM 5 POS AUDIO IN 6 POS AUDIO GND 7 POS AUDIO OUT 8 POS AUDIO GND 9 7 6 5 4 3 2 OUTSIDE SP LEVEL NIGHT MODE OUT COM PAGE TALK V DET 2 V DET 1 1 CONNECTOR 4 POS INTERFACE CONNECTOR 3 POS INTERFACE To DC Adapter 12V 15VDC CONTEC USB I O Terminal DIO 0808LY USB 1 SPEED TEAM CONNECTOR 4 TALK LOCK RELEASE 2 MANAGER SELECT 3 4 PAGE S...

Page 56: ...UDIO OUT TEL AUDIO GND RESERVED CALL DROP COM 1 2 3 4 5 6 LAN Cable with Shield CONNECTOR 7 MAINTENANCE DOUBLE DRIVE THRU Use a LAN cable With the shield type CONNECTOR 7 MAINTENANCE DOUBLE DRIVE THRU Use a LAN cable With the shield type GND CN5 6 CN5 6 CN7 CN7 BEEP TX POWER INSTALLED SYSTEM SETTING PREV SEL NEXT N LOW FF YELLOW MID GREE YELLOW MID GREE TX POWER BEEP N LOW OFF O OFF OFF INSTALLED ...

Page 57: ... mounted outdoors and above ground The movement of a vehicle in the proximity of the menuboard speaker post triggers this device This unit is subject to false triggering by large animals people and other objects Most sonar units have a relay with normally open N O dry contacts that close when a vehicle is at the menuboard speaker post The relay contact opens as the drives away PHOTOELECTRIC The Pa...

Page 58: ... MID GREEN LOW OFF OFF AUX IN TALK PAGE BEEP AUX SP ECHO CANCELLER DNR LEVEL DUAL LANE LANE SELECT POS REM OTE TX POW ER INSTA LLED SYSTEM SETTING PREV SEL NEXT RED MAX YELLOW MID GREEN LOW OFF OFF TELEPHONE CONTROL OUT ID RESISTRA TION TELEPHONE CONTROL OUT TELEPHONE CONTROL OUT ID RESISTRA TION OPERA TIONA L SETTING SPEED TEA M BEEP DA Y NIGHT ON DA Y OUTSIDE SP LEVEL ON DA Y V DET OVERRIDE T P ...

Page 59: ...ter start delay ON OFF switch 2 position greeter headset playback ON OFF switch 2 position greeter output auxiliary speaker ON OFF switch 2 position greeter output headset ON OFF switch ID Registration switch Auxiliary speaker output select AUX IN TALK PAGE BEEP 3 position echo canceller effect level select LOW MID HIGH 3 position DNR effect level select LOW MID HIGH 2 position dual lane ON OFF se...

Page 60: ...it 157 mm W x 269 mm H x 82 mm D 6 3 16 W x 10 5 8 H x 3 1 4 D 150 g 0 33 lbs 10 C to 50 C 14 F to 122 F Battery Charger AC adaptor Rated input 100 V to 240 V AC 50 Hz 60 Hz AC adaptor Rated output 8 V DC 3 5 A Fast charge current 400 mA 10 4 circuits Ambient operating temperature 5 C to 35 C 41 F to 95 F Dimensions 204 W x 100 H x 46 5 D mm 8 1 32 W x 4 5 16 H x 1 13 16 D Weight excluding AC adap...

Reviews: