background image


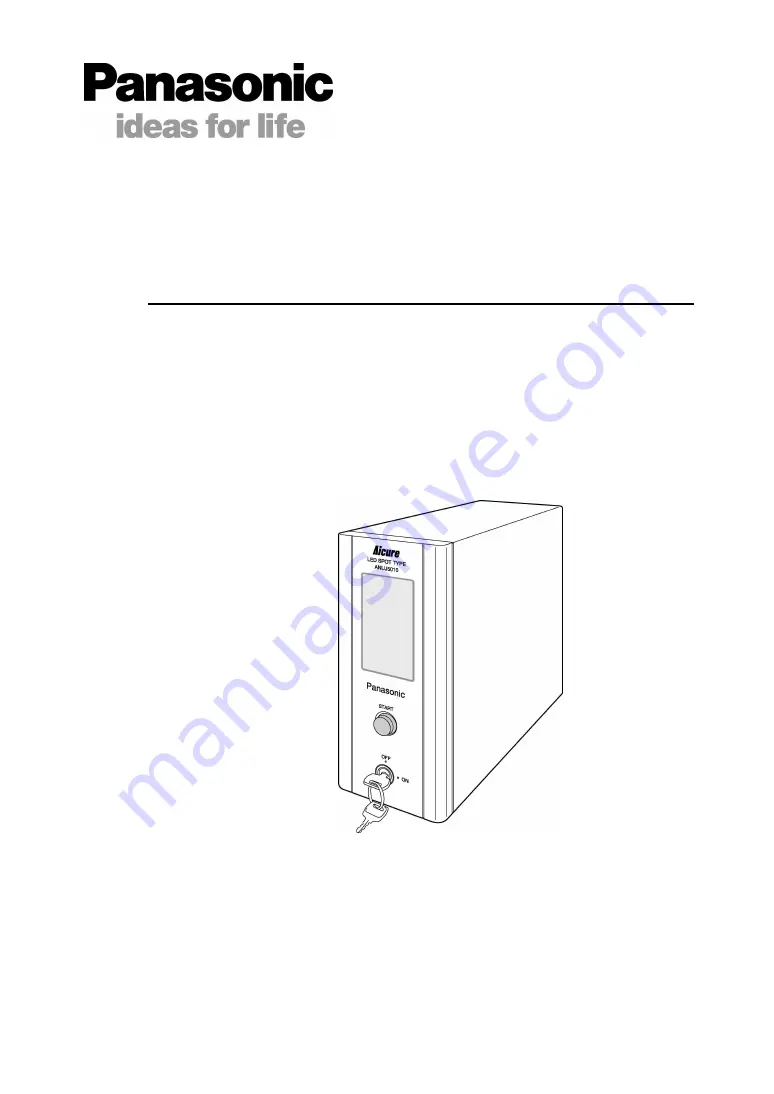
Thank you for your purchase of the Aicure LED spot UV curing system.   

 In order to use the system correctly, please read this User's Manual carefully before use. 

After you have read it, store it in a secure location, and refer back to it if you have any 
uncertainties.   

ANUJ5010 

Aicure UV Curing System 

User’s Manual


Summary of Contents for ANUJ5010

Page 1: ... curing system In order to use the system correctly please read this User s Manual carefully before use After you have read it store it in a secure location and refer back to it if you have any uncertainties ANUJ5010 Aicure UV Curing System User s Manual ...

Page 2: ... this product Disassembling this product could cause exposure to LED UV light causing eye damage or injury to the skin If there is a risk of the LED UV light being exposed to UV reflective light place the product inside a cover with proper reflectance and heat characteristics to block that reflective light When operating the controller set up the system so that the path of the LED UV light is not ...

Page 3: ...ear of the controller When the product ships these are shorted with the short bar Control Access via Key The main unit of this product is started via a key switch When not in use the key should be removed at all times LED Radiation Warnings Turning the key switch to the on position enables LED UV light radiation and the touch panel display on the front of the controller warns of LED radiation Erro...

Page 4: ... labels for the IEC EN standard are included Japanese language Warning Labels JIS Standard Locations of Labels Chinese Warning Labels GB Standard If the product will be used in China please affix the labels shown below over the Japanese warning labels English Warning Labels IEC EN Standard If the product will be used in a country other than Japan and China please affix the labels shown below over ...

Page 5: ...udes UV radiation in the 365 nm wavelength For this reason always use UV blocking protective goggles Do not disassemble Never perform disassembly repairs or modifications not described in this manual Doing so could lead to accidents or injuries Earth Connection Always connect to an earth Failure to ground could cause electrocution in the case of an electric leak Always unplug the unit from the pow...

Page 6: ...6 Do not bend the connecting cable to the LED head multiple times Doing so could cause a break in the cable If the cable to the LED head is broken the entire unit must be replaced 7 Make sure the system s rubber legs are set horizontally parallel before use Using the system while it is titled tipped on one side or upside down could cause the system to overheat and break Doing so is also dangerous ...

Page 7: ...hecking Status 18 Setting the Light Modulation Ratio 18 Manual Irradiation 19 7 Changing Setting Models 20 Changing Models 20 Setting Models 21 8 Irradiation Data Display 22 9 Configuration 23 9 1 Fine Tuning the LED Head 23 9 2 Configuring the Irradiation Patterns 24 9 3 Changing the Signal Output Contacts During Irradiation 25 9 4 Switching the UI Language 25 10 Operation via External Signals 26...

Page 8: ......

Page 9: ...perature increases A single 365 nm LED UV light source is used which does not include infrared radiation This eliminates the risk of heat damage to the workpiece Stable UV intensity UV intensity is kept constant even if the ambient or LED temperature changes Easy to install LED head At 12 mm dia x 52 mm len the LED is easy to mount on a jig Locking the LED head in place reduces overheating and inc...

Page 10: ...es to sense overcurrent and breaks in the LED head cord If the LED becomes abnormally overheated due to an ambient temperature increase or the like it automatically turns off The system is also equipped with emergency UV irradiation shutoff terminals and a fuse in the main unit 3 15A Removable external terminal block Efficiently connect to external devices via a removable terminal block Free power...

Page 11: ...ad with lens 1 connection cable Optional components sold separately ANUJ6324 head with lens unit ANUJ61324 Head with lens ANUJ6325 head with lens unit ANUJ61325 Head alone Head for ANUJ5010 ANUJ6130 4 mm dia replacement lens ANUJ6324 Lens unit 5 mm dia replacement lens ANUJ6325 Connection cable 1 7 m flexible cable ANUJ6220 UV goggles UV protective goggles ANUP5001SG ...

Page 12: ...nd Function of Each Part Front Back Touch Panel START button Key power switch UV radiation emergency stop terminals Power socket 100 240 VAC 50 60Hz Connection cord terminals External input terminals Fuse holder ...

Page 13: ... and check irradiation status see p 16 To Manual Mode screen Perform manual operation and check irradiation status see p 18 To Type Change screen Change the model see p 20 To Data screen Display irradiation data see p 22 To Stetting screen Configure irradiation patterns see p 23 Select Auto Mode Select auto mode type see p 17 ...

Page 14: ...this model If any of the LEDs to be used for irradiation are currently irradiating NO LED status irradiation will not begin Emergency stop during irradiation can be achieved via setting the emergency stop signal on the main unit to open normally closed when the external STOP 1 signal is turned on or when the START button on the main unit is on Auto Individual Pulse Start Mode On the Menu screen se...

Page 15: ...y closed when the external STOP 1 signal is turned on or when the START button on the main unit is on Auto Individual Status Start Mode On the Menu screen select Multi STAT and touch Auto to operate from the Auto Mode screen When the main unit is in READY status changing the external START signals from off to on during auto irradiation it is always on initiates individual irradiation of the LEDs s...

Page 16: ...Name and Function of Each Part 8 Switching Menu Screens The menu screens are switched as follows ...

Page 17: ...anged during irradiation 10 Press the START button again irradiation stops Model Setup 11 On the Menu screen touch TYPE CHG to change to the Model Switch screen 12 Select a model initial setting TYPE NO 1 External signals have precedence for model configuration If the external signal is 0 the system switches to the model configured on the main unit 13 Touch TYPE SET to change to the Model Setup sc...

Page 18: ...ed via an external signal or the START button on the main unit The START button on the main unit initiates batch irradiation 21 During irradiation the START button on the main unit is illuminated and the LED s external BUSY signal is on initial Busy signal setting A CONTACT The Busy signal can be switched to B CONTACT 22 When irradiation completes the LED s external BUSY signal is off ...

Page 19: ...d The minimum allowable bending radius for the LED head cord is 33 mm Using the cord with a curve radius of less than 33 mm could damage it Do not place items on top of the main unit or block its air vents Excessive heat could damage the unit due to overheating 4 2 General Guide for Irradiation Distance and UV Intensity Mount the LED head on the jig so that the irradiation distance is in accordanc...

Page 20: ...e connection cable terminals and hook up the cables LED 1 White LED 2 Red LED 3 Blue LED 4 Green Note Cable labels are affixed to the main unit Please use them if you want to identify the cables Plug the female side of the connection cable into the main unit Plugging in the wrong side the male connector could bend the connector pins or cause other issues 5 2 Connecting the LED Connecting the head ...

Page 21: ...on a jig the LED head can become hot during irradiation For this reason do not touch it directly with your hands during irradiation Note LED can be used with a light modulation ratio of 100 or greater by increasing the size of the cooling device and or cooling the LED head Warning Note The LED head is made of aluminum Care is required because if you tighten it directly with set screws using too mu...

Page 22: ... connectors on the back of the main unit two banks of 12 pins are removable It is possible to loosen the M3 screw on either side remove the connector board mount the crimping terminals and mount it on the rear of the main unit Both Y type and round type crimping terminals can be used ...

Page 23: ... pronged plug It must be plugged into an earthed three prong power outlet 5 5 Turning on the Power Insert the supplied power key into the power switch and turn it to the right When the power comes on the touch panel on the main unit lights and the Auto Mode screen initial configuration appears The system is equpped with a power thermistor to suppress inrush current Wait at least 5 times between tu...

Page 24: ...fter the alarm display the LED is shut off due to temperature error MENU To the Menu screen The Status Details Screen On the Auto Mode screen touch one of the LED numbers 1 2 3 4 to view detailed settings for that LED READY e The status of the main unit will be either READY NO LED or LED ON 1 2 3 4 The LED status inverted connected lit not connected flashing irradiating During irradiation the LED ...

Page 25: ...Begin irradiation upon start of external signal STAT Start irradiation when external signal switches from off to on turning the signal off during irradiation causes a stop during irradiation Select Individual All Multi Cause a single enabled LED to irradiate ALL Cause all enabled LEDs to irradiate The Multi ALL setting is shown on the Auto Mode screen For example if Multi is selected followed by A...

Page 26: ...The light modulation ratio setting enabled when the number is touched and inverted 0 0s The irradiation time WARN Inverted when there is an alert Touch to display the Warning Screen MENU To the Menu screen Setting the Light Modulation Ratio In Manual Irradiation mode the light modulation ratio can be set individually for each LED The initial setting is 100 To set the light modulation ratio from th...

Page 27: ... Starting Irradiation 1 Touch MENU MANUAL The Manual Mode screen appears 2 Make sure that READY is displayed 3 Touch the numbers of the LEDs to perform irradiation 1 to 4 inverting their displays uninverted LED numbers cannot be selected 4 On the main unit press the START button Irradiation starts and the START button lights The light modulation ratio can be changed during irradiation See previous...

Page 28: ... as 10 different model types Do display the Model Select screen touch MENU TYPE CHG Changing Models 1 Check the current settings The current settings are shown for the inverted number Touch the down arrow to display numbers 7 through 10 2 Touch the number to modify A confirmation screen appears External signals have precedence for model selection If the external signal is 0 all off the system swit...

Page 29: ...ious next models in turn Touch PATTERN to configure the irradiation patterns See 9 2 Configuring the Irradiation Patterns for details 3 Touch the LED pattern number of the irradiation pattern to select The Numeric Input screen appears 4 Enter the numbers 1 to 10 then touch the Enter key to modify the irradiation pattern If 0 is entered the LED will not irradiate 5 Repeat steps 3 and 4 to select th...

Page 30: ...ng this arrow loops through LED 1 LED 2 LED 3 LED 4 and User Preferences MENU Return to the Menu screen User Preferences Press the down arrow repeatedly to switch to the User Preferences screen Here you can set the LED replacement time to your liking initial value 10 000 hours The rule of thumb for replacing the LED is 10 000 hours at 70 initial intensity under the default head settings The lifeti...

Page 31: ...simply enter an intensity without performing irradiation 1 Touch the plus and minus keys to fine tune the LED head The number of steps appears Touch C to clear READY Displays the main unit status 100 The light modulation ratio Touch to adjust the light modulation ratio Setting the light modulation ratio Enter a number by touching 0 to 9 then touch the Enter button See page 18 for the actions of th...

Page 32: ...s seconds Do display the Pattern Setup screen touch MENU SETTING PATTERN Touch BACK to return to the Setup screen 1 Touch the pattern to configure P1 to P10 The Setup screen for the selected pattern appears 2 Set the UV light modulation ratio Intensity and irradiation time time for steps 1 and 2 3 Touch the down arrow to configure the next steps steps Up to 10 steps can be configured Touch BACK to...

Page 33: ...ENU SETTING BUSY SIG 1 Touch A CONTACT or B CONTACT The touched setting is selected inverted display 2 Touch BACK to return to the Setup screen 9 4 Switching the UI Language You can toggle the touch panel UI language Japanese English Chinese simplified Korean To switch the language press MENU SETTING LANGUAGE 1 Change the UI language by touching the language you desire 2 Touch BACK to return to th...

Page 34: ... 10 COM Input GND 11 START1 Input Start LED 1 or batch irradiation signal 12 STOP1 Input Stop LED 1 or batch irradiation signal 13 START2 Input Start LED 2 irradiation signal 14 STOP2 Input Stop LED 2 irradiation signal 15 START3 Input Start LED 3 irradiation signal 16 STOP3 Input Stop LED 3 irradiation signal 17 START4 Input Start LED 4 irradiation signal 18 STOP4 Input Stop LED 4 irradiation sig...

Page 35: ...Operation via External Signals 27 ...

Page 36: ...st 0 3 s all selected LEDs begin batch irradiation 2 Status Start Mode When the external Start 1 signal changes from off to on all selected LEDs begin batch irradiation After irradiation completes the signal remains on Emergency Stop Alarm Interrupt To perform an emergency stop set the external Emergency Stop signal to off Open An emergency stop will also be performed if the following external sig...

Page 37: ...Operation via External Signals 29 Batch Pulse Status Time Chart Batch Status Status Time Chart ...

Page 38: ...tart signals 1 2 3 4 begin at least 0 3 s the selected LEDs begin irradiation 2 Status Start Mode When the external Start signals 1 2 3 4 change from off to on the selected LEDs begin irradiation After irradiation completes the signal remains on Emergency Stop Alarm Interrupt To perform an emergency stop set the external Emergency Stop signal to off Open An emergency stop will also be performed if...

Page 39: ...Operation via External Signals 31 Individual Pulse Status Time Chart Individual Status Time Chart ...

Page 40: ...anges The inverted LED number s 1 to 4 indicates the location of the error Touch that number to view the warning message For Manual Mode Screen When an error occurs WARNING appears inverted on the screen Clicking on WARNING displays one of the screens below Use the up and down arrows to toggle between screens The inverted LED number s 1 to 4 indicates the location of the error Touch that number to...

Page 41: ...s 33 LED Temperature Warning Screen When the temperature of the LED head exceeds the danger level the amount over is displayed Replacement Time Warning Screen Shows the amount of time remaining to replace the LED head ...

Page 42: ...ions etc In the case of a system error such as a data transmission error or LED connection error the following Warning Screens red appear Press RESET to cancel the setting The screen turns back to green Press and hold RESET to forcibly cancel ...

Page 43: ... 4 When an external terminal is connected mistakenly shorting 24 V and GND will cause the 24 V circuit to halt When the cause of the short is removed the system automatically recovers Note however that continuing in this shorted state for extending periods could damage the system 12 2 Replacing the Fuse If the fuse blows replace it When changing the fuse turn off the power and unplug the power cor...

Page 44: ...ht modulation 0 to 120 increments of 1 Irradiation control Manual or timer control 0 1 to 999 9 sec Setting operation Setting English Japanese Chinese Korean switching with interactive 2 color LCD touch switch Power key switch External input Separate irradiation input separate irradiation stop input interlock complete irradiation input and type switching External output Ready signal error signals ...

Page 45: ...37 14 Dimension Diagrams ...

Page 46: ...ead Supplied ANUJ6325 5 mm dia lens Supplied 1 7 extension cable ANUJ61325C ANUJ6324 head with lens unit ANUJ61324 Head with lens ANUJ6325 head with lens unit ANUJ61325 Head alone Head for ANUJ5010 ANUJ6130 4 mm dia replacement lens ANUJ6324 Lens unit 5 mm dia replacement lens ANUJ6325 Connection cable 1 7 m flexible cable ANUJ6220 Optional replacement parts UV goggles UV protective goggles ANUP50...

Page 47: ... with lowered intensity light modulation ratio or improve the LED head s heat release LED CHANGE TIME ALARM LIGHTING LED IS TIME ALARM The time has come to replace the configured LED alternately if an LED replacement time has been set it is possible that it was set to a shorter time than the LED s cumulative time After resetting the error replace the LED head After replacing the LED go into the Da...

Page 48: ... 3 Initial version Although our manuals are prepared with great care if you should spot any errors please let us know at the address below Matsushita Electric Works Machine Vision Ltd 1048 Kadoma Kadoma City Osaka 571 8686 Japan TEL 81 6 6903 5129 main switchboard ...

Reviews: