background image

X-Tek X-ray and CT Inspection 

XT V 160 X-ray System 

Operator Manual 

XTM0011-F2 

Summary of Contents for XT V 160

Page 1: ...X Tek X ray and CT Inspection XT V 160 X ray System Operator Manual XTM0011 F2 ...

Page 2: ......

Page 3: ... for the verification process at the customer s site carried out by Nikon Metrology staff We also accept liability if the re calibration or verification process is carried out by the customer if these processes are explicitly agreed between the customer and Nikon Metrology We will not accept liability if the customer performs the re calibration or takes over responsibility for the verification pro...

Page 4: ......

Page 5: ...cle as a black symbol A white symbol inside a blue circle indicates a mandatory action that must be taken to avoid a hazard A black symbol inside a yellow triangle with a black border indicates a hazard A black symbol on a white background with a red diamond border indicates a harmful chemical or irritant A white symbol on a green background indicates a safe condition The note symbol is used to dr...

Page 6: ......

Page 7: ...sections Important health and safety information It is mandatory to read and understand this section before operating the X ray system Safety systems Details the safety systems of the machine Warnings It is mandatory to read and understand this section before operating the X ray system Introduction to the X ray system Provides an overview of the system and its components Getting started Provides i...

Page 8: ......

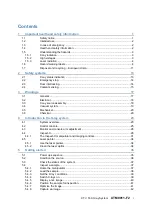
Page 9: ... ray source assembly 18 3 4 Vacuum system 19 3 5 Mechanical 20 3 6 Chemical 20 4 Introduction to the X ray system 23 4 1 System overview 23 4 2 Control console 25 4 3 Monitor and console arm adjustment 26 4 4 Inspect X 28 4 4 1 The Inspect X manipulator and imaging controls 31 4 5 Laser pointer 34 4 5 1 Use the laser pointer 34 4 5 2 Clean the laser optics 34 5 Getting started 35 5 1 Power up sequ...

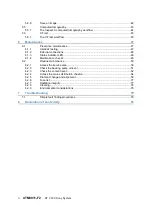
Page 10: ...ions 48 6 1 3 Status indicator LED 48 6 1 4 Maintenance checks 49 6 2 Routine maintenance 50 6 2 1 Access the service area 50 6 2 2 Check the backing pump oil level 51 6 2 3 Check the coolant level 52 6 2 4 Access the mains distribution chassis 54 6 2 5 Filament change and alignment 55 6 2 6 Fuse list 77 6 2 7 Radiation integrity 77 6 2 8 Cleaning 78 6 2 9 Environmental considerations 78 7 Trouble...

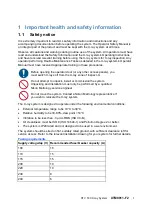
Page 11: ...er access panels you must switch X rays off from the X ray zone of Inspect X Do not attempt to unpack install or commission the system Unpacking and installation must only be performed by a qualified Nikon Metrology service engineer Do not move the system Contact a Nikon Metrology representative if you wish to relocate the X ray system The X ray system is designed to operate under the following en...

Page 12: ...tructive inspection of industrial and electronic components using X rays Do not use the system for any purpose other than its intended use 1 3 In case of emergency To make the system safe in case of emergency push the emergency stop button and isolate the system from mains power The emergency stop button is located on the control console 1 4 Health and safety information 1 The relevant Health and ...

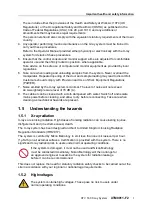
Page 13: ...R 7 Noise emitted by the X ray system is minimal The level of noise will not exceed an A weighted pressure level of 70 dB A 8 The cabinet can be cleaned with a cloth dampened with water Switch off and isolate mains power before cleaning and allow to dry before reconnecting Take care when cleaning as mechanical hazards are present 1 5 Understanding the hazards 1 5 1 X ray radiation X rays are ionis...

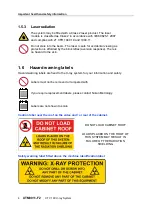
Page 14: ... by the blink reflex aversion response There is no hazard to the skin 1 6 Hazard warning labels Hazard warning labels are fixed to the X ray system for your information and safety Labels must not be removed or tampered with If you require replacement labels please contact Nikon Metrology Labels are not shown to scale Caution label near the roof on the sides and or rear of the cabinet DO NOT LOAD C...

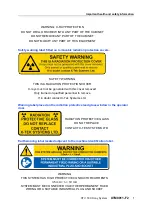
Page 15: ...COVER X rays must not be generated with this cover removed Only trained or qualified personnel to remove If in doubt contact X Tek Systems Ltd Warning label placed on the radiation protective lead glass window in the operator door RADIATION PROTECTIVE GLASS DO NOT REPLACE CONTACT X TEK SYSTEMS LTD Earth warning label located adjacent to the machine identification label WARNING THIS SYSTEM HAS HIGH...

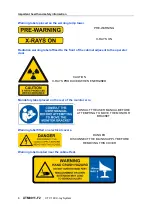
Page 16: ...ixed to the front of the cabinet adjacent to the operator door CAUTION X RAYS PRODUCED WHEN ENERGISED Mandatory label placed on the rear of the monitor arm CONSULT THE USER MANUAL BEFORE ATTEMPTING TO MOVE THE MONITOR BRACKET Warning label fitted on electrical covers DANGER DISCONNECT THE MAINS SUPPLY BEFORE REMOVING THIS COVER Warning label located near the cabinet feet ...

Page 17: ...O SERIOUS INJURY Laser warning label fitted to the front of the cabinet and manipulator if a laser module is fitted to the system LASER RADIATION DO NOT STARE INTO BEAM CLASS 2 LASER PRODUCT Laser aperture warning label Fitted to the laser module if a laser option is fitted to the system Laser Aperture Beta CW 670 mm Caution label placed on the manipulator platform ...

Page 18: ...ulator inside the cabinet dependent on the load rating of the manipulator platform MAXIMUM 500 g MAXIMUM 5 kg Warning label fitted to the X ray source target if a beryllium window is fitted BERYLLIUM THE TARGET ASSEMBLY ON THIS X RAY SOURCE CONTAINS A BERYLLIUM WINDOW WEAR GLOVES WHEN HANDLING DO NOT SCRATCH OR ABRADE THE WINDOW REFER TO MANUAL FOR MORE INFORMATION DO NOT REMOVE THIS LABEL ...

Page 19: ...ystem XTM0011 F2 9 Warning label placed on the top hinge of the service door HEAVY SERVICE DOOR 250 kg Warning label placed on the operator door HEAVY USER DOOR 50 kg Warning label on the X ray source inside the cabinet HEAVY X RAY SOURCE 2 PERSON LIFT 40 kg ...

Page 20: ...d on cooling system reservoir CAUTION FILL WITH UNDILUTED HEXID A4 ONLY Hexid A4 Supplied by Applied Thermal Control UK Tel 44 0 1530 839 998 COMPOSITION Water Propylene Glycol and Fluorescein Biocide 1 2 Benzisothiazol 3 2H one 0 002 Machine identification label fitted to the side of the cabinet ...

Page 21: ...quipment WEEE Directive 2012 19 EU It is marked with the following symbol This symbol indicates that this product is not to be disposed of with household waste according to the WEEE Directive 2012 19 EU and your national law This product should be handed over to a designated collection point or to an authorised collection site for recycling waste Electrical and Electronic Equipment EEE Improper ha...

Page 22: ......

Page 23: ... with the stated specification The system is then issued with a radiation certificate Periodical radiation checks must be carried out either by Nikon Metrology during annual service or by your own staff provided they are competent and appropriately trained and have access to the necessary measuring instruments In some territories persons making such measurements are required to be licensed or cert...

Page 24: ...ency stop To make the system safe in case of emergency push the emergency stop button and isolate the system from mains power The emergency stop system isolates all power to the system components should a hazardous situation arise Power isolation ensures that No X rays can be generated Movement of all axes of the manipulator is stopped The emergency stop button is located on the control console Op...

Page 25: ...voltage supplies for the X ray source With no high voltage present no X rays can be generated Manipulator movement is prevented by removing power from the motors The safety relay is configured for automatic reset operation Closing the door is sufficient to reset the safety relay X ray generation will however not automatically restart when the door is closed The operator must re initiate X ray gene...

Page 26: ......

Page 27: ...to service areas is restricted to suitably skilled technicians The machine must be isolated from the mains supply before removal of any covers The following warnings are identified as prohibited actions that must not be performed Do not remove any panels or covers from the machine whilst operating or powered up in any way Do not try to produce X rays with any safety interlock overridden or with an...

Page 28: ...ce must be carried out by a qualified Nikon Metrology service engineer The following warnings are identified as prohibited actions that must not be performed Never carry out any maintenance work on the X ray source while X ray power is on Never disconnect any cables while the system has electrical power Never disconnect any earth connections when the system has electrical power Do not adjust make ...

Page 29: ...system is used The first vacuum pump is generally known as a backing pump This pump alone is however not adequate to produce the vacuum required for generating X rays A second and finer turbomolecular turbo vacuum pump is necessary to bring the vacuum down to the required level The following warnings are identified as hazards Damage will result if the vacuum pumps are operated whilst open to atmos...

Page 30: ...ikon Metrology personnel Any movement of the cabinet requires it to undergo a radiation check If for any reason the manipulator becomes jammed the operator must remove power to the X ray system before attempting to unjam the manipulator Contact Nikon Metrology for further advice The system feet must only be adjusted by authorised Nikon Metrology personnel Incorrect adjustment may lead to the feet ...

Page 31: ...ought immediately Chemicals must be kept away from food and drink Inflammable products such as isopropyl alcohol IPA propanol must only be used in a well ventilated area and away from any source of ignition Cooling systems contain Hexid A4 heat transfer fluid or mineral oil Shell Diala While the coolant itself is not considered hazardous best practice dictates the use of gloves and goggles while h...

Page 32: ......

Page 33: ...2520 digital flat panel imaging options 4 1 System overview The system comprises a single enclosure that is separated into two sections The upper section is a lead lined chamber that houses the X ray source X ray imaging components and a motorised manipulator for moving the sample under inspection The lower section includes the electrical controls power supplies manipulator drives X ray source coo...

Page 34: ...including monitor bracket and lamp tower W x D x H are 1 225 x 1 810 x 2 145 mm 48 x 71 x 84 Weight is 2 100 kg 4629 lbs 1 X ray status indicators When the red X RAYS ON lamp is lit X rays are being produced The orange PRE WARNING light warns that X rays are about to be produced 2 Computer monitor The monitor shows the Inspect X software controls and X ray images 3 Service door Provides access to ...

Page 35: ...is a single unit that combines the controls used to operate the system and the joysticks used to move the sample manipulator The control console contains the following buttons and switches An EMERGENCY STOP button SYSTEM POWER on green and off red buttons X RAY POWER on off button white An INTERLOCK key switch ...

Page 36: ...es a satisfactory level 4 SYSTEM POWER On illuminates green when pressed and applies electrical power to the main circuits 5 SYSTEM POWER Off cuts electrical power to the main circuits when pressed 6 USB 3 ports provide easy access for USB devices 7 X Y Axis Manipulator Joystick moves the manipulator table in the X Y direction as indicated 8 Image Zoom Manipulator Joystick changes the geometric ma...

Page 37: ... the mount These should be re tightened after adjustment Do not use the grub screws to hold the monitor post in a raised position adjust height using the locking lever The amount of force needed to move the monitor arm and control console arm can be adjusted by tightening or loosening the resistance grub screws located at each hinge point ...

Page 38: ...ains controls for enabling and disabling live imaging saving images annotating images and controlling how the images are displayed 3 X ray image window The image window can display four images at once which can be a mix of captured or previously saved and re loaded images plus one live image These are displayed either as four tabs or if supported and enabled on your system as four images in a spli...

Page 39: ...successful completion of an operation A green tick next to System Status shows that interlocks are made and X rays can be generated A red cross indicates that interlocks are not made no X rays can be generated 6 Control panel Once a workflow has been selected the control panel displays relevant controls and settings on a series of tabs designed to step you through the selected process 7 Histogram ...

Page 40: ...lysis of an image Use these actions to create an inspection program 9 Scripts Shows a list of scripts collections of actions based on recorded actions You can also add scripts to an inspection program 10 X ray zone The controls for switching X rays on and off and stopping the manipulator in an emergency are always located in the bottom right corner of the screen ...

Page 41: ...wing section describes how to Position the sample on page 31 Optimise the image on page 32 Switch X rays on and off on page 33 For more information refer to the Inspect X Online Help or User Manuals Position the sample To inspect a sample move it into the path of the X ray beam using the manipulator Control the manipulator axes using The joysticks on the operator console The Axes controls and read...

Page 42: ...ne limits of travel of axes on horizontal systems The Mag axis in the image above has a travel limit applied shown by a red bar This is especially useful in preventing collisions It is recommended to set limits when loading new samples XT V systems have an anti collision system built in so the limit controls are not needed 3 Opens the Saved Positions window which allows specific manipulator positi...

Page 43: ... are by default only enabled below the defocusing threshold of the fitted target For example 7 W for the 225 kV reflection target Adjusting the X ray conditions and image settings is an iterative process and requires some knowledge of what to alter In particular knowledge of how to reduce the noise in the image is important There are two major sources of noise X ray photon noise and electronic noi...

Page 44: ...eam downwards onto the upper side of the sample tray whilst being invisible in the X ray image The path of the laser beam is aligned to coincide with the centre of the X ray image as shown below 4 5 1 Use the laser pointer The laser pointer is aligned with the centre of the X ray image to allow you to easily position your sample for inspection The part of the sample illuminated by the laser beam w...

Page 45: ...To power up the X ray system follow these steps 1 Turn the main power on at the wall 2 Press the SYSTEM POWER button located on the control console and ensure that the SYSTEM POWER lamp is illuminated 3 Turn the INTERLOCK key on the control console to the ON position 4 Turn the LCD monitor s on The computer should automatically boot up when the system is powered if not turn on the computer 5 Enter...

Page 46: ...nt recalibration Procedure To condition the source follow these steps 1 In Inspect X click Setup to select the setup controls 2 In the X rays panel under Auto condition set the required maximum kV You can either type a number into the Requested field or press the change buttons until the required kV value is displayed Auto conditioning set 0 µA internally within the software 3 Click Auto condition...

Page 47: ...spect X window To view the status of the system follow these steps 1 Click The System Status window opens 2 If the X ray controller interlock is not made check that The INTERLOCK key is in the ON position All cabinet doors are closed The X ray ON Lamp is operating correctly The turbo pump is up to speed shown in the System Status window The vacuum is below the set point shown in the System Status ...

Page 48: ...ow these steps 1 Click Setup to select the setup controls 2 In the Manipulator panel click A Warning appears reminding you to remove from the cabinet any objects that are likely to collide with the manipulator 3 Click OK at the prompt to proceed No other operation can be performed using the manipulator until the homing operation has completed or has been stopped by pressing the Stop button in the ...

Page 49: ...le 2 Beam current or Power µA or W which controls the brightness of the image To adjust the X ray conditions use the controls in the Optimise Image panel on the Position and Optimise tab You can adjust the conditions with X rays switched on or off The defining resolution of the X ray image is a function of the X ray spot size and the effective pixel size X ray spot size The X ray spot size is depe...

Page 50: ...isplay a live image Switches the live imaging mode on Switches the live imaging mode off You can display a live image of an object under inspection on only one of the Image tabs in Inspect X Use the other tabs to display captured images or images that you have saved previously and re loaded The live image displays a green border to distinguish it from captured or loaded images The border is red wh...

Page 51: ...n You can now move your sample into the path of the X ray beam with the manipulator to inspect in real time Control the manipulator using The joysticks on the inspection system The Axes controls and readouts in the Position panel on the Position and Optimise tab Saved manipulator position sets The manipulator map on some systems Interactions with the live image window If you are at high magnificat...

Page 52: ...seful if you want to accentuate specific features within an X ray image For detailed descriptions of the Tone tool and the other image processing functions see the Inspect X Online Help or User Manuals 5 4 8 Capture an image Switches image averaging on and off Once you have the live image displayed as required it can be captured To capture an image of the object that you are inspecting ensure that...

Page 53: ...m The set of projection images together with a reconstruction parameter files are called a CT dataset CT acquisition is only available on systems configured by Nikon Metrology to provide this option CT is covered in detail in the Inspect X Online Help and User Manuals There are however a few simple rules to follow when setting up your sample for a CT scan 1 No part of the sample can go out of view...

Page 54: ...ailable you can choose which version you want to use Select CT Profile From Dataset Sets the CT processing parameters to those in a selected CT profile dataset When you load a CT profile the manipulator is moved to the required position the X ray conditions are set up and the imaging device parameters are reloaded Position and Optimise This tab is used to position the sample for CT and to define t...

Page 55: ...flows in Inspect X are completely independent Traditional X ray inspection of multi layer boards has always been a difficult task since all layers are present within one image Other features in the image can obscure defects X Tract uses laminography or Oblique CT to reconstruct a high quality 3D image of a small region of interest in a large flat object without the need to rotate the sample 360 de...

Page 56: ...ty and interaction If you are using Inspect X as an Operator you can only use the Standard mode X Tract workflow A Supervisor can use Standard mode or Advanced mode Advanced mode This mode offers advanced control of the complete workflow It is only available if you are using Inspect X as a Supervisor ...

Page 57: ...tact Nikon Metrology Routine maintenance is only to be carried out by trained personnel Servicing is only to be performed by trained service engineers 6 1 1 Interlock testing The preventive maintenance schedule should include this interlock testing procedure Equipment Interlock testing Name Location Activation method Verification method Test frequency Comment Pass Fail Door Upper and lower door co...

Page 58: ... supply cable from being mechanically stressed squeezed pinched pulled Keep the electrical supply cable easily accessible for an emergency disconnection Protect the electrical supply cable and its terminals from being splashed or immersed in water Do not apply power to the system before having checked that all cables and pipes are properly connected 6 1 3 Status indicator LED There is a coloured i...

Page 59: ...rrect filament setup is very important in achieving good system performance Daily An operator should perform the following checks on a daily basis 1 Before switching the system on a visual check should be made for signs of any leakage of fluids The system uses coolant and mineral oil either of which could leak under extreme circumstances If there is any evidence of leakage from under the system DO...

Page 60: ...omputer 4 Check all cooling and filter vents on the back of the cabinet and top and bottom of the X ray source for obstructions and clean as necessary 5 Check all vacuum system connections for security 6 Check the cooling system and coolant level 7 Check the oil level in the backing pump 8 Check the emergency stop button s function correctly 9 Unplug one of the coolant hoses from the target and ch...

Page 61: ... is connected to the X ray gun via a length of vacuum hose and associated connectors The backing pump is directly connected to the exhaust of the turbo pump This is necessary as a turbo pump is unable to produce a high vacuum without having a low pressure exhaust It is the combination of the two pumps which produce the required vacuum An anti suckback reservoir may be fitted on the top of the pump...

Page 62: ... window 3 1 Pump inlet 2 Oil inlet plug 3 Observation window 4 Oil drain plug The oil level must be between a quarter and three quarters full Do not add more oil beyond the three quarter mark as this will impair the operation of the pump 3 If required remove the oil inlet plug 2 and pour in fresh oil Vacuubrand B oil up to the maximum mark indicated on the observation window and replace the oil in...

Page 63: ... system that will drop the interlocks if the coolant flow drops below a pre determined flow rate In this case there is no audible alarm but the Check Coolant and No Interlock banner displays in Inspect X The No Interlock condition can also occur for other reasons and is not exclusively indicative of a problem with the coolant flow To check coolant level follow these steps 1 Examine the cooling sys...

Page 64: ...bout two thirds the width of the machine The components are located behind a removable panel Before you remove this panel ensure that you read and act on all advice and warnings Refer to the Important health and safety information on page 1 for details Unplug the power supply from the machine before removing any access panels When checking the system the area should be marked out for restricted ac...

Page 65: ...nce and can in some cases be a diagnostic indicator for some fault conditions The filament should only be changed by a trained operator To ensure that you do not transfer dirt and grease always wear powder free gloves when changing the filament and handling the focus cup assembly anode and source barrel Tools required The following tools are required to change a filament Additionally an air duster...

Page 66: ...rature orange light is more effective than high colour temperature blue light Prepare to work on the X ray source Before you start 1 Prepare a clean area with good lighting for filament changing 2 Move the manipulator to the filament change position 3 Push the X RAY POWER button to switch off the vacuum pump circuit Do not start the turbo pump when you are changing the filament Running the vacuum ...

Page 67: ...operties window click to select the X ray properties 5 Click the Alignment tab 6 Click Filament Change Open the gun to access the focus cup Before opening the X ray source to change the filament ensure X ray power has been turned off the interlock key removed and the X ray source vented to release the vacuum To open the X ray source follow these steps 1 Position the manipulator to give access to t...

Page 68: ...assembly away from the source body 7 Tilt the target to approximately 90 degrees and release the pin The target latch should engage and secure the target in the open position The focus cup should now be visible Refer to the diagram below for an overview of the component parts of the focus cup assembly ...

Page 69: ... clean for optimum system operation Do not use sharp or abrasive objects as it is important to not scratch the surface of the focus cup Before touching the focus cup it should be earthed by grounding it to the outer casing using a suitable conductor such as a hex key or wire Be careful not to scratch the focus cup surface To change the filament follow these steps 1 Grasp the focus cup firmly and p...

Page 70: ... You now have access to the hairpin filament in the middle of the focus cup The filament is firmly plugged into the filament holder Replacing the filament does not require the filament holder to be removed 6 Using bent nose pliers grab the two filament pins at once and pull the filament out from the holder straight and firmly ...

Page 71: ...ure you do not contaminate the focus cup and do not use other air sources especially those containing water or oil Do not touch the focus cup with your bare fingers as you will contaminate the focus cup Remove any dust using an air duster Always check closely what you have been doing If you blow the dust with an air duster always check with a magnifier to ensure that the dust is removed Do not blo...

Page 72: ...ts the filaments being bent if the box is turned upside down 1 Filament 2 Ceramic base 3 Pins for electrical connection 9 Wearing gloves align the new filament with the filament holder and loosely place the filament 10 Press with the tip of the bent nose pliers on the white ceramic base until correctly seated Take care not to touch any part of the tungsten wire loop ...

Page 73: ...ly located in the focus insert aperture and just be visible when looking down the plane of the insert recess Alignment of the filament is critical to system performance View A Check filament is centred View B Check filament height Centre the filament The filament hairpin loop tip should be centrally located in the focus insert aperture and just be visible when looking down the plane of the insert ...

Page 74: ...ews and washers if they are replaced Use stainless steel screws The focus cup is a very important component and must be handled with care 2 Insert a thin bladed screwdriver into the gap between the focus cup and the filament holder and lever the filament holder to centralise the filament You must check the filament alignment in good light so that it can be easily seen Misalignment by as little as ...

Page 75: ...s cup is parallel to the lens of the magnifying glass or microscope to avoid parallax errors Viewing from the wrong angle is a very common mistake when centring the filament Parallax affecting the position of the filament Filament not centred but viewed correctly Filament off centre ...

Page 76: ...check the height of the filament The filament height seldom needs much adjustment as there is little variation between each filament in a box Sometimes a filament from a different box or batch may require a height adjustment If the filament is set too high or too low the X ray image quality may be suboptimal and in extreme cases the beam current could become unstable The aim is to get the filament...

Page 77: ...p of the filament is well above the line following the slope of the cone At this angle you should hardly see the tip of the filament This filament is too low To see the tip of the filament you must over tilt the focus cup Focus cup well tilted tip of the filament just visible ...

Page 78: ...ocus cup using clean lint free wipes to remove all traces of grease polish Any contamination could cause arcing which will prevent the X ray source operating in a stable manner at high voltages 4 Re fit the focus cup in the source The height screws are split so that they are tight in their holes Over time they may become loose In this case remove them and carefully insert a thin screwdriver into t...

Page 79: ...seated in its channel before closing the source Take care not to trap fingers when closing the source To close the source follow these steps 1 Slide back the locking pin 2 Close the target lid and whilst holding in position fasten the retaining latch Rotate advance the target Background Before conditioning the X ray source and calibrating the filament you should ensure that the target is not pitte...

Page 80: ...3 notches will be sufficient Power up the X ray source Once the filament has been changed and the target rotated optional you can power the X ray source and run the filament calibration routine To power the X ray source follow these steps 1 Turn the X ray power button ON The vacuum must re establish before the system can produce X rays Do not close the operator door Listen to the turbo pump speedi...

Page 81: ...onditions the source and sets the filament demand and X Y shifts Inspect X calculates the filament demand so that it is optimised for each X ray condition Ensure Safe focus is selected in the control software to prevent target damage when a high power X ray source is used Do not change the focus mode when performing alignment Nikon Metrology recommend that the filament calibration is re checked af...

Page 82: ...sage appears asking whether you have just performed filament change 7 Click Yes to display the Filament Set Up window If you click No the system will assume you wish to perform a regular filament adjustment 8 Ensure there is no sample in view and click Start Inspect X auto conditions the source calibrates the filament demand and the sets up the X and Y shifts ...

Page 83: ...Maintenance XT V 160 X ray System XTM0011 F2 73 ...

Page 84: ...lament It is recommended to do this after a few hours of operation of a new filament for optimum filament life and image quality as impurities on the filament surface boil off It can also be run at regular intervals to ensure optimum image quality You can also use the Regular filament adjustment option from the Setup page in Inspect X to recalibrate a filament during routine use of the system To r...

Page 85: ...ears asking whether you have just performed filament change 7 Click No to display the Filament Set Up window Ensure that a full calibration has been run previously before you click No 8 If you do not want to auto condition the source clear the Auto condition check box 9 Ensure there is no sample in view and click Start Inspect X auto conditions the source optional calibrates the filament demand an...

Page 86: ... F2 XT V 160 X ray System 10 When calibration is complete click Close Calibration error If the following error message is displayed in Inspect X you will need to remove the focus cup and recheck the alignment of the filament ...

Page 87: ...A T 5x20 24V DC PSU5 LASER POINTER F9 3 15A 5x20 230V AC COOLANT PUMP F21 1A T 5x20 24V DC IRIS JSB SUPPLY F20 3 15A 5x20 230V AC MONITOR F22 2A T 5x20 24V DC COOLING TRAY FANS F21 3 15 A T 5x20 230V AC AQUISITION PC F23 2A T 5x20 24V DC ELECTRICAL AREA FANS F22 5A T 5x20 230 VAC PSU3 SUPPLY F24 2A T 5x20 24V DC MANIPULATOR AUX F23 2A T 5x20 230V AC CABINET LIGHT F25 2A T 5x20 24V DC CT ARM F26 50...

Page 88: ...ogy No dangerous chemicals are used by the system to produce X rays For the purposes of re use and recycling of the system at the end of its useful life the following information may be useful Cabinets and the control consoles are made from either sheet steel or aluminium panels Lead is used throughout the whole cabinet to shield the user from X rays Various electronic units and subsystems are use...

Page 89: ...heck whether the image unit has power If there is power there is a hardware problem contact Support Check you are displaying a live image in Inspect X In Inspect X adjust the beam current demand value If the actual value remains at zero then change the filament No X rays are being produced Check the X ray status if it shows NO INTERLOCK check the System Status window to monitor the vacuum in the s...

Page 90: ...Troubleshooting 80 XTM0011 F2 XT V 160 X ray System ...

Page 91: ...f conformity This section contains pictures of typical declaration documents with a text version to provide a translation of the contents They are not intended to be the actual certificates which will be issued and supplied specifically for each machine ...

Page 92: ...tive 2006 42 EC with the relevant requirements of the Low Voltage Directive 2014 35 EU and with the essential protection requirements of the EMC Directive 2014 30 EU and EU Council Directive 2013 59 EURATOM and that where applicable the following standards and normative documents have been applied BS EN 60204 1 2006 A1 2009 Ionising Radiations Regulations 2017 Title 21 CFR 1020 40 BS EN ISO 12100 ...

Page 93: ......

Page 94: ...NIKON CORPORATION Shinagawa Intercity Tower C 2 15 3 Konan Minato ku Tokyo 108 6290 Japan phone 81 3 6433 3701 fax 81 3 6433 3784 www nikon com products industrial metrology NIKON METROLOGY EUROPE NV phone 32 16 74 01 01 sales europe nm nikon com NIKON METROLOGY GMBH phone 49 6023 91733 0 sales germany nm nikon com NIKON METROLOGY SARL phone 33 1 60 86 09 76 sales france nm nikon com NIKON METROLO...

Reviews: