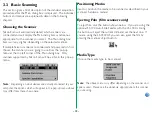
Summary of Contents for Scan

Page 1: ... 2 Setting the Application Gamma 4 3 Positioning Media 4 4 Ejecting Film film scanners only 4 5 Choosing the Media Type 4 6 Crop Preview Area Buttons 4 7 Cropping 4 8 Crop Size Control 4 9 Autofocus film scanners only 4 10 Adjust Focus film scanners only 4 11 Autoexposure 5 Image Compensation 5 1 Brightness Threshold 5 2 Contrast 5 3 Color Balance 5 4 Level Display Scanner Plug in Software Nikon S...

Page 2: ...rks of Adobe Systems Incorporated All other brand or product names mentioned in this manual are the trademarks or registered trademarks of their respective holders 6 Gamma Curves 6 1 Viewing the Gamma Curves 6 2 Viewing the Histogram 6 3 Modifying the Gamma Curves 7 Saving and Loading Settings 7 1 Saving Settings 7 2 Deleting Settings 7 3 Recalling Settings 7 4 Exporting Settings 7 5 Importing Set...

Page 3: ... reproduction of stamps issued by the government and certified documents stipulated by law is prohibited Cautions on certain copies and reproductions The government has issued cautions on copies or reproductions of securities issued by private companies shares bills checks gift certificates etc commuter passes or coupon tickets except when a minimum of necessary copies are to be provided for busin...

Page 4: ... optional AF 10 Auto Document Feeder mounted on the AX 110 or AX 210 or the optional SF 100 Auto Slide Feeder mounted on the LS 1000 images can be automatically and sequentially scanned by launching this software from within the Nikon Control application Consecutive and automated scanning might also be supported by other imaging applications but Nikon cannot ensure complete compatibility Note The ...

Page 5: ...pplications 2 2 Software Installation The Install disks provided with this product contain the Nikon Scan Macintosh plug in and the Nikon Control Macintosh application To begin using the Nikon Scan plug in you must first install Nikon Scan as described in the Installation section of the Nikon Control manual provided with this product Nikon Control is an easy to use application that acquires images...

Page 6: ...anner on Refer to the hardware manual provided with the product for details on how to insert and position the media to be scanned 3 1 Launching and Quitting The Nikon Scan plug in can be launched from the Acquire menu in your imaging application or from within Nikon Control as described in detail below Launching Double click the Nikon Control icon After Nikon Control is launched the following Cont...

Page 7: ... 7 You must first select the Nikon Scan plug in before you can begin scanning To do so choose Preferences from the File menu The Preferences dialog box appears ...

Page 8: ...required plug in from this dialog box and click the Select button The selected plug in is displayed after Selected plug in in the Preferences dialog box After quitting the Preferences dialog click the Acquire button on the Control palette The Nikon Scan Main dialog box appears Aquire button ...

Page 9: ... scanner you select The Main dialog box items will vary slightly depending on the selected scanner If multiple Nikon scanners are connected and powered on first choose the scanner you are going to use from the pop up menu at the top left corner of the Main dialog box Only scanners supported by Nikon Scan will be visible in this pop up menu Note Depending on what devices are actually connected to y...

Page 10: ...ol button menu or window for a brief description of its function Clicking a control will open this manual to the section in which its function is explained in greater detail To clear this explanation from the screen click the Close button below Close ...

Page 11: ...er Note Making the dialog larger than 800 x 600 pixels may require you allocate additional memory to your imaging application to accommodate the larger preview image Fit to screen Interactive Help Clicking the Help button at the bottom left of the dialog box activates the Interactive Help function Passing the cursor over a dialog item automatically displays appropriate Help text in the message dis...

Page 12: ...ox Only scanners supported by Nikon Scan will be visible in this pop up menu Note Depending on what devices are actually connected to your computer the options which will appear in the pop up menu above may differ from those shown here Positioning Media Insert or position the media to be scanned as described in your scanner s hardware manual Ejecting Film film scanners only To eject film click the...

Page 13: ...ich appear in the pop up menu above may differ from those shown here Please see the appendix appropriate to the scanner you are using Once the preview operation is completed an image will be displayed in the Preview display area Prescan check box PRESCAN ON PRESCAN OFF Note Even if the prescan check box is turned on the LS 4500AF will not conduct a prescan operation if the cropping area has not be...

Page 14: ...tons shown below the image displayed in the preview area by the preview operation can be rotated 90 to landscape or portrait orientation flipped vertically or horizontally and enlarged or reduced Setting Size Resolution and Image Adjustment You can change settings such as the resolution scale contrast gamma curve and other parameters as required ...

Page 15: ... 15 Scanning When the Scan button is clicked scanning is carried out in accordance with the settings made and the acquired image is passed to the imaging application or to Nikon Control ...

Page 16: ... top left corner of the Main dialog box Nikon Scan will automatically detect which scanners are connected and will display the Main dialog items and menus appropriate for the scanner you select The Main dialog box items will vary slightly depending on the selected scanner If multiple Nikon scanners are connected and powered on first choose the scanner you are going to use from the pop up menu at t...

Page 17: ... the scanner selected the options which appear in the pop up menu above may differ from those shown here Please see the appendix appropriate to the scanner you are using When Gamma Correction is chosen from the menu the Manual Gamma Correction dialog box appears You can set a Gamma value between 1 0 to 3 0 when the Use Application Gamma check box is unchecked If you want to use the application gam...

Page 18: ...he scanner s Eject button After the film eject button has been clicked a prescan operation will be carried out automatically 4 5 Choosing the MediaType MediaType Selection Choose the type of media to be scanned Note The above menu may differ depending on the scanner and options used Please see the appendix appropriate to the scanner you are using Choose one of the following from the upper part of ...

Page 19: ...unction is provided for this purpose This function can only be used to produce grayscale scans and is useful for dropping out unwanted colors such as document stains etc If you pull down the Media Type menu while holding down the option key on the keyboard the filter selection menu appears at the end of the Media Type menu Choose the filter you want to use from the menu ...

Page 20: ...iew operation can be rotated to landscape or portrait orientation flipped vertically or horizontally and enlarged or reduced Using the appropriate combination of these buttons will streamline the cropping process Clicking this button changes the entire preview area display including any existing crop marquis from portrait to landscape orientation The illustration on the button changes according to...

Page 21: ...ait orientation The illustration on the button changes according to the display orientation Flip The entire preview area display including any existing crop marquis is flipped horizontally by clicking this button The entire preview area display including any existing crop marquis is flipped vertically by clicking this button ...

Page 22: ...nal image is flipped horizontally or vertically the corresponding Flip button appears to have been pressed and will remain in a depressed position as shown below Clicking the button again restores its original appearance Zoom If Zoom in or Zoom out functions are unavailable e g when the minimum or maximum image size is shown the appropriate button is dimmed inactive and cannot be clicked ...

Page 23: ...thus forming a rectangle which is referred to as a marquis of marching ants Note Dragging means moving the mouse while holding the mouse button down The entire preview area can be re selected by double clicking anywhere in the preview window or by choosing Select All A Note For reasons involving the compression and display of the preview image there may be a slight difference between the crop area...

Page 24: ...he desired position Changing the Size of the Crop Area To change the size of the crop area drag a side or corner of the crop frame When a side is dragged the area will change only in the vertical or horizontal direction When a corner is dragged the size of the area will change both vertically and horizontally Note the type of cursor used for each change ...

Page 25: ...ed from the pop up menu When this selection is changed the values in the boxes are converted to the equivalent new units Selection Unit Pixels Pixel Inches Inch cm Centimeters mm Milimeters Picas Pica Points Point Note If the unit is changed the ruler and location display also change accordingly The width height aspect can be locked by clicking the padlock icon located to the left of the width and...

Page 26: ...ntrol area Output Resolution Enter the desired resolution in the Output Resolution field in the dialog box in order to set the output resolution The resolution specified here refers to the output resolution of the scanned image enter a value suitable for the final purpose of the scan If an unacceptable value is entered it will be shown in red The units for resolution can be selected from the pop u...

Page 27: ... controls Note If the file size calculated from the size resolution and scale settings is too large to be saved within the available disk space the value will be highlighted in yellow The padlock icon to the left of the File Size information item will lock in the file size permitting the size and resolution to change in proportion to each other without changing the final quantity of scan data the ...

Page 28: ...canner is selected You can choose a location in the image as the focus position by clicking this button while simultaneously holding down the option key If you click the Autofocus button without specifying a focus position the autofocus position chosen will be the center of the image Focus Position Cursor You can cancel the focus position cursor by clicking the Return to crop button ...

Page 29: ...s a value of zero 4 10 Adjust Focus film scanners only This function allows you to adjust focus to compensate for warping of the film or for differences in the thickness of slide mounts To use the Adjust Focus function choose Adjust Focus from the Special Capabilities submenu located on the pull down menu at the top left corner of the Main dialog box the Special Capabilities menu for the AX 110 an...

Page 30: ...kipped In this case you can carry out a prescan operation after preview by selecting Autoexposure from the Special Capabilities submenu Note The pop up menu shown above is for the LS 1000 The corresponding pop up menus for the LS 4500AF and for the AX 110 and AX 210 are different Please see the appendix appropriate to the scanner you using The prescanning operation begins immediately on your selec...

Page 31: ...le image or the threshold value for a B W Line Art image When this button is clicked and held down a slider bar pops up The value is set by dragging the slider to the left or right while holding down the mouse button The same result can be achieved by entering a value directly in the box to the right of the button When the slider is dragged in the plus direction the images will be brighter and the...

Page 32: ...justment permits individual compensation for each of these colors Adjustment range 100 to 100 Red Blue Green 5 2 Contrast This control is used to set the contrast for Color or Grayscale images A contrast setting is not used for B W Line Art images When this button is clicked and held down a slider bar pops up The value is set by dragging the slider to the left or right while holding down the mouse...

Page 33: ...eview area The values can be switched between absolute RGB pixel values in 8 bit level equivalent and CMY percentages by clicking within the boundary surrounding the density display area For grayscale images the L luminance in 8 bit level equivalence or K the black density percentage value at the cursor position is displayed ...

Page 34: ... the factory default gamma curves will yield excellent results These default gamma curves are well suited to the widest variety of original media However under certain circumstances you may want to use other gamma curves 6 1 Viewing the Gamma Curves When the Media Type is Color four gamma curves are displayed ...

Page 35: ... two dimensional graph represents the input output transfer function The horizontal axis represents the input or original values The vertical axis represents the output or new values A diagonal line connecting the lower left and upper right corners would represent a linear transfer function For example an input value of 100 would produce an output value of 100 Similarly an input value of 200 would...

Page 36: ...lor is selected as the Media Type in the Main dialog box The histogram will be displayed as long as the button is held down The histogram s horizontal axis represents the pixel intensity or brightness the darker values appearing on the left and the lighter values on the right The vertical axis is a statistical representation of the number of occurrences of each pixel value over the entire image Th...

Page 37: ... mode is maintained until another button is clicked Master Curve Red Green Blue 6 3 Modifying the Gamma Curves Modifying the gamma curves is relatively easy but modifying them correctly is not While the effects of altering the master curve are straightforward the relationships between the Red Green and Blue gamma curves are far more complex and much more difficult to control The gamma curves can b...

Page 38: ...image as seen in the preview window As the curve is altered a curve fitting software algorithm redraws the new curve Forcing the Gamma Curves to Linear To reset curves to a linear state clicking the Linear button shown below forces whichever gamma curve is active to linear Option clicking the Linear button will force all three gamma curves to linear Choosing the Reset Color Controls command from t...

Page 39: ...ce a 0 All the data values would then be meaningful To set the Black Point click the Black Point button After the Black Point button is clicked position the mouse cursor over the image in the preview window and select a pixel value to be used as the darkest point in the image Watch the Pixel Value display closely as you move the cursor across the image to enable you to choose the right value to mo...

Page 40: ... Point represents the lightest point in the image thus providing a function opposite to that of the Black Point Like the Black Point however selection of a White Point reduces the tonal range of the scanner so as not to waste any of its tonal range on light areas that are not actually present in the original The White Point is typically selected so that all values in the image that are lighter tha...

Page 41: ...n called dmin for minimum density When the White Point is selected the active gamma curve is automatically adjusted to reflect this selection This tool can be used with any gamma curve although it is most effective when used with the master gamma curve as it provides a neutral white point which is normal for many images When you decide on the pixel you want to use as the White Point of the image c...

Page 42: ...nalyze the portion of the preview image contained within the cropped region of the preview and automatically select an optimum Black Point and White Point The active gamma curves will be modified automatically Note that this may sometimes lead to undesirable color balance If for example the original image is of a predominantly warm toned scene such as a sunset then the neutral highlight produced b...

Page 43: ...lex gamma correction to improve reproduction Settings include the following items Scanner selection media type width and height units width value height value Aspect and file size locked unlocked status output resolution value scale value resolution unit Master R G and B curves brightness and contrast R G and B adjustment values Orientation horizontal and vertical flip status help ON OFF status cr...

Page 44: ... settings have previously been saved using the entered name the following dialog box will appear when you click the OK button If you want to overwrite the previous settings click the OK button If you want to keep the previous settings click the Cancel button and enter a different name for the new settings If you pull down the Settings menu after performing the save you will see that the name under...

Page 45: ...de factory default settings and last session settings as well as user settings Factory Defaults settings are made when the product is shipped and cannot be changed or deleted Last Session settings are saved automatically when you exit the plug in by clicking the Scan button Last Session settings cannot be deleted You can recall Factory Default settings Last Session settings or settings saved using...

Page 46: ... that can be located anywhere you can navigate to using the standard file dialog box A file to which settings have been saved using Export Settings function can be read using the Import Settings function To save the current settings to a file choose Export Settings from the Settings menu We recommend that you save mission critical settings data using Export Settings The Export dialog box appears W...

Page 47: ...u The Import dialog box appears When you click the Open button after opening the folder containing the settings and selecting a file the contents of that file are read 7 6 Reset Color Settings You can reset the modified gamma curves and image compensation Choosing the Reset Color Controls command from the Settings menu will force the Master Red Green and Blue gamma curves to linear and brightness ...

Page 48: ...terpolation Software Interpolation is used to provide precise image scaling and resolution The pop up menu at the top left corner of the Main dialog box includes the Special Capabilities sub menu Choose Software Interpolation from the Special Capabilities menu You can choose any one of the following from the Software Interpolation menu Bilinear Interpolation with emphasis on accuracy Nearest Neigh...

Page 49: ...a are automatically altered to reflect the format selected Choose any one of the following items from the film format submenu LoRes Uses the low resolution 1000 x 2000 dpi optical system HiRes Uses the high resolution 3000 x 3000 dpi optical system for 35mm film using a single frame holder 4 x5 4 x 5 film low resolution 6x6 9 Film measuring from 6 x 6 to 6 x 9 low resolution 6x4 5 Film measuring 6...

Page 50: ... on speed Normal Normal preview Highest Quality Preview with emphasis on quality B 3 Final Scan Quality Setting final scan quality allows you to choose whether scanning takes place in high speed mode or in high quality mode Select one of the following from the Final Scan Quality submenu Highest Speed Scan with emphasis on speed Normal Normal scan Highest Quality Scan with emphasis on quality Under...

Page 51: ... calibration will not proceed correctly The pop up menu at the top left corner of the Main dialog box includes the Special Capabilities sub menu Lamp calibration begins immediately on your selecting Make Shading from the Special Capabilities submenu B 5 Sharpening It is often necessary to sharpen images prior to reproduction since there are usually losses in definition when going to press To enhan...

Page 52: ...ers The operating procedures for the two models are identical C 1 Main Dialog Box The Main dialog box for the AX 110 and AX 210 is shown below Note that the Main dialog box for flatbed scanners lacks both Eject Film and Autofocus buttons and that the rulers in the Preview area differ from those shown for film scanners in scale and point of origin ...

Page 53: ...pe pop up menu Choose one of the following from the lower part of the Media Type menu Transparency To scan transparency images Reflective To scan reflective images Note When scanning transparencies with the Media Type set to Negative the prescan operation will be optimized for the currently selected crop If a new crop is selected after preview it may be necessary to carry out the prescan operation...

Page 54: ...ss will be scanned ADF On US Letter Enables scanning of letter sized documents placed on the ADF ADF On US Legal Enables scanning of legal sized documents placed on the ADF Note When the AF 10 Auto Document Feeder is attached to your scanner automated continuous scanning is available with applications supporting continuous acquire such as Photoshop version 3 or above or EasyPhoto 1 5 Continuous sc...

Page 55: ...harpen None Blur Blur More C 3 Software Interpolation Software interpolation is used to provide precise image scaling and resolution The pop up menu at the top left corner of the Main dialog box includes the Special Capabilities sub menu Choose Software Interpolation from the Special Capabilities menu You can choose either of the following from the Software Interpolation menu Bilinear Interpolatio...

Page 56: ...tering the Gamma Curves 38 Grayscale 18 31 32 H Highest Quality 50 Highest Speed 50 HiRes 49 Histogram button 36 I Image Compensation 31 Import Settings command 47 Importing Settings 47 Interactive Help 11 L Last Session 45 Launching 6 Level display 33 Linear button 38 Lores 49 LS 1000 4 5 12 18 48 LS 20 4 48 LS 4500AF 4 12 13 18 49 51 M Main Dialog Box 9 Make Shading 51 Master Curve button 37 Med...

Page 57: ...10 ScanTouch 210 See AX 210 Setting and Ejecting Film 18 Setting Size Resolution and Image Adjustment 14 Setting the Application Gamma 17 Setting the Black Point 39 40 Setting the White Point 40 Settings pop up menu 43 SF 100 Auto Slide Feeder 4 12 18 Sharpening 51 55 Software Installation 5 Software Interpolation 48 55 Specifying the Gamma Curve 37 SUPER COOLSCAN See LS 1000 System Requirements 5...

Reviews: