background image

4HE.IKON'UIDETO$IGITAL0HOTOGRAPHY

WITHTHE

$)')4!,#!-%2!

%N

Summary of Contents for D200

Page 1: ...4HE IKON UIDE TO IGITAL 0HOTOGRAPHY WITH THE 4 2 N ...

Page 2: ... Photography and Playback page 17 The basic operations involved in taking photographs and playing them back Technical Notes page 173 Read this chapter for information on camera specifications accessories and trouble shooting Setup Basic Camera Settings page 115 Basic camera setup including formatting memory cards and setting the camera clock Trademark Information Macintosh MacOS andQuickTimeareregi...

Page 3: ...utorial More on Photography More on Playback Basic Camera Settings The Setup Menu Shooting Options The Shooting Menu Playback Options The Playback Menu Custom Settings The Custom Settings Menu Technical Notes Photography and Playback ...

Page 4: ... of flammable gas as this could result in explosion or fire Do not place strap around the neck of an infant or child Placing the camera strap around the neck of an infant or child could result in stran gulation Do not disassemble Touching the product s internal parts could result in injury In the event of a malfunction the product should be repaired only by a qualified technician Should the product b...

Page 5: ... result in injury CD ROMs The CD ROMs on which the software and manuals are distributed should not be played back on audio CD equipment Playing CD ROMs on an audio CD player could cause hearing loss or damage the equipment Observe caution when using the flash Do not operate the flash with the flash window touching a person or object Failure to observe this precaution could result in burns or fire Usin...

Page 6: ...lar installation If this equipment does cause harmful interfer ence to radio or television reception which can be determined by turning the equipment off and on the user is encouraged to try to correct the interference by one or more of the follow ing measures Reorient or relocate the receiving antenna Increase the separation between the equip ment and receiver Connect the equipment into an outlet ...

Page 7: ...ns of securities issued by private companies shares bills checks gift certificates etc commuter passes or coupon tickets except when a minimum of necessary copies are to be provided for business use by a company Also do not copy or reproduce passports issued by the government licenses issued by public agencies and private groups ID cards and tickets such as passes and meal coupons Comply with copyr...

Page 8: ...g Mode 26 Image Quality and Size 28 Image Quality 28 Image Size 32 ISO Sensitivity 33 White Balance 35 Optimizing Images 45 Color Space 50 Focus 51 Focus Mode 51 Focus Area Selection 53 AF Area Mode 54 Focus Zone Selection 55 Focus Lock 56 The AF Assist Illuminator 58 Getting Good Results with Autofocus 59 Manual Focus 60 Exposure 61 Metering 61 Exposure Mode 62 Autoexposure Lock 70 Exposure Compe...

Page 9: ...9 USB 121 Dust Off Ref Photo 121 Battery Info 123 Firmware Version 123 Shooting Options The Shooting Menu 124 Shooting Menu Bank 125 Menu Reset 127 Folders 128 File Naming 129 Optimize Image 129 Color Space 129 Image Quality 129 Image Size 130 JPEG Compression 130 RAW Compression 130 White Balance 130 Long Exp NR 131 High ISO NR 131 ISO Sensitivity 132 Image Overlay 132 Multiple Exposure 132 Interv...

Page 10: ...rt and edu cation continually updated information is available on line at the following sites For users in the U S A http www nikonusa com For users in Europe and Africa http www europe nikon com support For users in Asia Oceania and the Middle East http www nikon asia com Visit these sites to keep up to date with the latest product information tips answers to fre quently asked questions FAQs and ...

Page 11: ...ra For information on viewing the soft ware manual see the Quick Start Guide To make it easier to find the information you need the following symbols and conventions are used This icon indicates that more infor mation is available elsewhere in this manual or in the Quick Start Guide This icon marks notes information that should be read before using the cam era This icon marks tips additional infor ...

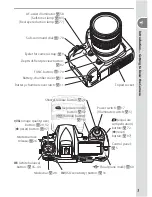
Page 12: ...the rest of the manual Camera Body Accessory shoe 180 Getting to Know the Camera flash sync mode button 78 Flash compensa tion 80 Lens release button 8 Focus mode selector 19 51 Built in flash 76 Connector cover 106 Video connector 106 DC IN connector for optional EH 6 AC adapter 181 USB connector 108 111 Eyelet for camera strap 9 Flash sync terminal 180 Flash pop up button 78 10 pin remote terminal...

Page 13: ...Battery chamber cover 11 Battery chamber cover latch 11 Tripod socket Mode dial lock release 26 QUAL image quality size button 29 32 reset button 97 WB white balance button 35 44 ISO ISO sensitivity button 33 Mode dial 26 Power switch 17 Illuminator switch 5 exposure compensation button 72 reset button 97 Control panel 5 focal plane mark 60 exposure mode button 62 format button 14 Shutter release ...

Page 14: ... eyepiece cup Viewfinder eyepiece 83 90 181 View more photo info Move cursor down View previous photo Return to previous menu Cancel Playback 98 Menu navigation 24 View next photo Display sub menu Make selection View more photo info Move cursor up Multiselector AE AF lock button 56 70 Main command dial 170 AF area mode selector 54 Focus selector lock 53 Diopter adjustment control 16 181 AF ON butto...

Page 15: ...stops 67 69 Bracketing increment 43 73 Number of shots per interval 91 Maximum aperture non CPU lens 95 PC connection indicator 108 17 Aperture stop indicator 67 69 2 1 3 4 5 6 7 8 9 10 11 12 13 14 15 17 16 18 Flash compensation indicator 80 19 Exposure compensation indicator 72 20 ISO sensitivity indicator 33 21 Flash value FV lock 81 22 Image comment indicator 118 23 Wide frame focus area indica...

Page 16: ... areas 55 8 Focus indicator 20 9 Metering 61 10 Autoexposure AE lock 70 11 Shutter speed 62 69 12 Aperture f number 62 69 Aperture number of stops 67 69 13 Exposure mode 62 14 Flash compensation indicator 80 15 Exposure compensation indicator 72 16 ISO sensitivity 33 17 Number of exposures remaining 17 Number of shots remaining before memory buffer fills 27 Preset white balance recording indicator 4...

Page 17: ...t with the background Vari Brite focus areas making it easier to identify the selected focus area The viewfinder is also equipped with on demand grid lines When On is selected for Custom Setting d2 Grid display 158 a reference grid is superim posed over the display in the viewfinder This grid is a useful aid when composing land scape shots or when tilting or shifting a PC Nikkor lens Owing to the ch...

Page 18: ... in the camera s bayonet mount Being careful not to press the lens re lease button rotate the lens counter clockwise until it clicks into place Attaching a Lens Care should be taken to prevent dust from entering the camera when the lens is removed 1 After confirming that the camera is off remove the rear lens cap and camera body cap First Steps Aperture Ring If the lens is equipped with an aperture ...

Page 19: ...rds as shown at right The Monitor Cover A clear plastic cover the BM 6 LCD monitor cover is pro vided with the camera to keep the monitor clean and protect it when the camera is not in use To attach the cover insert the projection on the top of the cover into the matching indentation above the camera monitor 햲 then press the bottom of the cover until it clicks into place 햳 ...

Page 20: ...th any warnings and instructions provided by the battery manufacturer Use only EN EL3e batteries The D200 is not compatible with the EN EL3 or EN EL3a batteries available for D100 D70 series or D50 cameras or with the MS D70 CR2 battery holder Do not use the battery at ambient temperatures below 0 C 32 F or above 40 C 104 F During charging the temperature should be in the vicinity of 5 35 C 41 95 ...

Page 21: ...x electronic circuitry Only Nikon brand electronic accessories including lenses Speedlights battery chargers batteries and AC adapters certified by Nikon specifically for use with this Nikon digital camera are engineered and proven to operate within the operational and safety requirements of this electronic circuitry THE USE OF NON NIKON ELECTRONIC ACCESSORIES COULD DAMAGE THE CAM ERA AND MAY VOID Y...

Page 22: ...the time and date 5 Highlight World Time 2 Display language menu 6 Display options 7 Highlight Time Zone 8 Display map of world time zones 9 Select local time zone UTC field shows time difference between selected time zone and Coordinated Universal Time UTC in hours 10 Return to WORLD TIME menu 3 Select language 4 Return to setup menu 1 Turn camera on and press button ...

Page 23: ...be advanced one hour 12 Display DATE menu 18 Return to WORLD TIME menu 19 Return to setup menu 16 Display options 17 Choose order in which date is displayed 14 Return to WORLD TIME menu 15 Highlight Date Format 13 Press multi selector left or right to select item up or down to change Using Camera Menus The language option is only highlighted automatically the first time menus are displayed See Usin...

Page 24: ...hs and other data they may contain Be sure all data you wish to keep have been copied to another storage device before formatting the card 2 1 Turn camera on and press and buttons simultaneously for about 2seconds until blinks in control panel and viewfinder 2 2 Press buttons again Do not turn camera off or remove battery or memory card until formatting is complete and control panel shows number of ...

Page 25: ...ry card while pressing the eject button Failure to observe this precaution could damage the camera or memory card 1 2 Illustrations In illustrations throughout this manual indicators in the control panel and viewfinder rel evant to the explanation in the accompanying text are shown in black Indicators not mentioned in the text are shown in gray Removing Memory Cards 1 Confirm that the access lamp is...

Page 26: ...cus when the shutter release button is pressed halfway When operating the diopter adjustment control with your eye to the viewfinder be careful not to put your fingers or fingernails in your eye Focus brackets At default settings the viewfinder display and the aperture and shutter speed indicators in the control panel will turn off if no operations are performed for about six seconds auto meter off redu...

Page 27: ...ange battery Battery level is not displayed when camera is powered by optional AC adapter 1 3 The exposure count displays in the control panel and viewfinder show the number of photographs that can be stored on the memory card Check the number of expo sures remaining If there is not enough memory to store ad ditional photographs at current settings the display will flash as shown at right No further...

Page 28: ...ize is ideal for snapshots 28 31 Image size L Large Images are 3 872 2 592 pixels in size 32 ISO sensitivity 100 ISO sensitivity digital equivalent of film speed set to value roughly equivalent to ISO 100 33 34 White balance A Auto White balance automatically adjusted for natu ral coloration under most types of lighting 35 44 Exposure mode Programmed auto Built in exposure program automatically adj...

Page 29: ...setting the camera will focus automatically when the shutter release but ton is pressed halfway Pictures can only be taken when the camera is in focus 3 1 Hold the camera as shown Holding the Camera Hold the handgrip in your right hand and cradle the camera body or lens with your left Keep your elbows propped lightly against your torso for sup port and place one foot half a pace ahead of the other...

Page 30: ...ra was unable to focus using autofocus Focus will lock while the shutter release button is pressed halfway If the subject is dark the AF assist illuminator may light to assist the focus operation 5 Check exposure In exposure mode P programmed auto the camera automatically sets shutter speed and ap erture when the shutter release button is pressed halfway Before shooting check the shutter speed and...

Page 31: ...hutter release button the rest of the way down to release the shutter and record the photograph The access lamp next to the card slot cover will light Do not eject the memory card or remove or disconnect the power source until the lamp has gone out and recording is complete ...

Page 32: ...ack To exit without deleting the picture press the button or press the shutter release button halfway Basic Playback Press the button to view photographs The most recent photo will be displayed in the monitor addi tional pictures can be displayed by pressing the multi selector left or right To end playback and return to shooting mode press the shutter release button halfway Deleting Unwanted Photo...

Page 33: ...ct or focus manually Focus 51 Let the camera choose shutter speed and aperture Exposure Mode P Programmed Auto 63 Freeze or blur motion Exposure Mode S Shutter Priority Auto 64 Control depth of field Exposure Mode A Aperture Priority Auto 66 Choose shutter speed and aperture manu ally Exposure Mode M Manual 68 Make photographs brighter or darker or en hance contrast Exposure Compensation 72 Use the...

Page 34: ... View recent settings Slider is displayed if more op tions are available in current menu Current setting for each op tion is shown by icon Current menu item is high lighted If icon is displayed help for current item can be viewed by pressing button Menu Description Playback Adjust playback settings and manage photos 133 Shooting Adjust shooting settings 124 Custom Settings Personalize camera setti...

Page 35: ...menu settings Display menus Highlight icon for current menu Select menu Position cursor in selected menu Highlight menu item Display options Highlight option Make selection Menu items that are displayed in gray are not currently available When formatting memory cards and in other cases in which user confirmation is required a selection can only be made with the center of the multi selector or by pr...

Page 36: ...d down camera records up to 5 frames per second Use to photograph moving objects or to capture a fleeting expression on portrait subjects Self timer Use the self timer for self portraits or to reduce blurring caused by camera shake 83 MUP Mirror up Press shutter release button once to raise mirror again to take photograph shutter will be released automatically if shutter release button is not press...

Page 37: ...ld down although the frame rate will drop once the buffer has filled While photographs are being recorded to the memory card the access lamp next to the memory card slot will light Depending on the number of images in the buffer record ing may take from a few seconds to a few minutes Do not remove the memory card or remove or disconnect the power source until the access lamp has gone out If the camer...

Page 38: ... one NEF RAW image and one basic quality JPEG image Size Priority selected for JPEG Compression 30 Image quality can be set using the Image Quality option in the shooting menu or by pressing the QUAL button and rotating the main command dial Two op tions are available for controlling compression RAW Compression for NEF RAW images 31 and JPEG Compression for JPEG images 30 NEF RAW NEF JPEG NEF RAW ...

Page 39: ...IC RAW NORM RAW FINE FINE RAW NORM BASIC File Names Photographs are stored as image files with names of the form DSC_nnnn xxx where nnnn is a four digit number between 0001 and 9999 assigned automatically in ascending order by the camera and xxx is one of the following three letter extensions NEF for NEF images JPG for JPEG images and NDF for Dust Off ref photos 121 122 The NEF and JPEG files recorde...

Page 40: ...ss the multi selector to the right The JPEG Compression Menu The JPEG compression menu offers the following options for JPEG images Mode Description Size Priority default Images are compressed to produce relatively uniform file size Quality varies with scene recorded Optimal Quality Optimal image quality File size varies with scene recorded TheeffectsoftheseoptionsaremostpronouncedwithhighISOsensitiv...

Page 41: ...essed Comp NEF RAW NEF images are compressed by about 40 50 with little drop in qual ity Recording time is reduced 1 Highlight RAW Compression in the shooting menu and press the multi selector to the right 2 Highlight the desired option and press the multi selector to the right The shooting menu will be displayed The selected option applies to all subsequent NEF RAW images ...

Page 42: ...inted at 200 dpi Large 3872 2592 10 0M 3 872 2 592 49 2 32 9cm 19 36 12 96in Medium 2896 1944 5 6M 2 896 1 944 36 8 24 7cm 14 48 9 72in Small 1936 1296 2 5M 1 936 1 296 24 6 16 5cm 9 68 6 48in Image size can be set using the Image Size option in the shooting menu or by pressing the QUAL button and rotating the sub command dial Note that the option selected does not affect the size of NEF RAW images...

Page 43: ... can be further increased up to 1EV over ISO 1600 ISO sensitivity can be adjusted using the ISO Sensitivity option in the shooting menu or by pressing the ISO button and rotating the main command dial The ISO Sensitivity Menu 1 Highlight ISO Sensitivity in the shooting menu and press the multi selector to the right 2 Highlight the desired option and press the multi selector to the right The shooti...

Page 44: ...When On is selected for Custom Setting b1 ISO Auto the camera will automatically vary ISO sensitivity from the value selected by the user to help ensure optimum exposure maximum can be selected from ISO 200 400 800 and 1600 ISO sensitivity can not be raised above 1600 while ISO Auto is on and On can not be selected for ISO Auto at ISO sensitivities over 1600 b2 ISO Step Value 154 Depending on the ...

Page 45: ... 800andSB 600Speedlights white balance reflects conditions in effect when flash fires Incandescent 3 000K Use under incandescent lighting Fluorescent 4 200K Use under fluorescent lighting Dir Sunlight 5 200K Use with subjects lit by direct sunlight Flash 5 400K Use with built in flash or optional Nikon flash units Cloudy 6 000K Use in daylight under overcast skies Shade 8 000K Use in daylight with subjec...

Page 46: ...ght Selecting Choose Color Temp displays a menu of color temperatures 38 White Balance Preset a preset white balance menu 39 other options a fine tun ing dialog 37 The WB Button Press the WB button and rotate the main command dial until the desired setting is displayed in the con trol panel e5 Auto BKT Set 166 When WB Bracketing is selected for custom setting e5 Auto BKT Set the camera will create ...

Page 47: ... At set tings other than 0 a icon appears in the control panel The White Balance Menu Selecting an option other than Choose ColorTemp or White Balance Preset in the white balance menu 35 displays the menu shown at right Press the multi selector up or down to choose the desired value and press the multi selector to the right The shooting menu will be displayed The WB Button Press the WB button and ...

Page 48: ... or red Light sources with a higher color temperature appear tinged with blue Choosing a Color Temperature Choose a setting of Choose Color Temp to select the color temperature from thirty one predetermined values ranging from 2 500K to 10 000K in incre ments of roughly 10 mired note that the desired results will not be obtained with flash or fluorescent lighting Color temperature can be selected in...

Page 49: ... 42 or white bal ance value is copied from Nikon Capture 4 Version 4 4 or later available separately 182 The camera can store up to five values for preset white balance in presets d 0 through d 4 A descriptive comment can be added to any white balance preset 42 Store values created in Nikon Capture 4 Version 4 4 or later available separately 182 d 0 Stores last measured value 40 Store values cop ie...

Page 50: ... 0 by pressing the WB button and rotating the sub command dial until d 0 is displayed Otherwise there is no need to select d 0 when measuring a new value for white balance 3 Release the WB button briefly and then press the button until the icon starts to flash A blink ing will also appear in the control panel and viewfinder frame count displays 4 Frame the reference object so that it fills the viewfind...

Page 51: ... is selected white balance will be set to a color temperature of 5 200K the same as Direct Sunlight The new white balance value will remain in preset d 0 until white balance is measured again By copying preset d 0 to one of the other presets before measuring a new value for white balance up to five white balance values can be stored 42 Nikon Capture 4 Version 4 4 or later available separately can b...

Page 52: ...of current preset d 0 d 4 and press multi selector right Press the multi selector up or down to highlight an option then press to the right to select Option Description Set Set white balance to value for selected preset and return to shooting menu Edit Comment Text edit dialog is displayed 118 Enter comment of up to 36 charac ters for current preset and press button to return to Step 1 Select Imag...

Page 53: ... of NEF RAW NEF JPEG Fine NEF JPEG Normal or NEF JPEG Basic To use white balance bracketing 1 Choose WB Bracketing for Custom Setting e5 Auto BKT Set 166 3 Pressing the button rotate the sub command dial to choose the white balance adjustment 197 Each increment is roughly equivalent to 10 mired 2 Pressing the button rotate the main com mand dial to choose the number of shots in the bracketing sequ...

Page 54: ...JPEG Normal or NEF JPEG Basic cancels white balance bracketing Shooting Mode In all modes including self timer and continuous modes only one shot will be taken each time the shutter release button is pressed Each shot will be processed to create the num ber of copies specified in the bracketing program Turning the Camera Off If the camera is turned off while the camera while the memory card access la...

Page 55: ... and sharpness to produce crisp images with sharp outlines PO Portrait Lowers contrast while lending natural texture and rounded feel to skin of portrait subjects Custom Customize sharpness contrast color reproduction saturation and hue 46 BW Black and white Take photos in black and white At Settings Other than Custom At settings other than Custom Photographs are optimized for current shooting con...

Page 56: ...g the camera processes photographs to emphasize the borders between light and dark areas making pictures appear sharper Sharpening can be customized using the Image Sharpening menu Option Description Auto default Camera automatically adjusts sharpening according to subject Re sults vary from shot to shot even in scenes of same type choose different setting to take multiple shots with same sharpenin...

Page 57: ...t Less Contrast Prevents highlights on portrait subjects from being washed out in direct sunlight More Contrast Preserves detail in misty landscapes and other low contrast subjects Custom Custom curve can be created in Nikon Capture 4 Version 4 4 or later avail able separately and downloaded to camera Choose Custom to select this user defined curve If no custom curve has been created this option is...

Page 58: ... appear increasingly orange Lowering hue below 0 would introduce a blue cast mak ing colors that would be red at a setting of 0 appear increasingly purple The RGB color model used in digital photographs reproduces colors using differing amounts of red green and blue light By mixing two colors of light a variety of different colors can be produced For example red combined with a small amount of green...

Page 59: ...tion Options Choosing Custom in the Optimize Image menu 45 displays the menu shown in Step 1 1 Highlight optimization option 2 Display sub menu 3 Highlight option 4 Make selection Repeat steps 1 4 to adjust other options 5 Highlight Done 6 Return to shooting menu ...

Page 60: ...photographs that will be printed without modification or viewed in applications that do not support color management or when taking photo graphs that will be printed with ExifPrint the direct printing option on some household printers or kiosk printing or other commercial print services Adobe RGB photographs can also be printed using these options but colors will not be as vivid JPEG photographs ta...

Page 61: ...ult set tings shutter can only be released when in focus indicator is displayed fo cus priority C Continuous servo AF Camera focuses continuously while shutter release button is pressed half way If subject moves focus will be adjusted to compensate predictivefocus tracking 52 At default settings photographs can be taken whether or not camera is in focus release priority M Manual Camera does not fo...

Page 62: ...ty photographs can be taken in continuous servo AF only when the camera is in focus Note that regardless of the setting selected focus will not lock when the in focus indicator is displayed a2 AF S Mode Priority 148 If Release is selected for Custom Setting a2 AF S Mode Priority photographs can be taken in single servo AF even when the camera is not in focus Note that regardless of the setting sel...

Page 63: ...e rotated to the L locked position following selection to prevent the selected focus area from changing when the multi selector is pressed Focus Area Selection The focus area can not be changed when the exposure meters are off during playback or while menus are displayed a3 Focus Area Frame 148 In single area and dynamic area AF select Wide Frame 7 Areas to choose from seven wide focus areas instea...

Page 64: ...amera focuses on center of selected group if subject leaves focus area even briefly camera fo cuses based on information from other focus areas in same group Use when subject is moving errati cally but place of subject in overall composition is known Custom Top Left Center Right Bottom Setting a4 149 can be used to change how focus areas are grouped or to focus on closest subject in selected group ...

Page 65: ...ect Wide Frame 7 Areas User can select from seven focus areas each covering wide area of frame making it easier to position subject in focus area and reducing time needed to frame photographs May produce unpredictable results if focus area contains multiple subjects Focus areas are displayed in the control panel and viewfinder as follows Control panel Viewfinder Single area AF Dynamic area AF Normal...

Page 66: ...sed to change the composition after focusing making it pos sible to focus on a subject that will not be in a focus area in the final composition It can also be used when the autofocus system is unable to focus 59 In single servo AF focus locks automatically when the in focus indicator ap pears in the viewfinder In continuous servo AF focus must be locked manually using the AE L AF L button To recomp...

Page 67: ... later remove your finger from the shutter release button 3 Recompose the photograph and shoot In single servo AF focus will remain locked between shots as long as the shut ter release button is kept pressed halfway allowing several photographs in suc cession to be taken at the same focus setting Focus will also remain locked between shots while the AE L AF L button is pressed Do not change the dis...

Page 68: ...lowing lenses autofocus with AF assist illumination is not available at ranges under 0 7m 2ft 4in AF Micro ED 200mm f 4D AF S ED 28 70mm f 2 8D AF S VR ED 24 120mm f 3 5 5 6G AF Micro ED 70 180mm f 4 5 5 6D With the following lens AF assist is not available at ranges under 1m 3ft 3in AF S DX ED 55 200mm f 4 5 6G With the following lens AF assist is not available at ranges under 2 5m 8ft 2in AF VR ...

Page 69: ... to focus on another subject at the same distance and then recompose the photograph There is little or no contrast between the subject and the background Example subject is the same color as the background The focus area contains objects at different distances from the camera Example subject is inside a cage The subject is dom inated by regular geometric patterns Example a row of windows in a skysc...

Page 70: ...her the portion of the subject in the selected fo cus area is in focus After positioning the subject in the active focus area press the shutter release button halfway and rotate the lens focusing ring until the in focus indicator is displayed To determine the distance between your subject and the camera measure from the focal plane mark on the cam era body The distance between the lens mounting fla...

Page 71: ...1in in diameter shown by corresponding 8 mm reference circle in viewfinder Classic meter for portraits recommended when using fil ters with an exposure factor filter factor over 1 181 Spot Camera meters circle 3mm 0 12in in diameter approximately 2 0 of frame Circle is centered on current focus area in group dynamic AF on center focus area of current group 54 making it possible to meter off center sub...

Page 72: ...ease will be disabled and a blinking will appear in the aperture displays in the control panel and viewfinder Type G lenses are not equipped with an aperture ring b1 ISO Auto 152 When Custom Setting b1 ISO Auto is on the camera automatically varies ISO sensitivity between ISO 100 and a maximum selected by the user to help ensure optimum exposure and flash level In exposure modes P and A the camera a...

Page 73: ... panel and A will be displayed in the viewfinder For more information see Aperture Priority Auto 66 Exposure Warning If the limits of the exposure metering system are exceeded one of the following indicators will be displayed in the control panel and viewfinder Indicator Description Subject too bright Use optional Neutral Density ND filter or lower ISO sensitivity 33 Subject too dark Use flash or rais...

Page 74: ...en 30s and s Use slow shutter speeds to suggest motion by blurring moving objects high shutter speeds to freeze mo tion Shutter priority auto is only available with CPU lenses To take photographs in shutter priority auto 2 Rotate the main command dial to choose the desired shutter speed 1 Press the button and rotate the main com mand dial until S is displayed in the viewfinder and control panel 3 F...

Page 75: ...nt of under or over exposure and one of the following indicators will be displayed in the control panel and viewfinder aperture displays Indicator Description Subject too bright Choose faster shutter speed or lower ISO sensitivity 33 or use optional Neutral Density ND filter Subject too dark Choose slower shutter speed or higher ISO sensitivity 33 or use flash Long Exp NR 131 To reduce noise at slow ...

Page 76: ...ain sub ject and background into focus Large apertures low f numbers soften back ground details and let more light into the camera increasing the range of the flash and making photographs less susceptible to blurring To take photographs in aperture priority auto 2 Rotate the sub command dial to choose the de sired aperture 1 Press the button and rotate the main com mand dial until A is displayed in...

Page 77: ...nd one of the following indicators will be displayed in the control panel and viewfinder shutter speed displays Indicator Description Subject too bright Choose smaller aperture larger f number or ISO sensitivity 33 or use optional Neutral Density ND filter Subject too dark Choose larger aperture smaller f number or higher ISO sensitivity 33 or use optional Speedlight b3 EV Step 154 This option contr...

Page 78: ...e a shutter speed and the sub command dial to set aperture Check exposure in the electronic an alog exposure displays see right and continue to adjust shutter speed and aperture until the desired exposure is achieved 1 Press the button and rotate the main com mand dial until M is displayed in the viewfinder and control panel 3 Frame a photograph focus and shoot At a shutter speed of the shutter wil...

Page 79: ...EV f5 Command Dials 170 Command Dials Change Main Sub and Command Dials Aperture setting control whether aperture is assigned with the main command dial the sub command dial or the lens aperture ring Regardless of the settings chosen the sub command dial is always used with type G lenses the lens aperture ring with non CPU lenses At shutter speeds other than the electronic analog exposure displays...

Page 80: ... 1 Select exposure mode P S or A and choose cen ter weighted or spot metering exposure lock has no effect in exposure mode M If using cen ter weighted metering select the center focus area with the multi selector 53 2 Position the subject in the selected focus area and press the shutter re lease button halfway With the shutter release button pressed halfway and the subject positioned in the focus a...

Page 81: ...er Speed and Aperture Metered Area In spot metering exposure will be locked at the value metered in a 3 mm 0 12in circle centered on the selected focus area In center weighted metering exposure will be locked at the value metered in an 8 mm 0 31in circle at the center of the viewfinder c1 AE Lock 156 If Release Button is selected for AE Lock exposure will lock when the shutter release button is pre...

Page 82: ... to values between 5EV underexposure and 5EV overexposure in increments of EV At values other than 0 the 0 at the center of the electronic analog exposure displays will flash and a icon will be displayed in the control panel and viewfinder after you release the button The current value for exposure compen sation can be confirmed in the electronic analog exposure display or by pressing the button 0EV ...

Page 83: ...ting to be performed using Custom Setting e5 Auto BKT Set 166 Choose AE Flash to vary both exposure and flash level the default setting AE Only to vary only exposure or Flash Only to vary only flash level 2 Pressing the button rotate the main com mand dial to choose the number of shots in the bracketing sequence 198 199 At settings other than zero a BKT icon and bracketing indi cator will be display...

Page 84: ... in the control panel A segment will disappear from the indicator after each shot To cancel bracketing press the button and rotate the main command dial until the number of shots in the bracketing sequence is zero and is no longer displayed in the control panel The program last in effect will be restored the next time bracketing is activated Bracketing can also be cancelled by performing a two butt...

Page 85: ... continuous low speed and continuous high speed modes shooting will pause after the number of shots specified in the bracketing program have been taken Shooting will resume the next time the shutter release button is pressed Resuming Exposure or Flash Bracketing If the memory card fills before all shots in the sequence have been taken shooting can be resumed from the next shot in the sequence after ...

Page 86: ...ground details or when exposure compensation is used Standard i TTL flash for digital SLR is activated automatically when spot metering is selected Flash Photography Using the Built in Flash ISO Sensitivity i TTL flash control can adjust for ISO sensitivities between 100 and 1600 It may not be able to adjust flash level appropriately for ISO sensitivities over 1600 When On is selected for Custom Sett...

Page 87: ...g caused by camera shake Rear curtain sync In shutter priority auto or manual exposure mode flash fires just before the shutter closes creating effect of a stream of light be hind moving objects In programmed auto and aperture priority auto slow rear curtain sync is used to capture both subject and background Use of tripod is recommended to prevent blurring caused by camera shake Red Eye Reduction So...

Page 88: ... dial until the desired flash sync icon is dis played in the control panel Red eye reduction slow sync1 Rear curtain sync3 Slow sync2 Red eye reduction Front curtain sync 1 Available only in exposure modes P and A In modes S and M red eye reduction is selected when the button is released 2 In exposure modes P and A flash sync mode will be set to slow rear curtain sync when the button is released 3 A...

Page 89: ...d aperture Consult table of flash of flash ranges 200 when setting aperture in A and M modes 5 Check that the flash ready indicator appears in the viewfinder If the flash ready indicator is not displayed when the built in flash is used the shutter release will be disabled 6 Compose the photograph making sure that the subject is within range of the flash 200 then focus and shoot If the flash ready light bl...

Page 90: ... increments of EV At values other than 0 a icon will be displayed in the control panel and viewfinder after you release the button The current value for flash exposure compensation can be confirmed by pressing the button Normal flash output can be restored by setting flash exposure compensation to 0 0 or performing a two button reset 97 Flash exposure compensation is not reset when the camera is turned...

Page 91: ... changes in ISO sensitivity or aper ture To use FV lock 1 Select FV Lock or FV Lock Lens Data for Cus tom Setting f4 FUNC Button 170 2 Press the flash pop up button to raise the flash 3 Position the subject in the center of the frame and press the shutter release button halfway to focus 4 Press the FUNC button The flash will emit a monitor preflash to determine the appropriate flash level Flash output ...

Page 92: ... mode see the Speedlight manual for details While FV lock is in effect flash output will automati cally be adjusted for changes in Speedlight zoom head position When Commander Mode is selected for Custom Setting e3 Built in Flash 161 FV lock can be used with remote SB 800 SB 600 or SB R200 flash units if a any of the built in flash flash group A or flash group B is in TTL mode or b a flash group is com p...

Page 93: ...revents light entering via the viewfinder from interfering with exposure 4 Press the shutter release button all the way down to start the self timer The self timer lamp AF assist lamp will start to blink and a beep will begin to sound Two seconds before the photo graph is taken the self timer lamp will stop blinking and the beeping will become more rapid The Built in Flash The self timer will be ca...

Page 94: ... Overlay Overlays are created using the Image Overlay option in the shooting menu 1 The new picture is saved at current image quality and size settings Before creating an overlay set image quality and size 28 3 Press the button to view the RAW images on the memory card Press the multi selector left or right to highlight images To zoom in on the highlighted image press and hold the but ton 4 Press ...

Page 95: ... Save and press the button Press the button to save the new image or the button to return to the preview dialog Selecting Photographs for Image Overlay Only RAW photographs taken with the D200 can be selected for image overlay Other images are not displayed in the thumbnail list Hidden images are not displayed and can not be selected Image Overlay The new image is recorded at current image quality...

Page 96: ...t will be combined to form a single photograph Press the multi se lector to the right to return to the multiple expo sure menu 4 Press the multi selector up or down to highlight Auto Gain and press the multi selector to the right 5 Press the multi selector up or down to highlight one of the following options and then press the multi selector to the right Option Description On default Gain adjusted...

Page 97: ...for 30s after the monitor has turned off during playback or menu operations The user selects Reset or Cancel in the mul tiple exposure menu and presses the multi se lector to the right The camera is turned off The battery is exhausted Pictures are deleted If shooting ends before the specified number of exposures have been taken a multiple exposure will be created from the exposures that have been rec...

Page 98: ...cted interval until the number of exposures specified in the multiple exposure menu have been taken the number of shots listed in the interval timer shooting menu is ignored These exposures will then be recorded as a single photograph and multiple exposure mode and interval timer shooting will end Note that unless No Limit is selected for Custom Setting c3 Auto Meter Off 157 or the camera is pow ere...

Page 99: ... press up or down to change Not available when Now is selected for Start Interval Enter time between shots Press multi selector left or right to high light hour minute or second press up or down to change Note that camera will not be able to take photographs at specified in terval if interval is shorter than shutter speed or time required to record images Select Intvl Shots Choose number of interva...

Page 100: ... Check the Time Before choosing a starting time select World Time in the setup menu and make sure that the camera clock is set to the correct time and date 12 Out of Memory If the memory card is full the interval timer will remain active but no pictures will be tak en Delete some pictures or turn the camera off and insert another memory card When the camera is turned on interval timer photography w...

Page 101: ...ime the shooting interval the selected number of intervals and number of shots and the number of intervals and shots remaining None of these items can be changed while interval timer photography is in progress DuringShooting To pause interval timer photography Press the button between intervals Highlight Start at the bottom of the interval timer menu and press the multi selector up or down until P...

Page 102: ... will turn off about four seconds before each interval Multiple Exposure Interval timer shooting can be used to create a multiple exposure 86 Shooting Mode Regardless of the shooting mode selected the camera will take the specified number of shots at each interval In CH continuous high speed mode photographs will be taken at a rate of five shots per second In S single frame CL continuous low speed an...

Page 103: ... note that it may be necessary to use center weighted or spot metering to achieve accurate results with some lenses in cluding Reflex Nikkor lenses Improves the precision of center weighted and spot metering and i TTL Bal anced Fill Flash for Digital SLR Specifying Lens Focal Length Lens focal length can be specified using the Non CPU Lens Data option in the shooting menu or by pressing the FUNC but...

Page 104: ...lti selector to the right The FUNC Button 1 Select FV Lock Lens Data for Custom Setting f4 FUNC Button 170 2 Press the FUNC button and rotate the main command dial Focal length is displayed in the control panel Focal Length Not Listed If the correct focal length is not listed choose the closest value greater than the actual focal length of the lens Default Maximum Aperture Selecting a focal length...

Page 105: ...ght Maximum Aperture in the Non CPU Lens Data menu and press the multi se lector to the right 2 Select the f number corresponding to the max imum lens aperture and press the multi selector to the right Zoom Lenses Lens data are not adjusted when non CPU lenses are zoomed in or out After changing the zoom position select new values for lens focal length and maximum aperture The FUNC Button 1 Select...

Page 106: ...A mode When the camera establishes communication with a GPS device a icon will be displayed in the control panel The exposure meters will not turn off while this icon is displayed Photo information for pictures taken while the icon is displayed will include an additional page 100 recording the current latitude longitude altitude and Coordinated Universal Time UTC If no data are received from the GP...

Page 107: ...lash exposure compensation 0 FV lock Off Number of shots is reset to zero Bracketing increment is reset to 1EV exposure flash bracketing or 1 white balance bracket ing The following shooting menu options will also be reset Only settings in the bank currently selected using the Shooting Menu Bank option will be reset 125 Settings in the remaining banks are unaffected Option Default Image Quality JPEG ...

Page 108: ... being recorded to the memory card In single frame self timer and mirror up modes photographs are displayed one at a time as they are taken In continuous shooting mode display begins when shooting ends with the first photograph in the current series displayed Playback will be interrupted when the shutter release button is pressed and resume when the button is released after shooting Rotate Tall 142...

Page 109: ...ensation 72 8 Focal length 176 9 Flash sync mode 77 10 Folder number frame number 135 Displayed only if Data is selected for Display mode 141 Photo Information Photo information is superimposed on images displayed in single image play back There are up to eight pages of information for each photo Press the multi selector down to cycle through photo information as follows Histogram Basic Informatio...

Page 110: ...ay differ when photo is viewed on a computer Camera histograms may differ from those displayed in imaging applications Histograms 쐂 쐃 쐇 쐋 쐏 쐄 RGB Histogram 1 Protect status 104 2 Image highlights areas of image that may be overexposed are marked by a flashing border 3 Folder number frame number 135 4 Histogram RGB chan nel In all histograms horizontal axis gives pixel brightness vertical axis number ...

Page 111: ...splayed separately for each color channel Press multi selector left or right while pressing button to cycle through channels as follows RGB all chan nels R red G green B blue RGB Histogram 1 Protect status 104 2 Histogram showing the distribution of tones in the image Horizontal axis corresponds to pixel brightness vertical axis shows number of pixels of each brightness in image 3 Folder number fr...

Page 112: ...and dial to scroll through photos a page at a time Delete photo Confirmation dialog will be displayed Press again to delete photo Press but ton to exit without deleting photo Zoom in on highlighted photo Press for enlarged view of highlighted photo 103 Protect photo To protect image or to remove protection from protected image press button 104 Display menus Press button to display camera menus 24 R...

Page 113: ...5 large images 19 medium images or 13 small images Re lease button to magnify selected area to fill monitor View other images Rotate main command dial to view same area of other im ages at current zoom ratio View other areas of image Use multi selector to view area not visible in monitor Hold multi selec tor down to scroll rapidly to other areas of frame The multi selector can be used at any time w...

Page 114: ...s will be deleted when the memory card is formatted To protect a photograph 1 Display the image in full frame playback or highlight it in the thumbnail list 2 Press the button The photograph will be marked with a icon To remove protection from the photograph so that it can be deleted display the photograph or highlight it in the thumbnail list and then press the button To remove protection from al...

Page 115: ...e displayed 3 To delete the photograph press the button again Press the button to exit without deleting the photograph Protected and Hidden Images Images marked with a icon are protected and can not be deleted Hidden images are not displayed in single image or thumbnail playback and can not be selected for deletion Delete 133 To delete multiple images use the Delete option in the playback menu Aft...

Page 116: ...mera 5 Tune the television to the video channel 6 Turn the camera on During playback images will be displayed on the tele vision screen or recorded to video tape the camera monitor will remain off Note that the edges may not be visible when photographs are viewed on a television screen Use an AC Adapter Use of an EH 6 AC adapter available separately is recommended for extended playback When the EH ...

Page 117: ...the battery before use or use an EH 6 AC adapter available separately Before connecting the camera set the USB option in the setup menu 121 according to the computer operating system and whether the camera is being controlled from Nikon Capture 4 Version 4 4 or later available separately or photographs are being trans ferred to the computer using the supplied software Operating system Supplied sof...

Page 118: ...anel and viewfinder and the PC mode indicator will flash if PTP is selected the camera displays will not change Photographs can be transferred to the computer as described in the manual for the supplied software on CD During Transfer Do not turn the camera off while transfer is in progress If Nikon Capture 4 Camera Control is running the control panel will show in place of the number of exposures rem...

Page 119: ...the taskbar and select Safely remove USB Mass Storage Device from the menu that ap pears Windows 2000 Professional Click the Unplug or Eject Hardware icon in the taskbar and select Stop USB Mass Storage Device from the menu that appears Windows Millennium Edition Me Click the Unplug or Eject Hardware icon in the taskbar and select Stop USB Disk from the menu that appears Windows 98 Second Edition ...

Page 120: ...er see the software manual on CD Note that RAW photographs can only be printed by transferring them to a com puter and printing them using the supplied software or Nikon Capture 4 Version 4 4 or later available separately Printing Via Direct USB Connection When the camera is connected to a printer that supports PictBridge 202 photographs can be printed directly from the camera Printing Photographs...

Page 121: ...n the camera on A welcome screen will be displayed followed by the PictBridge playback display Proceed to Printing Photographs One at a Time 112 or Printing Multiple Photo graphs 113 Press the multi selector left or right to view additional photographs or press and hold the button to zoom in on the current photo 103 To view six photographs at a time press the button and rotate the main command dia...

Page 122: ... or A4 then press multi selector right to select and return to print menu No of copies Menu shown at right will be displayed Press multi se lector up or down to choose number of copies maxi mum 99 then press multi selector to right to select and return to print menu Border Menu shown at right will be displayed Press multi selector up or down to highlight Printer Default default setting for current...

Page 123: ...photographs as small thumbnail images press the button The menu shown at right will be displayed Press the multi se lector up or down to highlight an option and press to the right to select Option Description Print Select Print selected pictures 114 Print DPOF Print current DPOF print order 139 Note that DPOF date and info options are not supported Index Print Create index print of all JPEG photos...

Page 124: ...oose page size border and time stamp options as de scribed on page 112 To print selected pic tures highlight Start Printing and press multi selector right PictBridge menu will be displayed when printing is complete The multi selector can be used at any time when the monitor is on The focus selector lock switch only takes effect when the monitor is off Using the Multi Selector Error Messages If the d...

Page 125: ... Auto Image Rotation 119 Recent Settings 119 USB 121 Dust Off Ref Photo 121 122 Battery Info 123 Firmware Version 123 Not available at battery levels of or below or when camera is powered by optional MB D200 battery pack equipped with AA batteries Basic Camera Settings The Setup Menu The multi selector can be used at any time when the monitor is on The focus selector lock switch only takes effect wh...

Page 126: ...s displayed LCD Brightness Press the multi selector up to increase brightness down to decrease The number to the right of the display indicates the current brightness level with 2 the brightest setting and 2 the darkest Press the multi selector to the right to complete the operation and return to the setup menu Before Formatting Formatting memory cards permanently deletes all data they contain inc...

Page 127: ...ur camera to a video device such as a television or VCR 106 choose a video mode setting that matches the video standard used in the device Option Description NTSC Use when connecting camera to NTSC devices PAL Use when connecting camera to PAL devices Note that number of pixels in output is selectively reduced caus ing drop in resolution World Time World Time is used to set the camera clock to the...

Page 128: ...o information display 100 Done Save changes and return to the setup menu Input Comment The following dialog will be displayed Enter a comment as de scribed below Keyboardarea Use multi selector to highlight letters press center of multi selector to select Comment area Comment appears here To move cursor press button and use multi selector To delete the character at the current cursor position pres...

Page 129: ...l images in same burst even if camera orientation is changed during shooting Camera orientation is not recorded when Off is selected Choose this option when taking photographs with the lens pointing up or down Recent Settings The following options are available Option Description Lock Menu Menu shown at right is displayed Select Yes to lock menu so that no items are added or removed No to un lock m...

Page 130: ...ck Menu No to unlock the Recent Settings menu 2 Select Delete Recent Settings Yes to delete all existing recent settings 3 Select the items you wish to include in the Recent Settings menu from the shooting and Custom Settings menus The fourteen most recently selected items will be stored 4 Select Lock Menu Yes to lock the Recent Settings menu ...

Page 131: ...ssional Windows Millennium Edition Me Windows 98 Second Edition SE Choose Mass Storage Mac OS 9 Not supported Dust Off Ref Photo Acquire reference data for the Image Dust Off function in Nikon Capture 4 Version 4 4 or later available separately for more information see the Nikon Capture 4 User s Man ual 2 Press the multi selector to the right The message shown at right will be displayed and will be ...

Page 132: ...cord the data The monitor turns off when the shutter release button is pressed If the reference object is too bright or too dark the camera may be unable to acquire Image Dust Off reference data and the message shown at right will be displayed Choose another reference object and repeat the process from Step 1 The Image Dust Off feature in Nikon Capture 4 Version 4 4 or later available separately proc...

Page 133: ...lue for preset white balance Charg Life Five level display showing battery age 0 New indicates that battery per formance has not been affected 4 Replace indicates that battery has reached end of charging life and should be replaced Firmware Version View the camera firmware version Press the multi selector to the left to return to the setup menu The MB D200 Battery Pack The following information is s...

Page 134: ...29 Color Space 129 Image Quality 129 Image Size 130 JPEG Compression 130 RAW Compression 130 White Balance 130 Long Exp NR 131 High ISO NR 131 ISO Sensitivity 132 Image Overlay 132 Multiple Exposure 132 Intvl Timer Shooting 132 Non CPU Lens Data 132 Reset to defaults when a two button reset is performed 97 The multi selector can be used at any time when the monitor is on The focus selector lock sw...

Page 135: ...s will be stored in the bank even when the camera is turned off and will be restored the next time the bank is selected Different combinations of settings can be stored in the other banks allowing the user to switch instantly from one combination to another by selecting the appropriate bank from the bank menu The default names for the four shooting menu banks are A B C and D A descrip tive caption c...

Page 136: ...ter at the current cursor position press the button To return to the shooting menu without changing the bank name press the button Bank names can be up to twenty characters long Any characters after the twentieth will be deleted 4 After editing the name press to return to the bank menu Renaming Shooting Menu Banks 1 Highlight Rename and press the multi selector to the right 2 A list of shooting me...

Page 137: ... Size Priority RAW compression NEF RAW White balance1 Auto2 Long Exp NR Off High ISO NR On Normal ISO sensitivity1 100 Option Default Multiple exposure3 Number of shots 2 Auto gain On Interval timer shooting4 Start time Now Interval 00 01 00 No of intervals 1 No of shots 1 Start Off Non CPU lens data Focal length N A Maximum aperture N A 1 Defaults can also be restored by performing two button reset...

Page 138: ...mber No folder will be created if the current folder is empty Creating a Folder at Startup Number of Folders Additional time may be required for recording and playback if the memory card contains a very large number of folders Automatic Folder Creation If the current folder contains 999 files or if sequential file numbering 159 is on and the current folder contains a picture numbered 9999 the camera...

Page 139: ...ve cursor left or right press button and use multi selector To delete the character at the current cursor position press the button To return to the shooting menu without changing the file naming rule press the button After editing the file name prefix press to return to the shooting menu New photo graphs will be saved using the new file naming rule Optimize Image Optimize color contrast sharpness sat...

Page 140: ... can be selected from Large Medium and Small See Reference Image Quality and Size 32 JPEG Compression Choose whether to compress JPEG images to a fixed size or to vary file size for improved image quality See Refer ence Image Quality and Size 30 RAW Compression Choose whether to compress NEF RAW images See Ref erence Image Quality and Size 31 ...

Page 141: ...n High ISO NR Photographs taken at high sensitivities can be processed to reduce noise Choose from the following options Option Description On Normal default Noise reduction takes effect at ISO sensitivities of 400 or above or if ISO sensitivity is raised to 400 or higher when On is selected for Custom Set ting b1 ISO Auto Select Normal or High for increased noise reduction Noise reduction is incre...

Page 142: ...es as color matrix metering aperture value display and balanced fill flash to be used with non CPU lenses See Reference Non CPU Lenses 93 Image Overlay Create a new image by superimposing two existing RAW photographs The RAW photographs must have been cre ated using the D200 and be on the same memory card See Reference Image Overlay and Multiple Exposure 84 ISO Sensitivity ISO sensitivity can be inc...

Page 143: ... the following options Option Description Selected Delete selected photographs All Delete all photographs The multi selector can be used at any time when the monitor is on The focus selector lock switch only takes effect when the monitor is off Using the Multi Selector Protected and Hidden Images Images marked with a icon are protected and can not be deleted Hidden images 137 are not displayed in th...

Page 144: ...cture highlight and press center of multi selector To exit without deleting pictures press but ton 4 Confirmation dialog displayed Press multi selector up or down to highlight option press to select Yes delete selected pictures No exit without deleting images Deleting All Photographs All Choosing All displays the confirmation dialog shown at right Press the multi selector up or down to highlight an ...

Page 145: ...ntly selected using Folders option in shooting menu are displayed during playback Slide Show To play images back one after the other in an automated slide show highlight Start in the slide show menu and press the multi selector right All photographs in the folder or folders selected in the Playback Folder menu will be played back in the order recorded with a pause between each image Hidden photogr...

Page 146: ...nitor off and return to shooting mode The dialog shown at right is displayed when the show ends or when the button is pressed to pause playback Press the multi selector up or down to highlight an option then press to the right to make a selection Restart Resume slide show Frame Interval Change the length of time each picture is displayed Exit End slide show and return to the playback menu To exit t...

Page 147: ...ge To view highlighted image full screen press Release to return to thumbnail list 2 Select highlighted image Selected im age marked by icon 3 Repeat steps 1 and 2 to select addi tional pictures To deselect picture highlight and press center of multi selector To exit without changing hidden status of pictures press button 4 Complete operation and return to play back menu Hidden images have hidden ...

Page 148: ...i selector up or down to highlight an option then press the button to make a selection Yes reveal all images in the folder or folders selected in the Playback Folder menu 135 The monitor will briefly show the message Deselect All Done and then the playback menu will be displayed No exit to the playback menu without changing the hidden status of images ...

Page 149: ... the memory card Before printing check that the printer or print service supports DPOF Pictures selected using Print Set can also be printed on PictBridge printers via direct USB connection 110 When a PictBridge printer is connected to the camera using the supplied UC E4 USB cable a menu will be displayed in the camera monitor select Print DPOF to print the current print order Note that the date a...

Page 150: ...o specify number of prints up to 99 or press center of multi selector to select image and set number of prints to 1 Selected images are marked by icon Data Imprint Print shutter speed and aperture on all pictures in print order Imprint Date Print date of recording on all pictures in print order To complete print order and return to playback menu highlight Done and press multi selector to right To ...

Page 151: ...ogram appears in photo information display Highlight Highlight page appears in photo information display RGB Histogram RGB histogram appears in photo information display Focus Area Active focus area if single servo AF is used with dynamic area AF group dynamic AF or closest subject priority area where focus first locked is shown in red in photo information display Default selection Image Review Ima...

Page 152: ...der recorded before deletion fol lowing image will be displayed or highlighted if deleted image was last frame in memory previous frame will be displayed or highlighted If user was scrolling through images in reverse order previous image will be dis played or highlighted if deleted image was first frame in memory following frame will be displayed or highlighted Rotate Tall Choose whether photograph...

Page 153: ...d then press the multi selector to the right The full list of Custom Settings a1 f7 will be displayed starting with the settings in the selected group To select a setting in a different group press the multi selector up or down scroll until the desired set ting is displayed or press the multi selector to the left to return the top menu and select a different group Custom Setting a1 AF C Mode Priorit...

Page 154: ...b1 ISO Auto ISO Sensitivity Auto Control 152 153 b2 ISO StepValue ISO Sensitivity StepValue 154 b3 EV Step EV Steps for Exposure Control 154 b4 Exp Comp FineTune Steps for Exposure Comp and FineTuning 154 b5 Exposure comp Easy Exposure Compensation 155 b6 Center Weighted Center Weighted Area 155 b7 FineTune Exposure FineTune Optimal Exposure 156 c Timers AE AF Lock c1 AE Lock AE Lock Buttons 156 c...

Page 155: ...g Auto Bracketing in M Exposure Mode 167 e7 Auto BKT Order Auto Bracketing Order 167 e8 Auto BKT Selection Auto Bracketing Selection Method 167 f Controls f1 Center Button Multi Selector Center Button 168 f2 Multi Selector When Multi Selector is Pressed 169 f3 Photo Info Playback Role of Multi Selector in full frame Playback 169 f4 FUNC Button Assign FUNC Button 170 f5 Command Dials Customize Comm...

Page 156: ...ent combinations of settings can be stored in the other banks allowing the user to switch instantly from one combination to another by selecting the appropriate bank from the bank menu The default names for the four Custom Settings banks are A B C and D A de scriptive caption can be added using the Rename option as described in The Shooting Menu Shooting Menu Bank 125 If settings in the current ba...

Page 157: ... AF Lock c3 Auto Meter Off 6s c4 Self Timer 10s c5 Monitor Off 20s d1 Beep High d2 Grid Display Off d3 ViewfinderWarning On d4 Shooting Speed 3fps d5 Exp Delay Mode Off d6 File No Sequence Off d7 Illumination Off d8 MB D200 Batteries LR6 AA size Alkaline Applies to all metering methods Custom Setting Default e1 Flash Sync Speed 1 250s e2 Flash Shutter Speed 1 60s e3 Built in Flash TTL e4 Modeling Flash O...

Page 158: ... does not lock when in focus indicator is displayed Custom Setting a2 AF S Mode Priority Selection This option controls whether photographs can be taken only when the camera is in focus focus priority or when ever the shutter release button is pressed release priority in single servo AF Regardless of the setting chosen focus will lock when the in focus indicator is displayed Option Description Foc...

Page 159: ...ation If subject moves out of center focus area camera will focus based on information from other focus areas in same group Center focus area of selected group is highlighted in control panel Pattern 1 Closest Subject Focus areas are grouped in pattern 1 150 Camera automatically selects focus area containing subject closest to camera in current fo cus area group If subject moves out of selected fo...

Page 160: ...er 2 Center 2 is only available when Center AF Area is selected for Center Button Custom Setting f1 Shooting Mode Custom Setting a5 Focus Tracking with Lock On This option controls how autofocus adjusts to sudden large changes in the distance to the subject Option Description Long Camera waits before adjusting focus when distance to subject changes abruptly Prevents camera from refocusing when sub...

Page 161: ... area is highlighted in red in the viewfinder Option Description Auto default Selected focus area is automatically highlighted as needed to provide contrast with background Off Selected focus area is not highlighted On Selected focus area is always highlighted regardless of brightness of back ground Depending on brightness of background selected focus area may be difficult to see Custom Setting a8 Foc...

Page 162: ...ry pack performs function currently assigned to camera FUNC button using Custom Setting f4 FUNC Button 170 Custom Setting b1 ISO Sensitivity Auto Control If On is selected for this option the camera will automati cally adjust ISO sensitivity when necessary to help ensure optimal exposure This option is not available at ISO sen sitivities over 1600 Custom Setting a10 AF ON Button for MB D200 Batter...

Page 163: ...f fect Max Sensitivity Menu shown at right is displayed Highlight desired ISO value and press multi selector right to return to ISO auto menu Min Shutter Speed Menu shown at right is displayed Highlight desired shutter speed and press multi selector right to return to ISO auto menu When On is selected the control panel and viewfinder show ISO AUTO When sensitivity is altered from the value selected...

Page 164: ... Setting b3 EV Steps for Exposure Control Choose whether adjustments to shutter speed aperture and bracketing are made in increments equivalent to EV 1 3 Step the default option EV 1 2 Step or 1EV 1 Step Custom Setting b4 Steps for Exposure Comp and Fine Tuning Choose whether adjustments to exposure compensation and exposure fine tuning are made in increments equiv alent to EV 1 3 Step the default ...

Page 165: ...ddials CustomSettingf5 ChangeMain Sub Off On Exposure mode P Sub command dial Sub command dial S Sub command dial Main command dial A Main command dial Sub command dial M N A On Auto Reset As for On except that exposure compensation set using command dial only is cancelled when camera is turned off or exposure meters turn off Custom Setting b6 Center Weighted Area When calculating exposure center wei...

Page 166: ...an option then press to the right to make a selection Fine Tuning Exposure Exposure can be fine tuned separately for each Custom Settings bank Note that as the exposure compensation icon is not displayed the only way to determine whether ex posure has been altered is to view the fine tuning menu Exposure compensation 72 is recommended in most situations Custom Setting c1 AE Lock Buttons This option ...

Page 167: ...to meter exposure when no operations are performed 4s 6s the default option 8s or 16s or until the camera is turned off No Limit Choose a shorter meter off delay for longer battery life Custom Setting c4 Self Timer Delay This option controls the length of the shutter release delay in self timer mode Shutter release can be delayed by ap proximately 2s 5s 10s the default option or 20s Custom Setting c...

Page 168: ...d or when shooting in black and white No warning is displayed when Off is selected before shooting check indicators in the control panel Custom Setting d4 CL Mode Shooting Speed This option determines the rate at which photographs can be taken in CL continuous low speed mode during interval timer photography this setting also determines the frame advance rate for single frame and mirror up modes Sh...

Page 169: ...ted in camera file numbering continues from last number used or from largest number in current folder whichever is higher If photograph is taken when current folder contains photograph numbered 9999 new folder will be created automatically and file numbering will begin again from 0001 Reset As for On except that next photograph taken is assigned file number by add ing one to largest file number in cur...

Page 170: ...ttached Speedlight is not CLS compatible When the camera shows a shutter speed of s in exposure mode P or A Auto FP High Speed Sync will be activated if the actual shutter speed is faster than s To fix shutter speed at the sync speed limit in shutter priority auto or manual exposure modes select the shutter speed after the slowest possible shutter speed 30s or An X will be displayed in the flash syn...

Page 171: ...lt setting to 30s 30s Custom Setting e3 Built in Flash Mode Choose the flash mode for the built in flash TTL default Flash output is adjusted automatically in re sponse to shooting conditions Manual The flash fires at the level selected in the menu shown at right Highlight a setting between Full Power and 1 128 Power 1 128 of full power and press the multi selector right to return to the Custom Settin...

Page 172: ...enu when settings are complete Option Description Output Highlight flash output expressed as fraction of full power Times Choose number of times flash fires at selected output Note that depending on shutter speed and option selected for Interval actual number of flashes may be less than selected Interval Choose number of times flash fires per second The number of times the flash can fire in succession is ...

Page 173: ... Menu of flash compensation values will be displayed choose value between 3 0 and 3 0EV in steps of EV AA Auto aperture not available with SB 600 and SB R200 Speedlights Menu of flash compensation values will be displayed choose value between 3 0 and 3 0EV in steps of EV M Choose flash output level for flashes in Group A from values between Full Power and 1 128 Power of full power Flashes in Group A d...

Page 174: ...f TTL or M is selected addi tional options can be select ed Press multi selector up or down to display option press right to select 4 Highlight Group A Mode 5 Select desired flash mode 6 If TTL AA or M is selected additional options can be se lected Press multi selector up or down to display option press right to select Repeat Steps 4 6 for Group B 7 Highlight Channel 8 Select channel 9 Press butto...

Page 175: ...nt the timing flashes emitted by the built in flash from appear ing in photographs taken at short ranges use a low ISO sensitivity and small aperture large f number or an optional SG 3IR infrared panel for the built in flash An SG 3IR is required for best results with rear curtain sync which produces brighter timing flashes After posi tioning the Speedlights take a test shot and view the results in th...

Page 176: ...ional Speedlights that support the Nikon Creative Lighting Sys tem will emit a modeling flash when the depth of field preview button is pressed Select Off to disable this fea ture Custom Setting e5 Auto Bracketing Set This option controls what settings are affected when auto bracketing is in effect Option Description AE Flash default Camera performs exposure and flash level bracketing AE Only Camera per...

Page 177: ...et to AE Flash If no flash is attached when Custom Setting b1 ISO Auto is on camera will vary ISO sensitivity only regardless of setting selected Flash bracketing performed only with i TTL or AA flash control Custom Setting e7 Auto Bracketing Order This option controls the order in which bracketing is per formed Option Description MTR Under Over default Bracketing performed in order described in Bra...

Page 178: ...a or focus area group group dynamic AF in viewfinder Not Used Pressing center of multi selector has no effect when camera is in shooting mode Center of multi selector can not be used to toggle between center focus area groups when Pattern 2 is selected for Custom Setting a4 Group Dynamic AF Playback Mode This option controls what operation is per formed when the center of the multi selector is press...

Page 179: ...e of Multi Selector in full frame Playback By default pressing the multi selector up or down during playback displays the other images on the memory card while pressing the multi selector left or right changes the photo information displayed These roles can be reversed using Custom Setting f3 Option Description Info PB default Press multi selector up or down to change photo info displayed left or ...

Page 180: ... Flash will not fire in photos taken while FUNC button is pressed Bracketing Burst While FUNC button is pressed all shots in exposure or flash bracketing program will be taken each time shutter release button is pressed In con tinuous high speed and continuous low speed modes camera will repeat bracketing burst while shutter release button is held down If white bal ance bracketing is selected camera...

Page 181: ...nd dial or main command dial if Change Main Sub is On Aperture Ring Aperture can only be adjusted using lens aperture ring Camera aperture display shows aperture in increments of 1EV This option is selected automatically when non CPU lens is attached Menus and Playback Controls functions performed by command dials dur ing playback or when menus are displayed Off default Multi selector used to choos...

Page 182: ...ted for Custom Setting c3 or optional AC adapter is used wait for about 20s Custom Setting f7 Disable Shutter If No Memory Card This option can be used to enable the shutter release when no memory card is inserted in the camera Note that when photographs are being captured to a computer using Nikon Capture 4 Camera Control photographs are not recorded to the camera memory card and the shutter rele...

Page 183: ... Accessories Only Nikon brand accessories certified by Nikon specifically for use with your Nikon digital camera are engineered and proven to operate within its operational and safety require ments THE USE OF NON NIKON ACCESSORIES COULD DAMAGE YOUR CAMERA AND MAY VOID YOUR NIKON WAR RANTY Software Filters Flash units Speedlights L i io n B A T T E R Y P A C K Viewfinder accessories Batteries AC adapt...

Page 184: ...70mm f 3 5 4 5G and 55 200mm f 4 5 6G AF S VR ED 24 120mm f 3 5 5 6G and AF S ED 17 35mm f 2 8D 24 85mm f 3 5 4 5G and 28 70mm f 2 8D 8 With maximum effective aperture of f 5 6 or faster 9 If AF 80 200mm f 2 8S AF 35 70mm f 2 8S new model AF 28 85mmf 3 5 4 5S orAF28 85mmf 3 5 4 5Siszoomed inwhilefocusingatminimumrange imageonmattescreenin viewfinder may not be in focus when in focus indicator is dis...

Page 185: ...umbers280001 300490 Lenses for the F3AF 80mm f 2 8 200mm f 3 5 TC 16 Teleconverter PC 28mm f 4 serial number 180900 or earlier PC 35mm f 2 8 serial numbers 851001 906200 PC 35mm f 3 5 old type 1000mm f 6 3 Reflex old type 1000mm f 11 Reflex serial numbers 142361 143000 2000mm f 11 Reflex serial numbers 200111 200310 Compatible Non CPU Lenses If lens data are specified using the Non CPU lens data optio...

Page 186: ... focal length of the lenses for the D200 in 35 mm format multiply the focal length of the lens by about 1 5 Option Approximate focal length mm in 35 mm format modified for picture angle 35 mm camera 17 20 24 28 35 50 60 85 D200 25 5 30 36 42 52 5 75 90 127 5 35 mm camera 105 135 180 200 300 400 500 600 D200 157 5 202 5 270 300 450 600 750 900 The size of the area exposed by a 35 mm camera is 36 24m...

Page 187: ...m respectively en sures that the illuminating angle is adjusted in accord with lens focal length The built in wide panel can be used for an angle of 14mm the SB 800 also supports 17mm An illuminator is included to assist in adjusting settings in the dark SB R200 Wireless Remote Speedlight This high performance wireless remote Speedlight has a Guide Number of 10 32 m ft ISO 100 20 C 68 F Although i...

Page 188: ...SLR is used with spot metering or when selected with Speedlight 5 Not available with non CPU lenses unless lens data have been specified using Non CPU Lens Data 6 Use Speedlight controls to select flash mode 7 Available only if non CPU lens is used without specifying lens data in Non CPU Lens Data menu 8 Select 1 250s Auto FP for Custom Setting e1 Flash Sync Speed 160 Not available if built in flash ...

Page 189: ...l Speedlight The camera provides AF assist illumination when other Speedlights are used 58 59 Auto power zoom is available only with SB 800 and SB 600 Speedlights In programmed auto the maximum aperture minimum f number is limited according to sensitivity ISO equivalency as shown below Maximum aperture at ISO equivalent of 100 125 160 200 250 320 400 500 640 800 1000 1250 1600 4 4 2 4 5 4 8 5 5 3 ...

Page 190: ...adjust flash level appropri ately for values over 1600 When On is selected for Custom Setting b1 ISO Auto 152 ISO sensitivity will automatically be adjusted as required for optimal flash output This may result in foreground subjects being underexposed in flash photographs taken at slow shut ter speeds in daylight or against a bright background In these cases choose a flash mode other than slow sync or...

Page 191: ...ore purchase to ensure that the desired focus can be achieved DK 21M Magnifying Eyepiece Increases viewfinder magnification to approxi mately 1 10 50 mm f 1 4 lens at infinity 1 0m 1 DG 2Magnifier Magnify the scene displayed in the center of the viewfinder for close up photography copying telephoto lenses and other tasks that call for added precision Eyepiece adapter required available separately Eyepi...

Page 192: ...tervals MC 21ExtensionCord 3m 9ft 10in Can be connected to MC series 20 22 23 25 30 or 36 MC 23 Connecting Cord 40cm 1ft 4in Connects two cameras for simulta neous operation MC 25 Adapter Cord 20cm 8in Ten pin to two pin adapter cord for connec tion to devices with two pin terminals including the MW 2 radio control set MT 2 intervalometer and ML 2 modulite control set MC 35 GPS Adapter Cord 35cm 1...

Page 193: ...ed with other makes of card For more details on the above cards please contact the manufacturer Memory Cards Format memory cards in the camera before first use Turn the power off before inserting or removing memory cards Do not remove memory cards from the camera turn the camera off or remove or disconnect the power source during formatting or while data are being recorded deleted or copied to a comp...

Page 194: ...nd or salt with a cloth lightly dampened in distilled water and dry thoroughly IMPORTANT Dust or other foreign matter inside the camera may cause damage not covered under warranty Lens mirror and viewfinder These elements are made of glass and are easily damaged Remove dust and lint with a blower If using an aerosol blower keep the can vertical to prevent the discharge of liquid To remove fingerprin...

Page 195: ...gn objects from adhering directly to the image sensor under certain conditions dirt or dust on the filter may appear in photographs If you suspect that dirt or dust inside the camera is affecting your photographs you can clean the filter as described below Note however that the low pass filter is extremely delicate and easily damaged Nikon recommends that filter be cleaned only by Nikon authorized serv...

Page 196: ...gn matter from entering the camera do not exchange lenses in dusty envi ronments To protect the camera when no lens is in place be sure to replace the body cap provided with the camera being careful to first remove all dust and other foreign matter that may be adhering to the body cap Should foreign matter find its way onto the low pass filter clean the low pass filter as in structed on pages 185 186 ...

Page 197: ...menon known as blooming can be prevented by reducing the amount of light that falls on the image sensor either by choos ing a slow shutter speed and small aperture or by using an ND filter Do not touch the shutter curtain The shutter curtain is extremely thin and eas ily damaged Under no circumstances should you exert pressure on the curtain poke it with cleaning tools or subject it to powerful air...

Page 198: ...revent the liquid crystal from the moni tor touching the skin or entering the eyes or mouth Replace the monitor cover when transporting the camera or leaving it unattended Turn the product off before removing or disconnecting the power source Do not unplug the product or remove the bat tery while the product is on or while images are being recorded or deleted Forcibly cutting power to the product i...

Page 199: ...rd 14 Menu item is unavailable Insert memory card Battery Info option is only available when using EN EL3e batteries 14 123 Image size can not be changed NEF RAW selected for image quality 28 Shutter release is disabled Aperture not locked at highest f number Memory card is full or not inserted Flash is charging Camera is not in focus Exposure mode S selected with select ed for shutter speed 8 14 ...

Page 200: ... lock when shutter re lease button is pressed halfway Camera is in focus mode C use AE L AF L button to lock focus 56 Area shown in viewfinder is smaller than final photo Viewfinder has vertical and horizontal frame coverage of about 95 Photos are out of focus Rotate focus mode selector to S or C Camera unable to focus using autofocus use manual focus or focus lock 51 56 60 Recording time increases T...

Page 201: ...on was pressed in continuous mode Camera was pointed up or down when shot was taken 142 119 27 119 Can not delete photo Photo is protected remove protection 104 Some photos are not displayed dur ing playback Select All for Playback Folder Note that Cur rent will automatically be selected when next photo is taken 135 Message is displayed stating that no images are available for playback Select All ...

Page 202: ... attached without specifying maxi mumaperture Apertureshownin stops from maximum aperture Aperture value will be displayed if maximum aperture is specified 67 69 blinks Camera unable to focus using autofocus Focus manually 60 Subject too bright photo will be overexposed Choose lower sensitivity Use optional Neutral Density ND filter In exposure mode S Increase shutter speed A Choose smaller aperture...

Page 203: ... photos at current set tings or camera has run out of file or folder numbers Reduce quality or size Delete photographs Insert new memory card 28 105 133 14 blinks No memory card Insert memory card 14 blinks Camera malfunction Release shutter If error persists or appears frequently consult with Nikon authorized service representative viii ...

Page 204: ...insert new memory card 183 viii 14 105 133 CARD IS NOT FORMATTED displayed when but ton is pressed blinks Memory card has not been formatted for use in D200 Format memory card 14 116 FOLDER CONTAINS NO IMAGES Memory card contains no images Current folder is empty Insert another card Set Playback Folder to All 14 135 ALL IMAGES HIDDEN All photos in current fold er are hidden Set Playback Folder to ...

Page 205: ...e program for mode P is shown in the following graph ISO 200 lens with maximum aperture of f 1 4 and minimum aperture of f 16 e g AF 50mm f 1 4 D 4 3 1 2 1 3 2 1 0 1 2 3 4 5 6 7 8 9 1 0 1 1 F1 4 F1 F2 F2 8 F4 F5 6 F8 F11 F16 F22 F32 30 15 8 4 2 1 2 4 8 15 30 60 125 250 500 1000 2000 4000 8000 2 2 2 1 2 0 1 9 1 8 1 7 1 6 1 5 1 4 EV 2 3 1 6 1 3 Shutter speed The maximum and minimum values for EV var...

Page 206: ...ures are approximate File size varies with scene recorded and make of memory card 2 Maximum number of frames that can be stored in memory buffer at ISO 100 Capacity of memory buffer will drop if noise reduction is on 3 Total for NEF and JPEG images 4 Figures assume RAW Compression is set to NEF RAW Selecting Comp NEF RAW decreases file size of NEF RAW images by approximately forty to fifty percent alt...

Page 207: ...Control panel display No of shots WB increment Bracketing order 3 1 1 0 2 3 2 2 0 4 3 3 3 0 6 3 1 1 2 0 3 2 2 4 0 3 3 3 6 0 2 1 0 1 2 2 0 2 2 3 0 3 2 1 0 1 2 2 0 2 2 3 0 3 3 1 0 1 1 3 2 0 2 2 3 3 0 3 3 5 1 0 2 1 1 2 5 2 0 4 2 2 4 5 3 0 6 3 3 6 7 1 0 3 2 1 1 2 3 7 2 0 6 4 2 2 4 6 7 3 0 9 6 3 3 6 9 9 1 0 4 3 2 1 1 2 3 4 9 2 0 8 6 4 2 2 4 6 8 9 3 0 12 9 6 3 3 6 9 12 ...

Page 208: ... shots Exposure increment Bracketing order EVs 3 0 3 0 0 7 3 0 7 0 1 3 3 1 1 0 0 2 0 3 0 3 0 7 0 3 0 7 1 3 0 3 1 1 0 2 0 0 2 0 0 3 2 0 0 7 2 1 0 1 2 0 0 3 2 0 0 7 2 1 0 1 3 0 0 3 0 3 3 0 0 7 0 7 3 1 0 1 1 5 0 0 7 0 3 0 3 0 7 5 0 1 3 0 7 0 7 1 3 5 1 0 2 0 1 1 2 0 7 0 1 0 0 7 0 3 0 3 0 7 1 0 7 0 2 0 1 3 0 7 0 7 1 3 2 0 7 1 0 3 0 2 0 1 0 1 0 2 0 3 0 9 0 1 3 1 0 0 7 0 3 0 3 0 7 1 0 1 3 9 0 2 7 2 0 1 3...

Page 209: ... 0 5 3 1 0 1 1 5 0 1 0 0 5 0 5 1 0 5 1 0 2 0 1 1 2 0 7 0 1 5 1 0 0 5 0 5 1 0 1 5 7 1 0 3 0 2 0 1 0 1 0 2 0 3 0 9 0 2 0 1 5 1 0 0 5 0 5 1 0 1 5 2 0 9 1 0 4 0 3 0 2 0 1 0 1 0 2 0 3 0 4 0 1 Step Selected for EV Step Control panel display No of shots Exposure increment Bracketing order EVs 3 1 1 0 0 2 0 3 1 1 0 2 0 0 2 1 0 1 2 1 0 1 3 1 0 1 1 5 1 0 2 0 1 1 2 0 7 1 0 3 0 2 0 1 0 1 0 2 0 3 0 9 1 0 4 0 3...

Page 210: ...varies with sensitivity ISO equivalency and aperture Aperture at ISO equivalent of Range 100 125 160 200 250 320 400 500 640 800 1000 1250 1600 m ft 1 4 1 6 1 8 2 2 2 2 5 2 8 3 2 3 5 4 4 5 5 5 6 1 0 7 5 3 3 24 6 2 2 2 2 5 2 8 3 2 3 5 4 4 5 5 5 6 6 3 7 1 8 0 7 5 4 2 3 17 7 2 8 3 2 3 5 4 4 5 5 5 6 6 3 7 1 8 9 10 11 0 6 3 8 2 0 12 5 4 4 5 5 5 6 6 3 7 1 8 9 10 11 13 14 16 0 6 2 7 2 0 8 9 5 6 6 3 7 1 8...

Page 211: ... 0m 3ft 3in AF S ED 17 35mm f 2 8D 24mm 1 0m 3ft 3in AF S DX IF ED 17 55mm f 2 8G 24mm 1 0m 3ft 3in AF ED 18 35mm f 3 5 4 5D 18mm 1 5m 4ft 11in AF S DX VR ED 18 200mm f 3 5 5 6G 18mm 1 0m 3ft 3in AF 20 35mm f 2 8D 20mm 1 0m 3ft 3in AF S ED 28 70mm f 2 8D 28mm 1 5m 4ft 11in 35mm 1 0m 3ft 3in The built in flash can also be used with Ai S Ai and Ai modified non CPU lenses with a focal length of 18 200m...

Page 212: ...rinted from print orders stored on the memory card Exif version 2 21 The D200 supports Exif Exchangeable Image File Format for Digital Still Cameras version 2 21 a standard that allows information stored with photographs to be used for optimal color reproduction when images are output on Exif compliant printers PictBridge A standard developed by in cooperation with the digital camera and printer i...

Page 213: ...color matrix metering multi sensor balanced fill flash for digital SLR and aperture value display supported if user provides lens data Picture angle Equivalent in 35 mm format is approximately 1 5 times lens fo cal length Viewfinder Diopter adjustment 2 0 1 0m 1 Focusing screen Type B BriteView clear matte screen Mark II with superimposed focus brackets and On Demand grid lines Eyepoint 19 5mm 1 0m 1...

Page 214: ...centered on active focus area on center focus area when non CPU lens is used Range ISO 100 equivalent f 1 4 lens 20 C 68 F 0 20EV 3D color matrix or center weighted metering 2 20EV spot metering Exposuremetercoupling Combined CPU and AI Exposure control Operating mode Programmed auto with flexible program shutter priority auto aperture priority auto manual Exposurecompensation 5 5EV in increments o...

Page 215: ...pixel RGB sensor SB 800 600 i TTL balanced fill flash for digital SLR and standard i TTL flash for digital SLR Auto aperture Available with SB 800 with CPU lens Non TTL auto Available with such Speedlights as SB 800 80DX 28DX 28 27 and 22s Range priority manual Available with SB 800 Flash compensation 3 1EV in increments of or EV Nikon Creative Lighting System With SB 800 600 and R200 supports Advanc...

Page 216: ...a camera with a fully charged battery operating at an ambient temperature of 20 C 68 F Nikon reserves the right to change the specifications of the hardware and software de scribed this manual at any time and without prior notice Nikon will not be held liable for damages that may result from any mistakes that this manual may contain Firmware upgrades Firmware can be upgraded by user Supported langu...

Page 217: ...d then turned off cycle repeated once exposure meters have turned off Example 2 340 shots Zoom Nikkor AF S VR 24 120mm f 3 5 5 6G IF ED lens VR off single frame shooting mode single servo autofocus image quality set to JPEG Normal image size set to L shutter speed s shutter release pressed halfway for five seconds and focus cycled from infinity to minimum range once with each shot built in Speedlight fi...

Page 218: ...lumination 159 d8 MB D200 Batteries 160 e1 Flash Sync Speed 160 e2 Flash Shutter Speed 161 e3 Built in Flash 161 166 e4 Modeling Flash 166 e5 Auto BKT Set 166 e6 Manual Mode Bkting 167 e7 Auto BKT Order 167 e8 Auto BKT Selection 167 f1 Center Button 168 f2 Multi Selector 169 f3 Photo Info Playback 169 f4 FUNC Button 170 f5 Command Dials 170 171 f6 Buttons and Dials 172 f7 No Memory card 172 SET UP...

Page 219: ...y auto 64 65 F FINE See Image quality Flash 76 80 See also Speedlight bracketing 73 75 Flash Color Information Com munication 177 178 Flash ready indicator 78 79 83 Flash sync mode 77 Flexible program 63 See also Exposure mode programmed auto Focal plane mark 3 60 Focus See autofocus focus mode manual focus Focus area focus brackets 18 53 54 55 56 141 148 149 150 151 Focus lock 20 56 57 Focus mode...

Page 220: ...posure mode shutter pri ority auto Shooting mode Self portraits See Self timer Self timer 26 83 Sensitivity See ISO sensitivity Sequential file numbering 159 Setup menu 115 123 Shutter speed 62 69 and flash synchronization 77 78 79 160 161 Shooting menu 124 132 banks 125 126 Shooting mode 26 27 Single frame See Shooting mode Single frame playback 22 98 Size See Image size Software 50 107 110 182 Spe...

Page 221: ...in Belgium 6MBA5111 01 No reproduction in any form of this manual in whole or in part except for brief quotation in critical articles or reviews may be made without written authorization from NIKON CORPORATION ...

Reviews: