background image

DIGITAL CAMERA

Reference Manual

En

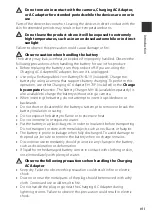
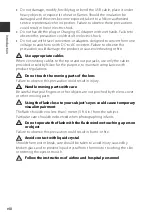
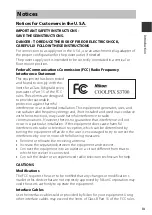
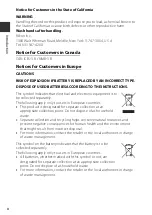
Summary of Contents for Coolpix S3700

Page 1: ...DIGITAL CAMERA Reference Manual En ...

Page 2: ...g for Shooting 6 Basic Shooting and Playback Operations 11 Shooting Features 19 Playback Features 50 Recording and Playing Back Movies 60 Using Menus 64 Using the Wi Fi Wireless LAN Function 100 Connecting the Camera to a TV Printer or Computer 104 Technical Notes 113 ...

Page 3: ...referred to as memory cards in this manual The setting at the time of purchase is referred to as the default setting The names of menu items displayed in the camera monitor and the names of buttons or messages displayed on a computer monitor appear in bold In this manual images are sometimes omitted from monitor display samples so that monitor indicators can be more clearly shown Read This First S...

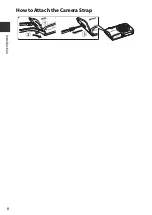
Page 4: ...ii Introduction How to Attach the Camera Strap ...

Page 5: ...rcuitry Only Nikon brand electronic accessories including battery chargers batteries Charging AC Adapter and AC adapters certified by Nikon specifically for use with this Nikon digital camera are engineered and proven to operate within the operational and safety requirements of this electronic circuitry THE USE OF NON NIKON ELECTRONIC ACCESSORIES COULD DAMAGE THE CAMERA AND MAY VOID YOUR NIKON WAR...

Page 6: ... money coins securities government bonds or local government bonds even if such copies or reproductions are stamped Sample The copying or reproduction of paper money coins or securities which are circulated in a foreign country is prohibited Unless the prior permission of the government was obtained the copying or reproduction of unused postage stamps or post cards issued by the government is proh...

Page 7: ...lity Before discarding a data storage device or transferring ownership to another person erase all data using commercial deletion software or format the device and then completely refill it with images containing no private information for example images of empty sky Care should be taken to avoid injury or damage to property when physically destroying data storage devices To delete the Wi Fi setti...

Page 8: ...ntative for inspection Do not disassemble Touching the internal parts of the camera or Charging AC Adapter could result in injury Repairs should be performed only by qualified technicians Should the camera or Charging AC Adapter break open as the result of a fall or other accident take the product to a Nikon authorized service representative for inspection after unplugging the product and or remov...

Page 9: ...ately is also available to charge the battery without using a camera When inserting the battery do not attempt to insert it upside down or backwards Do not short or disassemble the battery or attempt to remove or break the battery insulation or casing Do not expose the battery to flame or to excessive heat Do not immerse in or expose to water Put the battery in a plastic bag etc in order to insula...

Page 10: ...y the cables provided or sold by Nikon for the purpose to maintain compliance with product regulations Do not touch the moving parts of the lens Failure to observe this precaution could result in injury Handle moving parts with care Be careful that your fingers or other objects are not pinched by the lens cover or other moving parts Using the flash close to your subject s eyes could cause temporar...

Page 11: ...ctions may cause harmful interference to radio communications However there is no guarantee that interference will not occur in a particular installation If this equipment does cause harmful interference to radio or television reception which can be determined by turning the equipment off and on the user is encouraged to try to correct the interference by one or more of the following measures Reor...

Page 12: ...owing apply only to users in European countries This product is designated for separate collection at an appropriate collection point Do not dispose of as household waste Separate collection and recycling helps conserve natural resources and prevent negative consequences for human health and the environment that might result from incorrect disposal For more information contact the retailer or the ...

Page 13: ...S A and Canada Federal Communications Commission FCC and Industry of Canada IC Declaration of Conformity This device complies with Part 15 of FCC Rules and Industry Canada licence exempt RSS standard s Operation is subject to the following two conditions 1 this device may not cause interference and 2 this device must accept any interference including interference that may cause undesired operation...

Page 14: ...OET65 and RSS 102 of the IC radio frequency RF Exposure rules Please refer to the SAR test report that was uploaded to FCC website Declaration of Conformity Europe Hereby Nikon Corporation declares that COOLPIX S3700 is in compliance with the essential requirements and other relevant provisions of Directive 1999 5 EC The declaration of conformity may be consulted at http imaging nikon com support ...

Page 15: ...other personal information is susceptible to alteration and loss resulting from operational error static electricity accident malfunction repair or other handling Always keep separate copies of important information Nikon is not responsible for any direct or indirect damages or lost profits resulting from alteration or loss of content that is not attributable to Nikon Before discarding this produc...

Page 16: ...Memory Card 6 Removing the Battery or Memory Card 6 Memory Cards and Internal Memory 6 Charge the Battery 7 Turn the Camera On and Set the Display Language Date and Time 9 Basic Shooting and Playback Operations 11 Shooting with Scene Auto Selector Mode 11 Using the Zoom 13 The Shutter release Button 13 Play Back Images 14 Delete Images 15 Changing the Shooting Mode 17 Using the Flash Self timer Et...

Page 17: ...Lock 47 Functions That Cannot Be Used Simultaneously When Shooting 48 Playback Features 50 Playback Zoom 50 Thumbnail Playback Calendar Display 51 List by Date Mode 52 Editing Images Still Images 53 Before Editing Images 53 Quick Effects Changing Hue or Mood 53 Quick Retouch Enhancing Contrast and Saturation 54 D Lighting Enhancing Brightness and Contrast 55 Red eye Correction Correcting Red eye W...

Page 18: ...3 Movie Options 83 Autofocus Mode 84 Movie VR 85 Wind Noise Reduction 85 The Wi Fi Options Menu 86 Operating the Text Input Keyboard 87 The Setup Menu 88 Time Zone and Date 88 Monitor Settings 90 Date Stamp 92 Photo VR 93 AF Assist 94 Digital Zoom 94 Sound Settings 95 Auto Off 95 Format Card Format Memory 96 Language 97 Video Mode 97 Charge by Computer 98 Reset All 99 Conformity Marking 99 Firmwar...

Page 19: ...nter 107 Printing Images One at a Time 108 Printing Multiple Images 109 Using ViewNX 2 Transferring Images to a Computer 111 Installing ViewNX 2 111 Transferring Images to a Computer 111 Technical Notes 113 Caring for the Product 114 The Camera 114 The Battery 115 The Charging AC Adapter 116 Memory Cards 117 Cleaning and Storage 118 Cleaning 118 Storage 118 Error Messages 119 Troubleshooting 123 F...

Page 20: ...xviii ...

Page 21: ...13 f Wide angle 13 g Telephoto 13 h Thumbnail playback 51 i Playback zoom 50 j Help 20 4 Power switch power on lamp 9 5 Flash 35 6 Self timer lamp 38 AF assist illuminator 7 Lens 8 Lens cover 9 Built in microphone 10 Power connector cover for connection with optional AC adapter 11 Eyelet for camera strap ii 12 Connector cover 104 13 USB audio video output connector 104 ...

Page 22: ...movie record button 18 3 A shooting mode button 17 20 27 29 33 4 c playback button 14 5 Multi selector 64 6 k apply selection button 64 7 l delete button 15 8 d menu button 64 9 Battery chamber memory card slot cover 6 10 Tripod socket 134 11 Speaker 12 Monitor 3 13 N Mark NFC antenna 102 ...

Page 23: ...9 9999 AF AF AE AF L AE AF L 13 14 15 16 12 4 3 5 6 7 1 2 8 9 11 10 17 18 999 999 29m 0s 29m 0s 10 10 F3 7 F3 7 F3 7 1 250 1 250 1 0 1 0 400 400 1 Shooting mode 17 20 27 29 33 2 Flash mode 35 3 Macro mode 39 4 Zoom indicator 13 39 5 Focus indicator 12 6 AE AF L indicator 25 7 Movie options 83 8 Image mode 66 9 Panorama assist 24 10 Photo VR icon 93 11 Movie VR icon 85 12 Wind noise reduction 85 13...

Page 24: ...ion 23 29 43 72 22 Focus area subject tracking 73 74 23 ISO sensitivity 71 24 Battery level indicator 10 25 Date stamp 92 26 Date not set indicator 124 27 Wi Fi communication indicator 101 28 Travel destination icon 88 29 Soft 29 30 White balance 68 31 Foundation makeup 29 32 Hue 33 33 Skin softening 29 34 Vividness 29 33 35 Continuous shooting mode 70 36 Blink proof icon 77 37 Hand held tripod 21...

Page 25: ...ng icon 55 6 Quick retouch icon 54 7 Red eye correction icon 55 8 Internal memory indicator 9 Current image number total number of images 10 Movie length or elapsed playback time 11 Image mode 66 12 Panorama assist 24 13 Movie options 83 14 Small picture icon 58 15 Crop icon 50 59 16 Volume indicator 63 17 Quick effects guide 18 Panorama assist playback guide Movie playback guide 19 Time of record...

Page 26: ...ss the d button and select Format card in the setup menu A64 Removing the Battery or Memory Card Turn the camera off and make sure that the power on lamp and monitor have turned off and then open the battery chamber memory card slot cover Move the battery latch to eject the battery Gently push the memory card into the camera to partially eject the memory card Be careful when handling the camera ba...

Page 27: ... the Charging AC Adapter The charge lamp slowly flashes green to indicate that the battery is charging When charging is complete the charge lamp turns off It takes about 2 hours 40 minutes to charge a fully exhausted battery The battery cannot be charged when the charge lamp quickly flashes green possibly due to one of the reasons described below The ambient temperature is not suited to charging T...

Page 28: ...ile Charging If you press the power switch while charging with the Charging AC Adapter the camera turns on in playback mode and captured images can be played back Shooting is not possible C Charging Using a Computer or Battery Charger You can also charge the battery by connecting the camera to a computer You can use the Battery Charger MH 66 available separately to charge the battery without using...

Page 29: ...he camera off press the power switch again 2 Use the multi selector HI to select the desired language and press the k button 3 Select Yes and press the k button 4 Select your home time zone and press the k button Press H to display W above the map and enable daylight saving time Press I to disable it 5 Use HI to select the date format and press the k button Turn the Camera On and Set the Display L...

Page 30: ...he Language and Time zone and date settings in the z setup menu A64 You can enable or disable daylight saving time in the z setup menu by selecting Time zone and date followed by Time zone Press the multi selector K and then H to enable daylight saving time and move the clock forward one hour or I to disable daylight saving time and move the clock back one hour C The Clock Battery The camera s clo...

Page 31: ...microphone and speaker When taking pictures in portrait tall orientation turn the camera so that the flash is above the lens 2 Frame the picture Move the zoom control to change the zoom lens position When the camera recognizes the shooting scene the shooting mode icon changes accordingly Shooting with Scene Auto Selector Mode Zoom out Zoom in 8m 0s 8m 0s 1400 1400 Shooting mode icon ...

Page 32: ... memory card slot cover or remove the battery or memory card while an indicator is flashing Doing this could result in loss of data or in damage to the camera or the memory card C The Auto Off Function When no operations are performed for about one minute the monitor turns off the camera enters standby mode and then the power on lamp flashes The camera turns off after remaining in standby mode for...

Page 33: ...d further Zoom indicator is blue Image quality is not noticeably reduced by using the Dynamic Fine Zoom Zoom indicator is yellow There may be cases in which image quality is noticeably reduced The indicator remains blue across a wider area when the image size is smaller The zoom indicator may not change to blue when using certain continuous shooting settings or other settings The Shutter release B...

Page 34: ...shooting mode press the A button or shutter release button When e is displayed in full frame playback mode you can press the k button to apply an effect to the image Move the zoom control toward g i in full frame playback mode to zoom in on an image In full frame playback mode move the zoom control toward f h to switch to thumbnail playback mode and display multiple images on the screen Play Back ...

Page 35: ...eletion method and press the k button To exit without deleting press the d button 3 Select Yes and press the k button Deleted images cannot be recovered C Deleting the Image Captured While in Shooting Mode When using shooting mode press the l button to delete the last image that was saved Delete Images Delete Erase selected images Current image All images Yes No Erase 1 image ...

Page 36: ...K To undo the selection press I to remove K Move the zoom control A1 toward g i to switch to full frame playback or f h to switch to thumbnail playback 2 Add K to all images that you want to delete and then press the k button to confirm the selection A confirmation dialog is displayed Follow the on screen instructions to complete operations Erase selected images Back Back ...

Page 37: ...oting F Smart portrait Use glamour retouch to enhance human faces during shooting and use the smile timer or self collage function to take pictures A Auto mode Used for general shooting Settings can be changed to suit the shooting conditions and the type of shot that you want to capture 1 When the shooting screen is displayed press the A shooting mode button 2 Use the multi selector HI to select a...

Page 38: ...ds after you press the shutter release button p Macro mode Use macro mode when you take close up pictures o Exposure compensation You can adjust overall image brightness The functions that can be set vary depending on the shooting mode Display the shooting screen and press the b e movie record button to start recording a movie Press the b e button again to end recording To play back a movie select...

Page 39: ...able in x Scene Auto Selector Mode Flash mode A35 Self timer A37 Exposure compensation A40 Image mode A66 x Scene Auto Selector Mode Enter shooting mode M A shooting mode button M x scene auto selector mode M k button e Portrait for taking close up portraits of one or two people b Portrait for taking portraits of large numbers of people or images in which the background takes up a large portion of...

Page 40: ...iption of Each Scene Mode Help Display Select a scene and move the zoom control A1 toward g j to view a description of that scene To return to the previous screen move the zoom control toward g j again Scene Mode Shooting Suited to Scenes Enter shooting mode M A shooting mode button M b second icon from the top M K M HI M select a scene M k button b Portrait default setting i Dusk dawn1 2 3 c Land...

Page 41: ...od to stabilize the camera during shooting On the screen displayed when j Night landscape is selected select u Hand held or w Tripod u Hand held default setting Select this option to produce shots with reduced blurring and noise even when the camera is hand held w Tripod Select this option when using a tripod or other means to stabilize the camera when shooting Vibration reduction is disabled even...

Page 42: ...tting is saved in the camera s memory even after the camera is turned off You can move the focus area Press the k button use the multi selector HIJK to move the focus area and press the k button to apply the setting The shutter speed is fixed at four seconds The zoom is restricted to four fixed positions The flash always fires u Food m Fireworks show o Backlighting 8m 0s 8m 0s 1400 1400 ...

Page 43: ...tter automatically even if a dog or cat face is detected Press the shutter release button The camera also detects human faces when OFF is selected Pet portrait auto release is set to OFF after five bursts have been taken Shooting is also possible by pressing the shutter release button regardless of the Pet portrait auto release setting When V Continuous is selected you can take pictures continuous...

Page 44: ...de A39 and exposure compensation A40 settings in this step Press the k button to reselect the direction 2 Frame the first portion of the panorama scene and take the first picture The camera focuses on the subject in the center of the frame About one third of the image is displayed as translucent 3 Take the next picture Match the outline of the next image so that one third of the frame overlaps the...

Page 45: ...er only the first image is taken the camera cannot scroll the playback of the image A26 Shooting for the panorama series is terminated if the auto off function A95 initiates standby mode during shooting Setting the time allowed to elapse before the auto off function is enabled to a longer setting is recommended Images cannot be deleted while shooting in panorama assist mode When shooting a new ima...

Page 46: ...le to scroll the playback of or zoom in on panorama assist images captured with another make or model of digital camera B Notes About Printing Panorama Images The entire image may not be able to be printed depending on the printer s settings Additionally printing may not be possible depending on the printer Function Icon Description Rewind A Hold down the k button to scroll backward quickly Advanc...

Page 47: ...of an old photograph F High contrast monochrome Changes the image to black and white and gives it sharp contrast I Selective color Creates a black and white image in which only the specified color remains l Pop Increases the color saturation of the entire image to create a bright look o Cross process Gives the image a mysterious appearance based on a specific color m Toy camera effect 1 Gives the ...

Page 48: ...n the area in the center of the frame When Selective color or Cross process is selected use the multi selector HI to select the desired color and press the k button to apply the color To change the color selection press the k button again Save ...

Page 49: ...n makeup Q Soft G Vividness o Brightness Exp Select y Exit to hide the slider After configuring the desired effects press the k button to apply them 3 Frame the picture and press the shutter release button B Notes About Smart Portrait Mode The amount of effect may differ between the image on the shooting screen and the saved image Smart Portrait Mode Enhancing Human Faces When Shooting Enter shoot...

Page 50: ...touch function before selecting smile timer A29 When you press the shutter release button to take a picture smile timer is terminated B Notes About Smile Timer Under some shooting conditions the camera may be unable to detect faces or smiles A43 The shutter release button can also be used for shooting C When the Self timer Lamp Flashes When using smile timer the self timer lamp flashes when the ca...

Page 51: ... confirmation dialog is displayed When you press the d button and select Self Collage before pressing J you can configure the settings for Number of shots Interval and Shutter sound A76 If you want to apply glamour retouch when shooting set the effect before selecting self collage A29 Enter shooting mode M A shooting mode button M F Smart portrait mode M k button 15 11 2015 15 30 15 11 2015 15 30 ...

Page 52: ...g shooting and it changes to white after shooting When the camera finishes taking the specified number of shots the collage image is saved Each captured image is saved as an individual image separate from the collage image B Notes About Self Collage If you press the shutter release button before the camera takes the specified number of shots shooting is canceled and the collage image is not saved ...

Page 53: ...72 The default setting is Target finding AF A45 Functions Available in A Auto Mode Creative slider A33 Flash mode A35 Self timer A37 Macro mode A39 Shooting menu A66 Using the Creative Slider You can adjust the brightness exposure compensation vividness and hue when shooting 1 Press the multi selector K A Auto Mode Enter shooting mode M A shooting mode button M A auto mode M k button Enter shootin...

Page 54: ...ettings select P Reset and press the k button Return to step 2 and adjust the settings again 4 Press the k button when setting is complete The settings are applied and the camera returns to the shooting screen C Creative Slider Settings This function may not be available to use in combination with other functions A48 The settings for brightness exposure compensation vividness and hue are saved in ...

Page 55: ...a few seconds the selection will be canceled C The Flash Lamp The status of the flash can be confirmed by pressing the shutter release button halfway On The flash fires when you press the shutter release button all the way down Flashing The flash is charging The camera cannot shoot images Off The flash does not fire when a picture is taken If the battery level is low the monitor turns off while th...

Page 56: ...ily to other areas of the image In these cases select another flash mode and take the picture again U Auto The flash fires when necessary such as in dim lighting The flash mode icon on the shooting screen is displayed only immediately after the setting is made V Auto with red eye reduction Reduce red eye in portraits caused by the flash W Off The flash does not fire We recommend using a tripod to ...

Page 57: ...mportant occasions such as weddings n2s 2 seconds Use to prevent camera shake If the setting is not applied by pressing the k button within a few seconds the selection will be canceled When the shooting mode is Pet portrait scene mode Y pet portrait auto release is displayed A23 The self timer cannot be used When the shooting mode is smart portrait mode you can also use a Smile timer A30 and n Sel...

Page 58: ...ay down Countdown starts The self timer lamp flashes and then glows steadily about one second before the shutter is released When the shutter is released the self timer is set to OFF To stop the countdown press the shutter release button again F3 7 F3 7 F3 7 1 250 1 250 9 9 ...

Page 59: ... displayed in green the camera can focus on subjects as close as approximately 9 cm 3 6 in from the lens When the zoom is at the position where G is displayed the camera can focus on subjects as close as approximately 2 cm 0 8 in from the lens B Notes About Using the Flash The flash may be unable to light the entire subject at distances of less than 50 cm 1 ft 8 in C The Macro Mode Setting The set...

Page 60: ...Exposure Compensation Value The setting may not be available with some shooting modes A41 If the setting is applied in A auto mode it will remain saved in the camera s memory even after the camera is turned off C Using the Histogram A histogram is a graph showing the distribution of tones in the image Use as a guide when using exposure compensation and shooting without the flash The horizontal axi...

Page 61: ... Off Off3 0 0 c landscape W3 Off Off3 0 0 d sports W3 Off3 Off3 0 0 e night portrait V4 Off Off3 0 0 f party indoor V5 Off Off3 0 0 Z beach U Off Off3 0 0 z snow U Off Off3 0 0 h sunset W3 Off Off3 0 0 i dusk dawn W3 Off Off3 0 0 j night landscape W3 Off Off3 0 0 k close up W Off On3 0 0 u food W3 Off On3 0 0 m fireworks show W3 Off3 Off3 0 03 o backlighting X3 Off Off3 0 0 U panorama assist W Off...

Page 62: ...s fixed at fill flash with red eye reduction 5 Slow sync with red eye reduction flash mode may be used 6 Self timer cannot be used Pet portrait auto release can be turned on or off A23 7 a Smile timer A30 and n Self Collage A31 can be used in addition to self timer 8 Glamour retouch is displayed A29 9 Creative slider is displayed A33 R special effects W Off Off 0 0 F smart portrait U Off7 Off3 8 A...

Page 63: ...splayed around the other faces If the shutter button is pressed halfway when no faces are detected In x scene auto selector mode the focus area changes depending on the scene In Portrait and Night portrait scene modes or in smart portrait mode the camera focuses in the center of the frame In A auto mode the camera selects the focus area containing the subject closest to the camera B Notes About Fa...

Page 64: ... effect can be adjusted x scene auto selector mode A19 Portrait or Night portrait scene mode A20 Editing functions such as Skin softening can be applied to saved images by using Glamour retouch A56 even after shooting B Notes About Skin Softening It may take more time than usual to save images after shooting Under some shooting conditions the desired skin softening results may not be achieved and ...

Page 65: ...e subject closest to the camera When the subject is in focus the focus areas that are in focus are displayed in green B Notes About Target Finding AF Depending on shooting conditions the subject that the camera determines to be the main subject may vary The main subject may not be detected when using certain White balance settings The camera may not detect the main subject appropriately in the fol...

Page 66: ...ery dark No contrast between the subject and surroundings e g a portrait subject wearing a white shirt is standing in front of a white wall Several objects are at different distances from the camera e g the subject is inside a cage Subjects with repeating patterns window blinds buildings with multiple rows of similarly shaped windows etc Subject is moving rapidly In the situations noted above try ...

Page 67: ...he center of the frame and press the shutter release button halfway The camera focuses on the subject and the focus area is displayed in green Exposure is also locked 3 Without lifting your finger recompose the picture Make sure to maintain the same distance between the camera and the subject 4 Press the shutter release button the rest of the way down to take the picture F3 7 F3 7 F3 7 1 250 1 250...

Page 68: ...de cannot be used Image mode ISO sensitivity A71 When 3200 is selected the image mode setting of only r 2272 1704 q 1600 1200 or O 640 480 can be selected If any image mode setting other than above is selected the image mode setting is automatically changed to r 2272 1704 when ISO sensitivity is set to 3200 White balance Hue Using the creative Slider A33 When Hue is adjusted using the creative sli...

Page 69: ...ay not be available A94 When digital zoom is in effect the camera focuses in the center of the frame Digital zoom AF area mode A72 When Subject tracking is selected digital zoom cannot be used Shutter sound Continuous A70 When Continuous is selected the shutter sound is disabled Restricted function Option Description ...

Page 70: ... of the image press the multi selector HIJK When a zoomed image is displayed press the k button to return to full frame playback mode C Cropping Images When a zoomed image is displayed you can press the d button to crop the image to include only the visible portion and save it as a separate file A59 Playback Zoom 15 11 2015 15 30 15 11 2015 15 30 0004 JPG 0004 JPG 4 4 4 4 3 0 3 0 g i f h Image is ...

Page 71: ...a date and then press the k button to display the images captured on that day B Notes About Calendar Display Images captured when the camera s date is not set are treated as images captured on January 1 2015 Thumbnail Playback Calendar Display 1 20 1 20 15 11 2015 15 30 15 11 2015 15 30 0004 JPG 0004 JPG 1 20 1 20 Sun Mon Tue Wed Thu Fri Sat 30 30 30 29 29 29 28 28 28 27 27 27 26 26 26 25 25 25 24...

Page 72: ... settings can be applied to all images captured on the selected date l button Deletes all images captured on the selected date B Notes About List by Date Mode Up to the most recent 29 dates can be selected If images exist for more than 29 dates all images saved earlier than the most recent 29 dates will be combined under Others The 9 000 most recent images can be displayed Images captured when the...

Page 73: ...s You may not be able to edit images of a certain size or with certain editing functions Quick Effects Changing Hue or Mood Process images with a variety of effects Painting Photo illustration Soft portrait Portrait color B W Fisheye Cross screen or Miniature effect can be selected 1 Display the image to which you want to apply an effect in full frame playback mode and press the k button Editing I...

Page 74: ... button An edited copy is created Quick Retouch Enhancing Contrast and Saturation Use the multi selector HI to select the amount of effect applied and press the k button The edited version is displayed on the right To exit without saving the copy press J Press the c button playback mode M select an image M d button M Quick retouch M k button Cancel Cancel Check Check Quick effects Painting Photo i...

Page 75: ...lti selector J B Notes About Red eye Correction Red eye correction can only be applied to images when red eye is detected Red eye correction can be applied to pets dogs or cats even if their eyes are not red Red eye correction may not produce the desired results in some images In rare cases red eye correction may be applied unnecessarily to other areas of the image Press the c button playback mode...

Page 76: ...ects before pressing the k button F Small face B Skin softening l Foundation makeup m Glare reduction E Hide eye bags A Big eyes G Whiten eyes n Eye shadow o Mascara H Whiten teeth p Lipstick D Redden cheeks Press the d button to return to the screen for selecting a person 3 Preview the result and press the k button To change the settings press J to return to step 2 To exit without saving the edit...

Page 77: ...hanges Depending on the direction in which faces are looking or the brightness of faces the camera may be unable to accurately detect faces or the glamour retouch function may not perform as expected If no faces are detected a warning is displayed and the screen returns to the playback menu The glamour retouch function is available only for images captured at an ISO sensitivity of 1600 or lower an...

Page 78: ... saved at a size of 640 360 and images captured at an image mode setting of s 3864 3864 are saved at 480 480 Press the k button to proceed to step 2 2 Select Yes and press the k button An edited copy is created compression ratio of approximately 1 8 Press the c button playback mode M select an image M d button M Small picture M k button 640 480 320 240 160 120 Small picture Yes No Create small pic...

Page 79: ...isplayed Use the multi selector HIJK to scroll to the portion of the image that you want to display 3 Check that the desired cropping area is displayed and then press the k button 4 Select Yes and press the k button An edited copy is created C Image Size The aspect ratio horizontal and vertical ratio of a cropped image is the same as that of the original image An image that is cropped to a size of...

Page 80: ...tart movie recording The camera focuses in the center of the frame 3 Press the b e movie record button again to end recording 4 Select a movie in full frame playback mode and press the k button to play it back An image with a movie options icon is a movie 8m 0s 8m 0s 1400 1400 Remaining movie recording time 2m30s 2m30s 15 11 2015 15 30 15 11 2015 15 30 0010 AVI 0010 AVI 10s 10s Movie options ...

Page 81: ...ooting screen The actual remaining recording time may vary depending on the movie content subject movement or type of memory card Memory cards with an SD Speed Class rating of 6 or faster are recommended when recording movies A136 Movie recording may stop unexpectedly when memory cards with a lower Speed Class rating are used B Notes About Camera Temperature The camera may become hot when shooting...

Page 82: ...ng movies is recommended Depending on the distance to the subject or the amount of zoom applied colored stripes may appear on subjects with repeating patterns fabrics lattice windows etc during movie recording and playback This occurs when the pattern in the subject and the layout of the image sensor interfere with each other it is not a malfunction B Notes About Vibration Reduction During Movie R...

Page 83: ...ations During Movie Playback Function Icon Description Rewind A Hold down the k button to rewind the movie Advance B Hold down the k button to advance the movie Pause E Pause playback The operations listed below can be performed while paused C Rewind the movie one frame Hold down the k button for continuous rewinding D Advance the movie one frame Hold down the k button for continuous advancing F R...

Page 84: ...es play slide shows etc D Movie menu Available by pressing the d button when the shooting screen is displayed Allows you to change movie recording settings J Wi Fi options menu Allows you to configure Wi Fi settings for connecting the camera and a smart device z Setup menu Allows you to adjust basic camera functions such as date and time display language etc 1 Press the d menu button The menu is d...

Page 85: ...lect a setting and press the k button The setting you selected is applied When you are finished using the menu press the d button When a menu is displayed you can switch to shooting mode by pressing the shutter release button A button or b e button Time zone and date Monitor settings Date stamp Photo VR AF assist Digital zoom Set up Time zone and date Monitor settings Date stamp Photo VR AF assist...

Page 86: ...er the quality of the images but the number of images that can be saved is reduced The numerical values indicate the number of pixels that are captured Example x 5152 3864 approx 20 megapixels 5152 3864 pixels The Shooting Menu for A Auto Mode Enter shooting mode M d button M Image mode M k button Option Compression ratio Aspect ratio horizontal to vertical w 5152 3864P Approx 1 4 4 3 x 5152 3864 ...

Page 87: ...ages That Can Be Saved The approximate number of images that can be saved can be checked in the monitor when shooting A10 Note that due to JPEG compression the number of images that can be saved may vary greatly depending on the image content even when using memory cards with the same capacity and the same image mode setting In addition the number of images that can be saved may vary depending on ...

Page 88: ...e available to use in combination with other functions A48 Enter shooting mode M A shooting mode button M A auto mode M k button M d button M White balance M k button Option Description a Auto default setting White balance is automatically adjusted b Preset manual Use when the desired result is not achieved with Auto Incandescent etc A69 c Daylight Use under direct sunlight d Incandescent Use unde...

Page 89: ...easured value select Cancel and press the k button 4 Frame the white or gray reference object in the measuring window and press the k button to measure the value The shutter is released and measurement is complete no image is saved B Notes About Preset Manual A value for flash lighting cannot be measured with Preset manual When shooting using the flash set White balance to Auto or Flash Auto Auto ...

Page 90: ... other functions A48 Enter shooting mode M A shooting mode button M A auto mode M k button M d button M Continuous M k button Option Description U Single default setting One image is captured each time the shutter release button is pressed V Continuous While the shutter release button is held all the way down images are captured continuously The frame rate for continuous shooting is about 1 1 fps ...

Page 91: ... to r 2272 1704 q 1600 1200 and O 640 480 X is displayed next to the ISO sensitivity indicator in the monitor C ISO Sensitivity Display on the Shooting Screen When Auto is selected E is displayed when the ISO sensitivity increases When Fixed range auto is selected the maximum value for ISO sensitivity is displayed Enter shooting mode M A shooting mode button M A auto mode M k button M d button M I...

Page 92: ...ition with no human subjects or detected faces the camera automatically selects one or more of the nine focus areas containing the subject closest to the camera when the shutter release button is pressed halfway x Manual Use the multi selector HIJK to move the focus area to where you want to focus To use the multi selector to configure the flash mode or other settings press the k button To return ...

Page 93: ...he frame s Subject tracking Use this function to take pictures of moving subjects Register the subject on which the camera focuses The focus area automatically moves to track the subject See Using Subject Tracking A74 for more information M Target finding AF default setting When the camera detects the main subject it focuses on that subject See Using Target Finding AF A45 for more information Opti...

Page 94: ...n no longer track the registered subject the focus area disappears Register the subject again 2 Press the shutter release button fully to take the picture If the shutter release button is pressed while the focus area is not displayed the camera focuses on the subject in the center of the frame B Notes About Subject Tracking If you perform operations such as zooming while the camera is tracking the...

Page 95: ...enu Enter shooting mode M A shooting mode button M A auto mode M k button M d button M Autofocus mode M k button Option Description A Single AF default setting The camera focuses only when the shutter release button is pressed halfway B Full time AF The camera continues focusing even when the shutter release button is not pressed halfway The sound of lens drive movement is heard while the camera f...

Page 96: ...at the camera automatically captures number of captured images for an aggregated image 4 default setting or 9 can be selected Interval Set the interval time between each shot Short Medium default setting or Long can be selected Shutter sound Set whether to activate the shutter sound when shooting with the self collage function Standard SLR Magic default setting or Off can be selected The same sett...

Page 97: ... Blink proof M k button Option Description y On The camera automatically releases the shutter twice with every shot and saves one image in which the subject s eyes are open If the camera saved an image in which the subject s eyes may have been closed the dialog shown on the right is displayed for a few seconds The flash cannot be used Off default setting Turns the blink proof off A blink was detec...

Page 98: ...ce before transferring them On the image selection screen A82 select or deselect images for the Mark for Wi Fi upload function Note that when you select Reset all A99 in the setup menu or Restore default settings A86 in the Wi Fi options menu the Mark for Wi Fi upload settings that you made are canceled The Playback Menu Press the c button playback mode M d button MMark for Wi Fi upload M k button...

Page 99: ...ect Loop and press the k button before selecting Start The maximum playback time is up to about 30 minutes even if Loop is enabled 2 End or restart the slide show The screen shown on the right is displayed after the slide show ends or is paused To exit the show select G and then press the k button To resume the slide show select F and then press the k button Operations During Playback Use the mult...

Page 100: ... 90 degrees clockwise or 90 degrees counterclockwise Select an image from the image selection screen A82 When the Rotate image screen is displayed press the multi selector JK to rotate the image 90 degrees Press the k button to finalize display orientation and save orientation information with the image Press the c button playback mode M d button M Protect M k button Press the c button playback mo...

Page 101: ...lect a destination option to which images are copied and press the k button 2 Select a copy option and press the k button When you choose Selected images use the image selection screen to specify images A82 B Notes About Copying Images Only files in formats that this camera can record can be copied Operation is not guaranteed with images captured with another make of camera or that have been modif...

Page 102: ...witch to full frame playback or f h to switch to thumbnail playback Only one image can be selected for Rotate image Proceed to step 3 2 Use HI to select or deselect or to specify the number of copies When an image is selected an icon is displayed below the image Repeat steps 1 and 2 to select additional images 3 Press the k button to apply image selection When a confirmation dialog is displayed fo...

Page 103: ...or recording movies A136 When recording in the internal memory the default setting is g 480 30p or W 480 25p and f 720 30p or V 720 25p cannot be selected The Movie Menu Enter shooting mode M d button M D menu icon M Movie options M k button Option Image size Frame rate Image size Aspect ratio horizontal to vertical f 720 30p V 720 25p default setting 1280 720 16 9 g 480 30p W 480 25p 640 480 4 3 ...

Page 104: ...hen the distance between the camera and subject will remain fairly consistent during movie recording B Full time AF The camera focuses continuously during movie recording Select this option when the distance between the camera and subject will change significantly during recording The sound of the camera focusing may be heard in the recorded movie Use of Single AF is recommended to prevent the sou...

Page 105: ...forms optical compensation for camera shake using lens shift VR and simultaneously performs electronic VR using image processing The angle of view i e the area visible in the frame becomes narrower g On Performs compensation for camera shake using lens shift VR Off Compensation is not performed Enter shooting mode M d button M D menu icon M Wind noise reduction M k button Option Description Y On R...

Page 106: ...amera are displayed on the screen Disable Wi Fi Select to terminate the wireless connection between the camera and a smart device See Using the Wi Fi Wireless LAN Function A100 for more information Options SSID Change the SSID The SSID configured here is displayed on the smart device Set a 1 to 24 character alphanumeric SSID Auth encryp Select whether or not to encrypt the communications between t...

Page 107: ...enter the selected character in the text field and move the cursor to the next space To move the cursor in the text field select N or O on the keyboard and press the k button To delete one character press the l button To apply the setting select P on the keyboard and press the k button SSID Delete Delete Back Back Text field Keyboard ...

Page 108: ... Press HI Apply the setting Select the minute setting and press the k button Date format Select Year Month Day Month Day Year or Day Month Year Time zone Set time zone and daylight saving time When Travel destination x is set after having set the home time zone w the time difference between the travel destination and the home time zone is automatically calculated and the date and time are saved fo...

Page 109: ...t the time zone Press H to enable daylight saving time function and W is displayed Press I to disable the daylight saving time function Press the k button to apply the time zone If the correct time is not displayed for the home or travel destination time zone setting set the appropriate time in Date and time Time zone Home time zone Travel destination 15 11 2015 15 30 Time zone Home time zone Trav...

Page 110: ...ediately after shooting Default setting On Brightness Adjust the brightness Default setting 3 Shooting mode Playback mode Show info Auto info default setting The same information as shown in Show info is displayed and it is hidden as shown in Hide info if no operations are performed for a few seconds The information is displayed again when an operation is performed Hide info 8m 0s 8m 0s 1400 1400 ...

Page 111: ... In addition to the information shown in Auto info a frame is displayed before movie recording begins that represents the area that will be captured when recording movies The movie frame is not displayed while recording movies Same as Auto info Shooting mode Playback mode 8m 0s 8m 0s 1400 1400 4 4 4 4 15 11 2015 15 30 15 11 2015 15 30 0004 JPG 0004 JPG 8m 0s 8m 0s 1400 1400 4 4 4 4 15 11 2015 15 3...

Page 112: ...d in the following situations When using Panorama assist scene mode When shooting movies The stamped date and time may be difficult to read when using a small image size C Printing a Shooting Date on Images Without a Date Stamp You can transfer images to a computer and use the ViewNX 2 software A111 to imprint the shooting date on the images when they are printed Press the d button M z menu icon M...

Page 113: ...e to shooting mode wait for the shooting mode screen to be displayed completely before taking pictures Images in the camera monitor may be displayed blurry immediately after shooting The effects of camera shake may not be completely eliminated in some situations Press the d button M z menu icon M Photo VR M k button Option Description g On default setting Compensation for camera shake is performed...

Page 114: ...uto default setting The AF assist illuminator automatically lights up when you press the shutter release button under dim lighting The illuminator has a range of about 2 0 m 6 ft 6 in at the maximum wide angle position and about 1 5 m 4 ft 11 in at the maximum telephoto position Note that for some scene modes or focus areas the AF assist illuminator may not light Off The AF assist illuminator does...

Page 115: ...n the AC Adapter EH 62G is connected 30 minutes When an audio video cable is connected 30 minutes Press the d button M z menu icon M Sound settings M k button Option Description Button sound When On default setting is selected the camera produces one beep when operations are performed two beeps when focus is acquired on the subject and three beeps when an error occurs The start up sound is also pr...

Page 116: ...card into the camera Select Format card in the setup menu and then press the k button Formatting the Internal Memory Remove the memory card from the camera Select Format memory in the setup menu and then press the k button To start formatting select Format on the screen that is displayed and press the k button Do not turn the camera off or open the battery chamber memory card slot cover during for...

Page 117: ... for connection to a TV Select from NTSC and PAL Both NTSC and PAL are standards for analog color television broadcasting The available frame rates in Movie options A83 vary depending on the video mode setting Press the d button M z menu icon M Language M k button Press the d button M z menu icon M Video mode M k button ...

Page 118: ...d to charging Charge the battery indoors with an ambient temperature of 5 C to 35 C 41 F to 95 F The USB cable is not connected correctly or the battery is faulty Make sure the USB cable is connected correctly or replace the battery if necessary The computer is in sleep mode and is not supplying power Wake up the computer The battery cannot be charged because the computer cannot supply power to th...

Page 119: ...001 delete all images saved on the memory card or in the internal memory A15 before selecting Reset all Conformity Marking View some of the conformity markings that the camera complies with Firmware Version View the current camera firmware version This setting cannot be selected while Wi Fi is connected Press the d button M z menu icon M Reset all M k button Press the d button M z menu icon M Conf...

Page 120: ...uch as the password are not configured at the time of purchase It is the user s responsibility to configure the appropriate security settings in Options in the Wi Fi options menu A64 if necessary 1 Use your smart device to connect to the Google Play Store App Store or other online apps marketplace and search for Wireless Mobile Utility Check the user s manual provided with your smart device for fu...

Page 121: ...r the network names SSIDs that can be used for the smart device are displayed select the SSID displayed on the camera When Auth encryp in the Wi Fi options menu is set to WPA2 PSK AES the message for entering a password is displayed Enter the password that is displayed on the camera 3 While Negotiating Please wait is displayed on the camera start the Wireless Mobile Utility installed on the smart ...

Page 122: ...Connection Wi Fi connection operations are disabled in the following situations When using the camera s USB connection While recording movies While the camera is processing data such as saving images or recording movies When the camera is connected to a smart device Select Disable Wi Fi in areas where the use of radio waves is prohibited When Wi Fi is connected Auto off is disabled When Wi Fi is c...

Page 123: ... Utility the confirmation screen is displayed and the specified images are transferred to the smart device B Preselecting Images to Transfer During Playback While the camera is in playback mode press the Z Wi Fi button or use the NFC function to establish a Wi Fi connection and preselect the displayed images that you want to transfer In full frame playback mode you can add one image at a time In t...

Page 124: ...turn the camera off Before disconnecting make sure to turn the camera off If the AC Adapter EH 62G available separately is used this camera can be powered from an electrical outlet Do not use any other make or model of AC adapter as it may cause the camera to heat up or malfunction For information about the connection methods and subsequent operations refer to the documentation included with the d...

Page 125: ... s USB port with the USB cable Viewing and organizing images on a computer A111 You can transfer images to a computer to perform simple retouching and manage image data Connection method Connect the camera to the computer s USB port with the USB cable Before connecting to a computer install ViewNX 2 on the computer A111 If any USB devices that draw the power from the computer are connected disconn...

Page 126: ...e that the plugs are properly oriented Do not insert or remove the plugs at an angle when connecting or disconnecting them 2 Set the TV s input to external video input See the documentation provided with your TV for details 3 Hold down the c playback button to turn on the camera Images are displayed on the TV The camera monitor does not turn on Connecting the Camera to a TV Playback on a TV Yellow...

Page 127: ...inter 2 Turn off the camera and connect it to the printer using the USB cable Make sure that the plugs are properly oriented Do not insert or remove the plugs at an angle when connecting or disconnecting them 3 The camera is automatically turned on The PictBridge startup screen 1 is displayed in the camera monitor followed by the Print selection screen 2 Connecting the Camera to a Printer Direct P...

Page 128: ...he k button Move the zoom control toward f h to switch to thumbnail playback or g i to switch to full frame playback 2 Use HI to select Copies and press the k button Use HI to set the desired number of copies up to nine and press the k button 3 Select Paper size and press the k button Select the desired paper size and press the k button To print with the paper size setting configured on the printe...

Page 129: ...er size and press the k button To print with the paper size setting configured on the printer select Default The paper size options available on the camera vary depending on the printer that you use To exit the print menu press the d button 3 Select Print selection or Print all images and press the k button Print selection 15 11 2015 Print menu Print selection Print all images Paper size Print men...

Page 130: ...of copies to 0 Move the zoom control toward g i to switch to full frame playback or f h to switch to thumbnail playback Press the k button when setting is complete When the screen for confirming the number of print copies is displayed select Start print and press the k button to start printing Print all images One copy each of all images saved in the internal memory or on the memory card is printe...

Page 131: ...repare a memory card that contains images You can use any of the methods below to transfer images from the memory card to a computer SD memory card slot card reader Insert the memory card into the card slot of your computer or the card reader commercially available that is connected to the computer Direct USB connection Turn the camera off and ensure that the memory card is inserted in the camera ...

Page 132: ...until Nikon Transfer 2 starts B Notes About Connecting the USB Cable Operation is not guaranteed if the camera is connected to the computer via a USB hub 2 After Nikon Transfer 2 starts click Start Transfer Image transfer begins When image transfer is complete ViewNX 2 starts and the transferred images are displayed Consult online help for more information on using ViewNX 2 3 Terminate the connect...

Page 133: ...14 The Camera 114 The Battery 115 The Charging AC Adapter 116 Memory Cards 117 Cleaning and Storage 118 Cleaning 118 Storage 118 Error Messages 119 Troubleshooting 123 File Names 130 Optional Accessories 131 Specifications 132 Approved Memory Cards 136 Index 138 ...

Page 134: ... exposing it to sudden changes in temperature Keep Away from Strong Magnetic Fields Do not use or store this device in the vicinity of equipment that generates strong electromagnetic radiation or magnetic fields Doing so could result in loss of data or camera malfunction Do Not Point the Lens at Strong Light Sources for Extended Periods Avoid pointing the lens at the sun or other strong light sour...

Page 135: ...avoid bright subjects such as the sun reflected sunlight and electric lights The Battery Precautions for Use Note that the battery may become hot after use Do not use the battery at ambient temperatures below 0 C 32 F or above 40 C 104 F as this could cause damage or malfunction If you notice any abnormalities such as excessive heat smoke or an unusual smell coming from the battery immediately dis...

Page 136: ...attery at least once every six months and completely exhaust it before returning it to storage Put the battery in a plastic bag etc in order to insulate it and store it in a cool place The battery should be stored in a dry location with an ambient temperature of 15 C to 25 C 59 F to 77 F Do not store the battery in hot or extremely cold locations Battery Life A marked drop in the time a fully char...

Page 137: ...on the memory card Be sure to make copies of any images you wish to keep before formatting the memory card If the message Card is not formatted Format card is displayed when the camera is turned on the memory card must be formatted If there is data that you do not want to delete select No Copy the necessary data to a computer etc If you want to format the memory card select Yes The confirmation di...

Page 138: ...with your fingers Remove dust or lint with a blower typically a small device with a rubber bulb attached to one end that is pumped to produce a stream of air out the other end To remove fingerprints or other stains that cannot be removed with a blower wipe the lens with a soft cloth using a spiral motion that starts at the center of the lens and working toward the edges If this fails clean the len...

Page 139: ...rite position This card cannot be used An error occurred while accessing the memory card Use an approved memory card Check that the terminals are clean Confirm that the memory card is correctly inserted 6 136 This card cannot be read Card is not formatted Format card The memory card has not been formatted for use in the camera Formatting deletes all data saved on the memory card If you need to kee...

Page 140: ...ith a faster write speed 62 136 Memory contains no images There are no images in the internal memory or on the memory card Remove the memory card to play back images in the internal memory To copy the images saved in the camera s internal memory to the memory card press the d button to select Copy in the playback menu 6 81 File contains no image data The file was not created or edited with this ca...

Page 141: ... When the reception is poor When the battery level is low When a cable is connected or disconnected or a memory card is removed or inserted Use a fully charged battery disconnect the TV computer and printer from the camera and establish the wireless connection again 86 101 Lens error Try again after turning the camera off and on If the error persists contact your retailer or Nikon authorized servi...

Page 142: ...paper select Resume and press the k button to resume printing Printer error out of paper Load the specified size of paper select Resume and press the k button to resume printing Printer error check ink There is a problem with the printer s ink Check the ink select Resume and press the k button to resume printing Printer error out of ink Replace the ink cartridge select Resume and press the k butto...

Page 143: ...ra cannot be turned on The battery is exhausted 6 7 116 The camera turns off without warning The camera automatically turns off to save power auto off function The camera and battery may not work properly at low temperatures The inside of the camera has become hot Leave the camera off until the inside of the camera has cooled and then try turning it on again 12 115 The monitor is blank The camera ...

Page 144: ... monitor brightness The monitor is dirty Clean the monitor 90 118 O flashes on the screen If the camera clock has not been set O flashes on the shooting screen and images and movies saved before the clock is set are dated 00 00 0000 00 00 and 01 01 2015 00 00 respectively Set the correct time and date for Time zone and date in the setup menu The camera clock is not as accurate as ordinary watches ...

Page 145: ...cord movies When the camera is in playback mode press the A button shutter release button or b e button When menus are displayed press the d button The flash is charging while the flash lamp is flashing The battery is exhausted 1 14 64 35 6 7 116 The camera cannot focus The subject is too close Try shooting using scene auto selector mode Close up scene mode or macro mode The subject is hard to foc...

Page 146: ...d with certain shooting modes or when using certain settings in other functions 94 49 94 Image mode not available A function that restricts Image mode is enabled 48 No sound when the shutter is released Off is selected for Shutter sound in Sound settings in the setup menu No sound is produced with some shooting modes and settings even when On is selected 95 AF assist illuminator does not light Off...

Page 147: ...eye reduction and try taking the picture again 35 41 Skin tones are not softened In some shooting conditions facial skin tones may not be softened For images containing four or more faces try using the Skin softening effect in Glamour retouch in the playback menu 44 56 Saving images takes time It may take more time to save images in the following situations When the noise reduction function is in ...

Page 148: ...images cannot be edited Images that have already been edited may not be edited again There is not enough free space on the memory card or in the internal memory This camera is unable to edit images captured with other cameras Editing functions used for images are not available for movies 26 53 Images are not displayed on TV Video mode is not correctly set in the setup menu The memory card contains...

Page 149: ... reconnect the camera to the printer 64 98 Images to be printed are not displayed The memory card contains no images Remove the memory card to print images in the internal memory 6 Cannot select paper size with the camera The camera cannot be used to select the paper size in the following situations even when printing from a PictBridge compatible printer Use the printer to select the paper size Th...

Page 150: ... on the screen of the camera DSCN Original still images movies SSCN Small picture copies RSCN Cropped copies FSCN Images created by an image editing function other than crop and small picture 2 File number Assigned in ascending order starting with 0001 and ending with 9999 3 Extension Indicates file format JPG Still images AVI Movies ...

Page 151: ...r EH 62G connect as shown Make sure that the power connector cable is fully inserted in the power connector slot before inserting the AC adapter into the battery chamber In addition make sure that the power connector cable is fully inserted in the battery chamber slot before closing the battery chamber memory card slot cover If part of the cable protrudes from the slots the cover or cable may be d...

Page 152: ...at of approx 800 mm lens in 35mm 135 format Vibration reduction Lens shift still images Lens shift and electronic VR movies Autofocus AF Contrast detect AF Focus range W Approx 50 cm 1 ft 8 in T Approx 1 5 m 5 ft Macro mode Approx 2 cm 0 8 in wide angle position All distances measured from center of front surface of lens Focus area selection Face priority center manual with 99 focus areas subject ...

Page 153: ...lable when using Auto mode Exposure Metering mode Matrix center weighted digital zoom less than 2 spot digital zoom 2 or more Exposure control Programmed auto exposure and exposure compensation 2 0 2 0 EV in steps of 1 3 EV Shutter Mechanical and CCD electronic shutter Speed 1 1500 1 s 4 s Fireworks show scene mode Aperture Electronically controlled ND filter 3 AV selection Range 2 steps f 3 7 and...

Page 154: ...l Czech Danish Dutch English Finnish French German Greek Hindi Hungarian Indonesian Italian Japanese Korean Marathi Norwegian Persian Polish Portuguese European and Brazilian Romanian Russian Serbian Spanish Swedish Tamil Telugu Thai Turkish Ukrainian Vietnamese Power sources One Rechargeable Li ion Battery EN EL19 included AC Adapter EH 62G available separately Charging time Approx 2 h 40 min whe...

Page 155: ...liable for any errors this manual may contain The appearance of this product and its specifications are subject to change without notice Operating environment Temperature 0 C 40 C 32 F 104 F Humidity 85 or less no condensation Type Rechargeable lithium ion battery Rated capacity DC 3 7 V 700 mAh Operating temperature 0 C 40 C 32 F 104 F Dimensions W H D Approx 31 5 39 5 6 mm 1 3 1 6 0 3 in Weight ...

Page 156: ...tries Adobe the Adobe logo and Reader are either trademarks or registered trademarks of Adobe Systems Incorporated in the United States and or other countries SDXC SDHC and SD Logos are trademarks of SD 3C LLC PictBridge is a trademark Wi Fi and the Wi Fi logo are trademarks or registered trademarks of the Wi Fi Alliance Android and Google Play are trademarks or registered trademarks of Google Inc...

Page 157: ...ommercial activity and or was obtained from a video provider licensed to provide AVC video No license is granted or shall be implied for any other use Additional information may be obtained from MPEG LA L L C See http www mpegla com FreeType License FreeType2 Portions of this software are copyright 2012 The FreeType Project http www freetype org All rights reserved MIT License HarfBuzz Portions of...

Page 158: ...cro mode 18 39 o Exposure compensation 18 40 R 25 A AC adapter 104 131 AF area mode 72 AF assist 1 94 Aperture value 13 Audio video cable 105 106 131 Auto flash 36 Auto mode 17 33 Auto off 12 95 Auto with red eye reduction 36 Autofocus 62 75 84 Autofocus mode 75 84 B Backlighting o 20 22 Battery 6 7 10 135 Battery chamber 131 Battery charger 8 131 Battery latch 6 Battery level indicator 10 Battery...

Page 159: ...20 22 Firmware version 99 Fixed range auto 71 Flash 1 35 Flash lamp 2 35 Flash mode 35 36 Flash off 36 Fluorescent 68 Focus 72 Focus area 43 Focus indicator 3 12 Focus lock 47 Food u 20 22 Format internal memory 96 Format memory cards 6 96 Formatting 6 96 Full frame playback 50 Full time AF 75 84 Functions that cannot be used simultaneously 48 G Glamour retouch 29 56 H Help 20 High contrast monoch...

Page 160: ...Photo info 90 Photo VR 93 PictBridge 105 107 Playback 14 Playback menu 64 78 Playback mode 14 Playback zoom 14 50 Pop l 27 Portrait b 20 Power switch 1 Power on lamp 1 Preset manual 69 Pressing halfway 13 Print 105 108 109 Printer 105 107 Protect 80 Q Quick effects 53 Quick retouch 54 R Rechargeable Li ion battery 135 Red eye correction 55 Remaining movie recording time 60 61 Reset all 99 Restore ...

Page 161: ... 13 Televisions 105 106 Thumbnail display 14 51 Time difference 88 Time zone 10 88 Time zone and date 9 88 Toy camera effect 1 m 27 Toy camera effect 2 n 27 Tripod socket 2 134 U Upload from camera 86 USB cable 7 105 107 111 USB audio video output connector 1 V Video mode 97 ViewNX 2 111 Volume 63 W White balance 68 Wide angle 13 Wi Fi button 1 100 101 Wi Fi options 64 86 Wind noise reduction 85 W...

Page 162: ...A02 11 6MN53311 02 No reproduction in any form of this manual in whole or in part except for brief quotation in critical articles or reviews may be made without written authorization from NIKON CORPORATION ...

Reviews: