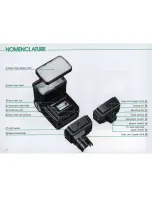
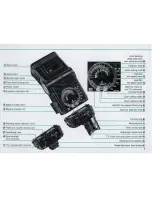
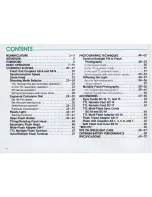
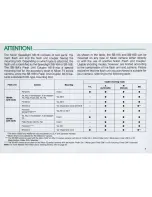
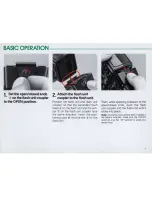
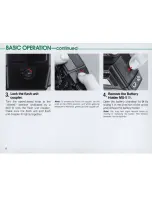
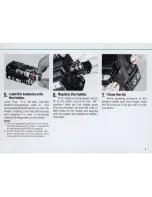
background image

Summary of Contents for 4543 - SB 16B - Hot-shoe clip-on Flash

Page 1: ...Nikon Speedlight INSTRUCTION MANUAL ...

Page 2: ... NOMENCLATURE Wide Flash Adapter SW 7 Main flash head Main flash unit J Light sensor nn nn ln oo knob 2 ...

Page 3: ...Zoom scale Shooling mode indicator LEOs TTL multiple flash terminal 3 ...

Page 4: ...ltiple flash photography 59rv61 MD synchronization with motor drive 24 Manual multiple flash photography 62 Exposure Calculator Dial 24rv 35 ACCESSORIES 63rv65 Set the film speed 24 Sync Cords SC 10 11 and 15 63 Set the zoom setting knob 25 TTL Remote Cord SC 14 63 Determine the exposure 25rv32 TTL Remote Cord SC 17 63 Exposure compensation 33rv35 TTL Multi Flash Sync Cords Ready light 36rv41 Warn...

Page 5: ...ited according to the combination of the flash unit and camera Please reconfirm that the flash unit you purchased is suitable for your camera referring to the following table Usable shooting mode A M TTL automatic manual MD Nikonos V Via V rype Sync Cord and AS 6 F3 series Via AS 4 or AS 7 except F3AF FA FE2 F 501 N2020 F 301 N2000 Direct 58 168 FG wlthAS 9 FM2 FG 20 EM FE FM Direct F2 series H Vi...

Page 6: ...r the SB 16 is also compatible with all other Nikon cameras for automatic but not through the Iens flash output control In the non TTL automatic mode you have a choice of two apertures With a silicon controlled recti fier and series circuitry the SB 16 is able to conserve energy when shooting subjects at close range thus re cycling times are shorter and the number of flashes per battery set is gre...

Page 7: ...n the flash unit and the sen sor J on the flash unit coupler face the same direction Insert the posi tioning claw into the slot on the flash unit Then while applying pressure to the open closed knob push the flash unit coupler into the flash unit until it clicks into place Note If batteries have already been installed in the battery chamber make sure the ON OFF switch is at the off position to avo...

Page 8: ...fit tightly together 8 Note To remove the flash unit coupler set the knob to the OPEN position and while applying pressure to the knob gently pull the coupler off 4 Remove the Battery Holder MS 5 Open the battery chamber lid by sliding it in the direction of the arrow and remove the battery holder Note You may feel slight tension when re moving or replacing the holder This tension however can be i...

Page 9: ... the S8 16 at full capacity 2 Do not mix brands or types of batteries Also avoid mixing new and old batteries since proper performance will not be obtained 6 Replace the holder First make sure the power switch of the flash unit is at the off position then put the holder back into the chamber so that the slots at both sides of the holder are aligned with the guide rails inside the battery chamber 7...

Page 10: ...Nikonos V refer to the Sync Cord s instruction manual 10 With the 5B 16A turn the locking ring around the mounting foot counterclockwise until the AS 8 s foot is uncovered fig 1 Then slide the mounting foot onto the camera s accessory shoe as far as it will go fig 2 Finally tighten the locking ring to prevent the unit from acci dentally slipping off fig 3 With the 5B 16B turn the locking nut on th...

Page 11: ...11 ...

Page 12: ...pensation With F 5011N2020 and F 3011N2ooo the usable film speed range for TTL operation is ASAIISO 25 to 1000 11 Set the zoom head j Pull out or push In the zoom head until the number indicated with an orange background matches the focal length of the lens on your cam era For lenses longer than 85mm use the 85mm setting For a 24 mm lens attach the Wide Flash Adapter CD with the zoom head set at W...

Page 13: ... mode selector of the FG to Por A Note For TTL operation with a Nikon F3 series camera the camera s backup mechanical release lever cannot be used with the shutter speed dial set at T time With the Nikon FA FE2 FG or Nikonos V a mechanical shutter speed i e M250 M90 or B cannot be used for TTL operation Steps 14 through 17 are divid ed into three sections accor ding to the shooting mode selected S...

Page 14: ... calculator dial Depending on how far away your subject is from the camera you must select an appropriate working aper ture by referring to the calculator dial You ll notice that each IIstop from 112 to f 22 has its own color coded line above the white dis tance scale indicating the range of distances at which you can shoot For example if you are using ASA ISO 100 film with the zoom head set at N ...

Page 15: ...e blue and orange lines at the bottom of the dial show the usable f stops For example with ASAIISO 100 film you can choose f 8 or f 4 The auto shooting ranges with the zoom setting at N tor a 35mm lens are 0 6 to 4 meters 20 to 31 ft and 0 6 to 8 meters 20 to 26 ft respectively Note The closest shooting distance for non TTL automatic operation is always 0 6m 12 0 It regardless 01 the film speed an...

Page 16: ...dot corres ponding to f 4 on the exposure calcu lator dial 16 B 16 Set the lens aperture ring to the appro priate f stop In the example 1 4 is set on the lens C 14 Set the exposure mode selector of the F 501 N2020 to P DUAL Por PHI or set the shooting mode selector of the F 301 N2000 to P or PHI For programmed TTL auto flash photography use AI S type lenses only ...

Page 17: ...ation I I Al A2 MD o I I For automatic operation A2 Turn on the flash unit Slide the S8 16 s ON OFF switch to the right Immediately an LED will light up green LED for TTL operation or red A1 or A2 LED for automatic operation Note The LED may blink for a short while after the flash unit is turned on This does not indicate a malfunction 17 ...

Page 18: ...nk make sure that a The flash unit is securely locked in place b The film speed setting on the camera is within the usable range when the flash unit is used in the TTL mode With the 58 168 and FA FE2 F 5011N2020 F 301IN2000 FG or Nikonos V If the camera s ready light blinks check to see if a A mechanical setting is not used in the TTL mode b The film speed setting on the camera is within the usabl...

Page 19: ...ht blinks as a warning im medialely following the shot to indicate there still may be underexposure In this case check the combination of shooting distance and aperture setected and use a wider aperture or move closer to the subject If necessary This warning is also provided in the viewfinder of all Nikon cameras having a built in ready light except F2 series cameras 20 Turn off the flash unit To ...

Page 20: ...h unit with the AS 9 as the Speedlight SB 16B The SB 16A and SB 16B can be mounted on almost any type of Nikon camera either directly or with the use of another Nikon Flash Unit 20 Coupler The TTL automatic shooting mode however is available only when the SB 16A is used with a Nikon F3 series camera or when the SB 16B is used with either the Nikon FA FE2 F 501 N2020 F 301 N2000 FG or Nikonos V via...

Page 21: ... Nikon F3 series FA FE2 FE F 501 N2020 F 301 N2000 FG FG 20 EM and Nikonos V cameras Actual shutt r sp d c 1 80 1 80 as set 1 250 1 250 as sel 1 250 as set as set 1 90 1 125 1 125 as set 11125 1 125 as set 1 90 as set as set 1 90 as set 1 90 sec Viewfinder shutt r ap d Indlcallon 80 Mao LCD shows manual set shutter speed no indication at B or T LCD shows 250 LCD shows M250 LCD shows manuallv set s...

Page 22: ...setting is shown in the table on pages 31 and 32 To set the zoom head simply pull it out or push it in until your desired number appears with an orange background behind it Notes 1 With subjects closer than 1 meter it is recommended that you select a setting with a one stop smaller number than the focal length of the lens in use to reduce the amount of light at such close distances 2 With the wide...

Page 23: ...ight given off Because the exposure is measured through the lens no exposure compensation is required in off camera and or bounce flash operation or even with a teleconverter or filter attached to the lens This setting is also used for programmed TTL auto opera tion with F 501 N2020 and F 301 N2000 A non TTL automatic operation In the non TTL automatic A mode the light output of the flash varies a...

Page 24: ...on page 30 Note As sufficient power is required for the flash unit to synchronize with a motor drive use the newest and freshest batteries whenever possible For the same reason avoid tripping the shutter immediately after the ready light comes on but wait for at least 30 seconds before beginning the motor drive sequence 24 Exposure Calculator Dial The exposure calculator dial on the back of the S8...

Page 25: ... TTL or non TTL automatic mode more than one f stop is usable When choosing an aperture make sure that your subject is within the auto shooting range indicated by the color coded lines The larger the aperture the smaller the f number you select the greater the maximum shooting distance whereas the smaller the aperture the larger the f number the less the maximum shooting distance If the subject di...

Page 26: ...ure the camera automatically selects the proper aperture according to the lens in use For information on the aperture selected and automatic shooting range see page 27 26 Example 1 If you are using ASAIISO 100 film with the zoom head set at N for a 35mm lens and select f 4 the auto shoot ing range is indicated by an orange line Thus you can take pictures of subjects located between 1 4 and 8 0m ap...

Page 27: ... 4 2 8 2 12 69 11 62 9 8 52 7 9 43 5 8 32 2 7 14 2 4 13 20 11 1 6 9 5 1 2 7 8 1 3 8 5 6 4 2 8 2 8 9 46 7 9 43 6 8 36 5 2 31 3 9 22 0 1 9 10 1 7 9 5 1 4 8 0 1 2 6 7 09 47 11 113 11 8 5 6 4 2 8 2 6 2 33 5 8 31 4 8 26 3 9 22 3 0 15 0 16 1 3 16 11 8 14 74 56 4 28 46 24 12 67 0 56 0 9 4 7 06 33 3 9 22 3 3 18 3 0 15 20 11 1 0 5 2 0 9 4 7 0 7 4 0 0 8 3 3 0 6 23 22 16 11 8 5 6 4 33 17 3 0 15 2 3 13 2 0 11...

Page 28: ...ure you selected 28 Example 1 If you are using ASA ISO 100 film with the zoom head set at N for a 35mm lens the usable aperture is f 8 at the blue A1 setting and f 4 at the orange A2 setting The automatic shooting range in this case is 0 6 to 4 0m 2 0 to 13 ft at A1 and 0 6m to 8 0m 1 0 to 26 ft at A2 For a subject more than 4m away the only usable flstop is f 4 With a subject 3m away you can sele...

Page 29: ...in the table the closest subject distance is always 0 6 m 20 It except at the T setting of the zoom head Note Regardless of the settings on the exposure calculator dial any film speed can be used for non TTL automatic operation Zoom head setting Shooting mode Shooting range A1 0 8 5 2 2 6 17 T 0 8 10 26 33 A2 S A1 0 6 4 7 2 0 15 A2 0 6 9 5 2 0 31 A1 0 6 4 0 2 0 13 N 0 6 8 0 2 0 26 A2 A1 0 6 3 3 2 ...

Page 30: ...SO 100 with the zoom head set at N for a 35mm lens and the subject is located 1 5m 5 0 ft away the correct aperture is approx f 22 With a subject 3m 10 ft away the aperture is approx fl11 Without referring to the exposure calculator dial you can also determine the flstop by using the following equation guide number flstop flash to subject distance With ASAIISO 100 film and meters and the zoom head...

Page 31: ...2 N 90 295 64 210 45 148 32 105 22 72 16 52 W 76 250 54 177 38 125 27 89 19 62 13 43 W 54 177l 38 125 27 89 19 62 13 43 9 5 31 W is used when the wide flash adapter is attached to the flash unit with the zoom head set at W For motor drive MD operation After setting the ASA ISO film speed and zoom setting knob on the exposure calculator dial focus on the sub ject then look at the lens and read off ...

Page 32: ...e is f12 Without referring to the exposure calculator dial you can The guide number at various film speeds and zoom head settings is shown in the following table Guide numbers in the MD mode Unit m tt Zoom head ASAIISO film speed setting 800 400 200 100 50 25 T 30 98 21 69 14 46 10 33 7 23 5 16 5 27 89 19 62 13 43 9 5 31 6 7 22 4 7 15 N 22 72 16 52 11 36 8 26 5 6 18 4 13 W 19 62 13 43 9 5 31 6 7 2...

Page 33: ... picture on manual TTL exposure compensation When shooting TTL auto flash pictures you can use the camera s exposure compensation dial or the exposure compensation button also available when using the Nikon FG in the normal way to make exposure compen sation according to the shooting situation or to make intentionally over or underexposed photographs Turn the dial in the direction to give more exp...

Page 34: ...range to match the compen sated amount will be shown on the exposure calculator dial 34 ASAJISO film speed to set for TTL exposure compensation n value 2 1 0 Film speed In use 25 25 50 25 50 100 25 50 100 200 50 100 200 400 100 200 400 800 200 400 800 1000 250 500 1000 For Nikon F 5011N2020 and F 301IN2000 only 1 2 50 100 100 200 200 400 400 800 800 7 7 Not possible make the necessary compensation...

Page 35: ...ompensation In the non TTL automatic exposure mode exposure compensation can be performed by stopping down or opening up the lens With a dark subject use a smaller aperture When a subject is light in tone use a larger aperture 35 ...

Page 36: ...With the Nikon FA FE2 F SOIIN2020 F 301 IN2000 FG FG 20 or Nikonos V the meter must first be turned on by depressing the shutter release button halfway to activate the ready light function 2 The ready light will light up when the S8 16 is recycled to approx 80 full capacity Therefore it is a good idea to wait for a few more seconds when shooting subjects located at the far limit of the auto shooti...

Page 37: ...closer to the subject Because the voltage of batteries decreases with use the guide number might also be reduced slightly The flash output of the 88 16 depends on the available ambient light and the reflectivity of the subject Note that because of these factors the ready light may blink to indicate that the light output was insufficient for correct exposure even if the subject is within the auto s...

Page 38: ...eyond the usable range of ASAIISO 25 400 without exposure compensation 3 When the shooting mode selector is set at TTL with any camera other than the Nikon F3 series Note that when the shutter speed setting on the Nikon FE or FM2 is improper for correct flash synchronization and the camera s meter is on only in the case of the FE just the camera s ready light blinks as a warning while the one on t...

Page 39: ...llnk Blink FO II A S Al A2 M MO Lights up Ughts up M90 B TTL Blinks Al A2 M MO Lights up Ali settings except M90 and B TTL Blink Blinks FO 20 II AS AI A2 M MO Lights up Lights up MOO B TTL Blink At A2 M MD Lights up Ali settings except M90 and B TTL Blink Blinks Nlkono Y AI A2 M MD Lights up Lights up II Y 1 1pa Sync Cord and AS M90 B TTL Blink Al A2 M MO Lights up It blinks when the film speed se...

Page 40: ...ou can use any set ting on the camera s shooting mode selector 3 When using the FA FE2 F 501 N2020 F 301 N2000 FG or Nikonos V to perform TIL automatic flash photography with a camera film speed setting over the usable range without exposure compensation or when using DX coded film with film speed higher than ISO 1000 for the F 501 N2020 and F 301 N2000 Make sure to use film within the usable rang...

Page 41: ... nkO FM2 wllh 1 200 e Al A2 M MO Lights up Ughts up Lights up yne ptled 11250 or rsater TTL Lights up SUnk Bllnk Al A2 M MD LI ht up Blink Blink F 501 N2020 All settings TTL Lights up Lights up Does not light up F 30lIN2000 Al A2 M MD Lights up Lights up Does not light up All s81llngs except M90 and B TTL Lights up Lights up Does not light up FQ AI A2 M MD Lights up Lights up Does not light up MOO...

Page 42: ...not connected to the camera 42 The open flash button is also useful for test firing the SB 16 to determine whether the illumination from the flash was sufficient for proper exposure in the non TTL automatic mode With the shooting mode selector set at one of the color coded dots A1or A2 push the FLASH button if it starts blinking then you know the amount of light might have been insufficient for th...

Page 43: ... ping the shutter Note that without film loaded in the camera the ready light will blink even if the correct exposure is obtainable As a substitute for loaded roll film you can use a strip of cut film provided it is not too old or a piece of gray paper 43 ...

Page 44: ...0 and 90 positions and 180 counterclockwise with click stops at 30 60 90 120 150 and 180 posi tions To rotate it push the flash head locking lever up as you move the flash head until it clicks into place Notes 1 In the MD mode only the main head fires 2 A special red LED is built into one end of the f ashtube to ensure stable light output If you release the camera s shutter or push the open flash ...

Page 45: ...ry head is built into the front of the flash unit and faces straight ahead Its purpose is to fill in the shadows in the eye sockets and provide a catch light for the eyes when doing bounce flash The second ary head has a guide number of 8 45 ...

Page 46: ... 60 respec tively allowing the SB 16 to be used with a 24mm wide angle lens With the SW 7 attached remember to set the zoom head knob on the exposure calculator dial at W2 46 Because the SW 7 diffuses the light emitted from the SB 16 the guide number is reduced to 19 at ASA ISO 100 and meters refer to pages 31 and 32 and the auto shooting ranges are less refer to page 27 for the TTL auto shooting ...

Page 47: ...tiple lighting setups For more detailed infor mation about manual multiple flash refer to pages 58 and 62 Notes I When the S8 16 is used off camera via a sync cord ready light indica tion inside the camera s viewfinder and automatic sync speed setting are not available and TTL auto flash operation cannot be performed 2 When attached to an all metallic accessory shoe such as the one on the Nikkorma...

Page 48: ... and balance the illumination levels of the subject and background you can use an electronic flash unit even in daytime One important fact to remember in balancing the expo sure for both subject and background is this Exposure with a flash unit is determined only by the aperture selected whereas exposure for ambient daylight is determined by a combination of shutter speed and aperture 48 Without f...

Page 49: ...With fill in flash both the subject and the background come out properly exposed 49 ...

Page 50: ... vary the composition you can use a wideangle to telephoto zoom lens As an alternate 50 method remove the flash unit from the camera using a separate sync cord and position it at the correct distance then you can shoot from any position 5 Take the picture Set the S8 16 for manual operation turn it on and wait until it is fully recycled before taking the shot This procedure balances the exposure fo...

Page 51: ...Set a shooting aperture on the lens Read off the two usable apertures from the exposure calculator dial and set one of them on the lens 2 Take a meter reading of the background Frame the background in the camera s viewfinder and turn on the camera s meter to determine the proper shutter speed for the aperture you have set Note that the shutter speed should be within the flash synchronization range...

Page 52: ...ackground may come out too dark To casts may occur when the ratio of flash illumination to ambientlightis low avoid this use a slower shutter speed The procedure for synchronization with slow shutter speeds is the same as that described before however you should mount the camera on a tripod to avoid camera shake at speeds of 1 30sec and below Also it is recommended that you make the background som...

Page 53: ...Fast synchronization speed the background is too dark Slow synchronization speed now detaifs in the background can be seen 53 ...

Page 54: ...e light you can either bounce the light off a broad reflective surface such as the ceiling or walls or use a diffuser between flash and subject Bounce flash photography With the 8B 16 s main flash head tilted back and or rotated the light travels directly to the ceiling or wall and then bounces back to the subject Acting as a broad re flector the ceiling or wall scrambles the direction of the ligh...

Page 55: ...Combination bounce and direct flash soft natural looking lighting with a pleasing catchlight in the eyes 55 ...

Page 56: ...e as the direct illumi nation thus effectively cancelling the diffused lighting effect In this case adjust the angle of the main flash head or shorten the bounce distance so that there is more difference in illumination levels 56 3 Choose an aperture Test firing the flash is necessary because exposure in bounce flash photography depends on so many condi tions such as reflectivity of the bounce sur...

Page 57: ...er around the flash head Experimentation with different flash to diffuser distances and or with more than one diffuser is recommended Notes 1 In non TTL automatic shooting make sure that the diffuser does not come between the S8 16 s sensor and the subject 2 Some diffusion materials may cause a slight reddish tint in color photo graphs by decreasing the color temperature of the light from the flas...

Page 58: ...oth TIL and manual multiple flash photography are possible In both cases one important fact to remember is that the effect produced by using more than one flash unit depends on the lighting ratio or balance of illumination between flash units 80 first you should determine the role of each flash unit deciding which flash will be the main flash and which the secondary To create pictures with high co...

Page 59: ... 88 16 8817 S8 18 and or 88 140 as slave flash unit s TIL multiple flash photography with up to five flash units can be performed To perform TIL multiple flash photography use the optional TTL Multi Flash Sync Cord SC 18 15m and or SC 19 3m to connect the flash units together via the TTL multiple flash terminal To use the S8 11 S8 14 and or S8 140 in TTL multiple flash photography the TIL Remote C...

Page 60: ...kon F3 Ikonos v 0 SB 18 IJ 5 5B l1Jl9JJ Nlkon FE2 SC 17 Nlkon F 5011 L O Q r f III II V Type Sync Cord Nlkon F 3011 Nikon FG N2000 L _ _ _ __ _ indicates the master flash unit TTL multiple flash photography is possible onty with an F3 series FA FE2 F 501IN2020 F 301IN2000 FG or Nlkonos V camera ...

Page 61: ...F s S 2 3 SB 11 ISB 14 ____ SB 140 SB 16B Ej AS 11 O SC 18 SC 19 o SC 18 IlIL SC 19 ail jllJIlll SE SB 18 El AS 11 SB 141 SB 140 61 ...

Page 62: ...le as optional ac cessories Note In manual multiple flash operation make sure to use both flash units on manual In the TTL or non TTL automatic shooting mode the correct exposure cannot be obtained because light from each speedlight affects the measurement 62 Caution The S8 16 employs a speciallow voltage triggering circuit to prevent electrical shock and damage to the hot shoe contact We do not r...

Page 63: ...n F3 series camera for TTL automatic flash operation TTL Remote Cord SC 17 The coiled cord 8C 17 enables the 8B 15 8B 16B or 8B 18 to be used up to one and half meters off a Nikon FA FE2 F 501 N2020 F 301 N2000 or FG camera for TIL automatic flash operation Even with the 8C 17 automatic sync speed setting and ready light indication in the viewfinder are provid ed just as if the flash unit were mou...

Page 64: ...10 is not always needed Without the AS 10 however the electrical con tacts on the flash unit are uncovered and can be the cause of incorrect output control 64 Flash Tripod Adaptor AS 11 The AS 11 enables the S8 16A used as a slave flash unit to be attached to a tripod Also it prevents the S8 16A ready light from blinking for no reason and lets you see when the flash is ready to fire and whether or...

Page 65: ...coupler or the glass surface of the adapter may be damaged RED EYE Red eye is a phenomenon in flash photography where the center portions of the subject s eyes appear as bright red orbs in color photographs or white in black and white pictures This is a result of the light from the flash illumi nating the retina directly If the subject looks straight into the lens and there is little or no ambient...

Page 66: ... for more than two weeks remove the batteries to avoid possible damage to the circuitry by battery leakage If leakage should inadvertently occur take the flash unit to your nearest Nikon authorized service facility To prevent damage to the flash unit s electronic circuitry keep the camera away from places where the temperature is likely to go higher than 50 C such as inside the trunk of a car in t...

Page 67: ...ew times every month After firing wait until the ready light lights then turn off the power switch remove the batteries and store the 88 16 in a suitable location This will pre vent the condenser from deteri orating Keep the flash unit away from salt Never attempt to disassemble or water and out of the rain repair the flash yourself These deli cate procedures should be left to an authorized servic...

Page 68: ...nt damage from leakage To minimize drain during the period of disuse store the batteries in a cool dry place below 20 C 68 F 68 Battery brands Do not mix brands of batteries nor use batteries with different model numbers Also avoid mix ing new and old batteries since proper performance will no be obtained and battery leakage may occur Disposal Do not dispose of batteries by burning Also for safety...

Page 69: ...e eyes Possible with four settings T S N and WI for 85mm 50mm 35mm and 28mm lens Batteries Four 1 5V AA type alkaline manganese penlight batteries or four 1 2V AA type NiCd batteries recommended Number of flashes and recycling time on manual at 25 C Battery type Number of flashes Recycling time Alkaline manganese approx 100 times approx 11 sec minimum NiCd approx 40 times approx 8 sec minimum At f...

Page 70: ...ing with 1 16th of full output guide number is 8 at ASA ISO 100 aM meters or 13 at ASA ISO 25 and feet with the zoom head set at N only main flash fires approx 82mm x 166 5mm x 100mm approx 82 mm x 144 mm x 100mm approx 485g without batteries approx 445g without batteries Wide Flash Adapter SW 7 Soft Case SS 16 Battery Holder MS 5 Specifications and designs shown herein are subject to change witho...

Page 71: ...71 ...

Page 72: ...ef quotation in critical articles or reviews may be made without written authorization from Nippon Kogaku K K 1IIIro NIPPON KOGAKU K K Fuji Bldg 2 3 Marunouchi 3 chome Chiyoda ku Tokyo 100 Japan Phone 81 3 214 5311 Telex J22601 NIKON Fax 81 3 201 5856 Printed in Japan 8 137 E06 ...

Reviews: