background image

ENG-1

NP03Wi

Installation Manual

Introduction ................................................................................... ENG-2
Read This Before Starting .............................................................. ENG-4
Features ........................................................................................ ENG-5
Packaged Items ............................................................................ ENG-6
Part Names ................................................................................... ENG-7
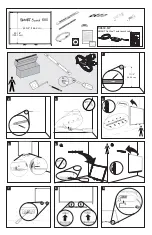
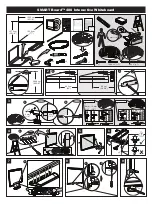
Setup Procedure ........................................................................... ENG-9
Troubleshooting ........................................................................... ENG-15
Specifications .............................................................................. ENG-15

CONTENTS

Interactive White Board Kit

Summary of Contents for NP03Wi

Page 1: ...lation Manual Introduction ENG 2 Read This Before Starting ENG 4 Features ENG 5 Packaged Items ENG 6 Part Names ENG 7 Setup Procedure ENG 9 Troubleshooting ENG 15 Specifications ENG 15 CONTENTS Interactive White Board Kit ...

Page 2: ...ur local authority and or ask the shop where you purchased the product After collecting the used products they are reused and recycled in a proper way This effort will help us reduce the wastes as well as the negative impact such as mercury contained in parts to the human health and the environment at the minimum level The mark on the electrical and electronic products only applies to the current ...

Page 3: ...quipment off and on the user is encouraged to try to correct the interfer ence by one or more of the following measures Reorient or relocate the receiving antenna Increase the separation between the equipment and receiver Connect the equipment into an outlet on a circuit different from that to which the receiver is con nected Consult the dealer or an experienced radio TV technician for help WARNIN...

Page 4: ...personal injury or damage to surrounding property Examples of pictograms The symbol indicates instructions urging caution including warnings A concrete indication of the caution is given within the symbol The symbol indicates prohibited actions A concrete indication of the prohibited action is given within the symbol The symbol indicates required actions A concrete indication of the required actio...

Page 5: ...d operation temperature range for the function of the stylus pen is 5 to 40 C 41 to 104 F Disposing of this product When disposing of this product contact your store of purchase or local government for instruc tions Features Interactive electronic white board function With a drawing software the white board or wall can be used as your interactive white board and you can take handwritten notes or d...

Page 6: ...330X UM280X UM330W UM280W are attached together before shipment Stylus pen x 2 USB cable x 1 For charging the stylus pen USB cable 4 5 m 14 8 feet x 1 For connecting the computer with the camera unit Installation Manual this document x 1 Screw M3 x 3 NOTE Download the driver and the calibration software from our website to install them on the computer URL http www nec display com dl en index html ...

Page 7: ...ENG 7 Part Names Camera unit Stylus pen USB cable Computer Projector Screen or whiteboard The drawing shows an example of the optional wall mount unit Model name NP04WK with the projector mounted on it ...

Page 8: ...plete in about 3 minutes Pressing the pen tip against a screen or white board will turn the indicator LED to red which indicates that charging is completed and you are ready to use the stylus pen If the red LED turns off charge the stylus pen Cautions on using the stylus pen Do not damage the stylus pen by dropping it on the floor or mishandling it Keep the stylus pen away from water and other liq...

Page 9: ... unit onto the projector Two kinds of adapters are included One is for UM330X UM280X UM330W UM280W and the other for M352WS M302WS M332XS For UM330X UM280X UM330W UM280W Use the camera unit adapter 24F5012 adapter cover 24F5013 and two screws Preparation Prepare a plus headed screwdriver If the cable cover is attached to the projector remove it To attach and remove the cable cover follow the proce...

Page 10: ...ver and align the screw hole of the cable cover with the one of the adapter Tighten the screw inside the cable cover 1 2 2 Attach the cable cover to the projector 3 Connect the USB cable to the camera unit Insert the L shaped connector of the included USB cable 4 5 m 14 8 feet into the USB port type B of the camera unit ...

Page 11: ...les of the adapter to align the screw hole Tighten the screw to ensure safety 5 Attach the adapter cover to the adapter Engage the two tabs of the lower end of the adapter cover in the mounting holes of the adapter and push them until they click into place Put the USB cable inside the adapter cover 1 2 ...

Page 12: ...ew hole Tighten the screw to ensure safety 2 Attach the adapter to the projector Engage the two protrusions of the adapter in the holes of the projector to align the screw hole Tighten the screw to ensure the safety NOTE Do not allow the screws to be loosened Doing so may cause the camera unit to fall resulting in personal injury Do not hold the camera unit to lift the projector Doing so may resul...

Page 13: ...ure see the projector user s manual 4 Connect the computer and the camera unit with the included USB cable Insert the L shaped connector of the included USB cable 4 5 m 14 8 feet into the USB port type B of the camera unit and insert the other end into a USB port type A of the computer For UM330X UM280X UM330W UM280W insert the L shaped connector of the supplied USB cable into the USB port of the ...

Page 14: ...dex html The operation on installing and calibrating is available in PDF Portable Document Format To view or print the PDF files Adobe Reader is required If you cannot open a PDF file on your computer obtain the current version of Adobe Reader for your OS from the home page of Adobe Systems and install it on your computer NOTE Drawing software is required to use the interactive white board functio...

Page 15: ...ot turn LED to red charge the stylus pen Is the screen size and usage temperature within appropriate range Use a screen within the effective range Use the stylus pen within a temperature range of 5 to 40 C 41 to 104 F Is the lens of the camera unit soiled If the lens is soiled wipe it with a soft dry non fluffy cloth Lines traced with the stylus pen do not match screen Has the sensor been properly...

Page 16: ......

Page 17: ...ionshandbuch Einführung GER 2 Bitte vor Beginn lesen GER 3 Merkmale GER 4 Enthaltene Teile GER 5 Teilebezeichnungen GER 6 Setup Verfahren GER 8 Fehlerbehebung GER 14 Technische Daten GER 14 INHALT Interaktives Whiteboard Set ...

Page 18: ...r konsultieren Sie den Händler bei dem Sie das Gerät erworben haben Nach der Sammlung benutzter Geräte werden diese erneut verwendet und entsprechend den Umweltbestimmungen recycelt Das trägt dazu bei die Abfallmenge zu reduzieren sowie die negativen Auswirkungen beispielsweise von in Teilen des Geräts enthaltenem Quecksilber auf die Gesundheit und die Umwelt möglichst gering zu halten Die Markier...

Page 19: ... Sachschäden in der Umgebung führen Beispiele für Piktogramme Das Symbol zeigt Anweisungen an die zu erhöhter Vorsicht mahnen einschließ lich Warnungen Ein konkreter Hinweis auf die nötige Vorsichtsmaßnahme wird in dem Symbol gegeben Das Symbol weist auf untersagte Vorgehensweisen hin Ein konkreter Hinweis auf die untersagte Handlung wird in dem Symbol gegeben Das Symbol weist auf notwendige Tätig...

Page 20: ...utzung der Infrarot Fernbedienung Der garantierte Betriebstemperaturbereich für die Funktion des Eingabestifts liegt zwischen 5 C und 40 C Entsorgung dieses Produkts Für Anweisungen zur Entsorgung dieses Produkts wenden Sie sich an Ihren Händler oder die örtlichen Behörden Merkmale Interaktive elektronische Tafelfunktion Mit einer Zeichen Software kann die Tafel oder Wand als Ihre interaktive Tafe...

Page 21: ...g für UM330X UM280X UM330W UM280W wer den vor der Versendung zusammengesetzt Eingabestift x 2 USB Kabel x 1 Zum Laden des Eingabestifts USB Kabel 4 5 m x 1 Zur Verbindung des Computers mit der Kameraeinheit Installationshandbuch dieses Dokument x 1 Schraube M3 x 3 HINWEIS Laden Sie den Treiber und die Kalibrierungs Software von unserer Webseite herunter um sie auf dem Computer zu installieren URL ...

Page 22: ...bezeichnungen Kameraeinheit Eingabestift USB Kabel Computer Projektor Bildschirm oder Tafel Die Abbildung zeigt ein Beispiel der optionalen Wandmontageeinheit Modellname NP04WK mit dem darauf montierten Projektor ...

Page 23: ...urch Drücken der Stiftspitze gegen einen Bildschirm oder eine Tafel wird die LED rot erleuchtet was anzeigt dass das Aufladen beendet ist und Sie den Eingabestift verwenden können Wenn die rote LED erlischt laden Sie den Eingabestift auf Vorsichtsmaßnahmen bei der Verwendung des Eingabestifts Beschädigen Sie den Eingabestift nicht indem Sie ihn zu Boden fallen lassen oder falsch verwen den Halten ...

Page 24: ... Sie die Kameraeinheit auf den Projektor Zwei Arten von Adaptern liegen bei Einer ist für UM330X UM280X UM330W UM280W und der andere für M352WS M302WS M332XS Für UM330X UM280X UM330W UM280W Verwenden Sie die Kameraeinheit Adapter 24F5012 Adapterabdeckung 24F5013 und zwei Schrauben Vorbereitung Bereiten Sie einen Kreuz Schraubendreher vor Wenn die Kabelabdeckung am Projektor angebracht ist entferne...

Page 25: ...hten Sie das Schraubenloch der Kabelabdeckung mit dem des Adapters aus Ziehen Sie die Schraube in der Kabelabdeckung an 1 2 2 Bringen Sie die Kabelabdeckung am Projektor an 3 Schließen Sie das USB Kabel an die Kameraeinheit an Setzen Sie den L förmigen Anschluss des beiliegenden USB Kabels 4 5 m in den USB Anschluss Typ B der Kameraeinheit ein ...

Page 26: ...auszurichten Ziehen Sie die Schraube fest um die Sicherheit zu gewährleisten 5 Bringen Sie die Adapterabdeckung am Adapter an Kuppeln Sie die zwei Laschen am unteren Ende der Adapterabdeckung in die Befestigungslöcher des Adapters ein und schieben Sie sie hinein bis Sie mit einem Klicken einrasten Legen Sie das USB Kabel in der Adapterabdeckung ab 1 2 ...

Page 27: ...rheit zu gewährleisten 2 Befestigen Sie den Adapter am Projektor Kuppeln Sie die zwei Vorsprünge des Adapters in die Löcher des Projektors ein um das Schraubenloch auszurichten Ziehen Sie die Schraube fest um die Sicherheit zu gewährleisten HINWEIS Achten Sie darauf dass die Schrauben nicht lose sind Dies kann dazu führen dass die Kameraeinheit herunterfällt und Verletzungen verursacht Halten Sie ...

Page 28: ...ellungsverfahren bitte das Benutzerhandbuch des Projektors 4 Verbinden Sie den Computer und die Kamera mit dem mitgelieferten USB Kabel Setzen Sie den L förmigen Anschluss des beiliegenden USB Kabels 4 5 m in den USB Anschluss Typ B der Kameraeinheit ein und stecken Sie das andere Ende in den USB Anschluss Typ A des Computers ein Für UM330X UM280X UM330W UM280W setzen Sie den L förmigen Anschluss ...

Page 29: ...Installation und Kalibrierung ist als PDF Portable Document Format verfügbar Zum Anzeigen und Ausdrucken der PDF Dateien ist der Adobe Reader erforderlich Wenn Sie eine PDF Datei auf Ihrem Computer nicht öffnen können besorgen Sie sich die aktuelle Version des Adobe Reader für Ihr Betriebssystem von der Homepage von Adobe Systems und installieren Sie sie auf Ihrem Computer HINWEIS Eine Zeichen Sof...

Page 30: ...gabestift ausreichend aufgeladen Wenn durch Drücken der Stiftspitze die LED nicht rot leuchtet laden Sie den Eingabestift auf Sind die Bildschirmgröße und Betriebstemperatur im Sollbereich Verwenden Sie einen Bildschirm innerhalb des effektiven Bereichs Verwenden Sie den Eingabestift in einem Temperaturbereich von 5 C bis 40 C Ist das Objektiv der Kamera verschmutzt Wenn das Objektiv verschmutzt i...

Reviews: