background image


XR900 Series

Mass Storage Subsystem

User’s Manual


MCPIOSA/UM2

Summary of Contents for XR900 Series

Page 1: ...XR900 Series Mass Storage Subsystem User s Manual MCPIOSA UM2 ...

Page 2: ...rior written permission of Motorola Inc It is possible that this publication may contain reference to or information about Motorola products machines and programs programming or services that are not announced in your country Such references or information must not be construed to mean that Motorola intends to announce such Motorola products programming or services in your country Restricted Right...

Page 3: ...hnical knowledge of energy and voltage hazards present in line connected electronic equipment is assumed To use this manual you may need to be familiar with the publications listed in the Related Documentation section in Chapter 1 of this manual If any modifications are made to an XR900 Series chassis the modifier assumes responsibility for radio frequency interference issues If any payload instal...

Page 4: ...rsonnel must not remove equipment covers Only Factory Authorized Service Personnel or other qualified maintenance personnel may remove equipment covers for internal subassembly or component replacement or any internal adjustment Do not replace components with power cable connected Under certain conditions dangerous voltages may exist even with the power cable removed To avoid injuries always disco...

Page 5: ...ce to radio communications Operation of this equipment in a residential area is likely to cause harmful interference in which case the user will be required to correct the interference at his own expense This digital apparatus does not exceed the Class A limits for radio noise emissions from digital apparatus as set out in the radio interference regulations of the Canadian Department of Communicat...

Page 6: ...rdware Preparation and Installation Introduction 2 1 Mounting Options 2 1 Hardware Preparation 2 1 Rack Mast Mounting 2 2 Pedestal Mounting 2 4 Cabling 2 8 Data Control Cables 2 8 Power Cables AC Chassis 2 11 Power Cables DC Chassis 2 11 Power Supply Limit Considerations 2 13 Chassis Cooling Considerations 2 14 CHAPTER 3 Operating Instructions Controls and Indicators 3 1 Overtemperature Indicator ...

Page 7: ... Removal 3 9 CHAPTER 4 Removal Replacement Procedures Introduction 4 1 Front Bezel 4 2 Removal 4 2 Replacement 4 2 Side Panel Pedestal Cover 4 4 Side Panel Removal 4 4 Side Panel Replacement 4 4 Pedestal Cover Removal Replacement 4 5 Power Supply 4 6 Removal 4 6 Replacement 4 7 Cooling Fan 4 8 Removal 4 8 Replacement 4 8 3 1 2 or 5 1 4 Inch Drive Modules 4 9 Removal 4 9 Replacement 4 11 CHAPTER 5 ...

Page 8: ...Panel Removal 2 6 Figure 2 4 Installing XR900 Chassis 2 7 Figure 2 5 SCSI and Environmental Monitor Connections 2 10 Figure 2 6 DC Terminal Block 2 12 Figure 4 1 Bezel Removal 4 3 Figure 4 2 Side Panel Removal 4 5 Figure 4 3 Power Supply Removal 4 7 Figure 4 4 Drive Module Release Latches 4 10 Figure 5 1 XR900 Series Chassis 5 3 ...

Page 9: ...x ...

Page 10: ...Specifications 1 4 Table 1 2 XR900 Power Supply Specifications 1 5 Table 1 3 SCSI Backplane Specifications 1 6 Table 2 1 Hardware Preparation Items 2 2 Table 3 1 Environmental Monitor Connector Signals 3 8 Table 5 1 XR900 Chassis Parts List 5 2 ...

Page 11: ...xii ...

Page 12: ...of standard system customers component level chassis customers and buyers of special system configurations for technical industrial and telecommunications applications Although the XR900 can be operated with any SCSI compatible host it is used most effectively with other Modular VME System units Modular Chassis The Modular Chassis building block approach supports a variety of options in enclosure ...

Page 13: ...CD ROM devices as follows Two bays for 31 2 inch hard disk drives Two bays for 51 4 inch or 31 2 inch removable media devices The Differential version accomodates 31 2 inch and 51 4 inch differential SCSI hard disk drives as follows Two 31 2 inch drive bays for differential hard disk drives Two 51 4 inch drive bays for differential hard disk drives Note The differential enclosure only supports dif...

Page 14: ...w of the XR900 enclosure s major assemblies Expansion Chassis The expansion chassis houses the drive enclosure A backplane located in the rear distributes DC power and interfaces SCSI signals to the drives Power is furnished by a 100W AC or DC power supply located beside the drive enclosure Note Temperature and humidity limits are determined primarily by tape and disk drives Broader temperature an...

Page 15: ...justment replace it with a known good power supply SCSI Backplane The XR900 mass storage drives and power supply plug into an SCSI backplane mounted behind the drive enclosure The backplane provides Table 1 1 XR900 Enclosure Specifications Characteristics Specifications Physical characteristics Height Width Depth Weight fully loaded 5 25 in 133 mm 19 0 in 483 mm w o flange extensions 23 0 in 584 m...

Page 16: ...s Table 1 2 XR900 Power Supply Specifications Characteristics Specifications Physical characteristics Height Width Length 4 0 in 102 mm 2 4 in 61 mm 9 0 in 229 mm Temperature Operating Storage and transit 0 to 50 C 32 to 122 F 55 to 85 C 67 to 185 F Relative humidity 0 to 90 noncondensing Altitude Operating Storage and transit 0 to 10 000 feet 3048 m 0 to 30 000 feet 9144 m Power ratings Input vol...

Page 17: ...ckness 4 1 inches 104mm 11 6 inches 295mm 0 062 inches 1 58mm typical Temperature Operating Storage and transit 0 C to 55 C 32 F to 131 F 55 C to 85 C 67 F to 185 F Relative humidity 0 to 90 noncondensing Power consumption without drive modules 0 5W 1W 0 1A 0 2A at 5V SCSI sockets DIN 64CSB 96 pin Socket spacing center to center 0 1 inch ...

Page 18: ...at in general must be met for the XR900 to achieve FCC compliance as a component of a Modular Chassis system At a minimum the chassis should be connected to earth ground through the safety ground wire in the power cord Where feasible the chassis ground connection on the back of the card cage 1 4 x 20 thread should be used as well These provide a path for connecting shields to earth ground All exte...

Page 19: ...e same number as the manual but has a suffix such as D2A1 the first supplement to the second edition of the manual The following publication is available from the source indicated ANSI Small Computer System Interface 2 SCSI 2 Draft Document X3 131 198X Revision 10c Global Engineering Documents P O Box 19539 Irvine CA 92714 Manual Terminology An asterisk following the name of a level significant si...

Page 20: ...m may include multiple chassis components which interconnect vertically with a latching mechanism As a member of the Modular VME System the XR900 is adaptable to both rack mast and pedestal installations For proper airflow and regulatory compliance a front bezel is supplied as standard equipment for the enclosure Hardware Preparation There are a number of items to check or tasks to perform before ...

Page 21: ...tions or in a 23 inch rack or mast The procedure is the same in all cases To rack or mast mount the chassis proceed as follows 1 Remove the blank bezel from the desired rack mounting location if a bezel is installed 2 Remove the bezel from the XR900 chassis if a bezel is installed Table 2 1 Hardware Preparation Items Item Location of Instructions Setting jumper options on drive modules used in thi...

Page 22: ...g flanges formed in the sheet metal at the forward corners of the chassis For a 19 inch mast installation mount a set of flanges at the center see Figure 2 1 narrow side out For a 23 inch rack or mast installation mount the flanges wide side out at the forward corners for a rack at the center for a mast Figure 2 1 Flange Installation on the XR900 Chassis 11276 00 9503 FOR MOUNTING FLANGES OPTIONAL...

Page 23: ...scribed in the Modular VME System Chassis User s Manual can be mounted directly atop the Modular Chassis in a pedestal configuration It can also be installed on top of an existing integrated peripheral expansion chassis in a pedestal configuration Although the XR900 uses no guide pins and unlike the integrated chassis receives power through an external cord rather than from the VME card cage the p...

Page 24: ...er Removal 3 Remove the bezel from the XR900 chassis if a bezel is installed 4 Remove the bezel and side panels from the supporting pedestal unit If the XR900 is to be mounted on an existing integral SCSI peripheral expansion chassis remove the bezel and side panels from that enclosure The bezel and panels on the Modular Chassis underneath can be left in place 111058 00 9410 2 2 ...

Page 25: ... brackets from the top section of the supporting pedestal unit 6 Place the XR900 chassis on top of the pedestal unit Fasten the XR900 to the pedestal unit with the stacking brackets removed in the preceding step 7 Install a second set of stacking brackets supplied with the chassis on the upper section of the XR900 8 Reinstall the bezel and side panels removed from the supporting pedestal unit in s...

Page 26: ... 2 Figure 2 4 Installing XR900 Chassis 9 Install the bezel and side panels supplied with the XR900 chassis on the XR900 10 Install the pedestal cover removed in step 2 on the XR900 EXPANSION CHASSIS CARD CAGE 11050 00 9503 ...

Page 27: ...the XR900 chassis Figure 2 5 Note For the differential enclosure make sure the cabling is connected to a differential controller 2 Locate the upper SCSI connector on the back of the existing integral SCSI peripheral expansion chassis if one is present or the appropriate SCSI connector on the back of the Modular Chassis Remove the terminator block and plug the other end of the SCSI cable into that ...

Page 28: ...45 connector on the back of the existing integral SCSI peripheral expansion chassis if one is present or into the appropriate RJ45 control board connector on the back of the Modular Chassis 6 Cable all other associated equipment terminals printers etc to the system as described in the installation guides for those peripherals ...

Page 29: ...Hardware Preparation and Installation 2 10 2 Figure 2 5 SCSI and Environmental Monitor Connections 11063 00 9409 SCSI TERMINATOR SCSI CABLE ENVIRONMENTAL MONITOR CABLE ...

Page 30: ... equipment is rack mounted the rack may be equipped with power distribution modules Power Cables DC Chassis 1 Power down the 48Vdc supply Caution Use a 48Vdc supply source that is electrically isolated from the main DC source The 48Vdc source is to be reliably connected to earth 2 Guide the free end of a DC power cable with about 1 2 inch of insulation stripped from the wires to the terminal block...

Page 31: ...to also use the chassis ground point on the rear wall of the unit the GND connection with a 1 4 x 20 thread located to the right of the upper set of SCSI and RJ45 connectors This ground point is to be connected to the equipment rack or other reliable path to earth ground Figure 2 6 DC Terminal Block GROUND 11302 00 9503 48VDC 48VDC ...

Page 32: ... the socket end of the unit s power cord into the AC power inlet on the back of the unit 7 Plug the power cord of the console terminal and any other AC equipment into an electrical outlet 8 Turn the DC power back on Power Supply Limit Considerations The XR900 chassis like the Modular Chassis can be equipped with a power supply module accepting either 48Vdc or 115 230Vac inputs The 5Vdc output is r...

Page 33: ...air inlet temperature avoid using tapes if the inlet temperature exceeds 40 C 104 F To provide adequate cooling The air space behind the chassis must not be blocked and the fan inlet screen must be clean The air inlet temperature must not exceed 50 C 122 F or 40 C 104 F if storage tapes are used When the XR900 is installed in a rack with other chassis be sure that each chassis in the rack is provi...

Page 34: ...e Overtemperature LED located next to the SCSI connectors on the back panel of the XR900 chassis turns on when the temperature sensor in the enclosure is not adequately cooled At that point Motorola supported SCSI devices in the XR900 and most other SCSI devices are approaching their upper temperature limits but are not in danger of immediate damage The sensor temperature is typically about 20 F a...

Page 35: ...toring but is equipped with a backplane temperature sensor As long as the RJ45 cable is installed XR900 temperatures are monitored along with Modular Chassis power supply voltages temperatures and optionally card cage temperatures Temperature Monitoring Function The Overtemperature LED on the front panel of the Modular Chassis indicates the presence of excessive operating temperatures within one o...

Page 36: ...ed SCSI devices in the XR900 enclosure and most other SCSI devices are approaching their upper temperature limits but are not in danger of immediate damage Several conditions can trigger the alarm A failed fan in a warm environment Blocked airflow in or out of the enclosure An ambient temperature near the specified limits of the enclosure 50 C 122 F The Overtemperature LED turns off when the cooli...

Page 37: ...integral and or standalone SCSI peripheral expansion enclosures provided that the cables are installed If an optional backplane thermal sensor is installed the temperature monitoring function also covers the Modular Chassis card cage Voltage Monitoring Function Similarly overvoltage protection circuitry monitors the power supply inputs and outputs If the 48Vdc or 115 230Vac inputs of a monitored p...

Page 38: ...software Only the basic power on power off procedure and remote interface are discussed here For additional operational information refer to the user s manual s for the modules used in the chassis Recommended Power On Procedure The XR900 has no power switch The power supply cycles on and off under the control of the host computer i e through application of the SCSI TERMPWR signal The only fuse is ...

Page 39: ...the Modular Chassis power switch to RUN on 5 If the system incorporates a dual 9 slot chassis repeat steps 3 and 4 for System B The fans run while power is on The indicator LED on the front panel of each Modular Chassis power supply illuminates as long as the power supply remains connected to a 48Vdc or 115 230Vac input power source and is free of defects Caution To ensure adequate cooling all fan...

Page 40: ...esponse When terminator power is removed by the host the XR900 powers down A loss of cooling shutdown triggered by the environmental monitor can be reset by cycling any power controlling input off and back on If the cooling sensor has cooled sufficiently the shutdown condition then resets If the power supply fuse blows the power supply should be considered as failed and should be replaced Damage t...

Page 41: ...le peripheral expansion enclosures any enclosure on the environmental monitor bus can pull SVCCFAIL down to its active low state Check the power on LEDs on the drives to identify the faulty unit 2 7 DISKOT Active low output that illuminates the Overtemperature LED to indicate a cooling problem Activates at a slightly lower sensor temperature than cooling failure shutdown so that system operation c...

Page 42: ...nd turn the Modular Chassis power switch to STANDBY off The power supply cycles down but the power status LED on the power supply remains on indicating that primary power is still present 2 If the system incorporates a dual 9 slot chassis repeat step 1 for System B 3 If the chassis is to be powered down for a long time or will be left unattended remove the key to prevent tampering with the power s...

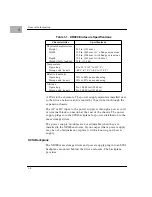
Page 43: ...Operating Instructions 3 10 3 ...

Page 44: ...lists in Chapter 6 The removal replacement procedures are organized and presented in the following order Front bezel Side panels and pedestal cover Power supply Cooling fan 31 2 or 51 4 inch drive modules Warning Dangerous voltages capable of causing death are present in this equipment Use extreme caution when handling testing and adjusting the equipment Caution Do not remove power from an operati...

Page 45: ...ers prevent the latches from being arbitrarily disengaged The suggested procedure for removal and replacement of the XR900 front bezel is as follows Removal 1 Unlock the bezel latches Figure 5 1 by rotating the locks a quarter turn inward from the locked icon to the unlocked icon with a Phillips screwdriver clockwise on the left side counterclockwise on the right 2 Unlatch the bezel from the enclo...

Page 46: ...Front Bezel 4 3 4 Figure 4 1 Bezel Removal 11051 00 9408 BEZEL LOCKS 1 EACH SIDE LATCH BUTTONS 1 EACH SIDE ...

Page 47: ...Panel Removal 1 Remove the front bezel 2 Unlock the side panel assembly Figure 5 2 by squeezing the inner latch levers at the forward edge with one hand and simultaneously slide the assembly backward approximately an inch until it clears the slide hooks on the chassis Caution Hand clearance in the latch area is limited Work carefully to avoid injury to fingers 3 Lift the assembly off the chassis 4...

Page 48: ...ted with the same type of hardware as the side panels but no latch is used Instead two screws on the back edge near the corners hold the cover in place The removal procedure consists of simply removing the screws then sliding the cover backward and disengaging it from the slide hooks Replacement is the reverse 11064 00 9503 ...

Page 49: ... the capacitors in the power supply to discharge The suggested procedure for removal and replacement of the XR900 power supply module is as follows Removal 1 Switch the power supply of the host system to STANDBY 2 Disconnect the input power source from the XR900 chassis If the power supply is an AC unit unplug the power cord from the AC outlet the other end of the cord disconnects automatically wh...

Page 50: ...ptive screw that holds the module in the chassis 3 Reinstall the XR900 bezel if the installation includes one 4 Reconnect the module to the AC or DC power source If the power supply is an AC unit plug the power cord back into the module and the AC outlet If the power supply is a DC unit plug the DC connector into the power supply input and turn the 48Vdc power source back on 11276 00 9503 1 2 ...

Page 51: ...three screws that secure the fan and finger guard to the power supply assembly 3 While still keeping the power supply assembly and fan together move the fan aside far enough to reach in and unplug the fan connector from its mating connector on the side of the power supply assembly 4 Remove the fan Replacement 1 Plug the fan wire connector into its mating connector on the side of the power supply a...

Page 52: ...Removal 1 Switch the power supply of the host system to STANDBY 2 Disconnect the input power source from the XR900 chassis If the power supply is an AC unit unplug the power cord from the AC outlet If the power supply is a DC unit turn off the 48Vdc power source and unplug the DC connector from the power supply input 3 Remove the XR900 bezel if installed 4 While pressing the latch at the side of t...

Page 53: ...Removal Replacement Procedures 4 10 4 Figure 4 4 Drive Module Release Latches 11060 00 9409 ...

Page 54: ...ber 3 Slide the replacement drive module gently into the drive bay until it contacts the backplane connector 4 Use firm steady pressure to seat the drive connector in the backplane 5 Reinstall the XR900 bezel if the installation includes one 6 Reconnect theXR900 chassis to the AC or DC power source If the power supply is an AC unit plug the power cord back into the module and the AC outlet If the ...

Page 55: ...Information The following sections of this chapter provide a parts list and location diagram for the XR900 chassis and its subassemblies Should you need to order replacement parts order them from the Customer Support Operations CSO Service Center The order should include the part number when applicable and description of the part that appears in this chapter The serial number of the chassis should...

Page 56: ...pan head 8 32 x 5 16 w cone washer 1 03SW996E104 Sem slotted hex head self tapping 10 16 x 1 2 3 07 W4353C01A Bracket RFI shield 2 30 W2740D01A Cable assembly power fan 1 30 W2787D01A Cable assembly adapter 1 33 W4658C01A Label rating AC component peripheral expansion 1 33 W4659C01A Label rating AC system peripheral expansion 1 33 W4660C01A Label rating DC component peripheral expansion 1 33 W4661...

Page 57: ...Parts List and Ordering Information 5 3 5 Figure 5 1 XR900 Series Chassis 11271 00 9503 1 3 2 4 ...

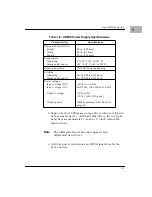
Page 58: ...Support Information 5 4 5 ...

Page 59: ...tions 2 11 DC connector assembly 2 11 Differential XR900 1 2 drive modules 4 9 drives supported 1 2 E electromagnetic interference EMI 1 7 emergency power removal 3 9 environmental monitor modes of operation 3 2 signals 3 8 expansion chassis 1 3 F fan 4 8 FCC compliance 1 7 flanges mounting 2 3 G grounding 1 7 2 12 I installation options 1 2 K key switch 3 6 L location diagram 5 1 M major assembli...

Page 60: ...over 4 5 power supply 4 6 side panels 4 4 resetting the power supply 3 5 S safety considerations 1 7 SCSI backplane 4 6 peripheral expansion chassis 2 4 2 8 termination 2 8 terminator power 3 7 SCSI compatible hosts operation with 1 1 Single Ended XR900 1 2 specifications backplane 1 4 enclosure 1 3 power supply 1 4 system operation 3 5 T temperature monitoring 3 2 operating 2 14 3 1 sensors 3 1 3...

Reviews: