background image

U S E R   G U I D E  

DCX3200 P2 


Summary of Contents for DCX3200 P2

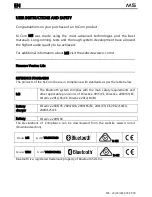
Page 1: ...USER GUIDE DCX3200 P2 ...

Page 2: ......

Page 3: ...prong The wide blade or the third prong is provided for your safety If the provided plug does not fit into your outlet consult an electrician for replacement of the obsolete outlet Protect the power cord from being walked on or pinched particularly at plugs convenience receptacles and the point where they exit from the apparatus Only use attachments accessories specified by the manufacturer Unplug...

Page 4: ...ion openings Install the terminal so that its position does not interfere with its proper ventilation For example do not place the terminal on a bed sofa rug or similar surface that could block the ventilation openings Install the terminal away from heat sources such as radiators heat registers and stoves Installation of the terminal near consumer electronics devices such as stereo receiver amplif...

Page 5: ...ntenna Increase the separation between the equipment and receiver Connect the equipment into an outlet on a circuit different from that to which the receiver is connected Consult the dealer or an experienced radio TV technician for help Caution Changes or modifications not expressly approved by Motorola for compliance could void the user s authority to operate the equipment This device complies wi...

Page 6: ...RECEIVER AND OR USING ANY OF THE SOFTWARE YOU INDICATE YOUR ACCEPTANCE OF EACH OF THE TERMS OF THIS LICENSE UPON ACCEPTANCE THIS LICENSE WILL BE A LEGALLY BINDING AGREEMENT BETWEEN YOU AND MOTOROLA THE TERMS OF THIS LICENSE APPLY TO YOU AND TO ANY SUBSEQUENT USER OF THIS SOFTWARE IF YOU DO NOT AGREE TO ALL OF THE TERMS OF THIS LICENSE I DO NOT USE THE SOFTWARE AND II RETURN THE RECEIVER AND THE SO...

Page 7: ...uclear facility MOTOROLA AND ITS THIRD PARTY LICENSORS DISCLAIM ANY EXPRESS OR IMPLIED WARRANTY OF FITNESS FOR SUCH USES YOU REPRESENT AND WARRANT THAT YOU SHALL NOT USE THE PRODUCT FOR SUCH PURPOSES Title to this Software including the ownership of all copyrights mask work rights patents trademarks and all other intellectual property rights subsisting in the foregoing and all adaptations to and m...

Page 8: ...trademarks or registered trademarks of HDMI Licensing LLC Dolby and the double D symbol are registered trademarks of Dolby Laboratories Macrovison is a registered trademark of Macrovision Corporation All other product or service names are the property of their respective owners All rights reserved Copyright 2010 Multimedia over Coax Alliance All Rights Reserved MoCA and the MoCA logo is a trademar...

Page 9: ...Audio Connections 11 Cable In 11 DVI 11 Component Video YPbPr 11 Audio 12 Connecting Your DCX Set top to an HDTV Separate Video Audio 13 Connecting Your DCX Set top to an HDTV Alternative Audio 14 Connecting an A V Receiver Audio 15 Connecting Your DCX Set top to an A V Receiver Audio 16 Connecting an SDTV 17 Connecting Your DCX Set top to an SDTV 18 Connecting an SDTV and VCR DVD Recorder 19 Conn...

Page 10: ...viii Data Features 24 5 On Screen Graphics 25 6 Configuring the audio video and closed caption settings 27 7 Troubleshooting 41 ...

Page 11: ... interface and provides 7 1 channels and beyond of enhanced quality audio This User Guide introduces you to the basic features outlines important safeguards and provides several options for integrating this component into your current entertainment system Please take a few moments to read through this User Guide the configuration diagrams on screen menu description and troubleshooting section will...

Page 12: ...nce per second to indicate unit is provisioning 4 LAN Illuminates to indicate one or more set top boxes and or DVR devices are detected on the home network 5 Rec Unit is in record mode on a home network device only available on DCX3200 M model with MoCA option 6 Power Button turns the set top on and off standby The availability of certain features is dependent upon application support ...

Page 13: ... of TV or VCR 7 Video Out Composite Video SDTV 8 Video outputs YPbPr Component video output HDTV 9 Baseband Audio Out L R audio 10 Digital Audio coaxial Provides Dolby Digital 5 1 audio or PCM output 11 Digital Audio optical Provides Dolby Digital 5 1 audio or PCM output 12 HDMI High Definition TV HDTV connector Provides Dolby Digital Plus 7 1 audio 13 Ethernet Network connection 14 USB 2 0 High S...

Page 14: ......

Page 15: ...ume scale is displayed on the screen Press MUTE on the remote control to toggle the sound on and off For best audio quality when using the analog L R audio outputs use the remote control to set the DCX set top to approximately three quarters of the maximum volume level and then adjust the audio levels on external devices such as your TV or A V receiver Interactive Program Guide The Interactive Pro...

Page 16: ......

Page 17: ...ohm coaxial cables equipped with F type connectors Disconnect power from your equipment before connecting or changing cable connections Disconnect power from your equipment before connecting or changing cable connections CAUTION CAUTION Do not place anything on top of your DCX set top especially other home entertainment components Be sure to provide adequate ventilation to prevent overheating Vide...

Page 18: ...using the IEEE 1394 connection on the rear panel of the DCX set top Refer to Section 5 for more information If your TV has a DVI input connect a DVI to HDMI adapter or cable to the HDMI out connector on the DCX set top and the DVI HDTV connector on your TV Note DVI does not provide audio A separate audio connection must be made Component video YPbPr HDTV and SDTV The YPbPr connectors on your DCX s...

Page 19: ...is is for both audio and video if you are using the TV speakers Connect a Standard HDMI cable to the TV and to the HDMI connector on your DCX set top IEEE 1394 If your HDTV has an IEEE 1394 connector you can use the IEEE 1394 for both your video and audio connection Connect an IEEE 1394 cable to the IEEE 1394 connector on your HDTV and DCX set top Note On screen graphics will not be displayed when...

Page 20: ...dio Note Only 1 HDTV video audio connection needs to be made to an HDTV Note On screen graphics will not be displayed when using IEEE 1394 connection Refer to Section 5 for more information Note Solid lines indicate optimum connections Note Optional HDMI connection to A V Receiver shown but not required ...

Page 21: ...d the HDTV To connect your audio connections with your TV speakers go to Audio on the next page To connect your audio connections for an A V receiver go to Connecting an A V Receiver Audio Component Video YPbPr Connect the component video cables to the Y Pb and Pr connectors on your HDTV and DCX set top Note This connection only supports the video connection between the DCX set top and the HDTV No...

Page 22: ...d the AUDIO L R connectors on the HDTV If your TV supports digital audio inputs use the digital audio OPTICAL S PDIF or COAXIAL S PDIF outputs instead of the AUDIO L R outputs S PDIF offers better audio quality including support for Dolby Digital audio For information on configuring your DCX set top settings go to Configuring the Audio Video and Closed Caption Settings ...

Page 23: ...ecting Your DCX Set top to an HDTV Separate Video Audio Note Only 1 video connection and 1 audio connection needs to be made to an HDTV Note Solid lines indicate optimum connections Note HDMI to DVI adapter is not included with the set top ...

Page 24: ...3 CONNECTING YOUR DCX SET TOP 14 Connecting Your DCX Set top to an HDTV Alternative Audio Note Only 1 audio connection needs to be made Note Solid lines indicate optimum connections ...

Page 25: ...ncluding support for Dolby Digital audio Digital audio optical S PDIF Connect the optical cable to the digital audio optical connector on the DCX set top and the optical connector on the A V receiver Digital audio coaxial S PDIF Connect the digital audio cable to the digital audio coaxial connector on the DCX set top and the DIGITAL INPUT COAX connector on the A V receiver Stereo audio Connect the...

Page 26: ...3 CONNECTING YOUR DCX SET TOP 16 Connecting Your DCX Set top to an A V Receiver Audio Note Only 1 audio connection needs to be made to an A V Receiver Note Solid lines indicate optimum connections ...

Page 27: ... Definition TV SDTV 2 Connect an S Video cable to the S Video out connector on the DCX set top and the input S Video on the TV Note If the TV does not support S Video connections composite video connections may be used in place of S Video connection These video connection methods do not support HD video If you have an HDTV see Connecting HDTV Single Connection for Video Audio ...

Page 28: ...T TOP 18 Connecting Your DCX Set top to an SDTV Note S Video and Composite video require separate audio connections Note Only 1 video connection and 1 audio connection is required Note Solid lines indicate optimum connections ...

Page 29: ...3 Connect a stereo audio cable to the OUTPUT AUDIO L R connectors on the VCR DVD recorder and the INPUT AUDIO LEFT and RIGHT connectors on the Standard Definition TV SDTV 4 Connect a composite video cable to the output video connector on the VCR DVD recorder and the input video connector on the Standard Definition TV SDTV Note You can also connect using the S Video connectors if supported by your ...

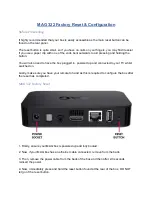
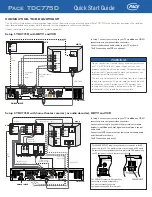
Page 30: ...3 CONNECTING YOUR DCX SET TOP 20 Connecting Your DCX Set top to an SDTV and VCR DVD Recorder ...

Page 31: ... receiver 5 Connect a composite video cable to the INPUT VIDEO connector on the VCR DVD recorder and the composite video VCR OUT connector on the A V receiver 6 Connect a composite video cable to the composite VIDEO OUT connector on the VCR DVD recorder and the video VCR IN connector on the A V receiver 7 Connect a S Video cable to the S Video connector in on the Standard Definition TV SDTV and th...

Page 32: ...Your DCX Set top to an A V Receiver SDTV and VCR DVD Recorder Note Solid lines indicate optimum connections Note Consult your A V receiver manual for additional wiring options or constraints when including a VCR DVD recorder in your configuration ...

Page 33: ... home entertainment components You can use this diagram to reconnect your system if you move the equipment or add new equipment Disconnect the power from the DCX set top before connecting or changing cable connections Do not place another component or object on top of the DCX set top ...

Page 34: ...work infrastructure to operate Data Features In addition to high quality audio and video the DCX set top has the capability to deliver high speed data services such as Internet access e mail IP telephony e commerce and home banking Note Your DCX set top may be equipped with the interface connections illustrated but their functionality depends on the services offered by your service provider ...

Page 35: ...s the User Setting menu closed captions and interactive program guides The DCX set top overlays these graphics whenever you open a menu enable closed captions or scroll through a program grid On screen graphics are not available on all video output combinations On screen graphics will not be displayed when you are using the IEEE 1394 connection on the rear panel of the DCX set top ...

Page 36: ......

Page 37: ... services 4 Turn the TV on When using an HDMI connection between the DCX3200 and the television be sure to have the cable connected and the TV powered on before adjusting the video settings Motorola recommends certified Standard HDMI cables for 1080i or 720p resolutions A certified High Speed HDMI cable is recommended for resolutions of 1080p To configure the DCX3200 settings on the User Settings ...

Page 38: ...er Settings menu indicates whenever an HDMI connection is in place between the DCX3200 and another device When the HDMI connection is not being used the User Settings Menu will update to reflect this An example of the User Settings menu when the HDMI output is not connected ...

Page 39: ...d in There is no video on the TV screen in the Troubleshooting section The User Settings option follow Setting Description TV Type The TV Type allows you to specify the style of television connected to the DCX3200 Options include 16 9 4 3 LETTERBOX and 4 3 PAN SCAN By default the 16 9 option is selected The options are used as follows 16 9 designates that a widescreen television is connected to th...

Page 40: ... 60 frames per second 480p The DCX3200 will present programs in the Enhanced Definition 480p format 720 x 480 pixels with progressive scanning at 60 frames per second 480i The DCX3200 will present programs in the Standard Definition 480i format 720 x 480 pixels with interlaced scanning at 30 frames per second Native The DCX3200 will present programs in the format that most closely matches their na...

Page 41: ...omatically stretch all Standard Definition programs to a widescreen aspect ratio and present the video in the format designated by the HDMI YPbPr Output setting Note that the Stretch option is only available when the TV Type setting is 16 9 Off The DCX3200 will create a widescreen version of a Standard Definition program by adding black bars to the left and the right of the picture and present the...

Page 42: ...n only The DCX3200 cannot convert any other broadcast format to the 1080p30 format 2 1080p24 The DCX3200 will present programs broadcast in the High Definition 1080p24 format 1920 x 1080 pixels with progressive scanning at 24 frames per second using the HDMI connection only The DCX3200 cannot convert any other broadcast format to the 1080p24 format 3 1080i The DCX3200 will present programs broadca...

Page 43: ...ecklist may be modified manually after the DCX3200 performs the automatic configuration 3 While this checklist provides the ability to customize the Native mode experience when using the DCX3200 it can also result in a loss of video if the checklist is modified without a clear understanding of the video formats supported by the TV These settings should only be modified by a professional installer ...

Page 44: ...der draws closed captions on any video output When this option is set to Enabled the DCX3200 renders draws closed captions on all video outputs By default the Disabled option is selected Additional Closed Caption Settings The Additional Closed Caption Settings option is available whenever the Closed Caption setting is set to Enabled Selecting this option will present a new menu screen with setting...

Page 45: ...I Settings menu screen 1 With an HDMI connection in place power off the DCX3200 and then immediately press the MENU key on the remote control 2 This will display the main User Settings menu 3 Move the cursor next to the Additional HDMI Settings option and press the key An example of the Additional HDMI Settings menu ...

Page 46: ...on is connected to the DCX3200 via an HDMI to DVI adapter Color Space The Color Space setting allows you to adjust the color space used by the DCX3200 to generate the video signals on the HDMI output By default this option is set to YCC 4 4 4 The options are used as follows YCC 4 4 4 designates that the DCX3200 will generate video signals within the YCC color space RGB designates that the DCX3200 ...

Page 47: ...ll provide the same digital audio format on the HDMI output as is provided with the program being viewed at that time For example if the program has a Dolby Digital soundtrack the DCX3200 will pass the Dolby Digital audio to the HDMI output This option is most useful when connecting the DCX3200 to a home theater receiver that has HDMI switching capability Note Adjusting these settings could result...

Page 48: ...abled 3 The option to enter the Additional Closed Caption Settings menu is now available An example of the Additional Closed Caption Settings menu The Additional Closed Caption Settings menu options are Setting Description Service Selection Sets the service used by the DCX3200 to render draw the closed captions Analog CC1 CC2 CC3 CC4 T1 T2 T3 or T4 The default is CC1 Digital PRIMARY LANGUAGE SECON...

Page 49: ...s AUTO Font Edge Color Sets the edge color AUTO WHITE BLACK RED GREEN BLUE YELLOW MAGENTA or CYAN The default is AUTO Background Color Sets the background color for closed captions Defaults to AUTO Options are AUTO WHITE BLACK RED GREEN BLUE YELLOW MAGENTA or CYAN Background Opacity Sets the background opacity for closed captions Defaults to AUTO Options are AUTO TRANSPARENT TRANSLUCENT SOLID or F...

Page 50: ......

Page 51: ... DCX set top is connected to a switched outlet on another unit verify that that unit is powered on Unplug the power cord from the DCX set top s AC outlet plug it back it in and then press the POWER button on the front panel or remote control Use an unswitched outlet if possible The batteries in the remote control may be depleted The remote control does not work Verify that the remote control is in...

Page 52: ...e audio connections Verify that the audio cables are firmly connected between the DCX set top and the audio playback device TV receiver DVD player etc There is no audio from the center and or surround speakers of a home theater receiver connected to the DCX set top Not all programs feature full Dolby Digital 5 1 or Dolby Digital Plus 7 1 full surround sound In some cases the programs may only cont...

Page 53: ...riate input source If the DCX set top video output is connected to a TV through an HDMI connection power off the TV and then power off the DCX set top Wait one second and then power on the devices Not all HDTVs can display every output format 1080p 1080i 720p 480p or 480i available on the DCX set top To select a different format 1 Ensure that your DCX set top is plugged into a power outlet and is ...

Page 54: ...nabled on the TV Note Closed captioning may not be available on the current program There are black bars to the right and left of the picture Wide screen TVs display 4 3 programs in this format unless set to Stretch Turn on the 4 3 OVERRIDE feature in the User Settings menu This enables most wide screen TVs to stretch the video to fill the screen see your TV manual for information about stretching...

Page 55: ...ur on a 4 3 TV if the 4 3 OVERRIDE setting is OFF To set 4 3 SD programming to fill the screen depending on the capabilities of the TV set 4 3 OVERRIDE to 480i or 480p This may occur on a 16 9 TV if the active video for an SD broadcast is in letterbox format To confirm wait for a commercial or look for a graphic such as a network logo If the commercial fills the screen from top to bottom or the gr...

Page 56: ......

Page 57: ...Motorola Inc 101 Tournament Drive Horsham PA 19044 U S A http www motorola com 571331 001 a 01 10 ...

Reviews: