background image

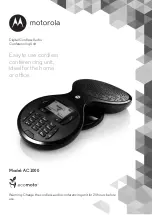
Warning: Charge the cordless audio conferencing unit for 24 hours before 

use.

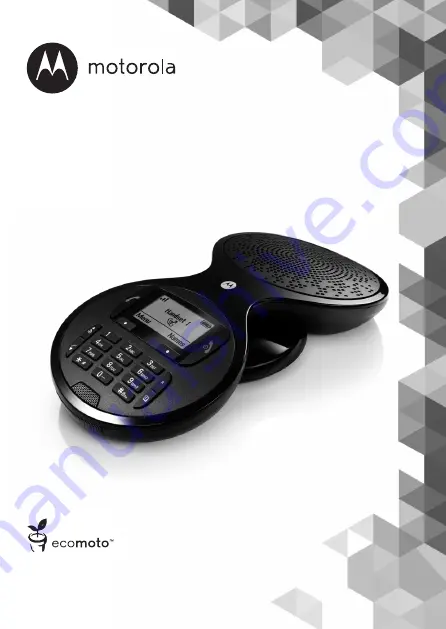
Model: AC1000 

Digital Cordless Audio 

Conferencing Unit

Easy to use cordless 

conferencing unit, 

ideal for the home 

or office.

Summary of Contents for AC1000

Page 1: ...Warning Charge the cordless audio conferencing unit for 24 hours before use Model AC1000 Digital Cordless Audio Conferencing Unit Easy to use cordless conferencing unit ideal for the home or office ...

Page 2: ... cordless audio conferencing units to a single base Choose from 15 different ringtones Need help If you have any problems setting up or using your AC1000 please contact Customer Services on Services on 65 68412668 Email support alcom com sg Alternatively you may find the answer in the Help section at the back of this guide 1You must subscribe to your network provider s Caller ID or Caller ID on Ca...

Page 3: ...wer adaptor for the base Telephone line cord ECOMOTO a convergence of efforts by marketing design research engineering and supply chain management that leads to better products for everyone A holistic view that focuses on both social and environmental responsibility A passion and a shared point of view The right thing to do Meets and or exceeds EMEA environmental regulatory requirements Eco friend...

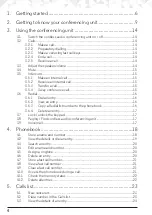
Page 4: ...al an entry 16 3 6 2 View an entry 16 3 6 3 Copy a Redial list number to the phonebook 16 3 6 4 Delete an entry 17 3 7 Lock unlock the keypad 17 3 8 Paging Find cordless audio conferencing unit 17 3 9 Voicemail 17 4 Phonebook 18 4 1 Store a name and number 18 4 2 View the details or dial an entry 19 4 3 Search an entry 20 4 4 Edit a name and number 20 4 5 Assign a ringtone 20 4 6 Delete an entry 2...

Page 5: ... 7 4 Key beep 28 7 5 Confirmation Tone 28 7 6 Name 28 7 7 Display language 29 7 8 Display contrast 29 7 9 Screensaver 29 8 Base settings 30 8 1 Auto answer 30 8 2 Auto end calls 30 8 3 Auto Join Calls 30 8 4 PBX access code 30 8 5 Recall mode 31 8 6 Dialling mode 31 8 7 Change the System PIN 32 8 8 Restore default settings 32 8 9 Registration 32 8 9 1 Registering an additional cordless audio confe...

Page 6: ...unit Any obstruction between the base and cordless audio conferencing unit will reduce the range significantly With the base indoors and the cordless audio conferencing unit either indoors or outdoors the range will normally be up to 50 metres Thick concrete and stone walls can severely affect the range SIGNAL STRENGTH The icon on your cordless audio conferencing unit indicates that you are within...

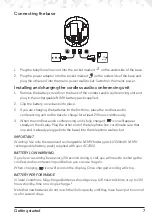
Page 7: ...en the cordless audio conferencing unit is fully charged icon will appear steady on the display Plug the other end of the telephone line cord make sure that one end is already plugged into the base into the telephone wall socket IMPORTANT Warning Use only the approved rechargeable Ni MH battery pack 1500mAh Ni MH rechargeable battery pack supplied with your AC1000 BATTERY LOW WARNING If you hear a...

Page 8: ...become warm during charging This is normal 1All talk and standby times are approximate and depend on features selected and usage pattern Date and time If you have subscribed to a Caller ID Service the date and time is set automatically for all cordless audio conferencing units when you receive your first call If you do not have a Caller ID service you can set the date and time manually NOTE In eit...

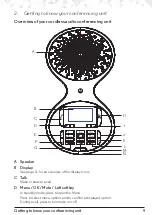
Page 9: ... conferencing unit A Speaker B Display See page 11 for an overview of the display icons C Talk Make or answer a call D Menu OK Mute Left softkey In standby mode press to open the Menu Press to select menu options and to confirm a displayed option During a call press to turn mute on off A B C D E F G H M N L K I J ...

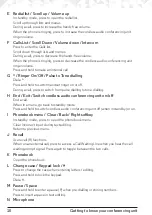
Page 10: ... or off During a call press to switch from pulse dialling to tone dialling H End Exit Switch cordless audio conferencing unit on off End a call When in a menu go back to standby mode Press and hold to switch cordless audio conferencing unit off when in standby or on I Phonebook menu Clear Back Right softkey In standby mode press to open the phonebook menu Clear incorrect input during text editing ...

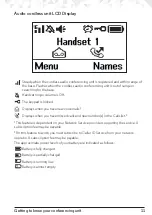
Page 11: ...when you have new voicemails 1 Displays when you have missed calls and new number s in the Calls list 2 1This feature is dependent on your Network Service provider supporting the service A subscription fee may be payable 2For this feature to work you must subscribe to Caller ID Service from your network operator A subscription fee may be payable The approximate power levels of your battery are ind...

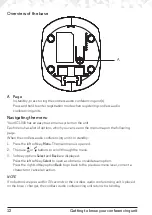
Page 12: ...llowing page When the cordless audio conferencing unit is in standby 1 Press the left softkey Menu The main menu is opened 2 Then use u or d buttons to scroll through the menu 3 Soft key options Select and Back are displayed Press the left softkey Select to open a sub menu or validate an option Press the right softkey option Back to go back to the previous menu level correct a character or cancel ...

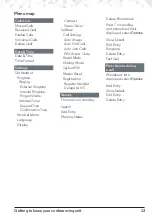
Page 13: ... Display Contrast Screen Saver Set Base Call Settings Auto Answer Auto End Calls Auto Join Calls PBX Access Code Recall Mode Dialling Mode System PIN Master Reset Registration Register Handset Deregister HS Names From menu in standby Search Add Entry Memory Status Delete Phonebook Press P in standby and phonebook list is displayed select Options Show Details Edit Entry Ringtone Delete Entry Fast C...

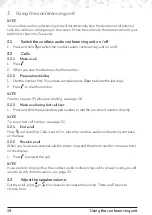
Page 14: ... last digit 2 Press t to dial the number NOTE To enter a pause P when pre dialling see page 18 3 2 3 Make a call using fast call keys 1 Press and hold the relevant keypad number to dial the pre stored number directly NOTE To store a fast call number see page 21 3 2 4 End a call Press e or if Auto End Calls is set to On place the cordless audio conferencing unit back on the base 3 2 5 Receive a cal...

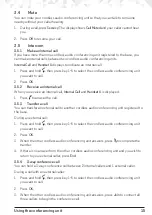
Page 15: ...Call and Handset X is displayed 1 Press t to answer the call 3 5 3 Transfer a call You can transfer an external call to another cordless audio conferencing unit registered to the base During an external call 1 Press and hold d then press key 1 5 to select the cordless audio conferencing unit you want to call 2 Press OK 3 When the other cordless audio conferencing unit answers press e to complete t...

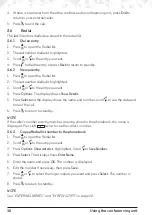
Page 16: ...shows Show Details 5 Press Select and the display shows the name and number scroll d to see the date and time of the call 6 Press e to return to standby NOTE If the caller s number exactly matches an entry stored in the phonebook the name is displayed Press left twice to see the caller s number 3 6 3 Copy a Redial list number to the phonebook 1 Press u to open the Redial list 2 Scroll u or d to th...

Page 17: ...ess audio conferencing unit You can alert a cordless audio conferencing unit user that they are wanted or locate a missing cordless audio conferencing unit Paging calls cannot be answered by a cordless audio conferencing unit 1 Press P onthe underside ofthe base All cordless audio conferencing units registeredto the basewill ring and displayPagingCall 2 To stop the ringing press P on the base agai...

Page 18: ...You can store multiple entries with the same name However to prevent unnecessary duplicated entries you can only store the same number once 1 Press Names to enter the phonebook menu 2 Search is highlighted 3 Scroll d to Add Entry and press Select 4 Enter a name and press OK 5 Enter a number and press Save 6 Scroll u or d to the melody you want and press Select The entry is stored 7 Press e to retu...

Page 19: ...ase 4 2 View the details or dial an entry 1 In standby press P The first entry is highlighted on the display 2 Scroll u or d to the entry you want Or To search alphabetically press the key with the first letter of the name e g if the name begins with N press 6twice The display shows the first entry beginning with N If required scroll u or d to the exact entry 3 Press t to dial the displayed entry ...

Page 20: ...5 Edit the number and press Save Press Clear to delete a character or press and hold Clear to delete all characters 6 Scroll u or d to the ringtone you want and press Select The entry is stored 7 Press e to return to standby 4 5 Assign a ringtone 1 In standby press P The first entry is highlighted on the display 2 Enter the first letter of the name to search alphabetically then scroll u or d to th...

Page 21: ...lphabetically then scroll u or d to the exact entry then press Options 4 Scroll u or d to Fast Call press Select 5 Scroll u or d to Key X where the entry is stored press Select 6 Scroll u or d to Show Details press Select to confirm 7 Press e to return to standby 4 9 Clear a fast call number 1 Press Names to enter the phonebook menu 2 Search is highlighted Press Select The first entry is highlight...

Page 22: ...book menu 2 Scroll d to Memory Status and press Select The display shows the number of used and max phonebook entries 3 Press e to return to standby 4 12 Delete all entries 1 Press Names to enter the phonebook menu 2 Scroll d to Delete Phonebook and press Select 3 Display shows Delete All Entries Press Yes 4 Press e to return to standby ...

Page 23: ... call is received the oldest entry will be deleted automatically The received and missed Calls list holds details of up to 50 calls If you receive more than one call from the same number all calls are kept in the Calls list 5 1 New calls alert When you have new missed calls incoming calls that you haven t answered the display shows X New call s If you press Back the screen returns to standby and t...

Page 24: ...most recent number or name if stored in the phonebook is displayed 4 Scroll u or d to the entry you want and press Options 5 Scroll d to Save Number and press Select 6 Enter a name and press OK 7 Display shows the number of the call Edit the number if necessary and press Save Press Clear to delete a character or press and hold Clear to delete all characters 8 Scroll u or d to the melody you want a...

Page 25: ...e Calls and press Select 3 Scroll u or d to highlight the Calls list Missed Calls Received Calls Dialled Calls Voicemail Calls or All Calls you want and press Select 4 Press Yes to confirm or No to cancel 5 Press e to return to standby ...

Page 26: ...t the date and time 1 Press Menu scroll d to Date Time and press Select 2 Scroll d to Date Time and press Select 3 Enter the time HH MM and press Save If the current time format setting is 12 hour scroll u or d to select am or pm 4 Enter the date using the format DD MM YYYY e g 04 08 2015 for 4 August 2015 and press Save 5 Press e to return to standby 6 2 Time format 1 Press Menu scroll d to Date ...

Page 27: ...ones You will hear a sample ring as you scroll to each ringtone 1 Press Menu scroll d to Settings and press Select 2 Set Handset is highlighted Press Select 3 Ringtone is highlighted Press Select 4 Ringing is highlighted press Select 5 Scroll d to Internal Ringtone and press Select 6 Scroll u or d to the ringtone that you want and press Select 7 Press e to return to standby 7 3 Ringer volume The c...

Page 28: ...on or off 1 Press Menu scroll d to Settings and press Select 2 Set Handset is highlighted Press Select 3 Ringtone is highlighted Press Select 4 Scroll d to Handset Tones and press Select 5 Scroll d to Confirmation Tone and press Select 6 Scroll u or d to Tones Off or Tones On then press Select 7 Press e to return to standby 7 6 Name If you are using more than one cordless audio conferencing unit w...

Page 29: ... are 5 levels to choose from 1 Press Menu scroll d to Settings and press Select 2 Set Handset is highlighted Press Select 3 Scroll d to Display and press Select 4 Contrast is highlighted Press Select 5 Scroll u or d to the level you want and press Select 6 Press e to return to standby 7 9 Screensaver When the screensaver is set to on the time and date is displayed The screensaver comes on when the...

Page 30: ...ct 3 Call Settings is highlighted Press Select 4 Scroll d to Auto End Calls Press Select 5 Scroll u or d to On or Off then press Select 6 Press e to return to standby 8 3 Auto Join Calls If more than one cordless audio conferencing unit is registered to your base a second handset can join the call automatically by just pressing t 1 Press Menu scroll d to Settings and press Select 2 Scroll d to Set...

Page 31: ...es The default recall mode preset in the AC1000 is suitable for your country network and therefore you should not need to change it NOTE The use of the AC1000 cannot be guaranteed on all PABX 1 Press Menu scroll d to Settings and press Select 2 Scroll d to Set Base and press Select 3 Scroll d to Recall Mode and press Select 4 Scroll u or d to Recall 1 or Recall 2 and press Select 5 Press e to retu...

Page 32: ...less audio conferencing units registered to the base will be retained Only the cordless audio conferencing unit and base settings will be reset 1 Press Menu scroll d to Settings and press Select 2 Scroll d to Set Base and press Select 3 Scroll d to Master Reset and press Select 4 Select Yes to confirm or No to cancel 5 The display will show Reset Complete and the unit will restart automatically 8 ...

Page 33: ...ne is set to on NOTE If registration is not successful the first time please repeat the process again in case the base registration period ran out of time If the base is not found after a few seconds the cordless audio conferencing unit returns to standby Try registering again If there are already 5 cordless audio conferencing units registered to the base registration will fail You must de registe...

Page 34: ...answer Off Auto end call Off Auto join call Off Ringer melody EXT Melody 1 Ringer melody INT Melody 3 Ringer volume 3 Speaker volume 2 Phonebook Unchanged Call list Unchanged Redial list Unchanged Master PIN 0000 Clock 00 00 Recall Mode Recall 2 600ms Dial mode Tone ...

Page 35: ...just the cordless audio conferencing unit slightly on the base Clean the charging contacts with a cloth moistened with alcohol Check that the mains power is connected properly and switched on The battery is full When the cordless audio conferencing unit is fully charged icon will appear steady on the display No Caller ID Check your subscription with your network operator The caller may have withhe...

Page 36: ...egistering AC1000 does not ring The cordless audio conferencing unit ringer volume may be set to Off Noise interference on my conferencing unit or on other electrical equipment nearby Place your AC1000 at least one metre away from electrical appliances or any metal obstructions to avoid any risk of interference ...

Page 37: ...ects of any kind into the product vents as that may result in fire or electric shock Unplug this product from the wall outlet before cleaning Do not use liquid cleaners or aerosol cleaners Use a damp cloth for cleaning Do not disassemble this product If service or repair work is required contact the customer service helpline found in this user s Guide Do not overload wall outlets and extension cor...

Page 38: ...e that could operate without electricity in the case the power in your home goes out To avoid interference to nearby appliances do not place the base of the phone on or near a TV microwave oven orVCR Battery Safety Instructions Do not burn disassemble mutilate or puncture the battery The battery contains toxic materials that could be released resulting in injury IMPORTANT There is a risk of explos...

Page 39: ...ct was purchased Product disposal instructions for business users Business users should contact their suppliers and check the terms and conditions of the purchase contract and ensure that this product is not mixed with other commercial waste for disposal Consumer Products and Accessories Warranty Thank you for purchasing this Motorola branded product manufactured under license by Suncorp Technolog...

Page 40: ...one jurisdiction to another Products Covered Length of Coverage Consumer Products One 1 year from the date of the products original purchase by the first consumer purchaser of the product Consumer Accessories battery power supply s and line cords Ninety 90 days from the date of the accessories original purchase by the first consumer purchaser of the product Consumer Products and Accessories that a...

Page 41: ...ort alcom com sg You will receive instructions on how to ship the Products or Accessories at your expense and risk to a SUNCORPAuthorized Repair Center To obtain service you must include a the Product or Accessory b the original proof of purchase receipt which includes the date place and seller of the Product c if a warranty card was included in your box a completed warranty card showing the seria...

Page 42: ... This page has been intentionally left blank ...

Page 43: ...opean Communities R TTE Directive 1999 5 EC Ecodesign Directive 2009 125 EC The products are compliant with the following standards Safety EN60950 1 2006 A11 2009 A1 2010 A12 2011 A2 2013 EMC EN301489 1 v1 9 2 and EN301489 6 v1 3 1 RF Spectrum EN301406 v2 1 1 Ecodesign EC No 278 2009 6 April 2009 For and on behalf of Suncorp Technologies Limited Signature ______________________ Printed name Positi...

Page 44: ...e for this product MOTOROLA and the Stylized M Logo are trademarks or registered trademarks of Motorola Trademark Holdings LLC and are used under license All other trademarks are the property of their respective owners 2015 Motorola Mobility LLC All rights reserved Version 3 SG ...

Reviews: