background image

Welcome - 

1

Welcome

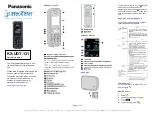
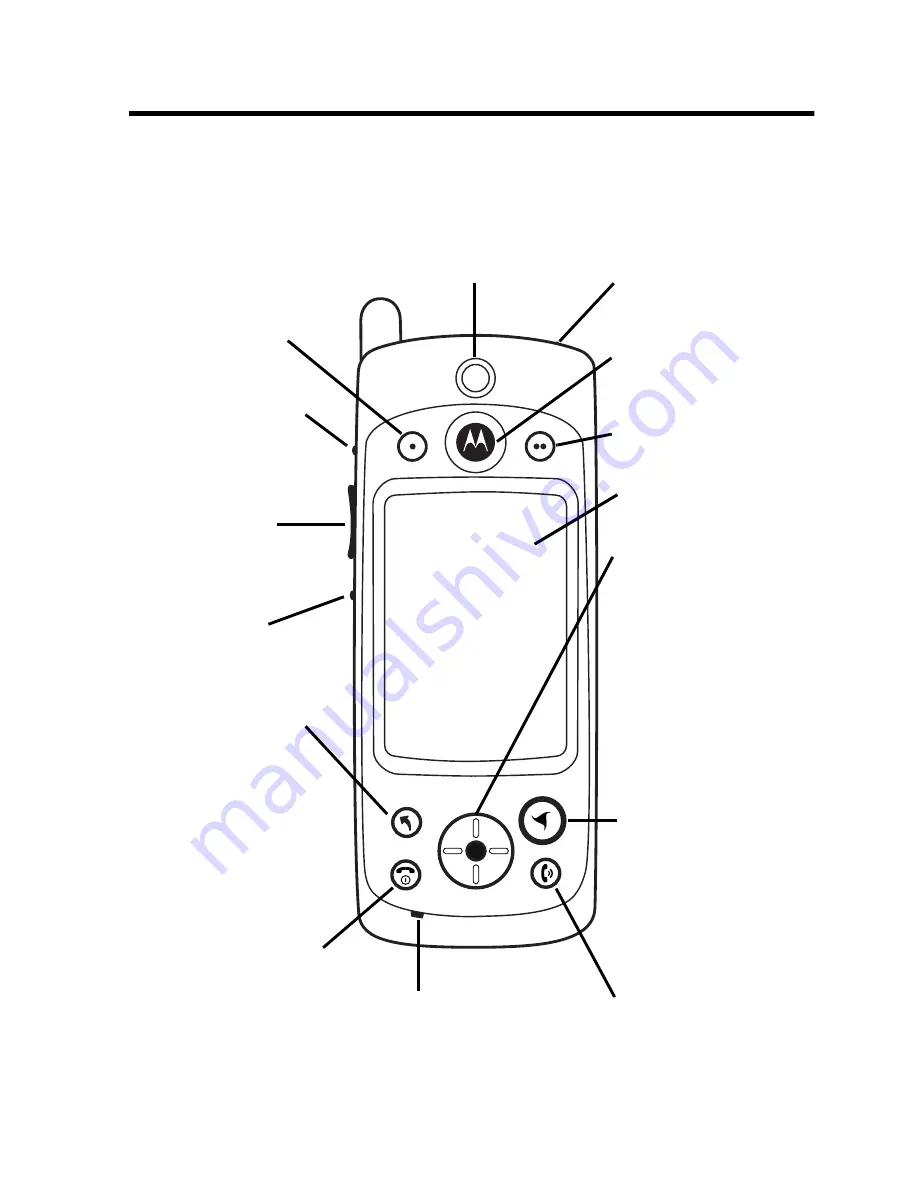
This reference guide describes the many features in your A920 

multimedia handset.

Power/End Key

Press & hold to 

turn on & off.
Press & release 

to end calls.

Earpiece

Touchscreen

Volume 
Up/Down

Camera

Send Key

Press to make & 

answer calls.

Shortcut Key

Press to go to 

favourite 

application 

(default: Home).

3 Key

Press to use 

features from 3.

Status Light

Voice Key

Speakerphone 
Key

Microphone

Navigation Key

Press arrows to 

move through 

items.
Press centre to 

select highlighted 

item.

Game Key A

Game Key B

Summary of Contents for A920

Page 1: ... to end calls Earpiece Touchscreen Volume Up Down Camera Send Key Press to make answer calls Shortcut Key Press to go to favourite application default Home 3 Key Press to use features from 3 Status Light Voice Key Speakerphone Key Microphone Navigation Key Press arrows to move through items Press centre to select highlighted item Game Key A Game Key B ...

Page 2: ...ola and third party software providers certain exclusive rights for copyrighted software such as the exclusive rights to distribute or reproduce the copyrighted software Accordingly any copyrighted software contained in the Motorola products may not be modified reverse engineered distributed or reproduced in any manner to the extent allowed by law Furthermore the purchase of the Motorola products ...

Page 3: ... Installing the Battery 21 Charging the Battery 22 Battery Use 22 Turning Your Handset On 23 Setting up Your Handset 24 Making and Answering Calls 24 Making a Call 24 Answering a Call 25 Using Your Handset 26 Handset Screen 26 Using Touchscreen Control 27 Using Navigation Key 27 Using 3 Key 28 Using Game Keys 28 Game Key A 28 Game Key B 28 Opening Applications 28 Folders 30 Switching Folders 31 Fi...

Page 4: ... Phone Number 40 Making a Voice Call 40 Dialling with Keypad 40 Dialling Special Characters 40 Dialling Stored Phone Numbers 41 Redialling Failed Voice Calls 41 Making a Video Call 41 Dialling Video Call with Keypad 41 Dialling Stored Phone Numbers 42 Retrying Failed Video Calls 42 Using Automatic Redial 42 Making an Emergency Call 43 Sending Tones 43 Answering Calls 44 Adjusting Volume 44 Using S...

Page 5: ...0 Turning off Call Ringing 50 Using Optional Network Features 50 Using Caller ID 50 Hiding your Caller ID 51 Using Call Waiting 51 Using Call Diverting 51 Using Call Barring 53 Monitoring Phone Use 54 Setting In Call Timer Options 54 Viewing Call Time Information 54 Resetting Call Timers 55 Viewing Call Charges 55 Messages and Email 56 Setting up Messaging Accounts 56 Email 56 Multimedia message a...

Page 6: ...g System Sounds 76 Setting Shortcut Key 76 Choosing Ringtunes 76 Choosing Ringtunes for Calls 77 Choosing Ringtunes for Messages 77 Choosing Vibrate Pattern 78 Installing Ringtunes 78 Ringtunes File Formats 78 Installing Audio Files as Ringtunes 79 Installing Saved Audio Files as Ringtunes 79 Personal Organiser Features 80 Calendar 80 Adding a Calendar Entry 80 Switching Calendar Views 82 Assignin...

Page 7: ... Time 91 Setting Time and Date 91 Setting Location 92 Setting Alarms 92 Responding to Alarms 93 Turning Alarm Sounds Off 93 Calculator 94 News and Entertainment 95 Web Browser 95 Setting Up Internet Account 95 Opening Web Browser 95 Opening Web Pages 95 Viewing Recently Visited Web Pages 96 Adding Bookmarks 96 Saving Web Pages 96 Downloading Audio Video and Pictures 97 Setting Web Preferences 97 M...

Page 8: ...ture Size 106 Recording Video Clips 106 Using Self Timer 107 Available Memory Indicator 107 Switching to Pictures 108 Switching to Video 108 Video 108 Opening Video 108 Playing a Video Clip 109 Switching to Landscape View 110 Setting Repeat Mode 110 Playing Streaming Video and Audio 110 Viewing Clip Information 111 Saving Video Clips 111 Deleting Video Clips 111 Sending Video Clips 112 Pictures 11...

Page 9: ...Desktop Suite 118 Remote Synchronisation 119 Setting Up Your Account 119 Configuring the Settings 119 Installing Applications on the Handset 120 Downloading Applications from Web 120 Downloading Application from Email or multimedia message 120 Downloading Application from Computer 121 Downloading Application from Memory Card 122 Security 123 Locking and Unlocking handset 123 Establishing Password ...

Page 10: ...signed to comply with local regulatory requirements in your country concerning exposure of human beings to RF energy Operational Precautions To assure optimal phone performance and make sure human exposure to RF energy is within the guidelines set forth in the relevant standards always adhere to the following procedures External Antenna Care Use only the supplied or Motorola approved replacement a...

Page 11: ...res from your body when transmitting Data Operation When using any data feature of the phone with or without an accessory cable position the phone and its antenna at least 1 inch 2 5 centimetres from your body Approved Accessories Use of accessories not approved by Motorola including but not limited to batteries and antenna may cause your phone to exceed RF energy exposure guidelines For a list of...

Page 12: ...ne more than 6 inches 15 centimetres from your pacemaker when the phone is turned ON NOT carry the phone in the breast pocket Use the ear opposite the pacemaker to minimise the potential for interference Turn OFF the phone immediately if you have any reason to suspect that interference is taking place Hearing Aids Some digital wireless phones may interfere with some hearing aids In the event of su...

Page 13: ...e may be propelled with great force and cause serious injury to occupants of the vehicle Potentially Explosive Atmospheres Turn off your phone prior to entering any area with a potentially explosive atmosphere unless it is a phone type especially qualified for use in such areas and certified as Intrinsically Safe Do not remove install or charge batteries in such areas Sparks in a potentially explo...

Page 14: ... in handling any charged battery particularly when placing it inside a pocket bag or other container with metal objects Use only Motorola original batteries and chargers Your battery or phone may contain symbols defined as follows Seizures Blackouts Some people may be susceptible to epileptic seizures or blackouts when exposed to blinking lights such as when watching television Symbol Definition I...

Page 15: ...ss involuntary movements or disorientation To limit the likelihood of such symptoms please take the following safety precautions Do not play or use a blinking lights feature if you are tired or need sleep Take a minimum of a 15 minute break hourly Play in a room in which all lights are on Play at the farthest distance possible from the screen Repetitive Motion Injuries When you play games on your ...

Page 16: ...ive 1999 5 EC All other relevant EU Directives The above gives an example of a typical Product Approval Number You can view your product s Declaration of Conformity DoC to Directive 1999 5 EC the R TTE Directive at www motorola com rtte to find your DoC enter the product Approval Number from your product s label in the Search bar on the Web site IMEI 350034 40 394721 9 0168 Type MC2 41H14 Product ...

Page 17: ... Desktop Suite product manuals and other product information and software Removable memory card may not be available in all countries USB cable for connecting to computer Regional power adapters Protective carrying case 3 welcome package may not be available in all countries Vehicle power adapter may not be available in all countries Note The in box items of the A920 multimedia handset may vary by...

Page 18: ... handset features Optional Features Optional Accessories Installing the USIM Card Your USIM Universal Subscriber Identity Module card contains your phone number service details and memory for storing phone numbers and messages Features marked with this label are optional network and or subscriber dependent They may not be offered by all service providers in all geographical areas Contact your serv...

Page 19: ...ard and avoid exposing it to static electricity water or dirt Do This 1 Push down releaselatch slide back cover down and remove 2 Slide USIM card door to the left and lift open 3 Insert USIM card into tray notch in upper right corner gold plate down Release latch ...

Page 20: ...ed to remove the memory card push it into the slot until it unlocks Then slide it out 4 Close USIM card door and slide to right to lock Do This 1 If back cover is on remove it as described in Installing the USIM Card on page 18 2 Insert memory card into card slot with notch in upper right corner Push card completely into slot until it locks Do This ...

Page 21: ...l batteries and accessories Store batteries in their protective cases when not in use Do This 1 Remove the battery from its protective clear plastic case 2 If back cover is on remove it as described in Installing the USIM Card on page 18 3 Insert the battery under the tab and push down 4 Replace back cover and slide into place ...

Page 22: ...ow metal objects to contact or short circuit the battery terminals To maximise your battery s performance Always use Motorola Original batteries and battery chargers The warranty does not cover damage caused by using non Motorola batteries and or battery chargers Do This 1 Plug the charger in with the release tab up 2 Plug the other end of the charger into an electrical outlet While the battery is...

Page 23: ...wear down and require longer charging times This is normal If you charge a battery regularly and notice a decrease in talk time or an increase in charging time it is probably time to buy a new one Dispose of rechargeable batteries properly You may need to recycle them Refer to your battery s label for battery type and contact your local recycling centre for proper disposal methods Never dispose of...

Page 24: ...e your handset If you want to enter information about yourself into the handset see Creating Owner Card on page 73 Making and Answering Calls This section describes the basic calling features For more features see Calling Features on page 39 To make and answer calls your handset must be turned on have a USIM card installed have a network connection with adequate signal strength Making a Call Do Th...

Page 25: ...ress C centre key to select the desired number To dial a different phone number use the provided stylus to tap Keypad at the bottom of the screen A dialling keypad displays Tap the number you want to dial on the keypad 3 Choose either a voice or a video call by tapping on the corresponding icon 4 Press B to make the call 5 To end the call press A Do This 1 Press B to answer the call 2 To end the c...

Page 26: ...lication Selector Bar Shows six icons that allow easy access to commonly used applications Menu Bar Shows menus for the open application Application Space Shows the open application Button Bar Shows buttons you can select in the open application Application Space Application Selector Bar Menu Bar Button Bar Status Bar ...

Page 27: ...e handset Using Navigation Key Instead of using the stylus you can use the Navigation key C Press the four arrows to highlight an item on the screen Press the centre key to select the highlighted item Note This guide describes how to use touchscreen control to use the features In most cases it does not include the equivalent Navigation key for using the feature Status Bar Shows handset status info...

Page 28: ... these keys as follows Game Key A In many handset applications you can press Game key A F to open the first leftmost menu in the menu bar Press F again to close the menu Game Key B Use Game key B G in conjunction with the Shortcut key D to lock the handset See Locking and Unlocking handset on page 123 for instructions Opening Applications Your handset has many built in applications for communicati...

Page 29: ... open your favourite application The default application is Home See Setting Shortcut Key on page 76 for how to assign a different application to this key You don t have to close applications just open the next one Changes or entries are always automatically saved The following icons open the handset applications Calendar see page 80 Messaging see page 56 Calculator see page 94 Phone see page 39 D...

Page 30: ... of the menu bar at the top of the screen You can use folders to organise your entries For example you can create separate folders for business and personal entries Video see page 108 Camera see page 104 Home see page 37 Remote Sync see page 119 Pictures see page 112 Current folder Tap folder name to see list of all folders ...

Page 31: ...Different Folder Adding Renaming and Deleting Folders Do This 1 In the application select the desired folder 2 Create a new entry The entry is automatically assigned to this folder Do This 1 Open the entry 2 Select a different folder The entry is moved to this folder Do This 1 Tap the current folder name and select Edit folders 2 To add a new folder tap Add To rename a folder tap Edit To remove a ...

Page 32: ...sage To change the alert mode tap this indicator and select the setting you want Location Mode Shows whether the GPS Global Positioning System Location service is off idle in standby or busy requesting location information The colour indicates the Location mode Off Grey Idle White Busy Green To turn the Location service on or off tap this indicator and select the setting you want The Location serv...

Page 33: ...Emergency service red Connected to GSM home network one green segment Connected to GPRS home network two green segments Connected to 3G home network three green segments Roaming to non home type network Indicator segments are amber Aeroplane mode phone disabled To turn Aeroplane mode on or off tap this indicator and select the setting you want See Switching to Aeroplane Mode on page 49 Signal Stre...

Page 34: ...all or message Alternating red green times out in 15 seconds In Service and no message Rapidly flashing green In Service and message waiting Alternating green red No Service and no message Slowly flashing red No Service and message waiting Rapidly flashing red Roaming and no message Rapidly flashing amber Roaming and message waiting Alternating amber red Battery charging when connected to battery ...

Page 35: ...s numbers or characters button on the left side of the handwriting pad Then use the stylus to write in one of the two writing spaces For best performance alternate between the writing spaces so that recognition can occur in one while you are writing in the other To enter punctuation marks special characters spaces and returns tap the buttons beneath the writing spaces Note You can activate the han...

Page 36: ...atus bar The handwriting pad or the keyboard appears depending on which you used last If the handwriting pad appears tap again and then tap Roman Keyboard in the popup menu To type tap the keyboard keys with the stylus Note You can activate the keyboard only when the screen cursor is in a field that allows you to enter text ...

Page 37: ...h as news entertainment and sports Displaying Home Home displays after the startup sequence when you turn on the handset You can also display Home by Pressing D if Shortcut key is set to default setting Tapping icon in Application Selector bar or Application Launcher Screen Contents Information Snacks Personal Information Application Shortcuts ...

Page 38: ...ments and active tasks Tap an item to open its application Messages Calendar or To Do Application Shortcuts Shows three icons that let you start your favourite applications Personalising Home Do This 1 Go to Home if not already shown 2 Tap Home Preferences 3 Tap Events tab 4 Select the items you want displayed in the Personal Information section Email Voicemail multimedia message Calendar appointm...

Page 39: ...ing ways Press B When the Phone application opens a list of the most recently dialled calls displays Tap in the Application Selector bar or Application Launcher When the Phone application opens the dialling keypad displays Tap keys to dial number Tap to erase last digit Display Tap to place voice call Tap to switch between keypad and call list Tap to place video call ...

Page 40: ...s displayed tap the star key to insert special dialling characters into phone number Do This 1 Use stylus to tap phone number on keypad If you make a mistake while dialling tap to delete last digit Tap and hold to delete all displayed digits 2 Tap Do This To 1 Tap star key once Insert a star character into phone number 2 Tap and hold star key Insert a pause character p into phone number A pause ca...

Page 41: ...calls to other devices that have video call capabilities Dialling Video Call with Keypad 3 Tap and hold key Insert a wait character w into phone number A wait character causes phone to wait until the call connects and then prompts for confirmation before it dials the next digit s Do This 1 Position camera lens so that it faces the image you want to send See Positioning the Camera Lens on page 105 ...

Page 42: ...ntinue Send multimedia message Press to send an multimedia message to the same phone number Voice Press to place a voice call to the same phone number Cancel Press to return to the dialling keypad Using Automatic Redial When Automatic Redial is turned on the handset automatically redials failed voice calls busy or no signal If the call does not go through after 10 redial attempts the handset stops...

Page 43: ...rs stored on it Note Emergency numbers vary by country Your handset s preprogrammed emergency number s may not work in all locations and sometimes an emergency call cannot be placed due to network environmental or interference issues Sending Tones While you are on a call you can enter information such as credit card numbers passwords and extensions by sending tones Do This 1 Tap Settings Call Cont...

Page 44: ...ve on Answer Tap to answer the incoming call and drop the current active call If there is another call on hold this call will not be affected Note The handset does not support simultaneous voice and video calls If you receive an incoming video call while a voice call is active the only options are to ignore the incoming video call or drop the current voice call and then answer the video call Adjus...

Page 45: ...o answer an incoming call using the speakerphone press the Speakerphone key while the handset is ringing or vibrating Using Features While on a Voice Call Muting Microphone To mute the microphone so the person on the other end cannot hear you tap the Mute button in the call screen While the call is on mute the Mute button changes to Unmute To turn the microphone back on tap Unmute Speakerphone Key...

Page 46: ...two calls or join the calls in a Grouptalk Do This 1 In the call screen tap Phone Transfer The Transfer screen displays 2 Dial the number to which you want to transfer the call in one of the following ways On the Keypad tab tap the number you want to dial and tap Done On the Contacts tab tap the name of the stored contact you want to call Then tap the stored number you want to dial The screen disp...

Page 47: ...old and the call on hold becomes active Joining Calls in a Grouptalk To join an active call and a call on hold so you can talk to both parties in a Grouptalk tap Join The Grouptalk screen displays listing the joined parties 3 Press B If the call succeeds one call is active and one call is on hold The screen displays both calls Do This ...

Page 48: ...Unmute Blocking Video To block the video during a video call tap Block Video on the remote device will freeze when block is set To turn video back on tap Unblock Viewing Call History The handset keeps a list of the calls you recently dialled answered and missed did not answer It sorts the list from the newest to oldest entries Do This 1 In the Grouptalk screen tap Keypad 2 Tap the number of the pa...

Page 49: ... tap Phone Clear Call History Switching to Aeroplane Mode If you want to use the handset s personal organisation and entertainment features in a situation where telephone use is not allowed such as on a plane switch the handset to Aeroplane mode Do This 1 Tap History A list of your most recently dialled calls displays on the Dialled tab 2 To view your most recently missed unanswered calls tap the ...

Page 50: ...ing calls by setting the handset s alert mode to vibrate or silent See Alert Mode on page 32 Using Optional Network Features Using Caller ID If you subscribe to the calling line identity caller ID feature you can see who is calling before you answer If the caller is stored as a contact the caller s name and picture if included when you added the contact displays Otherwise the screen displays the c...

Page 51: ...of an incoming call while a data call is in progress The screen displays the following buttons Ignore Tap to reject the incoming call Drop Tap to answer the incoming call and drop the current data call To turn on the call waiting feature Using Call Diverting If you subscribe to the call diverting feature the handset can forward incoming voice and data calls directly to another phone number Use the...

Page 52: ... tab 3 Select the type of incoming calls for which you want to specify forwarding options Voice or Data 4 Check the small box next to the type of calls you want to forward All calls Busy voice only No answer voice only or Unreachable voice only If you select All calls you cannot select the other options ...

Page 53: ...ollowing ways To enter the number manually tap the long box next to the call type Tap the number on the displayed keypad and tap Done To forward the call to a stored contact tap next to the call type Tap the name of the stored contact and then tap one of the stored numbers The selected forwarding number displays in the long box Do This 1 Tap Settings Call Control 2 Tap the Barring tab 3 Select the...

Page 54: ...password and tap Done 3 Enter a new password 4 10 characters and tap Done Do This 1 Tap Settings Call Tracking 2 On the In Call tab set the following options Audible Timer If you want the handset to sound an alert at specified intervals during a call select an interval between 1 and 15 minutes Select Off to disable audible timer Display If you want the call s elapsed time to display during the cal...

Page 55: ...provide you with information about your call charges To view this information 2 Tap the Timers tab The following information displays Last Call Elapsed time of your last dialled or received call Outgoing Elapsed time of all dialled calls since last reset Incoming Elapsed time of all received calls since last reset All Calls Elapsed time of all dialled and received calls since last reset Lifetime E...

Page 56: ...for how to download and store these files in the handset Setting up Messaging Accounts Before you can send and receive messages you must set up your accounts Contact your service provider for account details Email To send and receive emails you must set up an Internet account and an email account The handset supports the following email protocols IMAP4 POP3 and SMTP To create an Internet account D...

Page 57: ...e providers may require you to enter them Address Enter the Internet address of your account Your service provider supplies this address 7 On the Log in tab check the Get IP address automatically and Get DNS address automatically boxes The handset will automatically retrieve the IP and DNS addresses from your service provider If after you set up an Internet account you cannot connect to the Intern...

Page 58: ...ider If you use a proxy server you can specify a list of Web sites that are accessed from their original location s rather than through the proxy server Enter each address on a separate line in the Proxy exceptions box 9 On the Other tab select the following Enable PPP extensions Check this box if your service provider supports these extensions PPP extensions allow your handset to provide features...

Page 59: ...assword and Incoming server address Your service provider supplies this information which identifies the computer that stores your incoming emails Download If you do not have much time to download your emails you can choose to retrieve just a header the sender subject and date or set a size limit if an email is larger than this limit only the headers download You can download the complete email la...

Page 60: ...ll messages is encrypted to maximise security while you are connected to the Internet Outgoing mail port and Incoming mail port You probably do not need to change these settings Use MIME encoding MIME encoding is a standard that allows you to email non textual information for example graphics and accented characters Check this box to use this feature Secure password authentication Check this box i...

Page 61: ...s application When the Messaging application opens it shows a list of your established accounts Creating and Sending Messages Email and text message To write and send an email or text message Do This Tap in the Application Selector bar or Application Launcher Do This 1 Tap the email or text message account in the list of accounts ...

Page 62: ...ored address or phone number from Contacts tap To To enter several addresses or phone numbers enter a comma between each 4 In the Subj field email only write a subject line 5 In the text area write the text message 6 To add an attachment to an email tap the tab and tap Add Then select the stored file that you want to attach 7 When message is complete tap Send 8 If you want to send the message now ...

Page 63: ...must also subscribe to multimedia messaging To enter a stored number from Contacts tap To To enter several phone numbers enter a comma between each 4 Tap to add a sound You can then record a new sound or select a stored audio file You can add the following types of stored audio files to an multimedia message WAV and AMR Do This Image area Text area Duration label ...

Page 64: ...ltimedia message BMP WBMP GIF PNG JPEG and TIFF 6 Tap the text area to place a cursor in the text area Enter text with stylus or virtual keyboard 7 To set the slide duration tap the duration label 20 20s Specify how long in seconds you want the slide to play before automatically advancing to the next slide in the message The first number in the duration label indicates the selected duration of the...

Page 65: ...The Messaging application opens showing a list of established accounts The number of unread messages displays next to each account 2 Tap the account containing the message you want to read A list of messages displays Unread messages display in bold 3 Tap the message you want to read 4 Any attachments to the message display with a Tap on the attachment to open it Do This 1 Open the message 2 Tap Fr...

Page 66: ...ontains messages that are not ready to send To save a message in Draft create the message and leave it without tapping Send Sent Contains messages you have sent Finding Messages Do This 1 In the list of accounts or list of messages tap Message Find 2 Enter text you want to search for This text can be contained in the message subject line sender details or the body of the message 3 In the Where box...

Page 67: ...l emails To attach your owner card create the email message and tap Message Attach your card Always reply with history Specifies whether the text of the original message the history is included when you reply to an email message Signature Specifies text to display at the end of the emails you send To set email preferences Do This 1 Tap the email account in the list of accounts 2 Tap Edit Preferenc...

Page 68: ... to any stored contact from this list Opening Contacts Application Tap in the Application Selector bar or Application Launcher An alphabetical list of stored contacts displays The following icons can display next to a contact name Displays if contact has a voice tag assigned to a phone number See Adding Contacts on page 69 for how to assign a voice tag Displays if contact is saved in USIM folder ...

Page 69: ...eir name tap Edit Preferences and select the Show preferred phone number box Adding Contacts Do This 1 Open the folder in which you want to save the contact To store the contact on your USIM card open the USIM folder 2 Tap Contacts New The Contact information form displays ...

Page 70: ...timedia message capable Video Phone landline Video Mobile Email and Web 5 To assign a particular ringtunes to the contact tap the Ringtunes box and select a ringtunes from the list When you receive a voice or video call from this contact the selected ringtunes plays Tap to play the selected ringtune 6 To add a note to a contact tap and enter the note You can mark a note as Private Private notes ar...

Page 71: ...tap The contact now displays in the alphabetical list of contact names Do This 1 Tap Contacts Find 2 To search in all fields including notes you have created tap in all fields To search for names and company tap in Names Company 3 Enter search criteria in the Find Contact box Searching is not case sensitive and you do not have to enter an entire word to locate a matching entry 4 Tap Find Do This ...

Page 72: ...nd messages to your stored contacts Do This 1 In the list of contact entries tap the contact name The contact s defined phone numbers and email addresses display A phone number or email address might have additional icons next to it depending on its defined communication method ...

Page 73: ...o You can send your contact details as described in Sending Contact Details on page 73 2 To place a voice call tap the phone number To place a video call tap next to the phone number To send an email tap the email address To send an multimedia message tap next to the phone number or email address To send a text message tap next to the phone number Do This 1 Open the contact you want to send 2 Tap ...

Page 74: ...ng Contacts Do This 1 Tap Contacts New 2 Enter your contact information as described in Adding Contacts on page 69 3 Tap Contacts Set as owner card Do This 1 Tap Edit Preferences 2 Select the manner in which you want the contacts sorted 3 Tap Done ...

Page 75: ...Launcher Sample wallpapers are provided on the CD ROM supplied with the handset Note See News and Entertainment for how to download and save images you can use as wallpaper Setting Screen Brightness Do This 1 Open Application Launcher 2 Tap View Wallpaper 3 Tap Change 4 Select one of the stored images Do This 1 Open Control Panel application 2 Tap Screen 3 Slide Brightness dial to desired setting ...

Page 76: ...tting for this key is Home You can set the Shortcut key to open any application For example to be ready to take pictures with a single button press select Camera Choosing Ringtunes When you set the alert mode to audio the handset rings to indicate an incoming call or message You can select from the different ringtunes provided Do This 1 Open Control Panel application 2 Tap Sounds 3 Select desired ...

Page 77: ...ersonalised ringtunes Choosing Ringtunes for Calls Choosing Ringtunes for Messages Do This 1 Open the Phone application 2 Tap Settings Tones 3 Select the ringtunes you want for 3 phone number 3 additional line if applicable and video calls To hear the selected ringtune tap 4 Tap Done Do This 1 Open the Messaging application 2 Tap Edit Preferences 3 Select the ringtunes you want for each messaging ...

Page 78: ... can then assign the installed ringtune to a call or message as described in Choosing Ringtunes for Calls and Choosing Ringtunes for Messages earlier in this section You can also assign installed ringtunes as alarm sounds in the Contacts Calendar To Do and Time applications Sample ringtunes are provided on the CD ROM supplied with the handset Ringtunes File Formats You can install the following ty...

Page 79: ...og box appears that enables you to install the file Installing Saved Audio Files as Ringtunes To install previously saved audio files as ringtunes Do This 1 Open Control Panel application 2 Tap Ringtunes Manager A list of the currently installed ringtune files displays on the Audible tab 3 Tap Install 4 Select the folder in which the audio file is saved 5 Tap the file that you want to install 6 Ta...

Page 80: ...e and date are set before using Calendar See Setting Time and Date on page 91 Adding a Calendar Entry You can enter the following types of Calendar entries Appointment An entry with a start and end time for example a meeting Reminder An entry that does not need a time for example a birthday All day event An entry with a start and end date but no specific times Use an all day event for an entry tha...

Page 81: ...6 Tap the Alarm box if you want the handset to sound a reminder alarm for this entry The time and date of the alarm display below the Alarm box To change when the alarm sounds tap the time or date 7 If this entry recurs tap Repeat to select a repeat interval 8 To mark this entry as Private when you synchronise Calendar entries with a computer tap Private 9 To add a note to the entry tap and enter ...

Page 82: ...f an entry tap the entry Assigning Colours to Calendar Folders In Calendar you can assign colours to folders For example you can use different colours for business and personal entries Entries in a folder display in the assigned colour in the Day and Week views so that you can see the pattern of events 10 Tap to save the entry Do This 1 Tap the current folder name 2 Tap Edit folders 3 Tap the name...

Page 83: ... Do This 1 Tap Calendar Find 2 Enter text for which you want to search 3 In the Where box select whether you want to search through future entries past entries or everywhere all entries 4 Tap Find A list of entries containing the specified text displays Do This 1 Open the entry 2 Tap Calendar Delete Entry Do This 1 Tap Calendar Remove entries 2 In the Removal range box select the period of time fo...

Page 84: ...this information If you copy an entry back to Calendar the handset does not restore this information If you move an entry with an alarm it will sound in To Do Sending Entries You can send Calendar entries by email text message or multimedia message Setting Calendar Preferences Do This 1 Open the entry 2 Tap Calendar Move to To Do Do This 1 Open the entry you want to send 2 Tap Calendar Send As 3 S...

Page 85: ...me intervals Sets the intervals into which the day divides in Day view For example enter 00 30 for half hour divisions Standard entry length Sets the preferred length for entries For example enter 2 00 to set the end date for new entries to be two hours after the start time View hours in week Sets the hours you see in Week view 3 On the Alarms tab you can set the following options Alarm precedes e...

Page 86: ...date The current date displays next to the Due date box To select a different due date tap the date and select a date from the displayed calendar 6 Tap the Alarm box if you want the handset to sound a reminder alarm for this entry The time and date of the alarm displays below the Alarm box To change when the alarm sounds tap the time or date 7 To mark this entry as Private when you synchronise To ...

Page 87: ...leting Entries When you no longer need a record of your completed entries delete them To delete an individual entry tap the entry in the list and tap Delete To delete all completed entries in your list of entries tap To do Delete completed 8 To add a note to the entry tap and enter the note 9 Tap to save the entry Do This 1 Tap To Do Find 2 Enter text for which you want to search 3 In the Where bo...

Page 88: ...set uses the current date for the new Calendar entry If you move an entry with an alarm it sounds in Calendar Sending Entries You can send To Do entries by email text message or multimedia message Setting To Do Preferences Do This 1 Open the entry 2 Tap To do Move to Calendar Do This 1 Open the entry you want to send 2 Tap To Do Send As 3 Select the method by which you want to send the entry 4 Tap...

Page 89: ... overdue Display completed Select this option to display completed entries in the list of entries Alarm sound Sets the sound of the alarm To hear the selected sound tap 3 Tap Done Do This 1 Open Notes 2 Tap Notes New 3 Enter the note using the stylus or virtual keyboard 4 To add a graphic to the note tap 5 Use the stylus to sketch your graphic On screen buttons allow you to change line width and c...

Page 90: ...the original is deleted Finding Notes Sending Notes You can send Notes notes by email text message or multimedia message Do This 1 Tap Notes Find 2 Enter text for which you want to search 3 Tap Find A list of notes containing the specified text displays Do This 1 Open the note you want to send 2 Tap Notes Send As 3 Select the method by which you want to send the note 4 Tap Done ...

Page 91: ...te If you have not already set the current time and date Do This 1 Open Time The Time screen displays 2 Tap Time Set Time Date 3 Enter the current time and date 4 To set the preferred time and date format tap the Format tab Select the time and date format from the lists of available formats 5 Tap Done Current time and date Other city time and date Alarm slots Current city ...

Page 92: ...setting this location to your home city To set locations Setting Alarms You can use Time as an alarm clock It is ideal for wake up alarms and other regular alarms you do not want to include in your Calendar or To Do list You can set up to three alarms in Time The alarm slots display in the lower half of the Time screen Do This 1 Tap Time Set Location 2 Select your current location from the Current...

Page 93: ... Turn off the alarm by unchecking the alarm slot checkbox Tap the alarm slot and select Silent in Alarm sound Do This 1 Tap one of the alarm slots 2 Set the following alarm details Time Select the time of day you want the alarm to sound When Select how often you want the alarm to sound only once in the next 24 hours daily on workdays only or weekly Alarm sound Select the sound you want the alarm t...

Page 94: ...Use the calculator by tapping the on screen keys The calculator has the following memory keys Key Description mr Tap to store a number in memory mr Tap to subtract a number from the number in memory mr Tap once to retrieve a number from memory and enter it into the display Tap twice to clear memory ...

Page 95: ...n alphabetical list of your bookmarks and saved Web pages displays To open the Web browser and go directly to the Hutchison portal press E Note If you accept a videocall during a browsing session the browser session will be interrupted and only the videocall will be maintained Opening Web Pages You can open a Web page in the following ways Tap the bookmark or saved Web page you want to open Tap We...

Page 96: ...st of pages recently viewed tap Web History Tap a page in the list to view it Adding Bookmarks To add a bookmark for a Web page so you can return to the page without having to enter its address Saving Web Pages To save a Web page so you can view it later when not connected to the Internet offline browsing Do This 1 Open the Web page 2 Tap Web Add bookmark 3 Select a folder for the bookmark 4 Tap A...

Page 97: ...open tap Edit Find 2 Enter the text you want to find and tap Find The first occurrence of the text highlights 3 To find the next occurrence tap Edit Find next Do This 1 Tap Edit Preferences 2 On the General tab you can set the following options Use Cookies Specifies whether the browser accepts cookies from Web sites A cookie helps a Web site track your visits The site generates a cookie which is t...

Page 98: ...he audio tracks saved in a specific folder tap the current folder name upper right corner and select the desired folder from the list Sample music files are provided on the CD ROM supplied with the handset Note Audio tracks must be stored in the proper directory on the memory card for you to see and play them in Music When you copy audio files to the memory card from a computer ensure that the fil...

Page 99: ... play Information about the track displays artist album etc and the track begins to play 2 While the track plays you can tap the following buttons at the bottom of the screen Tap and hold down to rewind the track Tap to stop playing and return to the start of the track Tap to switch between play and pause mode Tap and hold down to advance fast forward the track Note The C key also controls audio p...

Page 100: ... Tap Edit Edit Playlist The Reorder Playlist screen displays 4 To arrange the sequence in which the tracks will play tap a track and then tap the arrows to move it up or down in the sequence 5 When the tracks are arranged in the sequence you want tap Done Do This ...

Page 101: ...News and Entertainment 101 Playing a Music Playlist Do This 1 Open the desired folder 2 Tap to switch to the Playlist view 3 Tap Music starts playing the tracks in the sequence you selected ...

Page 102: ...e tap Music Repeat 4 While the playlist plays you can tap the following buttons at the bottom of the screen Tap and release to start playing from the beginning of the current track or to jump to the beginning of the previous track in the playlist if already at the start of the current track Tap and hold down to rewind the current track Tap to stop playing and return to the start of the track Tap t...

Page 103: ...ard when possible The handset supports Content Forward Management CFM CFM allows content to be downloaded to the handset however the content might be flagged such that the content cannot be forwarded to another device Deleting Audio Files Do This 1 Tap Edit Preferences A list of all available audio file types displays 2 Select the file types you want to play 3 Tap Done Do This 1 Tap Save 2 Select ...

Page 104: ...ou can use the built in camera to take still pictures and record video clips 3 Tap Music Delete Do This 1 Open the folder with the audio file you want to send 2 In the list of tracks tap the track you want to send 3 Tap Music Send as 4 Select the method by which you want to send the audio file 5 Tap Done Do This ...

Page 105: ... camera lens Positioning the Camera Lens You can position the camera lens so that it faces towards the front or back of the handset Rotate the wheel on the back of the handset to move the lens Note To protect the lens when not using the camera position it so that it faces the top of the handset Viewfinder Camera Mode buttons Still and Video Memory available Camera lens Rotate to move camera lens ...

Page 106: ...seconds long Do This 1 Tap to place camera in Still mode 2 Point the camera lens at the subject 3 Press C centre key to take the picture The picture displays in the viewfinder 4 If you want to save the picture press C centre key If you want to delete the picture without saving it press C right arrow Do This 1 Tap to place camera in Still mode 2 Tap Camera Set picture size 3 Select desired picture ...

Page 107: ...emory is full the camera stops recording 2 Point the camera lens at the subject 3 Press C centre key to start recording the video The video image displays in the viewfinder 4 To stop recording press C centre key again The video is saved to the currently selected folder Do This 1 Set camera to desired mode still sequence or video as described in the previous sections 2 Point the camera lens at the ...

Page 108: ... that you recorded with the handset s camera downloaded from the Web or received as an email attachment or stored on the removable memory card Opening Video Tap in the Application Launcher When Video opens it shows a list of all saved video clips To view the video clips saved in a specific folder tap the current folder name upper right corner and select the desired folder from the list Sample vide...

Page 109: ...e video files in any of the following directories Media Files Video Movie Trailers Media Files Video Home Media Files Video Unfiled Playing a Video Clip Do This 1 In the list of video clips tap the clip you want to play The video begins to play in portrait vertical view ...

Page 110: ...dio from the Web use the Web browser to select the link to the video or audio clip or broadcast The handset establishes a connection with the server and buffering begins When buffering completes the video or audio starts playing 2 While the video plays you can tap the following buttons at the bottom of the screen Tap to switch between play and pause mode Tap to stop the video and return to the beg...

Page 111: ... ensure optimum use of handset memory save video clips to the memory card when possible The handset supports Content Forward Management CFM CFM allows content to be downloaded to the handset however the content might be flagged such that the content cannot be forwarded to another device Deleting Video Clips Do This 1 Tap Video Clip info 2 Tap Done to return to the video Do This 1 Tap Video Save 2 ...

Page 112: ...a list of picture files depending on the view you selected when Pictures was last open To switch views tap Setting List Thumbnail To see the pictures saved in a specific folder tap the current folder name and select the desired folder from the list Note Pictures must be stored in the proper directory on the memory card for you to see them in Pictures When you copy picture files to the memory card ...

Page 113: ... Files Image Vacation Media Files Image Unfiled Viewing Pictures Do This 1 Tap the thumbnail picture or file name you want to view The picture displays If the original picture is larger than the display area it reduces to fit To see the picture in its original size tap Pictures Actual size view Use the C key to scroll to see the entire picture ...

Page 114: ...he Camera application Tap to return to the list or thumbnails of pictures Do This 1 Open the folder with the pictures you want to view 2 Tap Pictures View slideshow Pictures starts showing the pictures in the folder in the order listed Note The default interval between slides is 3 seconds To change this interval tap Setting Slideshow interval If you select Manual mode you must press the left and r...

Page 115: ...ate a file called PIC1 gif the rotated picture is named PIC1 jpg If a file named PIC1 jpg already exists the new file is named PIC1ROT1 jpg Drawing on Pictures Do This 1 Tap Pictures Image info 2 Tap Done to return to the picture Do This 1 Tap Edit Free draw A colour palette displays below the picture 2 Tap the colour with which you want to draw 3 Use the stylus to draw on the picture 4 Tap Done t...

Page 116: ...inal filename plus EDT1 For example if you edit a picture named PIC1 the new filename is PIC1EDT1 If you edit the file again the new filename is PIC1EDT2 Do This 1 Tap Edit Add frame A row of available frame images displays below the picture 2 Tap the image you want to use A frame displays around the picture 3 Tap Done to save the edited picture The picture s new filename consists of the original ...

Page 117: ...s by email or multimedia message Deleting Pictures Do This 1 Tap Setting 2 Tap the sorting method you want to use Do This 1 Tap the thumbnail picture or file name you want to send 2 Tap Pictures Send as 3 Select the method by which you want to send the picture 4 Tap Done Do This 1 Tap the thumbnail picture or file name you want to delete 2 Tap Pictures Delete ...

Page 118: ... A920 Desktop Suite Before you connect your handset to a computer you should first install the A920 Desktop Suite software from the in box CD ROM Follow the on screen prompts to complete the installation Setting up the Connection Connect the USB cable from the accessory port on the bottom of the handset to the USB port on the computer To complete the connection tap Desktop Suite in the Application...

Page 119: ... and a password To synchronise over HTTP you also need an Internet account Configuring the Settings Once you have the account information you can configure your A920 to remotely synchronise with the synchronisation server You can now start the synchronisation by tapping Sync For more information on how to synchronise remotely contact your service provider Do This 1 Tap SyncML within Application La...

Page 120: ...owing ways Download from Web Download from email or multimedia message attachment Download from a computer Download from Memory card Downloading Applications from Web Downloading Application from Email or multimedia message Do This 1 Open Web browser 2 Follow the instructions on the Web page to download the SIS application file After you download the file the handset automatically starts installin...

Page 121: ...lation completes Do This 1 Establish a link between your handset and the computer as described in Connecting to a Computer on page 118 2 Start the A920 Desktop Suite program on the computer 3 Follow the A920 Desktop Suite online instructions to transfer the SIS application file to the handset When the handset receives the file it automatically starts installing A message informs you when the insta...

Page 122: ...e that a memory card is installed in handset as described in Installing the Memory Card on page 20 2 Open the Application Launcher 3 Tap Launcher Install 4 Tap the name of the application you want to install 5 Tap Install Installation begins A message informs you when the installation completes ...

Page 123: ...hree seconds To unlock the handset press the same keys again Establishing Password Protection You can establish password protection to prevent unauthorised access to information in the handset Do This 1 Open Control Panel application 2 On the Device tab tap Password 3 In the Ask for password list select Never never enter a password At switch on enter your password every time you turn on the handse...

Page 124: ...y screen to display owner information a Check the Put owner information in password screen box b In the Owner Information box write the text that you want to appear 5 Tap Set password 6 Enter password and tap Done 7 Confirm the password and tap Done The password is now set Do This ...

Page 125: ... the handset and make sure you have inserted a valid USIM card See Installing the USIM Card on page 18 Does the handset have a network signal The signal strength indicator in the status bar should show at least one bar If it does not move to an area with a stronger signal Is the earpiece volume too low While on a call press the top of the Volume key on the left side of the handset Is the other par...

Page 126: ...ur monthly wireless service bill I pressed the Power End key A but nothing happened Be sure to press and hold Auntil the display appears and you hear an alert sound this could take several seconds If nothing happens check that the battery is charged See Charging the Battery on page 22 My handset does not ring If you see or in the status bar the ringer is turned off See Alert Mode on page 32 I trie...

Page 127: ...s bridges car parks or tall buildings The screen says Data Calls Only You are in an area where the network does not support voice calls You can make only data calls until you move to an area where the network supports voice calls I cannot hear others on my handset While on a call press the Volume key on the left side of the handset The sound should get louder I cannot open my inbox Before you can ...

Page 128: ...xtending your battery life see Battery Use on page 22 Why are my audio files not appearing in the Music application Check that your Music preferences Edit Preferences are set to show the particular file type Why are the audio video or image files on the Memory card not appearing in the Music Video or Pictures application The file must be stored in the proper directory to appear in the application ...

Page 129: ...er the guidelines for your handset model the SAR limit is 2 0 W kg Tests for SAR are conducted in accordance with CENELEC testing procedures using standard operating positions with the handset transmitting at its highest certified power level in all tested frequency bands Although the SAR is determined at the highest certified power level the actual SAR of the handset while operating can be well b...

Page 130: ...e designed to be within the guidelines The SAR limit recommended by international guidelines ICNIRP for mobile handsets used by the public is 2 0 watts kilogram W kg averaged over ten grams of tissue The limit incorporates a substantial margin for safety to give additional protection for the public and to account for any variations in measurements CENELEC is a European Union standards body Additio...

Page 131: ... bound by Product related statements not directly made by Motorola nor any warranty obligations applicable to the seller A list of the Motorola Call Centre numbers is enclosed with this Product During the Warranty term Motorola will at its discretion and without extra charge as your exclusive remedy repair or replace your Product which does not comply with this warranty or failing this to reimburs...

Page 132: ...ovide warranty service Alternatively for further information on how to get warranty service please contact either the customer service department of your service provider or Motorola s call centre at the telephone numbers below for your country In order to claim the warranty service you must return the Personal handset and or accessories in question to Motorola Please avoid leaving any supplementa...

Page 133: ...ts accessories batteries or parts Motorola will not be responsible in any way for problems or damage caused by any ancillary equipment not furnished by Motorola which is attached to or used in connection with the Products or for operation of Motorola equipment with any ancillary equipment and all such equipment is expressly excluded from this warranty When the Product is used in conjunction with a...

Page 134: ...ess caused directly by defects in material or workmanship 5 Products disassembled or repaired in such a manner as to adversely affect performance or prevent adequate inspection and testing to verify any warranty claim 6 Defects or damage due to range coverage availability grade of service or operation of the cellular system by the cellular operator 7 Defects or damage due to moisture liquid or spi...

Page 135: ...erformance for your Motorola Personal handset within the first six months from date of purchase and up to 200 charges The warranty for Motorola rechargeable batteries becomes void if i the batteries are charged other than by Motorola approved battery chargers specified for the charging of the battery ii any of the seals on the battery are broken or show evidence of tampering iii the battery is use...

Page 136: ...sound off 93 alert mode changing 32 status bar indicator 32 answering calls 25 44 application icons 29 installing 120 opening 28 shortcuts 38 Application Launcher 29 Application Selector bar 26 appointments 80 attachments opening 65 AU files 98 audio mode indicator 32 automatic redial 42 B battery charging 22 extending battery life 22 installing 21 strength indicator 33 battery cover removing 19 r...

Page 137: ...ng 24 putting on hold 46 recently dialled 48 redialling 41 restricting 53 ringtunes 77 switching between multiple 47 to stored contacts 72 transferring 46 vibrate pattern 78 video 41 viewing charges 55 voice 40 camera landscape view 110 memory available 107 opening application 105 portrait view 110 positioning lens 105 recording video clips 106 self timer 107 taking still pictures 106 CD ROM 17 ch...

Page 138: ... 115 E earpiece illustration 1 volume adjusting 44 email account 58 opening attachments 65 preferences 67 receiving 65 sending 61 sending to contact 72 signature 67 status bar indicator 33 emergency making calls 43 status bar indicator 33 End key 1 F files adding to multimedia message 63 attaching to email and text message 62 deleting audio 103 deleting pictures 117 deleting video 111 downloading ...

Page 139: ...ing voice calls 41 sending tones 43 setting timer options 54 status bar indicator 32 handwriting recognition 35 hiding caller ID 51 history calls 48 hold putting calls on 46 Home displaying 37 personalising 38 Hutchison key 1 I icons applications 29 status bar 32 inbox 66 information snacks 38 installing applications 120 battery 21 memory card 20 ring tone files 78 USIM card 18 Internet account 56...

Page 140: ...to 103 saving video files to 111 menu bar 26 messages accounts 56 finding 66 folders 66 inbox 66 opening application 61 opening attachments 65 outbox 66 receiving 65 ringtunes 77 saving sender as contact 65 sending 61 status bar indicator 33 vibrate pattern 78 microphone 1 45 MIDI files 98 MIME encoding 60 month view 82 MP3 files 98 multimedia message maximum size 64 receiving 65 sending 62 status...

Page 141: ... authentication 60 call barring 54 Internet 57 setting protection level 123 pause character 40 phone handset mode 49 switching lines 50 phone number dialling with keypad 40 inserting special characters 40 storing in contact list 70 viewing your own 40 Pictures adding frames to pictures 116 adding stamps to pictures 116 assigning to contacts 70 deleting pictures 117 drawing on pictures 115 opening ...

Page 142: ...talling files 78 roaming status bar indicator 33 status light 34 rotating pictures 115 S saving audio files 103 video files 111 screen brightness 75 described 26 wallpaper 75 security locking handset 123 password protection 123 self timer camera 107 Send key 1 sending messages 61 Notes 90 pictures 117 To Do entries 88 video clips 112 Short Message Service See text message Shortcut key 1 29 37 sett...

Page 143: ...eceiving 65 sending 61 status bar indicator 33 time alarms 92 setting 91 timer calls 54 To Do adding entries 85 alarm 86 deleting entries 87 due dates 86 finding entries 87 marking tasks as complete 87 moving entries to Calendar 88 private entries 86 sending entries 88 setting preferences 88 tones 43 touchscreen 27 transferring calls 46 troubleshooting 125 U USIM card installing 18 saving contacts...

Page 144: ...keyboard 36 voice calls 40 Voice key 1 voice message indicator 32 volume adjusting 44 key 1 44 W wait character 41 wallpaper 75 WAV files 98 Web adding bookmarks 96 cache size 97 cookies 97 downloading files 97 finding text 97 opening pages 95 saving viewed pages 96 setting preferences 97 viewing history 96 week view 82 WMA files 98 writing using stylus 35 using virtual keyboard 36 6809454A45 ...

Reviews: