background image

Operating and installation instructions

Built-in food warming drawer
ESW 47.2
ESW 48.2

To avoid the risk of accidents or
damage to the appliance it is

essential

to read these

instructions before it is installed
and used for the first time.

M.-Nr. 07 462 960

en - GB

Summary of Contents for ESW 47.2

Page 1: ...structions Built in food warming drawer ESW 47 2 ESW 48 2 To avoid the risk of accidents or damage to the appliance it is essential to read these instructions before it is installed and used for the first time M Nr 07 462 960 en GB ...

Page 2: ...sing for the first time 12 Operation 14 Functions 14 Temperature settings 15 Duration 15 Sabbath mode 17 Capacity 18 Keeping food warm 19 Settings 20 Warming crockery 21 Heating up times 21 Other uses 22 Cleaning and care 25 General notes 25 Appliance front and interior 25 Anti slip mat 26 Problem solving guide 27 Optional accessories 29 Contents 2 ...

Page 3: ...ilding in dimensions ESW 47 2 31 Building in dimensions ESW 48 2 33 Installing the appliance 34 Aligning the front of the food warming drawer 35 Fixing the furniture front 36 Electrical connection 38 After sales service data plate 40 Contents 3 ...

Page 4: ...Front view aControl panel bAnti slip mat cAir vents dRack Guide to the appliance 4 ...

Page 5: ...lecting the function Temp For setting the temperature Timer For setting the duration Displays Functions For warming cups and glasses H For warming plates and dishes 2 For keeping food warm Temperature Duration 1h 1 hour 2h 2 hours 3h 3 hours 4h 4 hours Guide to the appliance 5 ...

Page 6: ... accessories supplied with your drawer as well as a range of optional ones are available to order see Optional accessories Rack For increasing the loading area Anti slip mat For keeping crockery secure Guide to the appliance 6 ...

Page 7: ... capabilities or lack of experience or knowledge unless they are supervised whilst using it or have been shown how to use it correctly by a person responsible for their safety Safety with children This appliance is only intended for use by adults who have read these instructions The appliance is not a toy To avoid the risk of injury keep children away from it at all times and do not let them play ...

Page 8: ...pplied without a plug it must be installed and connected by a suitably qualified and competent person in strict accordance with current local and national safety regulations The manufacturer cannot be held liable for damage caused by incorrect installation or connection For safety reasons this appliance may only be used when it has been built in Never open the housing of the appliance Tampering wi...

Page 9: ...dvisable to use heat resistant pot holders or gloves when using the appliance Do not let them get damp or wet as this causes heat to transfer through the material more quickly with the risk of scalding or burning yourself The underside of the drawer gets hot when switched on Be careful not to touch it when the drawer is open Do not store any plastic containers or inflammable objects in the warming...

Page 10: ...eratures and could catch fire Do not sit or lean on the opened drawer This can damage the telescopic runners Make sure that you select a high enough temperature setting to keep food warm Bacteria can develop in the food if the temperature is too low Never use a steam cleaner to clean the appliance The steam could reach electrical components and cause a short circuit While the appliance is under gu...

Page 11: ... they are recycled Disposal of your old appliance Electrical and electronic appliances often contain materials which if handled or disposed of incorrectly could be potentially hazardous to human health and to the environment They are however essential for the correct functioning of your appliance Please do not therefore dispose of it with your household waste Please dispose of it at your local com...

Page 12: ...shing up liquid Dry using a soft cloth Wipe the appliance inside and out with a damp cloth only and then dry with a soft cloth Replace the anti slip mat and the rack if applicable in the drawer Then heat the empty drawer for at least two hours Switch the appliance on by touching On Off s sensor Touch the Menu sensor repeatedly until the 2 symbol lights up in the display Touch the Temp sensor repea...

Page 13: ...oating which may give off a slight smell when heated up for the first time The smell and any vapours will dissipate after a short time and do not indicate a faulty connection or appliance Ensure that the kitchen is well ventilated whilst the appliance is being heated up for the first time Before using for the first time 13 ...

Page 14: ...hown in the display The appliance has a fan which distributes the warm air evenly through the drawer The fan runs continuously when the drawer is operating on the cups glasses or plates dishes functions It runs at intervals on the keep food warm function The appliance can be used to keep food warm at the same time as warming plates and dishes Use the Keeping food warm function for this Take care T...

Page 15: ...re measured in the middle of the drawer when empty Duration The appliance is set for continuous operation A limited duration can be selected by touching the Timer sensor One touch for 1 hour 1h two touches for 2 hours 2h etc up to a maximum of 4 hours Continuous operation is restored by touching the sensor a fifth time Do not leave the drawer unattended for too long in continuous operation Keeping...

Page 16: ...pliance is set for continuous operation If you wish to limit the duration touch the Timer sensor until the duration in hours required lights up Close the drawer The drawer can be loaded once the necessary pre heating time has elapsed If crockery has been warmed during the pre heating phase use oven gloves to remove it Take care when opening and shutting the loaded drawer that liquids do not spill ...

Page 17: ...will turn off after about 72 hours then automatically reset to normal operation To activate Touch and hold the Timer sensor At the same time touch and hold the On Off s sensor Continue to touch both sensors until all 4 timer indicators light up at once If desired select the function and temperature To deactivate Touch and hold the On Off s sensor until all indicators go out The appliance is reset ...

Page 18: ...6 cm 1 serving dish C 13 cm or alternatively 40 dinner plates C 26 cm 60 soup bowls C 23 cm 45 soup cups C 10 cm 20 dinner plates C 26 cm 20 soup bowls C 23 cm 20 pizza plates C 36 cm 142 espresso cups C 5 9 cm 90 cappuccino cups C 8 8 cm 30 punch glasses C 6 7 cm 8 5 cm high You can increase the load area by using the rack supplied with the appliance Position the rack to suit With a second rack y...

Page 19: ...ep crisp These types of food need to be kept warm at a higher temperature Cover food with a high moisture content liquids and foods which can develop a skin with aluminium foil or a plate To avoid spillages do not overfill dishes Freshly cooked food is hotter than food which is being kept warm Serve food which is being kept warm on pre heated plates Nutrients are lost when food is cooked and conti...

Page 20: ... potato Dish Yes x Roast meat Plate Yes x Meat in a sauce Dish Yes x Stew Dish Yes x Casserole Dish Yes x Vegetables in a sauce Dish Yes x Plated meal Plate Yes x Boiled potatoes Dish Yes x Gravy Dish Yes x Strudel Plate No x Bake gratin Shallow dish Yes x Fish fingers Pan No x Breaded escalope Pan No x Pizza Plate No x Pancakes potato pancakes Plate No x x Depending on model Keeping food warm 20 ...

Page 21: ...C is not exceeded Heated crockery cools down very quickly Do not remove it from the drawer until just before you need it Heating up times Various factors will affect the heating up times The material and thickness of the crockery The amount of crockery How the crockery is arranged The temperature setting It is therefore not possible to state precise times However the following information can be u...

Page 22: ...Proving dough Bowl Yes with plate x 0 30 Making yoghurt Yoghurt jars with lid x 5 00 Defrosting berries Bowl dish No x 0 50 Defrosting frozen vegetables Bowl No x 1 00 Dissolving gelatine Dish max 7 cm deep No x x 0 15 Rice pudding to finish off the cooking process Pan with lid x x 0 40 Melting chocolate Bowl No x x 0 20 Depending on model Other uses 22 ...

Page 23: ...oking result The higher the core temperature the drier the meat will become At a lower core temperature the meat retains its succulence It is essential to maintain a constant temperature A meat thermometer can be used to monitor the core temperature To cook meat in the food warming drawer Pre heat the warming drawer Sear the meat on all sides over a high heat on the hob The heat closes the pores o...

Page 24: ...container Roast beef Rare Roasting pan Roast beef Medium to well done Roasting pan Pork fillet Medium Plate Pork fillet Well done Roasting pan Rack of lamb Medium Plate Rack of lamb Well done Roasting pan Duck breasts Medium Plate Duck breasts Well done Roasting pan Other uses 24 ...

Page 25: ...iance Appliance front and interior Remove any soiling immediately If not it might become impossible to remove and could cause the external surfaces to alter or discolour Clean the front using a Miele microfibre E cloth or with a clean sponge and a solution of hot water and washing up liquid Then dry with a soft cloth The external surfaces of this appliance are all susceptible to scratching Scratch...

Page 26: ...r cleaner oven sprays glass cleaning agents hard abrasive sponges and brushes e g pot scourers sharp metal scrapers Anti slip mat The anti slip mat can be removed for cleaning Clean the anti slip mat by hand only using warm water and a little washing up liquid and then dry with a cloth Do not put the anti slip mat back into the drawer until it is completely dry Do not wash the anti slip mat in a d...

Page 27: ...e held liable for unauthorised work What to do if the appliance does not heat up Check whether the appliance is correctly plugged in at the mains socket and switched on the mains fuse has tripped If the mains fuse has tripped call an electrician or the Miele Service Department the food is not hot enough Check whether the correct temperature setting has been selected the vents have been covered up ...

Page 28: ... to heat up for example The material and thickness of the crockery The amount of crockery How the crockery is arranged The temperature setting the crockery is too hot Check that the correct temperature has been set a noise can be heard when the drawer is being used This is not a fault The noise is caused by the fan which distributes the heat evenly through the drawer The fan works at intervals on ...

Page 29: ...bre cloth Removes finger marks and light soiling A range of Miele branded accessories and cleaning products is available for your appliance from your local retailer the Miele Spare Parts Department or via the internet on www miele shop com See the back cover of this booklet for contact details Optional accessories 29 ...

Page 30: ...od warming drawer in combination with another suitable appliance the food warming drawer must be fitted above a fixed interim shelf in the housing unit to ensure that the housing unit can suport both its weight and that of the other appliance As the combination appliance is placed directly on top of the food warming drawer once it is built in an interim shelf is not necessary between the two appli...

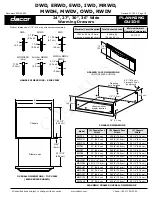
Page 31: ...Installation with an oven Side view with oven Building in dimensions ESW 47 2 31 ...

Page 32: ...Solo installation Side view aAn interim fixed shelf is required above the appliance for solo installation Building in dimensions ESW 47 2 32 ...

Page 33: ...Installation with an oven Side view with oven Building in dimensions ESW 48 2 33 ...

Page 34: ...nce to function correctly To avoid the risk of injury wear protective gloves when installing the appliance in its housing unit Push the appliance into the housing unit and align it Open the drawer and use the 4 screws supplied to secure the appliance to the side walls of the housing unit Installing the appliance 34 ...

Page 35: ... to damage or pull on the cable and place it on the floor of the drawer Loosen the 2 screws b on the inside of the drawer front Align the drawer front Tighten the screws on the inside of the drawer front Carefully replace the control panel taking care not to damage or pull on the cable Replace the 2 screws in the left and right side of the drawer front Aligning the front of the food warming drawer...

Page 36: ... left and right side of the drawer front Carefully lift the control panel out taking care not to damage or pull on the cable and place it on the floor of the drawer see Aligning the front of the food warming drawer Loosen the two screws inside the drawer and remove the fixing panel from the front of the drawer Pre drill the furniture front see illustration C 10 mm D 10 mm Secure the fixing panel t...

Page 37: ...ecure with 2 screws from inside the drawer front Align the drawer front Tighten the screws on the inside of the drawer front Carefully replace the control panel taking care not to damage or pull on the cable Replace the 2 screws in the left and right side of the drawer front Fixing the furniture front 37 ...

Page 38: ...antee the required safety of the appliance Please ensure that the connection data quoted on the data plate match the household mains supply This appliance is supplied with a cable and moulded plug for connection to a suitable switched socket which should be easily accessible after installation It can if necessary be connected to a suitable isolator or a double pole fused spur connection unit which...

Page 39: ... applicable to the design of plug fitted Replacement fuses should be ASTA approved to BS 1362 and have the correct rating Replacement fuses and fuse covers may be purchased from your local electrical supplier Important The electrical safety of this appliance can only be guaranteed when continuity is complete between the appliance and an effective earthing system which complies with local and natio...

Page 40: ...e our service When contacting Miele please quote the model and serial number of your appliance which are given on the data plate N B A call out charge will be applied for unnecessary service visits where the problem could have been rectified as described in these instructions Space in which to stick the extra data plate supplied with the appliance Ensure that the model number is the same as the on...

Page 41: ...41 ...

Page 42: ...42 ...

Page 43: ...43 ...

Page 44: ...Alteration rights reserved 3109 M Nr 07 462 960 02 ...

Reviews: