background image

Operating and installation instructions

Cooker hood
DA 3360

To avoid the risk of accidents
or damage to this appliance,
it is

essential

to read these

instructions before it is installed
and used for the first time.

M.-Nr. 09 190 840

en - GB

Summary of Contents for DA 3360

Page 1: ...stallation instructions Cooker hood DA 3360 To avoid the risk of accidents or damage to this appliance it is essential to read these instructions before it is installed and used for the first time M Nr 09 190 840 en GB ...

Page 2: ...vice 18 Appliance dimensions 19 Installation 20 Installation accessories 20 Positioning the appliance in the wall housing unit 23 Attaching the lightshield 26 Weight of a lightshield matching existing furniture 26 Aligning the deflector plate 27 Fitting the grease filter 27 Vent ducting 28 Setting up for recirculation mode 29 Electrical connection 29 Connection for air extraction 30 Condensate tra...

Page 3: ...f the reach of babies and young children Danger of suffocation Disposal of your old appliance Electrical and electronic appliances often contain valuable materials They also contain materials which if handled or disposed of incorrectly could be potentially hazardous to human health and to the environment They are however essential for the correct functioning of your appliance Please do not therefo...

Page 4: ...pported by the manufacturer and could be dangerous Miele cannot be held liable for damage resulting from incorrect or improper use or operation The cooker hood is not intended for outdoor use This appliance can only be used by people with reduced physical sensory or mental capabilities or lack of experience or knowledge if they are supervised whilst using it or have been shown how to use it in a s...

Page 5: ...ty reasons this appliance may only be used when it has been fully installed Only open the housing as described in the instructions given in the installation sheet and in the Cleaning and care section of this booklet Under no circumstances should any other parts of the housing be opened Tampering with electrical connections or components and mechanical parts is highly dangerous to the user and can ...

Page 6: ...ng danger of toxic fumes Great care should be taken when using the cooker hood at the same time and in the same room or area of the house as another heating appliance which depends on the air in the room Such appliances include gas oil wood or coal fired boilers and heaters continuous flow or other water heaters gas hobs cookers or ovens which draw air in from the room and duct exhaust gases out t...

Page 7: ... wall vents or by other technical measures such as ensuring that the cooker hood can only be switched on when the heating appliance is switched off or vice versa A ventilation brick alone is not generally sufficient to ensure safe ventilation The overall ventilation condition of the dwelling must be taken into account If in any doubt the advice of a competent builder or for gas a qualified gas fit...

Page 8: ...herwise condensation may collect in the hood which could cause corrosion When cooking with oil or fat chip pans and deep fat fryers etc do not leave the pans unattended Never leave an open grill unattended when grilling Overheated oil and fat can ignite and could set the cooker hood on fire Do not use the cooker hood without the filters in place This way you will avoid the risk of grease and dirt ...

Page 9: ...ld onto the cooker hood Safety regulations prohibit the fitting of a cooker hood over solid fuel stoves All ducting pipework and fittings must be of non flammable material These can be obtained from the Miele Spare Parts department or from builders merchants The appliance must not be connected to a chimney or vent flue which is in use Neither should it be connected to ducting which ventilates room...

Page 10: ...Guide to the appliance Operation 10 ...

Page 11: ...cooking vapours levels 1 to 3 are usually sufficient for normal cooking For short periods of strong vapours and cooking odours e g whilst searing meat select the Intensive setting IS Pull the deflector plate out to its full extent to gain maximum extraction whilst avoiding excessive noise levels It is advisable to run the fan for a few minutes after cooking has finished to neutralise any lingering...

Page 12: ...ooker hood is switched on the non return flap opens for the cooking vapours to be blown directly outside air recirculation air recirculation conversion kit required The air is drawn in and cleaned first by the grease filter and then by a charcoal filter The cleaned air is then recirculated back into the kitchen Charcoal filters are available to order through your Dealer Chartered Agent or the Miel...

Page 13: ...urfaces dry using a soft cloth Do not use too much water when cleaning the controls Water could penetrate into the electronics and cause damage Avoid cleaning agents containing soda acids chlorides or solvents abrasive cleaning agents e g powder cleaners or cream cleaners and abrasive sponges as well as pot scourers or sponges which have been used previously with abrasive cleaning agents These wil...

Page 14: ...cooker hood To avoid a build up of fat it should be cleaned every 3 4 weeks on average but sooner if necessary An oversaturated filter is a fire hazard When removing the grease filter do not tilt it downwards at an angle Push the deflector plate in Then grip the front of the deflector plate and hold the grease filter securely Whilst holding the grease filter pull the deflector plate out as illustr...

Page 15: ... dishwasher detergent Depending on dishwasher detergent used cleaning the filters in a dishwasher can cause permanent discolouration to the surface However this will not affect the functioning of the filters in any way After cleaning leave the filter to dry for a while on an absorbent surface before putting it back in place When removing the filter for cleaning also clean off any residues of oil o...

Page 16: ...grease filter Replacement charcoal filters can be obtained from your dealer Miele or via the internet at www miele shop com See back cover for contact details and Technical data for type and reference number Follow the instructions supplied with the charcoal filter when fitting it Replace the charcoal filter at least every six months or more frequently if necessary Used charcoal filters can be dis...

Page 17: ... the manufacturer s instructions Remove the charcoal filter if the cooker hood is being used in recirculation mode Before any cleaning or maintenance work disconnect the cooker hood from the mains supply Push down the lighting unit slightly via the opening in the safety panel The halogen lamp is now accessible to be unscrewed anti clockwise Replace it with a new halogen lamp specification GU GZ 10...

Page 18: ... removed For the U K Please note that telephone calls may be monitored and recorded for training purposes N B A call out charge will be applied for service visits where the problem could have been resolved as described in these instructions Guarantee For information on the appliance guarantee specific to your country please contact Miele See back cover for contact details In the U K your appliance...

Page 19: ...uires installation kit DUU 151 Safety distance between hob and cooker hood The following distance must be maintained between the top of the cooker hob and the bottom of the cooker hood unless a greater distance is specified by the manufacturer of the cooker or hob above electric hobs and cookers 450 mm above electric barbecue grilles and deep fat fryers 650 mm above gas hobs and cookers 650 mm If ...

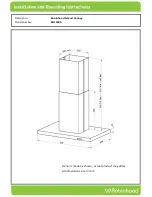
Page 20: ...Installation accessories Installation 20 ...

Page 21: ...xible aluminium hose with clips this is not included but is available as an optional extra see Technical Data gDML 400 installation kit optional accessory contains hinging and screws for fixing a lightshield to match kitchen furniture lightshield not supplied with cooker hood 12 screws 4 x 15 mm for securing the cooker hood into the wall unit 8 screws M4 x 12 mm for securing the cooker hood to the...

Page 22: ...Installation 22 ...

Page 23: ...is installation requires dimension b for the front panel plus 5 mm for the DML 400 fixing kit to be added to the shelf dimension 95 mm 5 mm dimension b The remaining installation gap must be at least 180 mm in depth If it is less than 180 mm position the appliance further back and reduce measurement T accordingly The position of the deflector plate can be adjusted in depth by a maximum of 35 mm at...

Page 24: ...ned for 16 and 19 mm thick carcase sides Orientate the bracket so that the vertical depth matches the thickness of the panel as shown Do not remove the protective film between the deflector plate and the casing until the hood has been placed in the housing unit Installation of the cooker hood is carried out without the grease filter fitted in position If the grease filter has already been fitted t...

Page 25: ...ooker hood Undoing the screws on the left and right inside the housing releases the spring mounts allowing the appliance to be removed from the unit Push the cooker hood back against the spacer strip Pull out the deflector plate Secure the appliance to the brackets using two screws on each side Installation 25 ...

Page 26: ... spacer strip to the back of the appliance from behind using 4 plastic rivets as shown Attaching the lightshield Attach the lightshield if using A DML 400 installation kit available as an optional accessory is required for this Follow the installation instructions supplied Weight of a lightshield matching existing furniture The lightshield must not exceed 1300 g in weight This applies to lightshie...

Page 27: ...grease filter Remove the protective strip around the edge of the grease filter Fit the grease filter To do this pull the deflector plate out Turn the grease filter so that the red plastic guides are at the front and facing upwards Fit the grease filter in the front of the deflector plate press it upwards and push it in together with the deflector plate It will slide onto the fixing pins at the bac...

Page 28: ...ecure the exhaust socket supplied to the exhaust ducting with hose clips If using C 125 mm ducting fit the reducing collar into the exhaust socket and secure the exhaust ducting to the reducing collar with a hose clip See Connection for air extraction Place the exhaust ducting on the fan connection for the cooker hood See Connection for air extraction for further instructions on fitting the ductin...

Page 29: ...cal data Fit the conversion kit as described in the installation instructions supplied with the kit Make sure that the slats in the exhaust grille point towards the centre of the room and not towards a wall or the ceiling A non return flap is not used in recirculation mode Fit the charcoal filter see Cleaning and care Electrical connection Refer to the notes in Electrical connection and Warning an...

Page 30: ...t connection All ducting pipework and fittings must be of non flammable materials The exhaust ducting should be as short and straight as possible Only use wide radius bends The exhaust ducting should not be kinked or compressed Ensure that all connections are strong and airtight Where ducting is horizontal it must be laid to slope away at at least 1 cm per metre This is to ensure that condensate c...

Page 31: ...d to collect and evaporate any condensate which may occur Condensate traps are available for C 125 mm or C 150 mm ducting When installing a condensate trap ensure that it is positioned vertically and if possible directly above the exhaust connection The arrow on the housing indicates the direction of air flow Connection for air extraction 31 ...

Page 32: ...side e g traffic noise For this reason the silencer must be positioned as close as possible to where the ducting leaves the building a in recirculation mode The silencer needs to be positioned between the fan and the exhaust grille b Ensure there is adequate space for fitting it In all modes of operation the most effective noise reductions are achieved if two silencers are fitted in the system Con...

Page 33: ...ppliance should be made via a suitable isolator or a double pole fused spur connection unit which complies with national and local safety regulations and the On Off switch should be easily accessible after the appliance has been built in When switched off there must be an all pole contact gap of 3 mm in the switch including switch fuses and relays according to EN 60335 If the switch is not accessi...

Page 34: ...1044 Electrical cable length 1 5 m Weight 12 kg Fan performance Extraction power according to EN 61591 Extraction system ø 150 mm Level I 150 m3 h Level II 240 m3 h Level III 320 m3 h Intensive Setting 430 m3 h Recirculation with charcoal filter Level I 80 m3 h Level II 150 m3 h Level III 200 m3 h Intensive Setting 300 m3 h Optional accessories for recirculation mode Conversion Kit DUU 151 Miele c...

Page 35: ...35 ...

Page 36: ...Alteration rights reserved 1413 M Nr 09 190 840 04 ...

Reviews: