background image

Fitting and installation instructions

Miele

|

home

Con

|

ctivity

XKM 2100 KM

M.-Nr. 07 828 230

en - GB

Summary of Contents for Conn@ctivity XKM 2000 KM

Page 1: ...Fitting and installation instructions Miele home Con ctivity XKM 2100 KM M Nr 07 828 230 en GB ...

Page 2: ...ele home First installation 17 a First installation of the InfoControl unit and signing on of the hob 17 b First installation of the SuperVision appliance and signing on of the hob 19 c First installation of the InfoControl unit and SuperVision appliance signing on of the hob 21 Miele home Installation at a later date 23 f Signing on the hob to the InfoControl unit at a later date 23 g Signing on ...

Page 3: ... qualified electrician if in any doubt The electrical safety of this appliance can only be guaranteed when continuity is complete between it and an effective earthing system which complies with current local and national safety regulations It is most important that this basic safety requirement is present and regularly tested and where there is any doubt the household wiring system should be inspe...

Page 4: ... the mains electricity supply While the appliance is under guarantee repairs should only be undertaken by a service technician authorised by the manufacturer Otherwise the guarantee is invalidated Do not connect the appliance to the mains electricity supply by an extension lead or a multi socket unit These do not guarantee the required safety of the appliance e g danger of overheating This applian...

Page 5: ...vided for all poles When switched off there must be an all pole contact gap of 3 mm in the switch including switch fuses and relays See data plate for connection details Ensure that these match the mains supply Ensure power is not supplied to the appliance until after installation work has been carried out The appliance must only be operated when built in This is to ensure that all electrical part...

Page 6: ...electrical cable must only be replaced by a suitable qualified electrician in accordance with local and national safety regulations Connection data is quoted on the data plate Important UK The wires in the mains lead are coloured in accordance with the following code Green yellow earth Blue neutral Brown live WARNING THIS APPLIANCE MUST BE EARTHED The earth lead must be connected to the connection...

Page 7: ...haft with communication module fitted bData line cConnection point for mains connection cable 1 connection cable with plug 1 connection cable with wire end ferrules Accessories supplied Adapter Description of the appliance 7 a b c ...

Page 8: ...line The connection point for the data line is located underneath the hob The following illustrations are examples The connection position may vary Type 1 Type 2 Type 3 Connecting the communication module 8 ...

Page 9: ...he cover from the data line connection point see illustration Connecting the data line Type 1 and Type 2 Connect the data line Use the adapter supplied for connection types 1 and 2 Replace the cover and secure with the screws Type 1 and Type 2 connections Connect the Miele home connection box to the mains supply The Miele home connection box must not be screwed to the underside of the hob or to an...

Page 10: ... hob must be fitted with communication module XKM 2100 KM b The hob transmits information about its operating status to the cooker hood via the household power supply Powerline c The XKM 2000 DA a is fitted inside the cooker hood and will get its power supply from the cooker hood The XKM 2100 KM b has its own electrical connection to the mains independent from the hob and needs to be connected to ...

Page 11: ...r signing on the cooker hood must be completed before the hob can be signed on Start the signing on process on the hob Induction hob KM 59 see KM 59 All other hobs please refer to the Con ctivity Miele home section in the operating instruction manual for your hob If the signing on process is unsuccessful repeat the procedure If this does not solve the problem call the Miele Service Department Con ...

Page 12: ...ing on the cooker hood and the hob Sign on the cooker hood as an Installation at a later date appliance Sign on the hob as an Installation at a later date appliance see chart in Miele home Installation options To integrate Con ctivity into an existing Miele home system Sign on the cooker hood Sign on the hob as an Installation at a later date appliance see chart in Miele home Installation options ...

Page 13: ...can use the master appliance to call up information about communication enabled appliances such as programme status or fault messages at any time Miele home system components aCommunication module bCommunication enabled appliances examples c230 volt power supply Powerline dSuperVision appliance e g an oven used as a static master appliance eInfoControl unit base station and mobile receiver as a mo...

Page 14: ...Microwave combi ovens Dishwashers Steam ovens Combi steam ovens Receives and displays data from up to 11 signed on appliances The display can show information such as programme duration and status fault messages or operating tips for the following communication enabled appliances washing machines tumble dryers dishwashers fridges freezers fridge freezers A wine storage unit will be shown as a frid...

Page 15: ...nce or InfoControl unit of an existing Miele home system The appliances remain signed on even if they are switched off The SuperVision appliance must be fitted with Communication module XKM 2000 SV The First installation of the Miele home system only needs to be carried out once The appliances remain signed on even if the SuperVision appliance is switched off The First installation of the Miele ho...

Page 16: ...t installed the Miele home system into your home and would like to connect it to the household power lines for the first time and also sign on communication enabled appliances to the system You have already installed the Miele home system into your home and would now like to sign on a communication enabled appliance a First installation of the InfoControl unit and signing on of the hob d Does not ...

Page 17: ...base station Activation can take up to 2 minutes Mieleqhome Mieleqhome activating activation Please wait complete O O O F F F F F FM O O O O O O O O O Press the OK button Select that installation has been successful by pressing the button on the base station If acitvation is not successful repeat the procedure If this does not solve the problem call the Miele Service Department Signing on the hob ...

Page 18: ...rol unit The InfoControl will register all the appliances being received one after the other Signing on Please wait O O O F F F F F FM If signing on is successful the InfoControl display will show Sign on to BackA Hob Searching successful appliances O O O O O O O O O Appl search H Select Back by pressing the button If you do not press the button to confirm the display will go out after 10 minutes ...

Page 19: ...other hobs please refer to the Con ctivity Miele home section in the operating instruction manual for your hob During the hob signing on process you will be asked to confirm the following on the SuperVision appliance Mieleqhome SuperVision After starting to sign all appliances on press the OK button Confirm with OK The SuperVision appliance will register all the appliances being received one after...

Page 20: ...perVision Sign on successful Confirm that signing on has been successful with OK Confirm the signing on process on the hob If the signing on process is unsuccessful repeat the procedure If this does not solve the problem call the Miele Service Department Miele home First installation 20 ...

Page 21: ...y Miele home section in the operating instruction manual for your hob Now sign on the SuperVision appliance Mieleqhome Installation Install SuperVision for the first time Sign SuperVision on to Mieleqhome Sign appliance without SuperVision on Select the Sign SuperVision on to Miele home option from the Settings Miele home menu Mieleqhome SuperVison Sign SuperVision on Confirm with OK During the si...

Page 22: ... SuperVision Sign on successful Confirm with OK the InfoControl display will show Sign on to BackA Hob Searching successful appliances O O O O O O O O O Appl search H Select Back by pressing the button If you do not press the button to confirm the display will go out after 10 minutes Confirm the signing on process on the hob If the signing on process is unsuccessful repeat the procedure If this do...

Page 23: ...pl search H Select Sign on appliances with the button and confirm your selection by pressing the button Mieleqhome Start signing on appliances Start the signing on process on the hob Induction hob KM 59 see KM 59 All other hobs please refer to the Con ctivity Miele home section in the operating instruction manual for your hob During the hob signing on process you will be asked to confirm the follo...

Page 24: ...uccessful appliances O O O O O O O O O Appl search H Select Back by pressing the button If you do not press the button to confirm the display will go out after 10 minutes Confirm the signing on process on the hob If the signing on process is unsuccessful repeat the procedure If this does not solve the problem call the Miele Service Department Miele home Installation at a later date 24 ...

Page 25: ...g on the SuperVision appliance Mieleqhome SuperVision After starting to sign all appliances on press the OK button Confirm with OK The SuperVision appliance will register the hob Mieleqhome SuperVision Signing on Please wait O O O O F F F F F F F F FM If signing on is successful the SuperVision appliance display will show Mieleqhome SuperVision Sign on successful Confirm that signing on has been s...

Page 26: ... operating instructions for the relevant appliance Carry out the signing off process on the hob Induction hob KM 59 see KM 59 All other hobs please refer to the Con ctivity Miele home section in the operating instruction manual for your hob Confirm the signing off process on the Miele home master appliance see the operating instructions for the appropriate appliance Signing off the hob 26 ...

Page 27: ...y 0 hobs with 9 17 power levels or 10 hobs with 12 23 power levels On hobs with 4 or more cooking zones touch the front right sensor and on hobs with 3 cooking zones touch the rear right sensor until a 2 appears in the display The signing on process will start and a rotating will appear in the display The signing on process will take a few minutes As soon as it has been completed successfully the ...

Page 28: ...nes touch the left sensor until the following shows in the display 0 hobs with 9 17 power levels or 10 hobs with 12 23 power levels On hobs with 4 or more cooking zones touch the front right sensor and on hobs with 3 cooking zones touch the rear right sensor until a 1 appears in the display The signing off process will start and a rotating will appear in the display The signing off process will ta...

Page 29: ...n the hob Repeat the signing on procedure on the InfoControl unit and on the hob see Signing on the hob to the InfoControl unit at a later date There was a problem during activation Repeat the signing on procedure Other problems Problem Cause Remedy The hob does not appear in the list of signed on appliances The signing on procedure has not been carried out on the hob Repeat the signing on procedu...

Page 30: ...ances There was a problem during the signing off procedure Repeat the signing off procedure on the hob The signing off on the master appliance was successful but the hob still appears in the list of signed on appliances The signing off procedure has not been carried out on the hob Carry out the signing off procedure on the hob as well The signing off procedure on the hob has been unsuccessful Ther...

Page 31: ...31 ...

Page 32: ...Alteration rights reserved 3212 M Nr 07 828 230 01 ...
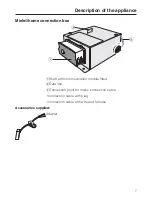
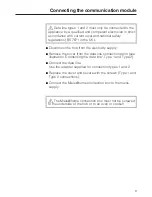
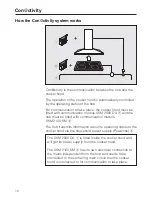
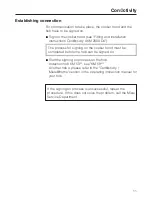
Reviews: