background image

INSTRUCTION MANUAL

MANUAL DE INSTRUCCIONES

Cordless Impact Driver

Atornillador de Impacto 

Inalámbrico

XDT15 

IMPORTANT:

 Read Before Using.

IMPORTANTE:

 Lea antes de usar.

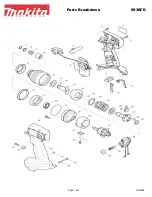
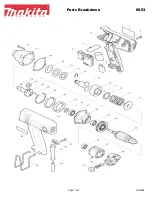
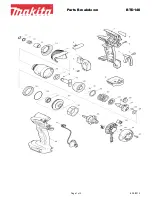
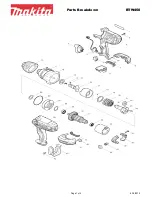
Summary of Contents for XDT15

Page 1: ...INSTRUCTION MANUAL MANUAL DE INSTRUCCIONES Cordless Impact Driver Atornillador de Impacto Inalámbrico XDT15 IMPORTANT Read Before Using IMPORTANTE Lea antes de usar ...

Page 2: ...wer tools Unmodified plugs and matching outlets will reduce risk of electric shock 2 Avoid body contact with earthed or grounded surfaces such as pipes radiators ranges and refrigerators There is an increased risk of elec tric shock if your body is earthed or grounded 3 Do not expose power tools to rain or wet con ditions Water entering a power tool will increase the risk of electric shock 4 Do no...

Page 3: ...f fire when used with another battery pack 2 Use power tools only with specifically desig nated battery packs Use of any other battery packs may create a risk of injury and fire 3 When battery pack is not in use keep it away from other metal objects like paper clips coins keys nails screws or other small metal objects that can make a connection from one terminal to another Shorting the battery ter...

Page 4: ...a tool and charger Tips for maintaining maximum battery life 1 Charge the battery cartridge before completely discharged Always stop tool operation and charge the battery cartridge when you notice less tool power 2 Never recharge a fully charged battery car tridge Overcharging shortens the battery service life 3 Charge the battery cartridge with room tem perature at 10 C 40 C 50 F 104 F Let a hot ...

Page 5: ... indication In this situation turn the tool off and stop the application that caused the tool to become overloaded Then turn the tool on to restart Overheat protection When the tool battery is overheated the tool stops automatically In this situation let the tool battery cool before turning the tool on again Overdischarge protection When the battery capacity is not enough the tool stops automatica...

Page 6: ... the light flashes for one minute and then the LED display goes off In this case cool down the tool before operating again NOTE Use a dry cloth to wipe the dirt off the lens of the lamp Be careful not to scratch the lens of lamp or it may lower the illumination Reversing switch action 1 A B 1 Reversing switch lever CAUTION Always check the direction of rotation before operation CAUTION Use the rev...

Page 7: ...n Hard 3 900 min 1 min Tightening when force and speed are desired Tightening wood screws tightening bolts Soft 1 600 min 1 min Tightening with less force to avoid screw thread breakage Tightening sash screws tight ening small screws such as M6 A mode 3 900 min 1 min Tightening screws with better control Tightening long screws NOTE A mode is available only when the tool rotates clockwise When rota...

Page 8: ...t return to its original position and the driver bit will not be secured In this case try re inserting the bit according to the instruc tions above NOTE After inserting the driver bit make sure that it is firmly secured If it comes out do not use it Installing hook 3 2 1 1 Groove 2 Hook 3 Screw The hook is convenient for temporarily hanging the tool This can be installed on either side of the tool...

Page 9: ... Before starting your job always perform a test operation to determine the proper fastening time for your screw The fastening torque is affected by a wide variety of factors including the following After fastening always check the torque with a torque wrench 1 When the battery cartridge is discharged almost completely voltage will drop and the fastening torque will be reduced 2 Driver bit or socke...

Page 10: ...t prepaid to one of Makita s Factory or Authorized Service Centers If inspection shows the trouble is caused by defective workmanship or material Makita will repair or at our option replace without charge This Warranty does not apply where repairs have been made or attempted by others repairs are required because of normal wear and tear the tool has been abused misused or improperly maintained alt...

Page 11: ...enadas son propensas a accidentes 2 No utilice las herramientas eléctricas en atmósferas explosivas tal como en la presen cia de líquidos gases o polvo inflamables Las herramientas eléctricas crean chispas que pueden prender fuego al polvo o los humos 3 Mantenga a los niños y curiosos alejados mientras utiliza una herramienta eléctrica Las distracciones le pueden hacer perder el control Seguridad ...

Page 12: ...rios o guar dar las herramientas eléctricas Dichas medidas de seguridad preventivas reducen el riesgo de que la herramienta se inicie accidentalmente 4 Guarde la herramienta eléctrica que no use fuera del alcance de los niños y no permita que las personas que no están familiarizadas con ella o con las instrucciones la operen Las herramientas eléctricas son peligrosas en manos de personas que no sa...

Page 13: ...ería al agua o la lluvia Un cortocircuito en la batería puede causar un flujo grande de corriente sobrecalentamiento posibles quemaduras e incluso una descompostura 6 No guarde la herramienta ni el cartucho de batería en lugares donde la temperatura pueda alcanzar o exceder los 50 C 122 F 7 Nunca incinere el cartucho de batería incluso en el caso de que esté dañado seriamente o ya no sirva en abso...

Page 14: ...com pletamente el cartucho de batería hasta que el indicador rojo no pueda verse Si no podría accidentalmente salirse de la herramienta y caer al suelo causando una lesión a usted o alguien a su alrededor PRECAUCIÓN No instale el cartucho de batería a la fuerza Si el cartucho no se desliza al interior fácilmente se debe a que no está siendo insertado correctamente Indicación de la capacidad restan...

Page 15: ...em pre y cerciórese de que el gatillo interruptor se acciona debidamente y que vuelve a la posición OFF apagado cuando lo suelta Para poner en marcha la herramienta simplemente apriete el gatillo interruptor La velocidad de la herra mienta aumenta incrementando la presión en el gatillo Para detenerla suelte el gatillo NOTA La herramienta se detiene automáticamente si continúa jalando el gatillo in...

Page 16: ...herramienta ponga siempre la palanca del con mutador de inversión en la posición neutral Esta herramienta tiene un conmutador de inversión para cambiar la dirección de rotación Presione la palanca del conmutador de inversión desde el lado A para una rotación en sentido de las manecillas del reloj o desde el lado B para una rotación en sentido inverso al de las manecillas del reloj Cuando la palanc...

Page 17: ...l grado de fuerza del impacto no puede cambiarse ENSAMBLADO PRECAUCIÓN Asegúrese siempre de que la herramienta esté apagada y el cartucho de batería haya sido extraído antes de realizar cualquier trabajo en la misma Instalación o extracción de la punta de destornillador punta de atornillar Accesorio opcional 12 mm 15 32 9 mm 3 8 Utilice únicamente la punta de destornillador punta de atornillar que...

Page 18: ...0 N m 29 ft lbs 20 N m 14 ft lbs 12 mm 1 2 14 mm 9 16 10 mm 3 8 12 mm 1 2 14 mm 9 16 10 mm 3 8 8 mm 5 16 8 mm 5 16 3 1 Tiempo de apriete segundos 2 Torsión de apriete 3 Torsión de apriete apropiada correspondiente al diámetro de cada perno Perno de alta resistencia 3 2 1 2 0 1 0 0 3 0 10 mm 3 8 12 mm 1 2 12 mm 1 2 8 mm 5 16 8 mm 5 16 10 mm 3 8 N m ft lbs 100 N m 72 ft lbs 120 N m 87 ft lbs 80 N m ...

Page 19: ...ados para utilizarse con su herra mienta Makita especificada en este manual El empleo de cualquier otro accesorio o aditamento puede conllevar el riesgo de lesiones personales Utilice los accesorios o aditamentos solamente para su fin establecido Si necesita cualquier ayuda para más detalles en relación con estos accesorios pregunte a su centro de servicio local Makita Puntas de destornillador Pun...

Page 20: ...ados por el lijado aserrado esmerilado taladrado y otras actividades de la construcción contienen sustancias químicas reconocidas por el Estado de California como causantes de cáncer defectos de nacimiento y otros peligros de reproducción Algunos ejemplos de estos productos químicos son plomo de pinturas a base de plomo sílice cristalino de ladrillos y cemento y otros productos de albañilería y ar...

Page 21: ...iende su signifi cado antes de usarla Fast Charger Chargeur rapide Cargador rápido Ready to charge Prêt à recharger Preparación para la carga Charging En charge Cargando Charging complete Recharge terminée Completada la carga Delay charge Battery cooling or too cold battery Charge différée Batterie en cours de refroidissement ou batterie trop froide Retraso de la carga La batería se está enfriando...

Page 22: ...atteries Ne jamais court circuiter les bornes d une batterie No provoque un cortocircuito en las baterías IMPORTANT Read Before Using IMPORTANT Lire ce qui suit avant d utiliser cet outil IMPORTANTE Leer antes de usar ...

Page 23: ...not play with the battery charger 15 Do not charge battery cartridge when room temperature is BELOW 10 C 50 F or ABOVE 40 C 104 F When the battery temperature is under 0 C 32 F charging may not start 16 Do not attempt to use a step up transformer an engine generator or DC power receptacle 17 Do not allow anything to cover or clog the charger vents Charging 1 Plug the battery charger into the prope...

Page 24: ... to enable the battery to prove its own performance Sound of cooling air comes out during cooling which means no trouble on the charger Yellow light will flash for warning in the following cases Trouble on cooling fan Incomplete cool down of battery such as being clogged with dust The battery can be charged in spite of the yellow warning light But the charging time will be longer than usual in thi...

Page 25: ...ter tout danger 12 Évitez d utiliser ou démonter le chargeur après qu il ait reçu un choc violent ait été échappé ou ait subi quelque dommage que ce soit Portez le chez un réparateur qualifié Une utilisation ou un remontage maladroit peut entraîner un risque de choc électrique ou d incendie 13 Ce chargeur ne doit pas être utilisé sans supervision par les jeunes enfants et par les personnes handica...

Page 26: ...ature de la batterie est supérieure à environ 70 C deux témoins de charge peuvent clignoter en rouge tandis qu à une température d environ 50 C à 70 C un seul témoin clignote en rouge Si le témoin de charge clignote alternativement en vert et en rouge la charge n est pas possible Les bornes du chargeur ou de la batterie sont alors bloquées par la poussière ou bien la batterie est soit usée soit en...

Page 27: ... charge d entretien Tension 9 6 V 12 V 14 4 V Capacité Ah Temps de charge en minutes Nombre de cellules 8 10 12 Cartouche de batterie au Ni MH 1 7 20 BH9020A 2 0 20 BH1220 C BH1420 2 0 15 2 7 20 BH9033A 3 3 30 BH1233 C BH1433 3 3 22 Tension 14 4 V 18 V 14 4 V 18 V Temps de charge en minutes Nombre de cellules 4 5 8 10 Cartouche de batterie au Li ion BL1415 BL1815 15 BL1430 BL1830 22 ...

Page 28: ...a dañado de cualquier otra forma llévelo a un técnico cualificado para que se lo arregle Una utilización o montaje de sus piezas incorrecto podrá acarrear un riesgo de descarga eléctrica o incendio 13 El cargador de baterías no ha sido pensado para ser utilizado por niños pequeños ni personas frágiles sin supervisión 14 Los niños pequeños deberán ser supervisados para asegurarse de que no juegan c...

Page 29: ...tería alcance el grado al cual es posible cargar Si la temperatura de la batería es de más de aproxima damente 70 C podrán parpadear dos luces de carga en color rojo y si es de aproximadamente 50 C 70 C podrá parpadear una luz de carga en rojo Si la luz de carga parpadea alternativamente en color verde y rojo la batería no se podrá cargar Los terminales del cargador o de la batería estarán obstrui...

Page 30: ... de mantenimiento Tensión 9 6 V cc 12 V cc 14 4 V cc Capacidad Ah Tiempo de carga minutos Número de celdas 8 10 12 Cartucho de batería Ni MH 1 7 Ah 20 min BH9020A 2 0 Ah 20 min BH1220 C BH1420 2 0 Ah 15 min 2 7 Ah 20 min BH9033A 3 3 Ah 30 min BH1233 C BH1433 3 3 Ah 22 min Tensión 14 4 V cc 18 V cc 14 4 V cc 18 V cc Tiempo de carga minutos Número de celdas 4 5 8 10 Cartucho de batería Li ion BL1415...

Page 31: ...11 ...

Page 32: ...Makita Corporation 3 11 8 Sumiyoshi cho Anjo Aichi 446 8502 Japan www makita com 884676H946 IDE ...

Reviews: