background image

I N S T R U C T I O N   M A N U A L

WARNING:

For your personal safety, READ and UNDERSTAND before using.
SAVE THESE INSTRUCTIONS FOR FUTURE REFERENCE.

w w w . m a k i t a t o o l s . c o m

Trimmer

1/4”
MODEL 3708FC

002000

DOUBLE
INSULATION

Summary of Contents for 3708FC

Page 1: ... T I O N M A N U A L WARNING For your personal safety READ and UNDERSTAND before using SAVE THESE INSTRUCTIONS FOR FUTURE REFERENCE w w w m a k i t a t o o l s c o m Trimmer 1 4 MODEL 3708FC 002000 DOUBLE INSULATION ...

Page 2: ...s or dust Power tools create sparks which may ignite the dust or fumes 3 Keep bystanders children and visitors away while operating a power tool Distrac tions can cause you to lose control Electrical Safety 4 Double insulated tools are equipped with a polarized plug one blade is wider than the other This plug will fit in a polarized outlet only one way If the plug does not fit fully in the outlet ...

Page 3: ...Keep proper footing and balance at all times Proper footing and balance enables better control of the tool in unexpected situations 14 Use safety equipment Always wear eye protection Dust mask non skid safety shoes hard hat or hearing protection must be used for appropriate conditions Ordinary eye or sun glasses are NOT eye protection Tool Use and Care 15 Use clamps or other practical way to secur...

Page 4: ...52 2 DO NOT let comfort or familiarity with product gained from repeated use replace strict adherence to trimmer safety rules If you use this tool unsafely or incorrectly you can suffer serious personal injury 1 Hold tool by insulated gripping surfaces when performing an operation where the cutting tool may contact hidden wiring or its own cord Contact with a live wire will make exposed metal part...

Page 5: ... tool towards the rear 15 Do not smear the tool base carelessly with thinner gasoline oil or the like They may cause cracks in the tool base 16 Draw attention to the need to use cutters of the correct shank diameter and suitable for the speed of the tool 17 Some material contains chemicals which may be toxic Take caution to prevent working dust inhalation and skin contact Follow material supplier ...

Page 6: ...Loosen the wing bolts and adjust the angle of the tool base 5 per graduation to obtain the desired cutting angle Adjusting amount of chamfering To adjust the amount of chamfering loosen the wing nuts and adjust the trimmer shoe CAUTION With the tool unplugged and switch in the OFF position rotate the collet nut on the tool several times to be sure that the bit turns freely and does not contact the...

Page 7: ...se the rotating speed is kept con stant even under load condition Soft start Soft start feature minimizes start up shock and makes the tool start smoothly Lighting up the lamps CAUTION Do not look in the light or see the source of light directly To turn on the lamp start the tool Then the lamp lights up the top of the bit To turn it off stop the tool NOTE Use a dry cloth to wipe the dirt off the l...

Page 8: ...ers and flat washers to install the trimmer shoe as shown in the figure OPERATION Turn the tool on without the bit making any contact with the workpiece and wait until the bit attains full speed Then move the tool over the workpiece surface keeping the tool base and trimmer shoe flush with the sides of the workpiece NOTE This tool can be used as a conventional trimmer when you remove the trimmer s...

Page 9: ...e cut will look as well as enable you to check dimensions CAUTION Since excessive cutting may cause overload of the motor or difficulty in controlling the tool the depth of cut should not be more than 3 mm 1 8 at a pass when cutting grooves When you wish to cut grooves more than 3 mm 1 8 deep make several passes with progressively deeper bit settings Templet guide The templet guide provides a slee...

Page 10: ...he side of the templet NOTE The workpiece will be cut a slightly different size from the templet Allow for the distance X between the router bit and the outside of the templet guide The distance X can be calculated by using the following equation Distance X outside diameter of the templet guide router bit diameter 2 Straight guide optional accessory The straight guide is effectively used for strai...

Page 11: ...re to keep it on the right side in the feed direction This will help to keep it flush with the side of the workpiece If the distance A between the side of the workpiece and the cutting position is too wide for the straight guide or if the side of the workpiece is not straight the straight guide cannot be used In this case firmly clamp a straight board to the work piece and use it as a guide agains...

Page 12: ... mm 8 11 16 For cutting circles between 70 mm 2 3 4 and 121 mm 4 3 4 in radius For cutting circles between 121 mm 4 3 4 and 221 mm 8 11 16 in radius NOTE Circles between 172 mm 6 3 4 and 186 mm 7 5 16 in radius cannot be cut using this guide 1 Wing nut 2 Wave washer 3 Flat washer 4 Guide plate 5 Straight guide 6 Centre hole 7 Bolt 1 2 3 4 5 6 7 001993 1 Wing nut 2 Wave washer 3 Flat washer 4 Guide...

Page 13: ...ing bolts and secure the tool base horizontally Install the trimmer guide on the tool base with the clamp screw A Loosen the clamp screw B and adjust the dis tance between the bit and the trimmer guide by turning the adjusting screw 1 mm 3 64 per turn At the desired dis tance tighten the clamp screw B to secure the trimmer guide in place When cutting move the tool with the guide roller riding the ...

Page 14: ... in the holders Both carbon brushes should be replaced at the same time Use only iden tical carbon brushes Use a screwdriver to remove the brush holder caps Take out the worn carbon brushes insert the new ones and secure the brush holder caps To maintain product SAFETY and RELIABILITY repairs any other maintenance or adjustment should be performed by Makita Authorized or Factory Service Centers al...

Page 15: ...o persons Only use accessory or attachment for its stated purpose If you need any assistance for more details regarding these accessories ask your local Makita service center Straight groove forming bits Edge forming bits Laminate trimming bits Straight guide assembly Trimmer guide assembly Trimmer base assembly For chamfering with straight bit Trimmer shoe Templet guide Collet cone 1 4 Wrench 10 ...

Page 16: ...Memo 16 ...
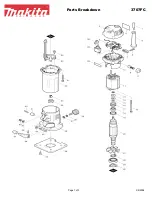
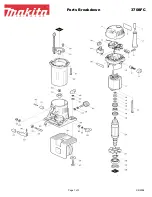
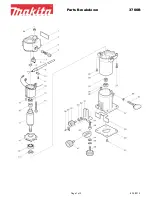
Page 17: ...17 First Class Postage Required Post Office will not deliver without proper postage Makita U S A Inc 14930 Northam Street La Mirada CA 90638 5753 Fold Cut ...

Page 18: ...ability Power Other Design Features Size Price Makita Brand 5 Any comments MAIL THIS PORTION Your answers to the following questions are appreciated BE SURE TO COMPLETE THE CUSTOMER S PORTION OF THIS FORM AND RETAIN FOR YOUR RECORDS DATE PURCHASED MODEL NO SERIAL NO INTL LAST NAME COMPANY NAME STREET ADRESS CITY STATE AGE ZIP CODE PHONE AREA CODE STATUS Married SEX M F Single MONTH DAY YEAR Under ...

Page 19: ...HIGAN 37454 Ann Arbor Trail Livonia MI 48150 313 432 1012 MINNESOTA 6427 Penn Ave South Richfield MN 55423 612 869 5199 MISSOURI 9876 Watson Road St Louis MO 63126 2221 314 909 9889 NEBRASKA 4129 S 84th St Omaha NE 68127 402 597 2925 NEVADA 3375 S Decatur Blvd Suites 22 24 Las Vegas NV 89102 702 368 4277 NEW JERSEY 251 Herrod Blvd Dayton NJ 08810 1539 609 655 1212 NEW MEXICO 5805 Menaul Blvd NE Al...

Page 20: ...e of Makita s Factory or Authorized Service Centers If inspection shows the trouble is caused by defective workmanship or material Makita will repair or at our option replace without charge This Warranty does not apply where repairs have been made or attempted by others repairs are required because of normal wear and tear the tool has been abused misused or improperly maintained alterations have b...

Reviews: