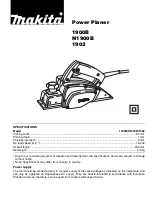
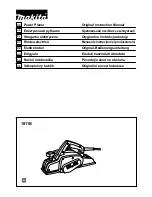
background image

GB

Power Planer

Instruction Manual

F

Rabot

Manuel d’Instructions

D

Falzhobel

Betriebsanleitung

I

Pialla

Istruzioni d’Uso

NL

Schaafmachine

Gebruiksaanwijzing

E

Cepillo

Manual de Instrucciones

P

Plaina

Manual de Instruço

˜ es

DK

Maskinhøvl

Brugsanvisning

S

Elhandhyvel

Bruksanvisning

N

Høvel

Bruksanvisning

SF

Höylä

Käyttöohje

GR

∏ÏÂÎÙÚÈ΋ ¶Ï¿ÓË

√‰ËÁ›Â˜ ÃÚ‹Ûˆ˜

1923B

N1923B

1923B (12lang)(cover) (’96. 4. 16)

Summary of Contents for 0088381045919

Page 1: ... I Pialla Istruzioni d Uso NL Schaafmachine Gebruiksaanwijzing E Cepillo Manual de Instrucciones P Plaina Manual de Instruço es DK Maskinhøvl Brugsanvisning S Elhandhyvel Bruksanvisning N Høvel Bruksanvisning SF Höylä Käyttöohje GR ÏÂÎÙÚÈÎ Ï ÓË ËÁ  ÃÚ Ûˆ 1923B N1923B 1923B 12lang cover 96 4 16 ...

Page 2: ...1 2 3 4 5 6 7 8 2 1923B 12lang illust 96 4 16 ...

Page 3: ...9 10 11 12 13 14 15 16 1923B 12lang illust 96 4 16 3 ...

Page 4: ...17 18 19 20 21 22 23 24 4 1923B 12lang illust 96 4 16 ...

Page 5: ...25 26 27 1923B 12lang illust 96 4 16 5 ...

Page 6: ...h wire Safety hints For your own safety please refer to enclosed Safety instructions These symbols mean Read instruction manual DOUBLE INSULATION ADDITIONAL SAFETY RULES 1 Rags cloth cord string and the like should never be left around the work area 2 Avoid cutting nails Inspect for and remove all nails from the workpiece before operation 3 Handle the blades very carefully 4 Be sure the blade inst...

Page 7: ...he set plate with the pan head screws and set the mini planer blade on the gauge base so that the cutting edge of the blade is perfectly flush with the inside flank of the gauge plate 3 Set the adjust plate set plate on the gauge base so that the planer blade locating lugs on the set plate rest in the mini planer blade groove then press in the heel of the adjust plate flush with the back side of t...

Page 8: ...d To start the machine press the lock off button and pull the trigger Release the trigger to stop Planing operation Fig 11 First rest the machine front base flat upon the workpiece surface without the blades making any contact Switch on and wait until the blades attain full speed Then move the machine gently forward Apply pressure on the front of machine at the start of planing and at the back at ...

Page 9: ...ng the planer blades Fig 21 22 23 For standard blades only Always keep your blades sharp for the best perfor mance possible Use the sharpening holder to remove nicks and produce a fine edge First loosen the two wing nuts on the holder and insert the blades A and B so that they contact the sides C and D Then tighten the wing nuts Immerse the dressing stone in water for 2 or 3 minutes before sharpen...

Page 10: ... Veiligheidswenken Voor uw veiligheid dient u de bijgevoegde Veiligheids voorschriften nauwkeurig op te volgen Deze symbolen betekenen Lees de gebruiksaanwijzing DUBBELE ISOLATIE AANVULLENDE VEILIGHEIDSVOORSCHRIFTEN 1 Lompen doeken touwen en soortgelijke prul len dienen nooit in het werkgebied achterge laten te worden 2 Zorg dat het gereedschap nooit in kontakt komt met spijkers Verwijder alvorens...

Page 11: ...kken en de afdekplaat van het schaaf blok grondig schoon Om de messen van het schaafblok te verwijderen draait u met de sok sleutel de drie bevestigingsbouten los De afdek plaat kunt u dan tegelijk met de messen verwij deren 2 Om de nieuwe messen te installeren bevestig de afstelplaat losjes op de klemplaat met behulp van de kruiskopschroeven en plaats dan het mini schaafmes zodanig op de kaliberv...

Page 12: ...per toeval wordt ingedrukt Om de machine te starten druk de ontgrendelknop in en druk dan de trekkerschakelaar in Om de machine te stoppen de trekkerschakelaar loslaten Schaven Fig 11 Leg eerst het voorste zoolvlak plat op het oppervlak van het werkstuk zonder dat de messen nog iets aanraken Schakel het gereedschap in en wacht totdat de messen op volle snelheid draaien Hierna beweegt u het gereeds...

Page 13: ...eken Gebruik dezelfde schroeven om de spaanafvoer te bevestigen Aanscherpen van de schaafmessen Fig 21 22 en 23 Alleen voor standaard schaafmessen Houd uw schaafmessen altijd scherp om de best mogelijke resultaten te krijgen Gebruik de aanscherp houder Om bramen te verwijderen of de beitels aan te scherpen Draai eerst de twee vleugelmoeren op de houder los en steek messen A en B erin zodat deze me...

Reviews: