background image

OWNER'S MANUAL

LAUNDRY CENTER

Read this owner's manual thoroughly before operating the 

appliance and keep it handy for reference at all times.

ENGLISH

WKHC202H*A

MFL71728987

Rev.06_062322

www.lg.com

Copyright © 2021-2022 LG Electronics Inc. All Rights Reserved.

Summary of Contents for WKHC202H A Series

Page 1: ...ER Read this owner s manual thoroughly before operating the appliance and keep it handy for reference at all times ENGLISH WKHC202H A MFL71728987 Rev 06_062322 www lg com Copyright 2021 2022 LG Electronics Inc All Rights Reserved ...

Page 2: ...ding Cleaning Products 14 Control Panel 17 Wash Cycles 20 Cycle Modifiers 20 Options and Extra Functions 22 OPERATION DRYER 22 Using the Dryer 24 Control Panel 26 Dry Cycles 28 Cycle Modifiers 28 Options and Extra Functions 31 SMART FUNCTIONS 31 Using LG ThinQ Application 33 Smart DiagnosisTM Function 35 MAINTENANCE 35 Washer 41 Dryer 45 TROUBLESHOOTING 45 Washer 52 Dryer 57 Common 58 LIMITED WARR...

Page 3: ...r death follow all installation instructions Refer to the INSTALLATION INSTRUCTIONS for detailed grounding procedures Installation instructions are packed with the appliance for the installer s reference If the appliance is moved to a new location have it checked and reinstalled by qualified service personnel When moving or installing the product in a different location call two or more qualified ...

Page 4: ...electric shock Check with a qualified electrician or service personnel if you are in doubt whether the appliance is properly grounded Do not modify the plug provided with the appliance if it will not fit the outlet have a proper outlet installed by a qualified electrician The appliance must be grounded In the event of a malfunction or breakdown grounding will reduce the risk of electric shock by p...

Page 5: ...or explosive substances as they give off vapors that could ignite or explode Do not dry unwashed items in the appliance Remove all objects from pockets such as lighters and matches Do not add gasoline dry cleaning solvents or other flammable or explosive substances to the wash water These substances give off vapors that could ignite or explode Do not tamper with controls Fix the drain hose securel...

Page 6: ... floor Operation Turn off the water faucets and unplug the appliance if the appliance is to be left for an extended period of time such as during vacations ALWAYS follow the fabric care instructions supplied by the garment manufacturer Use fabric softeners or products to eliminate static only as recommended by the manufacturer Do not combine laundry products for use in one load unless specified on...

Page 7: ... improvement purposes Front View a Control Panel b 3 Piece Lint Filter c Dryer Drum d Dryer Door e Magnetic Door Stop f Detergent Dispenser Drawer g Washer Door h Washer Drum i Drain Hose j Drain Pump Filter k Drain Pump Filter Cover l Leveling Feet Rear View a Terminal Block Access Panel b Dryer Drain Outlet behind stacking bracket c Hot and Cold Water Inlets d Shipping Bolts e Drain Hose for Was...

Page 8: ...only authorized components The manufacturer is not responsible for product malfunction property damage or bodily injury caused by the use of separately purchased unauthorized components parts or non LG products Model WKHC202H A Electrical Requirements Please refer to the rating label for detailed information Min Max Water Pressure 20 120 psi 138 827 kPa Dimensions Width X Height X Depth 27 X 74 3 ...

Page 9: ...evel and option settings for the selected cycle are shown The Normal cycle must be selected in order to change its default settings Pressing the Start Pause button without selecting a cycle immediately starts the Normal cycle with the default settings 5 Adjust settings Default settings for the selected cycle can be changed if desired using the cycle modifier and option buttons Not all modifiers an...

Page 10: ...ght colors or whites Mixing dark clothes with light clothes can result in dye transfer or discoloration of the lighter clothes Soil Level Wash heavily soiled clothing together Washing lightly soiled clothing in the same load with heavily soiled clothing could result in poor wash performance for the lightly soiled clothing Fabric Type Delicate articles should not be mixed with heavy or sturdy fabri...

Page 11: ...s as shown Do not press down on items while stacking them in the drum Load clothes loosely and do not overfill the drum Clothes need room to circulate in order to get clean Combine large and small items in the drum Load large items first Large items should not be more than half of the total load The washer can be fully loaded but the drum should not be tightly packed with items The door of the was...

Page 12: ...ergents because even a small amount of extra detergent can lead to problems Never use more than the maximum amount of detergent recommended by the manufacturer Using too much detergent can lead to oversudsing poor rinsing detergent buildup in clothing and residue buildup that can contribute to odors in the washer a Maximum fill line b Average load fill line c Liquid detergent d Powdered detergent ...

Page 13: ...uids and powders If the dispenser has a liquid detergent cup and insert Make sure they are in place when using liquid detergent Make sure to remove them when using powdered detergent Powdered detergent will not dispense with the liquid detergent cup and insert in place If you use a detergent that does not dissolve easily or a detergent with high viscosity it will leave a residue and clog the dispe...

Page 14: ...Once the desired cycle has been selected the standard presets will appear in the display These settings can be adjusted using the Cycle Modifier buttons at any time before starting the cycle c Start Pause Button Press and hold this button to start the selected cycle If the washer is running use this button to pause the cycle without losing the current settings NOTE If the Start Pause button is not...

Page 15: ...is locked The indicator light stays on until the cycle is paused stopped or has finished d Signal Indicator This indicator lights up when the end of cycle and button tones are turned on e Estimated Time Remaining When a cycle is selected the default time for that cycle is displayed This time will change as modifiers or options are selected If the display shows I then the time will be displayed aft...

Page 16: ...icators These LEDs will blink when a cycle is selected to indicate which stages will run When a cycle is running the LED for the active stage will blink and the LEDs for the remaining stages will remain steady Once a stage is complete the LED will turn off If a cycle is paused the active stage LED will stop blinking ...

Page 17: ...hout selecting a cycle will cause the Normal cycle to begin immediately using the default settings Wash Temp Default Warm Available All Spin Speed Default Medium High Available High Medium High Medium Low Soil Level Default Normal Available All Cycle Bedding Description Suitable for washing blankets or bulky items which have difficulty absorbing water such as pillows blankets comforters sheets or ...

Page 18: ... Speed Wash Description Quickly washes lightly soiled clothing and small loads For high wash and rinse efficiency wash small loads of 2 3 lightly soiled garments less than 3 lb 1 36 kg Use very little detergent in this cycle To add an extra rinse use the Extra Rinse option Wash Temp Default Very Warm Available Very Warm Warm Cool Cold Spin Speed Default High Available All Soil Level Default Light ...

Page 19: ...19 OPERATION WASHER ENGLISH Delicates Heavy Duty Speed Wash Downloaded default Rinse Spin Cycle Steam Turbo Wash Extra Rinse Pre wash ...

Page 20: ... speeds extract more water from clothes reducing drying time and saving energy Press the Spin button repeatedly until the desired speed is selected Some fabrics such as delicates require a slower spin speed Soil Adjusting the soil level setting will modify the cycle times and or wash actions Press the Soil button repeatedly until the desired soil level is selected The Heavy soil setting may increa...

Page 21: ... changing cycles or operating this washer NOTE The function does not lock the door Once this function is set all buttons are locked except the Power button When the controls are locked CL and the remaining time are alternately shown on the display during the wash cycle Turning off the power will not reset this function You must deactivate this function before you can access any other options and f...

Page 22: ...hime will sound and the LED will not come on if the selection is not allowed 6 Begin Cycle Press the Start Pause button to begin the cycle The cycle can be paused at any time either by opening the door or by pressing the Start Pause button On some models the door automatically locks when the cycle starts To open the door during a cycle pause the cycle If the Start Pause button is not pressed withi...

Page 23: ...verload your dryer Take out permanent press items as soon as the dryer stops to reduce wrinkles Baby Clothes and Nightgowns Always check the manufacturer s instructions Rubber and Plastics Do not dry any items made from or containing rubber or plastics such as Aprons bibs and chair covers Curtains and tablecloths Bath mats Fiberglass Do not dry fiberglass articles in your dryer Glass particles lef...

Page 24: ...e cycle without losing the current settings NOTE If you do not press the Start Pause button to resume a cycle within a certain time the appliance turns off automatically and all cycle settings are lost d Cycle Modifier Buttons Press these buttons to select additional cycle options Press and hold any button marked with an asterisk for 3 seconds to activate a special function e Extra Options and Fun...

Page 25: ... is displayed This time will change if you select extra options for the cycle The cycle time on Sensor Dry cycles may fluctuate as the appliance recalculates drying time for optimal results f Condenser Clean Indicator This icon indicates the condenser auto cleaning status The icon is displayed when water is being sprayed on the condenser g Lint Filter Status Indicator K lights up when the applianc...

Page 26: ... Descripti on Use this cycle for drying blankets or bulky items such as pillows blankets comforters sheets or pet bedding Dry Mode Not adjustable Dry Level Not adjustable Cycle Delicates Description Use this cycle for drying dress shirts blouses nylons lingerie or sheer and lacy clothes which can easily be damaged Dry Mode Default Normal Available Normal Dry Level Default Normal Available All Cycl...

Page 27: ...cycle to this cycle position The default cycle is Perm Press This cycle is also available for download Refer to the LG ThinQ application to see the cycles available for download Dry Mode Default Normal Available Normal Dry Level Default Normal Available Normal Less Cycle Dry Mode Wrinkle Care Cycle Dry Level Off Energy Saver Normal Speed Normal Very More Normal Less Damp Bedding Delicates Very Mor...

Page 28: ...ral additional cycle options to customize cycles to meet your individual needs Select the desired option after selecting the desired cycle and settings NOTE The LED for the option will light up when the option is selected To protect your garments not every option is available with every cycle A chime will sound twice and the LED will not light up if the selected option is not allowed for the selec...

Page 29: ... is turned on This light automatically turns off when the door is closed and the cycle starts Press and hold the Condenser Care button for 3 seconds during the cycle to turn on the drum light The drum light will turn off automatically after 4 minutes Rack Dry Use this function with items such as wool sweaters silk items and lingerie that should be dried flat The function can also be used with item...

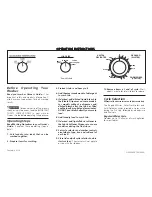
Page 30: ...30 OPERATION DRYER 6 Press the Start Pause button to start the cycle ...

Page 31: ...ication NOTE If you change your wireless router Internet service provider or password delete the connected appliance from the LG ThinQ application and connect it again This information is current at the time of publication The application is subject to change for product improvement purposes without notice to users Before Using LG ThinQ Application 1 Check the distance between the appliance and th...

Page 32: ... a cycle from the LG ThinQ application on your smartphone NOTE Once this function is enabled you can only start a cycle from the LG ThinQ smartphone application If the cycle is not started the appliance will wait to start the cycle until it is turned off remotely from the application or this function is disabled If the door has been opened you cannot start a cycle remotely Disabling Remote Start M...

Page 33: ...low the specific operating instructions for satisfying RF exposure compliance Open Source Software Notice Information To obtain the source code that is contained in this product under GPL LGPL MPL and other open source licenses that have the obligation to disclose source code and to access all referred license terms copyright notices and other relevant documents please visit https opensource lge c...

Page 34: ... Time Wrinkle Care Dryer buttons for 3 seconds or until the audible tones start Hold the smartphone mouthpiece to the logo until the data transfer is complete Keep the smartphone in place until the data transfer has finished Time remaining for data transfer is displayed 4 After the data transfer is complete the diagnosis will be displayed in the application NOTE For best results do not move the sm...

Page 35: ...n and pets do not climb into the drum Engage the Control Lock feature if needed to prevent children from accidentally starting a wash cycle Cleaning the Exterior Proper care of your washer can extend its life Door Wash with a damp cloth on the outside and inside and then dry with a soft cloth Exterior Immediately wipe off any spills Wipe with a damp cloth Do not touch the surface or the display wi...

Page 36: ...nd the lifespan of the washer Use of a water softener is recommended in areas with hard water Use a descaler to remove visible mineral buildup on the washer drum After descaling always run the Tub Clean cycle before washing clothing Mineral scale and other spots may be removed from the stainless steel drum using a soft cloth soaked in stainless steel cleaner Do not use steel wool or abrasive clean...

Page 37: ...t in the water supply or other debris WARNING The inlet screens protect the delicate parts of the inlet valve from being damaged by particles that could enter the valves with the water supply Operating the washer with these filters removed could cause a valve to open continuously resulting in flooding and or property damage CAUTION Do not use the washer without the inlet filters Doing so will caus...

Page 38: ...e a bucket if the drum is not completely drained before you open the drain filter Using the washer without the drain filter or with an incorrectly assembled drain filter may cause leaks or malfunction of the washer 1 Turn off the washer and unplug the power cord 2 Open the drain pump filter cover 3 Drain any remaining water Unclip the drain hose and remove the plug from the drain hose to drain the...

Page 39: ...art Pause button to start the drain pump for 1 minute This will expel some of the antifreeze leaving enough to protect the washer from damage 8 Turn off the washer and unplug the power cord 9 Dry the drum interior with a soft cloth and close the door 10 Store the washer in an upright position 11 Remove the inserts from the dispenser Drain any water in the compartments and let them dry 12 To remove...

Page 40: ...ress the Start Pause button When the Drain Hose is Frozen 1 Pour hot water in the washer drum and close the door 2 Wait for 1 2 hours 3 Press the Power button 4 Press the Spin button to operate spin only cycle for draining and spinning 5 Press the Start Pause button to make sure the water drains ...

Page 41: ... the magnet just contacts the inner door frame Cleaning the 3 Piece Lint Filter CAUTION Refer to the following instructions for proper cleaning of the lint filter Failure to do so can cause lint buildup on the condenser that can affect the drying performance NOTE Cleaning the lint filter will reduce drying time and energy consumption and prevent unnecessary malfunctions Unload all of the clothes f...

Page 42: ...lding the sides 5 Remove the residual lint with a vacuum cleaner or by washing under running water If washed allow the filter to dry completely before use Failure to do so may cause an odor CAUTION Do not tap the filter repeatedly as the built in magnet may dislodge and cause a malfunction 6 Reassemble the filters and reinsert them CAUTION Do not load or remove any clothes when the lint filter is ...

Page 43: ...ocess takes about 1 hour 6 Open the dryer door after the cleaning is finished and leave it open to allow air to circulate and thoroughly dry the drum WARNING For safety reasons do not allow children or animals to climb into the appliance Doing so could cause damage or injury Care in Cold Climates Thawing out the Accessories CAUTION Wear gloves and take care to avoid burning yourself with hot water...

Page 44: ... 140 60 water can cause scalding or burns Using water that is hotter than that can cause the appliance to malfunction 3 Turn on the appliance and run the Normal cycle for about 30 seconds Then wait about 30 minutes 4 Run the Normal cycle again Check if the OE message appears within 10 minutes of running the appliance If the OE message appears go to step 2 and repeat procedure If the OE message doe...

Page 45: ...r beep and then nothing happens A The Control Lock feature is turned on To turn it off turn on the washer then press and hold the button that has Control Lock on or under it for 3 seconds Q Where should I pour the powdered laundry products when doing my laundry A If you are using powdered laundry detergent load it in the main detergent dispenser after removing the liquid detergent insert Powdered ...

Page 46: ...onnect power and try again If the error code is still displayed call for service FE OVERFLOW ERROR Water level is too high due to a faulty water valve Close the water faucets unplug the washer and call for service PE PRESSURE SENSOR ERROR The water level sensor is not working correctly Close the water faucets unplug the washer and call for service LE MOTOR LOCKED ERROR A motor error has occurred A...

Page 47: ...eration Rattling and clanking noise Foreign objects such as keys coins or safety pins may be in drum or pump Stop the washer check the drum and the drain filter for foreign objects If noise continues after the washer is restarted call for service Thumping sound Heavy wash loads may produce a thumping sound This is normal but if the sound continues the washer is probably out of balance Stop and red...

Page 48: ...create leaks and may be caused by the type and amount of detergent used HE High Efficiency detergent is the only detergent recommended The normal amount of detergent to use is 1 4 to 1 2 of the maximum amount recommended by the detergent manufacturer Always reduce the amount of detergent if the load is small or lightly soiled or if the water is very soft Never use more than the maximum amount reco...

Page 49: ...will not operate Control panel has powered off due to inactivity This is normal Press the Power button to turn on the washer Washer is unplugged Make sure that the power cord is plugged securely into an electrical outlet Water supply is turned off Turn both hot and cold faucets fully on Controls are not set properly Make sure that the cycle was set correctly close the door and press the Start Paus...

Page 50: ...ove the end of the drain hose so that it is lower than 96 inches 2 4 m Bleach does not dispense Bleach dispenser cover is not properly installed on some models Make sure that the bleach cover is properly installed and snapped into place before the beginning of the cycle Bleach dispenser is dirty or clogged Lift out the bleach dispenser cover and clean out the reservoir Lint and other foreign debri...

Page 51: ...ly set stains Articles that have previously been washed may have stains that have been set These stains may be difficult to remove and may require hand washing or pre treating to aid in stain removal Musty or mildewy odor in the washer Incorrect or too much detergent has been used Use only HE High Efficiency detergent in accordance with the manufacturer s instructions Inside of the drum was not cl...

Page 52: ...ecured Close and secure the door If the message keeps appearing unplug the power cord and call for service dE4 DOOR OPEN ERROR Door switch detection is not working properly Unplug the power plug and call for service tE1 tEz tE3 tE4 TEMPERATURE ERROR Temperature Sensor has malfunctioned Unplug the power plug and call for service FI TEMPERATURE ERROR The temperature inside the drum has risen suddenl...

Page 53: ...iner hose or the optional drain hose is not connected correctly Connect the water container hose or the optional drain hose correctly The door is closed while clothes or foreign substance is caught in the door Check if clothes or foreign substance is caught in the door before using the appliance If water leaks continuously contact the LG Electronics Customer Information Center The appliance runs a...

Page 54: ...long cycles Drying time is not consistent Heat settings load size or dampness of clothing is not consistent The drying time for a load will vary depending on the size of the load the type of fabrics the wetness of the clothes and the condition of the lint filter An unbalanced load in the appliance can cause poor spinning resulting in wetter clothes which will take longer to dry Problem Possible Ca...

Page 55: ... or is used incorrectly Use a fabric softener if available to reduce static electricity Be sure to follow the manufacturer s instructions Clothes dried too long overdried Overdrying a load of laundry can cause a buildup of static electricity Adjust settings and use a shorter drying time Select a lower dry level setting if necessary Drying synthetics permanent press or synthetic blends These fabric...

Page 56: ...cle ends For ventless models leave the dryer door open after drying or use the magnetic door stop on some models to keep the door slightly ajar If the odor is coming from the washer follow the instructions in the product manual to clean the washer tub drum Keep both lint filters clean Clogged or dirty lint filters can cause odors After cleaning the lint filter allow it to dry completely before usi...

Page 57: ...ctly The wireless network name SSID should be a combination of English letters and numbers Do not use special characters The router frequency is not 2 4 GHz Only a 2 4 GHz router frequency is supported Set the wireless router to 2 4 GHz and connect the appliance to the wireless router To check the router frequency check with your Internet service provider or the router manufacturer The appliance a...

Page 58: ...W ANY IMPLIED WARRANTY OF MERCHANTABILITY OR FITNESS FOR A PARTICULAR PURPOSE ON THE PRODUCT IS LIMITED IN DURATION TO THE DURATION OF THE ABOVE LIMITED WARRANTY UNDER NO CIRCUMSTANCES SHALL LG OR ITS U S DISTRIBUTORS DEALERS BE LIABLE FOR ANY INDIRECT INCIDENTAL CONSEQUENTIAL SPECIAL OR PUNITIVE DAMAGES INCLUDING WITHOUT LIMITATION LOST GOODWILL LOST REVENUES OR PROFITS WORK STOPPAGE IMPAIRMENT O...

Page 59: ...y LG Replacement of light bulbs filters fuses or any other consumable parts Damage or failure of the Product caused by transportation storage and or handling including scratches dents chips and or other damage to the finish of your Product unless such damage is reported within one 1 week of delivery Damage or missing items to any display open box refurbished or discounted Product Refurbished Produ...

Page 60: ... as a copy of this provision to the AAA in the manner described in the AAA Rules You must also send a copy of your written demand to LG at LG Electronics USA Inc Attn Legal Department Arbitration 111 Sylvan Avenue Englewood Cliffs NJ 07632 If there is a conflict between the AAA Rules and the rules set forth in this section the rules set forth in this section will govern This arbitration provision ...

Page 61: ...lephone a your name and address b the date on which the product was purchased c the product model name or model number and d the serial number the serial number can be found i on the product or ii online by accessing https www lg com us support repair service schedule repair continued and clicking on Find My Model Serial Number You may only opt out of the dispute resolution procedure in the manner...

Page 62: ...62 Memo ...

Page 63: ...63 Memo ...

Page 64: ...LG Customer Information Center Register your product Online www lg com For inquiries or comments visit www lg com or call 1 800 243 0000 U S A 1 888 542 2623 CANADA ...

Page 65: ...R Read this installation manual thoroughly before installing the appliance and keep it handy for reference at all times ENGLISH WKHC202H A MFL71728986 Rev 04_071122 www lg com Copyright 2021 2022 LG Electronics Inc All Rights Reserved ...

Page 66: ...TS 7 PRODUCT OVERVIEW 7 Product Features 9 INSTALLATION 9 Before Installing 11 Choosing the Proper Location 12 Unpacking and Removing Shipping Material 13 Connecting Electric Dryers 17 Connecting the Water Inlet Hoses 18 Connecting the Drain Hose 20 Leveling the Appliance 22 Final Installation Check 23 APPENDIX 23 Disassembly ...

Page 67: ...r death follow all installation instructions Refer to the INSTALLATION INSTRUCTIONS for detailed grounding procedures Installation instructions are packed with the appliance for the installer s reference If the appliance is moved to a new location have it checked and reinstalled by qualified service personnel When moving or installing the product in a different location call two or more qualified ...

Page 68: ...electric shock Check with a qualified electrician or service personnel if you are in doubt whether the appliance is properly grounded Do not modify the plug provided with the appliance if it will not fit the outlet have a proper outlet installed by a qualified electrician The appliance must be grounded In the event of a malfunction or breakdown grounding will reduce the risk of electric shock by p...

Page 69: ...or explosive substances as they give off vapors that could ignite or explode Do not dry unwashed items in the appliance Remove all objects from pockets such as lighters and matches Do not add gasoline dry cleaning solvents or other flammable or explosive substances to the wash water These substances give off vapors that could ignite or explode Do not tamper with controls Fix the drain hose securel...

Page 70: ... floor Operation Turn off the water faucets and unplug the appliance if the appliance is to be left for an extended period of time such as during vacations ALWAYS follow the fabric care instructions supplied by the garment manufacturer Use fabric softeners or products to eliminate static only as recommended by the manufacturer Do not combine laundry products for use in one load unless specified on...

Page 71: ... improvement purposes Front View a Control Panel b 3 Piece Lint Filter c Dryer Drum d Dryer Door e Magnetic Door Stop f Detergent Dispenser Drawer g Washer Door h Washer Drum i Drain Hose j Drain Pump Filter k Drain Pump Filter Cover l Leveling Feet Rear View a Terminal Block Access Panel b Dryer Drain Outlet behind stacking bracket c Hot and Cold Water Inlets d Shipping Bolts e Drain Hose for Was...

Page 72: ...only authorized components The manufacturer is not responsible for product malfunction property damage or bodily injury caused by the use of separately purchased unauthorized components parts or non LG products Model WKHC202H A Electrical Requirements Please refer to the rating label for detailed information Min Max Water Pressure 20 120 psi 138 827 kPa Dimensions Width X Height X Depth 27 X 74 3 ...

Page 73: ...ant that you review this entire manual before installing and using the appliance Detailed instructions concerning electrical connections and additional requirements are provided on the following pages Moving or installation of the appliance requires two or more people Failure to follow these instructions may result in injury Store and install the appliance where it will not be exposed to temperatu...

Page 74: ...ng outlet Failure to follow this warning can cause serious injury fire electric shock or death Certain internal parts are intentionally not grounded and may present a risk of electric shock only during servicing Service personnel Do not contact the following parts while the appliance is energized pump valve motor control board noise filter NOTE When moving the product tilt it toward the back of th...

Page 75: ...wood floor is sufficient provided it is built to FHA standards The floor under the appliance must not slope more than 1 inch 2 5 cm from front to back or side to side Installing on carpeting and soft tile surfaces is not recommended Never install the appliance on a platform or weakly supported structure Floor Installation To ensure sufficient clearance for water inlet hoses drain hose and airflow ...

Page 76: ...iances to make noise or come into contact causing paint damage and further increasing noise No other fuel burning appliance can be installed in the same closet as an appliance Unpacking and Removing Shipping Material Unpacking Shipping Material This feature is only available on some models Lifting the Appliance off the Foam Base After removing the carton and shipping material lift the appliance of...

Page 77: ...h the circuit conductors and connected to the equipment grounding terminal or lead on the dryer The dryer has its own terminal block that must be connected to a separate 240 VAC 60 Hertz single phase circuit fused at 30 amperes The circuit must be fused on both sides of the line ELECTRICAL SERVICE FOR THE DRYER SHOULD BE OF THE MAXIMUM RATE VOLTAGE LISTED ON THE NAMEPLATE DO NOT CONNECT THE DRYER ...

Page 78: ...to the center screw of the terminal block 7 Attach the power cord ground wire to the green ground screw 8 Tighten all screws securely 9 Reinstall the terminal block access cover a White Wire moved from Ground Screw b Hot Leads of Power Cord Black and Red c Neutral Wire White d Power Cord Ground Wire e Ground Screw green Four Wire Direct Wire 1 Remove 5 inches 12 7 cm of the outer covering from the...

Page 79: ... green ground screw 9 Tighten all screws securely 10 Reinstall the terminal block access cover a White Wire moved from Ground Screw b Hot Leads of Power Cord Black and Red c Neutral Wire White d Power Cord Ground Wire e Ground Screw green Three Wire Power Cord 1 Remove the terminal block access cover on the upper back of the appliance 2 Install the UL listed strain relief into the power cord throu...

Page 80: ...ock access cover on the upper back of the appliance 3 Install UL listed strain relief into the power cord through hole 4 Thread the 3 wire 10 AWG minimum copper conductor power cable prepared in step 1 through the strain relief a Terminal block b UL listed strain relief c UL listed 3 wire power cord 5 Attach the two hot leads black and red of the power cord to the outer terminal block screws 6 Att...

Page 81: ...wash temperatures Do not store or install the appliance in a location subject to freezing temperatures Damage to the water inlet hoses and internal mechanisms of the appliance can result If the appliance was exposed to freezing temperatures prior to installation allow it to stand at room temperature for several hours before use and check for leaks prior to operation Do not use flood preventing hos...

Page 82: ...washer As the drain outlet is raised beyond 66 168 cm the drain function will be increasingly affected If you are experiencing backflow or residual water in the dryer reservoir try reducing the height of the dryer drain hose end to lower than 38 above the base of the washer Never create an airtight seal between the hose and the drain with tape or other means If no air gap is present water can be s...

Page 83: ...of the drain hose connector helps avoid siphoning odors or improper draining Make sure the drain hoses are not kinked or pinched This is a potential cause of drainage problems or noise Using a Standpipe to Drain NOTE The end of the drain hose should be located a minimum of 24 61 cm and a maximum of 96 244 cm above the bottom of the washer For best results locate the end of the drain hose no higher...

Page 84: ... tie strap to secure the drain hose in place Leveling the Appliance The drum of the washer spins at very high speeds To minimize vibration noise and unwanted movement the floor must be a solid level surface CAUTION Using the appliance without leveling it may cause excess vibration and noise leading to an appliance malfunction Adjust the leveling feet only as far as necessary to level the appliance...

Page 85: ...iance is level WARNING Do not raise the front of the appliance with a wood block or similar object Doing so can cause serious injury or death Using Non Skid Pads If you install the appliance on a slippery surface it may move because of excessive vibration Incorrect leveling may cause malfunction through noise and vibration If this occurs install the non skid pads under the leveling feet and adjust...

Page 86: ... a proper outlet installed by a qualified electrician The appliance and outlet must be positioned so that the plug is easily accessible Do not use an adapter or extension cord Doing so may result in serious injury fire electric shock or death For best performance plug the appliance into its own individual outlet This helps prevent overloading house wiring circuits which could cause a fire hazard f...

Page 87: ...of the product is not covered by the product warranty 1 Be sure to unplug the appliance 2 Loosen screws assembled on the stack bracket on the back of the appliance 3 Push open the caps at the left and right sides of the control panel on the front of the appliance Loosen the screws under the caps 4 Pull the control panel forward to remove it 5 Disconnect the wire harnesses from the washer a and dry...

Page 88: ... Protect your hands and arms from sharp edges of the panel frame exposed on the top of the washer To avoid strain injuries use 2 or more people to lift the dryer NOTE When assembling the appliance proceed in reverse order ...

Page 89: ...25 Memo ...

Page 90: ...26 Memo ...

Page 91: ...27 Memo ...

Page 92: ...LG Customer Information Center Register your product Online www lg com For inquiries or comments visit www lg com or call 1 800 243 0000 U S A 1 888 542 2623 CANADA ...

Reviews: