background image

OWNER'S MANUAL

Color Video Camera

Please read this manual carefully before operating  

your set and retain it for future reference.

MODEL

LCV5500-BN
LCV5500-BP

 1205(V1.0)

Summary of Contents for LCV5500-BN
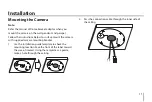
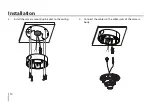
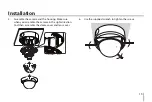
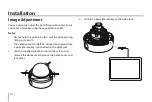
Page 1: ...OWNER S MANUAL Color Video Camera Please read this manual carefully before operating your set and retain it for future reference MODEL LCV5500 BN LCV5500 BP 1205 V1 0 ...

Page 2: ...dio frequency energy Changes or modifications to this equipment may cause harmful interference unless the modifications are expressly approved in the instruction manual The user could lose the authority to operate this equipment if an unauthorized change or modification is made REGULATORY INFORMATION FCC Part 15 This equipment has been tested and found to comply with the limits for a Class A digit...

Page 3: ...te measures Warning To reduce a risk of fire or electric shock do not expose this product to rain or moisture Warning The product has been dropped or the case is broken turn off the power and unplug the power cord This may cause fire electric shock or injury Warning If the product has no video out or sound please stop using Unplug the power cable immediately and contact the service center This may...

Page 4: ...l of your old appliance will help prevent potential negative consequences for the environment and human health 4 For more detailed information about disposal of your old appliance please contact your city office waste disposal service or the shop where you purchased the product EEE Compliance with Directive for Turkey only LG Electronics hereby declares that this these product s is are in complian...

Page 5: ...ctrician for replacement of the obsolete outlet 10 Protect the power cord from being walked on or pinched particularly at plugs convenience receptacles and the point where they exit from the apparatus 11 Only use attachments accessories specified by the manufacturer 12 Use only with the cart stand tripod bracket or table specified by the manufacturer or sold with the apparatus When a cart is used ...

Page 6: ... quantity of neutral detergent then wipe dry Avoid the use of volatile solvents such as thinners alcohol benzene and insecticides They may damage the surface finish and or impair the operation of the camera Operating and storage location Avoid viewing a very bright object such as light fittings during an extended period Avoid operating or storing the unit in the following locations Extremely hot o...

Page 7: ...allation 11 Mounting the Camera 11 Image Adjustment 14 Menu Operation 17 General Operation 20 Exposure Settings 21 White Balance settings 25 Day Night Setting 26 Motion Detection Setting 27 3D DNR Setting 28 Privacy Setting 28 Special Menu Settings 30 SYSTEM Setting 34 Specification 35 Contents ...

Page 8: ...tact authorized service center High resolution and high sensitivity with a 6 mm 1 3 Type Exview Super HAD CCD II Automatically switch between DC 12 V and AC 24 V Smart motion detector Wide Dynamic Range WDR Accessories Installation sticker FRONT PRODUCT CENTER POSITION MEZ62687703 n 4 Place SELFTAPPING SCREW CABLE HOLE LCV5300 CABLE HOLE LCD5300 Wrench M4 Fixing screws PRODUCT CENTER POSITION MEZ6...

Page 9: ... e Rotate adjuster f Tilting lock screw Fixes the tilting position after adjusting g Pan adjuster h Setup menu control buttons i Video Out connector Use this jack for checking the picture with portable monitor when install the camera j Power input connector Supplies AC 24 V or DC 12 V from an external power source k Video output connector BNC type a b c d e f g h i j k ...

Page 10: ...n The peripheral devices DVR monitor etc AC DC adapter and cables are not supplied 1 Make the video signal connection between the camera and the monitor or DVR 2 Connect a external power source to the power input jack of the camera ...

Page 11: ...REW CABLE HOLE LCV5300 CABLE HOLE LCD5300 FRON T PRODUCT CENTER POSITION MEZ6268 7703 4 Place SELFTAPP ING SCREW CABLE HOLE LCV5300 CABLE HOLE LCD5300 FRON T PRODUCT CENTER POSITION MEZ6268 7703 4 Place SELFTAPP ING SCREW CABLE HOLE LCV5300 CABLE HOLE LCD5300 FRON T PRODUCT CENTER POSITION MEZ6268 7703 4 Place SELFTAPP ING SCREW CABLE HOLE LCV5300 CABLE HOLE LCD5300 2 Pass the connection cable thr...

Page 12: ...R POSITIO N MEZ62 68770 3 4 Place SELFTA PPING SCREW CABLE HOLE LCV53 00 CABLE HOLE LCD53 00 4 Connect the cables to the cable jacks of the camera body FRO NT PRODUC T CENTER POSITI ON MEZ62 68770 3 4 Place SELFTA PPING SCREW CABLE HOLE LCV53 00 CABLE HOLE LCD53 00 Installation ...

Page 13: ...stallation 5 Assemble the camera and the housing Make sure when you assemble the camera in the right direction And then assemble the dome cover and lens cover 6 Use the supplied wrench to tighten the screws ...

Page 14: ... Do not hold the camera by lens unit to adjust panning tilting or azimuth The video output to the BNC will be interrupted while a portable monitor is connected to the video jack 1 Use the supplied wrench to loosen the screws and remove the dome cover Remove the Dome cover and lans cover TILT TILT 2 Connect a portable monitor to the video jack ...

Page 15: ...3 Adjust the pan tilt rotate position of the camera TILT TILT PAN ROTATE 4 Adjust the zoom 4 1 Unlock the zoom lever 4 2 Move the lever to adjust the zoom 4 3 Lock the lever FAR NEAR TELE WIDE Installation ...

Page 16: ... 1 Unlock the focus lever 5 2 Move the lever to adjust the focus 5 3 Lock the lever FAR NEAR 6 This camera utilizes an on screen user MENU To set items on the menu use the following buttons After then attach the lens cover and dome cover ...

Page 17: ...his button to select an item or adjust the parameters RIGHT button Moves the cursor to the right Used to increment the value selected in the menu The parameter changes each time this button is pressed LEFT button Moves the cursor to the left Used to decrement the value selected in the menu The parameter changes each time this button is pressed SET button Executes selections and displays a submenu ...

Page 18: ...AUTO x2 x512 SENS UP OFF AUTO EXIT TOP RET END WHITE BAL ATW AUTO AWC SET KEY MANUAL RED 100 to 100 BLUE 100 to 100 EXIT TOP RET END Main Menu Sub Menu Contents DAY NIGHT AUTO BURST ON OFF LEVEL LOW MIDDLE HIGH USER DWELL TIME 3 SEC to 60 SEC EXIT TOP RET END DAY NIGHT BURST ON OFF EXIT TOP RET END MOTION DET OFF ON AREA SETUP AREA SELECTION 1 to 8 STATE ON OFF POSITION 0 to 7 POSITION 0 to 5 SIZE...

Page 19: ...0 POSITION 0 to 100 SIZE 1 to 15 SIZE 1 to 15 RADIOUS 1 to 100 EXIT TOP RET END Main Menu Sub Menu Contents PRIVACY MASK ON POLYGON MASK SELECTION 1 to 2 DISPLAY OFF MOZAIC COLOR1 to COLOR 8 SHAPE POSITION EXIT TOP RET END EXIT TOP RET END SPECIAL D ZOOM OFF ON ZOOM x1 0 to x16 0 PAN 100 to 100 TILT 100 to 100 EXIT TOP RET END D EFFECT OFF MIRROR ROTATE V FILP SHARPNESS 0 to 100 COLOR 0 to 100 SYN...

Page 20: ...setup menu screen appears on the monitor 2 Use UP or DOWN button to select an option then press SET button Submenu appears on the monitor 3 Use UP or DOWN button to select a submenu option 4 Use LEFT or RIGHT button to select a value TOP Return to the CAMERA SETTING menu screen RETURN Return to the previous END Exit the setup menu ...

Page 21: ...setting Use Backlight option to view the object clearly in backlight conditions 1 Select BACKLIGHT option 2 Use LEFT or RIGHT button to select a mode then press SET WDR WDR Wide dynamic range feature can be very helpful to cope with very challenging lighting conditions It is capable of capturing both of the dark part and bright part and combining the differences into a scene to generate a highly r...

Page 22: ... or DOWN button to select a ON or OFF Press SET to exit the Area setting menu GRAY SCALE Use LEFT or RIGHT button to select a gray scale USER SCALE Use LEFT or RIGHT button to select a bright level 5 level MASK Use LEFT or RIGHT button to select ON or OFF If you set the MASK to ON the mask function is activate only when the HSBLC is automatically activated in low luminance scene OFF Not used BRIGH...

Page 23: ...er Speed setting Select the desired shutter speed for camera exposure You can change the shutter speed to higher speed to capture fast moving subjects though the image becomes darker 1 Select SHUTTER option 2 Use LEFT or RIGHT button to set shutter speed Notes When the SHUTTER is set to AUTO the picture may become unstable if the camera faces a bright fluorescent light directly Therefore take care...

Page 24: ... set BACKLIGHT mode to WDR sub menu SHUTTER LIMIT of SHUTTER AUTO will be blocked and shutter will be fixed LCV5500 BN 1 60 LCV5500 BP 1 50 SENS UP setting If pictures are not clear due to darkness this SENS UP operation would increase the sensitivity of picture 1 Use UP or DOWN button to select SENS UP option 2 Use LEFT or RIGHT button to select mode AUTO Adjust the sensitivity of the picture aut...

Page 25: ...HITE BAL option 2 Use LEFT or RIGHT button to select a mode then press SET ATW Auto Tracing White Balance Use LEFT or RIGHT button to select the ATW then press SET button AUTO Use LEFT or RIGHT button to select the AUTO then press SET button AWC SET KEY If you select the AWC SET KEY mode you will be able to set up the White Balance automatically using SET button MANUAL You can set the white balanc...

Page 26: ... DAY NIGHT function is not available and mark is displayed BURST Use LEFT or RIGHT button to select ON or OFF LEVEL Use LEFT or RIGHT button to select a level DWELL TIME Use LEFT or RIGHT button to select a dwell time DAY Color mode enabled NIGHT Black and white mode enabled BURST Use LEFT or RIGHT button to select ON or OFF Note Select the BURST ON or OFF when the color noise occurs on the screen...

Page 27: ...tton to select a area 1 8 to 8 8 on the AREA SELECTION Use LEFT or RIGHT button to set up the ON or OFF on the STATE Use UP or DOWN to select an option then use LEFT or RIGHT button to adjust the option POSITION Moves horizontal position of the mask POSITION Moves vertical position of the mask SIZE Enlarge or decrease the horizontal size of the mask SIZE Enlarge or decrease the vertical size of th...

Page 28: ...tting This function is aiming at the protection of personal privacy selecting a screen part black not to be displayed in the screen Up to 14 zones can be registered 1 Select PRIVACY option 2 Use LEFT or RIGHT button to select a ON and press SET The PRIVACY SETUP menu appears RECTANGLE Use LEFT or RIGHT button to select a mask on the MASK SELECTION Use LEFT or RIGHT button to set up the DISPLAY opt...

Page 29: ... DISPLAY option Use UP or DOWN to select an option then use LEFT or RIGHT button to adjust the option POSITION Moves horizontal position of the mask POSITION Moves vertical position of the mask SIZE Enlarge or decrease the horizontal size of the mask SIZE Enlarge or decrease the vertical size of the mask RADIUS SIZE You can adjust the RADIUS SIZE POLYGON Use LEFT or RIGHT button to select a mask o...

Page 30: ...ENCY adjustments are applied in common from COLOR 1 to COLOR 7 after mask setting Special Menu Settings This menu lets you adjust and set up D ZOOM D EFFECT SHARPNESS COLOR SYNC USER TITLE LANGUAGE function by yourself in the SPECIAL menu 1 Select SPECIAL option 2 Press SET button and the SPECIAL menu appears ...

Page 31: ...en use LEFT or RIGHT button to select a level ZOOM Use LEFT or RIGHT button to enlarge the screen PAN Use LEFT or RIGHT button to move the screen left or right TILT Use LEFT or RIGHT button to move the screen up or down Setting the D EFFECT Digital effect You can select the digital effect 1 Select D EFFECT option on the SPECIAL menu 2 Use LEFT or RIGHT button to select a digital effect V FLIP Flip...

Page 32: ...menu 2 Use LEFT or RIGHT button to change a adjust the option If you set the sharpness value to higher the image outline becomes sharp If you set to lower value the image outline becomes dim Setting the COLOR You can switch the displayed picture to gray scale or color 1 Select COLOR option on the SPECIAL menu 2 Use LEFT or RIGHT button to change a adjust the option ...

Page 33: ...e camera The USER TITLE is displayed on the upper left of the screen To disappear the user title select OFF 1 Select USER TITLE option 2 Use LEFT or RIGHT button to select a ON then press SET The USER TITLE menu appears A 3 Use UP DOWN LEFT or RIGHT button to select a character or number then press SET button CLR Clear all entered characters and numbers POS Move the USER TITLE position on the scre...

Page 34: ...tion on the SPECIAL screen 2 Press LEFT or RIGHT button to select a language SYSTEM Setting 1 Select the SYSTEM menu 2 Press SET button and the SYSTEM menu appears 3 Use UP or DOWN button to select the option FACTORY RESET To reset the camera setting to factory setting select the FACTORY RESET option 4 Press SET button to confirm your selection Note The menu screen is move to top menu after set up...

Page 35: ...S Control DC Sync System Internal Line Lock Scanning Frequency H V 15 734 KHz 59 94 Hz 15 625 KHz 50 Hz Horizontal Resolution 650 TV Lines Color 700 TV Lines B W S N Ratio 50 dB Minimum Illumination 30 IRE F1 2 Color 0 2 lx Sens up Off 0 00 3 lx Sens up Auto 0 000 1 lx Sens up X512 B W 0 02 lx Sens up Off 0 000 3 lx Sens up Auto 0 000 01 lx Sens up X512 Video Output Signal 1 Vp p Composite 75 Ω Da...

Page 36: ... MANUAL Motion Detection 8 Zones Privacy Zone Masking 14 Masks Digital Effect OFF MIRROR ROTATE V FILP Communication Coaxial Communication Power Source DC 12 V AC 24 V Power Consumption 190 mA Operation Temperature Humidity 10 ºC to 50 ºC 0 RH to 80 RH Storage Temperature Humidity 20 ºC to 60 ºC 0 RH to 90 RH Dimension Ø x H 140 mm x 122 mm Weight 710 g ...

Page 37: ......

Reviews: