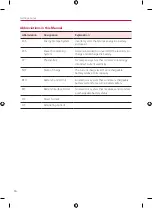
background image

INSTALLATION MANUAL

Residential Battery Unit

https://www.lg.com/global/business/ess/business-resources/download 

Copyright © 2022 LG Electronics Inc. All Rights Reserved.

*MFL1199-00494-00

R e v .   0 1   2 1 / 0 4 / 2 0 2 2
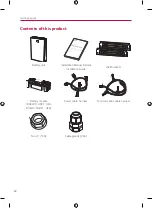
Model

BUEL011HBC1 (Pack*3+BCU+Enclosure)

BUEL015HBC1 (Pack*4+BCU+Enclosure)

• 

Please read this manual carefully before operating and retain it for future 
reference.

•  For stable operation and periodic system updates, LG Electronics highly 

recommend the user to subscribe to EnerVu and maintain connection.

Summary of Contents for BUEL011HBC1

Page 1: ...ghts Reserved MFL1199 00494 00 R e v 0 1 2 1 0 4 2 0 2 2 Model BUEL011HBC1 Pack 3 BCU Enclosure BUEL015HBC1 Pack 4 BCU Enclosure Please read this manual carefully before operating and retain it for future reference For stable operation and periodic system updates LG Electronics highly recommend the user to subscribe to EnerVu and maintain connection ...

Page 2: ...ace objects of any kind on top of the product during operation y y All work on the ESS must be carried out by LG certified service providers only y y Electrical installations must be done in accordance with the local and national electrical safety standards y y Wear rubber gloves and protective clothing including protective glasses and boots when working on the ESS y y There is a risk of electric ...

Page 3: ...nnel y y The product should not be exposed to water dripping or splashing and no objects filled with liquids such as vases should be placed on the product y y The product has IP Protection class 55 Please avoid installation in dusty or high humidity environment y y The metal enclosure may heat to a high temperature during operation y y The product must be disposed of according to local regulations...

Page 4: ...ce which makes AC voltage such as an AC power source or a generator Connecting the product to external devices could result in serious damage to your equipment y y Handling of batteries should be performed or supervised by an LG service person or a qualifieds installer y y The battery does not discharged when the load is under the certain level y y For the latest ESS documents and full Limited War...

Page 5: ...r dry sand if only few cells are involved In case of large fire use large amount of water to extinguish or an Lithium fire extinguisher to extinguish Special hazards arising from the chemical May form hydrofluoric acid if electrolyte comes into contact with water In case of fire the formation of the following flue gases cannot be excluded Hydrogen fluoride HF Carbon monoxide and carbon dioxide Pro...

Page 6: ...ns contained in this document are verified to be accurate at the time of printing However since continuous improvement is a goal at LG Electronics we reserve the right to make product modifications at any time The images provided in this document are for demonstration purposes only Depending on product version and market region details may appear slightly different 2022 LG Electronics Inc All righ...

Page 7: ... Connection parts 16 LED Indicators 17 Installation Installation Location 18 Minimum clearance 21 Floor Standing Wall Mount 22 Installing battery modules 25 Wiring connection between battery unit and PCS 29 Appendix Maintenance 35 Cleaning the Product 35 Inspecting Regularly 35 Contact 35 Disposing the product 36 Entsorgung Ihrer Altgeräte 37 Specifications 38 Error Codes and Messages 41 Wiring Di...

Page 8: ...tion hot surface Caution risk of electric shock energy storage timed discharge Caution risk of electric shock No open flame open ignition source or smoking Wear protective glasses when working on the battery unit Install this product out of reach of children Read the instruction manual booklet before starting work or before operating equipment or machinery Take care when handling corrosive substan...

Page 9: ... ventilation of the charging area and take care to avoid coming in contact with acid In case of contact with acid material immediately flush the area with plenty of water Get medical attention immediately Wash contaminated clothing before reuse with sufficient water Fire extinguishers must be used to put out flames Ensure the conductive terminals are matched to their corresponding counterparts ...

Page 10: ...e the battery PV Photovoltaic A solar panel system that converts solar energy into direct current electricity SOC State of charge The current charge level of an rechargeable battery relative to its capacity BCU Battery Control Unit An electronic system that control a rechargeable battery system for securing battery safety BIC Battery Interface Circuit An electronic system that measures and monitor...

Page 11: ... and components c Remove the battery unit from the packaging y y When working on the battery installation at least 2 people are needed for safe installation and moving y y This product is heavy Wear appropriate personal protective equipment such as gloves and protective footwear when handling the unit Only a sufficient number of trained movers should lift the product WARNING ...

Page 12: ...Contents of this product Battery unit Installation Manual Quick Installation Guide Wall brackets Battery module BUEL011HBC1 3EA BUEL015HBC1 4EA Power cable harness Communication cable harness Nuts 17 EA Cable glands 2 EA ...

Page 13: ...nnection y y Follow the local code y y CAT V better CAT VI with 4 x 2 x 0 4 mm or 4 x 2 x 0 6 mm TWP Cable y y Minimum 300 V rated 3 conductor twisted pair or double insulated with one twisted pair shielded copper Cu cable Power connection y y 600V Twisted Shielded Pair Cable at least 3 pair cable is required y y Cable with minimum 1 x 6 mm in the color black and red grounding green minimum 1 x 6 ...

Page 14: ...bit holder and T Handle torque wrench with magnet hex socket M5 M6 M8 Screw driver Phillips 5 mm Flat head 6 5 4 2 mm Hex wrench 6 mm 8 mm Cutter 14 Inclinometer Tape measure Writing utensil Wire strippers A Wire strippers C Wire cutter B Spanner 17 mm Recommended Tools Lift equipment Wire strippers B RJ 45 Climping tool ...

Page 15: ...arted 15 Name of each part Front and Rear A B C D E F G H A LED Indication B Cable gland communication C Cable gland power D START 5s button E POWER button F Front cover G Top cover H Wall bracket connected parts ...

Page 16: ...Getting Started 16 Connection parts A B C D A Circuit breaker of PCS B Power terminals Positive GND Earth Negative C Communication terminal D Circuit breaker of battery pack ...

Page 17: ...s LED Status and Indications SOC level Error code Operating Fault Charge On Off BAT Charging Not operating Discharge On Off BAT Discharging Not operating Fault On Off Fault Normal Refer to Error Codes and Messages for more information ...

Page 18: ...ng is increased at the transfer connection point to the public electricity supply system by the nominal current of the connected ESS PCS y y Exercise extreme caution when transporting the product There is risk of the product falling and causing physical injury y y Use appropriate moving equipment to transport make sure that the equipment is capable of supporting the weight of the equipment CAUTION...

Page 19: ...kg y y The floor of installing location must be able to support the weight of this product apprx HBC 11H 117Kg HBC15H 142kg y y Do not install the product on the ceiling y y Do not install the product widthwise or install on a wall with a lean of more than 10 degrees y y Do not install the product tilting forward 3 000 m y y This product must not be installed or used at altitudes above 3 000 m y y...

Page 20: ... or environments subject to the heavy build up of dust y y Do not block the air ventilation openings for cooling y y When cleaning the air duct shut off all of the systems including battery unit y y This product generates some noise at times and should not be installed close to living or sleeping areas y y Please consult the location with your installer when installing in places subject to noise s...

Page 21: ...between enclosure and enclosure enclosure and other devices Keep the 700 mm distance between the front door and in order to allow space for installation and servicing If the door is closed all other products should be away at least 300 mm from the front door for safety operation Be sure not to place any object on top of the enclosure Risk of fire or serious injury due to high temperature If the ES...

Page 22: ... hole size matches the anchor type CAUTION y y When attaching the wall bracket to a wall adjust the horizontal level using inclinometer y y When indicate the position to drill you can refer to the Quick Installation Guide which is true to scale print of the actual wall bracket if required y y Quick Installation Guide is in the accessory package y y Before fixing the bracket screws check the horizo...

Page 23: ...tion conditions and clearance requirement And indicate the positions to drill using a pencil or other writing utensil Drill holes in the indicated positions Mount bracket hole guide Template 406 mm 305 mm 404 mm 755 mm b Affix the wall bracket to the wall with screws and anchors ...

Page 24: ...t that could damage the bottom of the product WARNING c Hang the enclosure on the wall bracket Then rotate the legs to bring the product level with the floor y y Depending on the surface different screws anchors and additional supports may be required for installing the wall brackets Therefore these screws and anchors are not provided The system installer is responsible for selecting the proper sc...

Page 25: ...connection make sure that the circuit breaker of PCS and the circuit breaker of battery pack are off securely WARNING y y Serious injury may occur due to the heavy weight of the product Therefore special care must be taken in handling Make sure to have at least two people to move the package y y All installation work must be done only as described in this manual Otherwise It may cause fire electri...

Page 26: ...tion 26 b Before start the wiring make sure the circuit breaker of the battery unit is OFF OFF C Place a battery module inside the enclosure and fix the battery module using supplied nuts 2 positions 25 kgf cm ...

Page 27: ...ring to previous step Nut assembling positions are indicated in the figure Total number of battery modules may differ depending on your model E Remove protective labels and covers on the power connector of the battery modules Do not touch the terminals after removing the protective label and cover Protective label ...

Page 28: ...Installation 28 F Connect the power cable harness as shown in the figure G Connect the communication cable harness as shown in the figure ...

Page 29: ...nstall the PCS in place where the battery cables can easily access battery unit Refer to the installation manual of the PCS for more information A Assemble the supplied cable glands to the right side of the battery unit b In order to making the electrical connections the connection box cover should be removed Loosen the 4 bolts and 2 nuts indicated in the figure ...

Page 30: ...rily remove cables passing through the connection box cover After completing all connections temporarily removed cables must be restored to their original state d Pass the 3 conductor communication cable through the upper cable gland to the right side of the battery unit Rotate the cable gland to tighten the gland hole ...

Page 31: ...own Green f Connect the 3 conductor communication wires to the communication terminal block as shown in the figure For connection at LG ESS PCS please refer to the PCS manual chapters ATS BMS EV METER Communication Connections 3 RS485_Low At PCS Port 18 4 RS485_High At PCS Port 17 6 Shield Earth At PCS Port 16 Blue Brown Green ...

Page 32: ...ease refer to the PCS Manual chapter Battery Connection h Strip off the 3 power cables at the battery unit as shown in the figure 12 mm Red Green Black i Connect the 3 conductor power wires to the power terminal block as shown in the figure After completing all connections temporarily removed connection box cover and cables must be restored to their original state Red Green Black 1 Battery wire 2 ...

Page 33: ...Installation 33 j Switch the main circuit breaker of battery pack to the ON ON k Switch the circuit breaker of PCS to the ON ON l Close the front door and fasten the bolts on the right side 30 kgf cm ...

Page 34: ... START 5s button for 5 seconds You can hear the sound click If SOC level is shown on the LED display the battery operation has been normally succeeded a b n Find the main label on the right side of the battery unit and mark the checkboxes of the applicable items using oil based autograph pen black ...

Page 35: ...ducts in contact with the product for a long period of time Inspecting Regularly It is recommended to check the operating status and connection status once a year It should be done by an LG certified service provider Contact an authorized dealer or the seller you purchased the system from Contact If you have technical problems or questions contact installation company or LG Electronics 1 Installat...

Page 36: ...rmation for your country please see www lg com global recycling Removal of waste batteries and accumulators Product with embedded battery ONLY You can take your appliance either to the shop where you purchased the product or contact your local government waste office for details of your nearest authorised WEEE collection point Please note that some distributors are obliged to take back old devices...

Page 37: ...e repariert werden können aber auch sonstige wertvolle Materialien enthalten die zur Schonung knapper Ressourcen recyclet werden können 3 Sie können Ihr Gerät entweder in den Laden zurückbringen in dem Sie das Produkt ursprünglich erworben haben oder Sie kontaktieren Ihre Gemeindeabfallstelle für Informationen über die nächstgelegene autorisierte WEEE Sammelstelle Bitte beachten Sie dass einige Ve...

Page 38: ... 28S 9P Maximum charging voltage Vdc 458 3 343 7 End of discharging voltage Vdc 361 76 271 32 Maximum charging current A 16 00 16 00 Maximum discharging current A 13 22 17 63 Standard charging current A 11 1 11 1 Standard discharging current A 7 38 7 38 Size mm 698 W x 205 D x 1073 H 698 W x 205 D x 1073 H Weight kg 142 00 117 00 Over Voltage Cut off Parameter Vdc 4 1 4 1 Over Current Cut off Para...

Page 39: ... 28S 9P Nominal voltage Vdc 101 64 Capacity Ah Ah 36 90 Maximum charging voltage Vdc 114 60 End of discharging voltage Vdc 70 00 Maximum charging current A 18 27 Maximum discharging current 5 0kW A 19 80 Standard charging current A 11 10 Standard discharging current A 7 38 Module size mm 600 2 W x 191 6 D x 211 9 H Module weight kg 26 Battery Cell Unit SPEC JPTUV 11151560379313 001 Model Name INR ...

Page 40: ...10 years Certification UL1973 UN38 3 IEC62619 IEC63056 IEC60730 1 Annex H IEC61000 CE IP55 y y Design and specifications are subject to change without notice To ensure the full performance of the battery it is recommended not to exceed the period of six month from the manufacturing date to the date of commissioning Contact office for compliance of this product LG Electronics European Shared Servic...

Page 41: ... temperature level is lower than the limit Automatically released after warning condition is cleared 682 Terminal Over Temperature Warning Power Terminal temperature level is higher than the limit Automatically released after warning condition is cleared 686 Discharge Over Current Warning Discharge current level is higher than the limit Automatically released after warning condition is cleared 687...

Page 42: ...mit Automatically restart after fault condition is cleared 711 Discharge Under Temperature Fault1 Discharge temperature level is lower than the limit Automatically restart after fault condition is cleared 712 Charge Over Temperature Fault1 Charge temperature level is higher than the limit Automatically restart after fault condition is cleared 713 Charge Under Temperature Fault1 Charge temperature ...

Page 43: ...he limit Contact service center 742 Discharge Over Temperature Fault2 Discharge temperature level is higher than the limit Contact service center 743 Discharge Under Temperature Fault2 Discharge temperature level is lower than the limit Contact service center 744 Charge Over Temperature Fault2 Charge temperature level is higher than the limit Contact service center 745 Charge Under Temperature Fau...

Page 44: ...h Open Contact service center 774 Magic Number Error Magic Number Error Contact service center 775 Pack Number Error Pack Number Error Contact service center 776 MCU ADC Stuck Error MCU ADC Stuck Error Contact service center 777 Temperature ADC Stuck Error Temperature ADC Stuck Error Contact service center 778 Cell ADC Stuck Error Cell ADC Stuck Error Contact service center 779 BCU ADC Reference V...

Page 45: ...M ECC Check Error BCU ROM ECC Check Error Automatically restart after detecting fault 793 BCU RAM ECC Check Error BCU RAM ECC Check Error Automatically restart after detecting fault 794 BCU MCU Clock Check Error BCU MCU Clock Check Error Automatically restart after detecting fault 795 MarchC 1 region Copy Error MarchC 1 region Copy Error Automatically restart after detecting fault 796 MarchC 2 reg...

Page 46: ...Appendix 46 Wiring Diagram BUEL011HBC1 Pack 3 BCU Enclosure BUEL015HBC1 Pack 4 BCU Enclosure ...

Page 47: ...Appendix 47 ...

Page 48: ......

Page 49: ...kku Baustein für den Wohnbereich Modell BUEL011HBC1 Paket 3 BCU Gehäuse BUEL015HBC1 Paket 4 BCU Gehäuse Bitte lesen Sie vor Gebrauch des Produkts diese Anleitung sorgfältig durch und bewahren Sie sie zum späteren Nachschlagen auf Für stabile Betrieb und periodische System Updates empfiehlt LG Electronics dem Anwender dringend sich bei EnerVu zu unterschreiben und die Verbindung zu pflegen ...

Page 50: ...fizierten Dienstleistern durchgeführt werden y y Elektroinstallationen müssen in Übereinstimmung mit den vor Ort und im Land geltenden Sicherheitsstandards durchgeführt werden y y Bei Arbeiten am ESS sind Gummihandschuhe und Schutzkleidung einschließlich Schutzbrille und Schutzstiefel zu tragen y y Es besteht Stromschlaggefahr Nicht die Abdeckung entfernen Im Inneren befinden sich keine Teile die ...

Page 51: ...itzendem Wasser ausgesetzt werden und es dürfen auch keine mit Flüssigkeit gefüllten Gefäße auf ihm abgestellt werden wie z B eine Blumenvase y y Dieses Produkt entspricht IP Schutzklasse 55 Bitte nicht in staubiger oder feuchter Umgebung installieren y y Das Metallgehäuse kann sich während des Betriebs stark erhitzen y y Die Entsorgung dieses Produkts muss den vor Ort gültigen Vorschriften und Ge...

Page 52: ...elspannung erzeugt wie z B an eine Wechselstromquelle oder einen Generator Anschließen des Produkts an externe Geräte kann zu starken Beschädigungen führen y y Die Handhabung von Akkus sollte nur durch LG Servicepersonal oder ausgebildete Installateure erfolgen oder angeleitet werden y y Der Akku wird nicht weiter entladen wenn dessen Restladung unter einer bestimmten Stufe ist y y Um die jüngste ...

Page 53: ... nur wenige Zellen betroffen sind Im Falle eines großen Brandes verwenden Sie eine große Menge Wasser zum Löschen oder einen Lithium Feuerlöscher zum Löschen Besondere Gefahren die von den Chemikalien ausgehen Wenn das Elektrolyt mit Wasser in Berührung kommt kann sich Fluorwasserstoffsäure bilden Im Brandfall kann die Bildung der folgenden Rauchgase nicht ausgeschlossen werden Fluorwasserstoff HF...

Page 54: ... enthaltenen Spezifikationen und Beschreibungen wurden zum Zeitpunkt der Drucklegung auf ihre Richtigkeit hin überprüft Da LG Electronics aber das Ziel hat Produkte kontinuierlich zu verbessern behalten wir uns das Recht vor jederzeit Produktänderungen durchzuführen Die in diesem Dokument enthaltenen Abbildungen dienen nur Demonstrationszwecken Je nach Produktversion und Marktgebiet können Einzelh...

Page 55: ...orne und hinten 15 Teile zum Anschließen 16 LED Anzeigen 17 Installation Ort der Installation 18 Mindestabstände 21 Standgerät mit Wandbefestigung 22 Akku Module installieren 25 Kabelverbindung zwischen Akku Baustein und PCS 29 Anhang Wartung 35 Das Produkt reinigen 35 Regelmäßige Inspektionen 35 Kontakt 35 Produkt entsorgen 36 Technische Daten 37 Fehlercodes und Meldungen 40 Elektroschaltplan 45 ...

Page 56: ...iße Oberfläche Vorsicht Stromschlaggefahr zeitlich festgelegte Entladung gespeicherter Energie Vorsicht es besteht Stromschlaggefahr Keine offene Flamme oder Zündquelle betreiben und nicht rauchen Beim Arbeiten am Akkusystem eine Schutzbrille tragen Das Produkt außerhalb der Reichweite von Kindern installieren Erst das Handbuch die Broschüre mit der Anleitung lesen bevor Sie die Arbeit beginnen od...

Page 57: ...rennbaren Materials kein Brand entsteht Der Bereich zum Aufladen muss hinreichend belüftet werden darauf achten nicht in Kontakt mit Säure zu kommen Falls Sie in Kontakt kommen mit säurehaltigem Material den betroffenen Bereich sofort mit viel Wasser spülen Sofort ärztliche Hilfe in Anspruch nehmen Kontaminierte Kleidung mit ausreichend Wasser waschen bevor sie wieder benutzt wird Zum Löschen von ...

Page 58: ...aik Sonnenkollektorsystem das Solarenergie in Gleichstrom verwandelt SOC State of Charge Ladezustand Aktueller Ladezustand einer wiederaufladbaren Batterie Akkus relativ zur Kapazität BCU Battery Control Unit Akku Steuereinheit Elektronisches System zur Steuerung eines System wiederaufladbarer Batterien Akkus zur Gewährleistung der Batteriesicherheit BIC Battery Interface Circuit Batterie Interfac...

Page 59: ...hmen c Den Akku Baustein aus der Verpackung nehmen y y Für die sichere Installation und den Transport sind mindestens 2 Personen erforderlich y y Dieses Produkt ist sehr schwer Bei Handhabung des Geräts ist persönliche Schutzausrüstung zu tragen z B Handschuhe und Sicherheitsschuhe Das Produkt sollte nur von einer ausreichenden Anzahl geschulter Umzugshelfer angehoben werden WARNUNG ...

Page 60: ...ku Baustein Installationsanleitung und Anleitung zur Schnellinstallation Wandhalterungen Akku Modul BUEL011HBC1 jeweils 3 BUEL015HBC1 jeweils 4 Stromkabel Kabelbaum Kommunikationskabel Kabelbaum Muttern jeweils 17 Kabelmuffen jeweils 2 ...

Page 61: ...e die vor Ort geltenden Standards y y CAT V besser CAT VI mit 4 x 2 x 0 4 mm oder 4 x 2 x 0 6 mm TWP Kabel y y Minimum 300 V Nennwert 3 polig Twisted Pair oder doppel isoliert mit ein Twisted Pair abgeschirmtes Kupferkabel Cu Stromanschluss Netz y y 600 V abgeschirmtes Twisted Pair Kabel mindestens 3 paariges Kabel erforderlich y y Kabel mit mindestens 1 x 6 mm in den Farben schwarz und Rot für Er...

Page 62: ...et Bohrspitzenhalter und Knebelgriff Drehmomentschlüssel mit magnetischem Innensechskant M5 M6 M8 Schraubendreher Phillips 5 mm Flachkopf 6 5 4 2 mm Schneidewerkzeug 14 Neigungsmesser Maßband Schreibgerät Abisolierzange A Abisolierzange C Drahtschneider B Schraubenschlüssel 17 mm Empfohlene Werkzeuge Hebevorrichtung Abisolierzange B RJ45 Crimpzange ...

Page 63: ...ichnung der einzelnen Teile Vorne und hinten A B C D E F G H A LED Anzeige B Kabelmuffe Kommunikation C Kabelmuffe Strom D START 5s Taste E POWER Taste F Vordere Abdeckung G Obere Abdeckung H Wandhalterungs Verbindungsteile ...

Page 64: ...Erste Schritte 16 Teile zum Anschließen A B C D A Stromkreisunterbrecher der PCS B Stromanschlüsse Positiv GND Erde Negativ C Anschluss für Kommunikationskabel D Hauptschalter von Akku Paket ...

Page 65: ...us und Anzeigen SOC Niveau Fehlercode Betrieb Fehler Aufladen Ein Aus BAT Aufladen Nicht in Betrieb Entladen Ein Aus BAT Entladen Nicht in Betrieb Fehler Ein Aus Fehler Normal Weitere Informationen finden Sie unter Fehlercodes und Meldungen ...

Page 66: ...fentlichen Stromversorgungsnetz wird die sekundäre Kurzschluss Strombelastbarkeit erhöht um den Nennstrom des angeschlossenen PCS des ESS y y Beim Transport des Produkts ist äußerste Vorsicht geboten Falls die Gefahr besteht dass das Produkt fällt kann das zu Körperverletzungen führen y y Für den Transport sind geeignete Transportmittel zu verwenden Und stellen Sie sicher dass diese das Gewicht de...

Page 67: ... Gewicht dieses Produkts ca HBC 11H 117 Kg HBC15H 142 kg tragen können y y Das Produkt nicht an der Decke installieren y y Dieses Produkt nicht breitseitig installieren oder an einer Wand die um mehr als 10 Grad geneigt ist y y Das Produkt nicht mit Neigung nach vorne installieren 3 000 m y y Dieses Produkt darf nicht installiert oder betrieben werden an Orten die über 3000 m über dem Meeresspiege...

Page 68: ...bungen installieren wo sich viel Staub ansammelt y y Die Öffnungen die zur Luftzirkulation und Kühlung dienen unbedingt frei lassen y y Zum Reinigen des Luftkanals alle System Komponenten einschließlich Akku ausschalten y y Dieses Produkt erzeugt zu bestimmten Zeiten leichte Geräusche darum sollte es nicht zu nahe am Wohn oder Schlafstätten installiert werden y y Bitte fragen Sie Ihren Installateu...

Page 69: ...0 mm Abstand eingehalten werden Zwischen Vordertür und anderen Objekten muss für Installationsarbeiten und andere Wartungsarbeiten 700 mm Abstand eingehalten werden Um einen sicheren Betrieb zu gewährleisten sollten andere Produkte mindestens 300 mm Abstand haben von der geschlossenen Vordertür Oben auf das Gehäuse keine Gegenstände ablegen Durch hohe Temperaturen besteht Gefahr durch Feuer und sc...

Page 70: ...ls passt VORSICHT y y Wenn Sie die Wandhalterung an der Wand anbringen sorgen Sie für horizontalen Sitz indem Sie den Neigungsmesser benutzen y y Bei Bedarf können Sie zur Kennzeichnung der Bohrlochposition die Anleitung zur Schnellinstallation zu Hilfe nehmen in der die tatsächliche Größe der Wandhalterung abgedruckt ist y y Die Anleitung zur Schnellinstallation ist im Zubehörpaket y y Vor dem Fe...

Page 71: ...zungen und die erforderlichen Abstände eingehalten werden können Mit einem Stift die Stellen markieren an denen gebohrt werden muss An den markierten Stellen Löcher bohren Schablone zu Lochführung der Halterung 406 mm 305 mm 404 mm 755 mm b Die Wandhalterung mit Dübel und Schrauben an der Wand befestigen ...

Page 72: ...te des Produkts beschädigen könnten WARNUNG c Das Produkt an die Wandhalterung hängen Dann die Beine drehen damit das Produkt Bodenhaftung hat y y Welche Schrauben und Dübel und weitere Stützen zur Anbringung der Wandhalterung erforderlich sind hängt von der Beschaffenheit der Wand ab Darum sind die Schrauben und Dübel nicht Bestandteil des Lieferumfangs Der Installateur des Systems ist verantwort...

Page 73: ...CS und der Schutzschalter des Batteriepacks sicher ausgeschaltet sind WARNUNG y y Aufgrund seines schweren Gewichtes könnte das Produkt schwere Verletzungen verursachen Darum muss die Handhabung mit besonderer Vorsicht erfolgen Stellen Sie sicher dass Sie mindestens zwei Personen zum Transportieren des Pakets haben y y Alle Installationsarbeiten dürfen nur so durchgeführt werden wie es in dieser A...

Page 74: ...uf achten dass der Hauptschalter des Akku Bausteins auf AUS steht Erst dann mit der Verkabelung beginnen AUS C Das Akku Modul in das Akku Gehäuse setzen und darin mit den mitgelieferten Muttern 2 Stellen 25 kgf cm befestigen ...

Page 75: ...tt Die Muttern Montagepositionen sind in der Abbildung angegeben Je nach Modell kann die Gesamtanzahl der Akku Module unterschiedlich sein E An den Strom Konnektoren der Akku Module die Schutzetiketten und Abdeckungen entfernen Nicht die Strom Anschlüsse berühren nachdem Sie das Schutzetikett und die Abdeckung entfernt haben Schutzetikett ...

Page 76: ...Installation 28 F Wie in der Abbildung gezeigt den Stromkabel Kabelbaum anschließen G Wie in der Abbildung gezeigt den Kommunikationskabel Kabelbaum anschließen ...

Page 77: ... Stelle an der die Batteriekabel leicht an die Batterieeinheit gelangen können Für weitere Informationen lesen Sie bitte das Installationshandbuch des PCS A Die mitgelieferten Kabelmuffen auf der rechten Seite des Akku Bausteins montieren b Um die elektrischen Anschlüsse durchführen zu können muss der Deckel des Anschlusskastens entfernt werden Die in der Abbildung gezeigten 4 Schrauben und 2 Mutt...

Page 78: ...n Deckel geführten Kabel vorübergehend zu entfernen Nach Fertigstellung aller Anschlüsse müssen die vorübergehend entfernten Kabel wieder an ihre ursprüngliche Stelle gebracht werden d Das 3 polige Kommunikationskabel durch die obere Kabelmuffe auf der rechten Seite des Akku Bausteins führen Die Kabelmuffe drehen um die Kabelmuffenöffnung zu verengen ...

Page 79: ...Braun Grün f Wie in der Abbildung gezeigt an der Klemmleiste für Kommunikationskabel das 3 polige Kommunikationskabel anschließen Bei Anschluss an LG ESS PCS beachten Sie im PCS Handbuch das Kapitel Kommunikations Anschlüsse ATS BMS EV ZÄHLER 3 RS485_Low At PCS Port 18 4 RS485_High At PCS Port 17 6 Shield Earth At PCS Port 16 Blau Braun Grün ...

Page 80: ...m PCS Handbuch das Kapitel Akku Anschluss h Wie in der Abbildung gezeigt auf Akku Seite die 3 poligen Stromkabel abisolieren 12 mm Rot Grün Schwarz i Wie in der Abbildung gezeigt an der Klemmleiste für Stromkabel das 3 polige Stromkabel anschließen Nach Fertigstallung aller Anschlüsse müssen die vorübergehend entfernten Kabel und die Anschlusskasten Abdeckung wieder an ihre ursprüngliche Stelle ge...

Page 81: ...j Den Hauptschalter des Akku Pakets auf Position EIN stellen EIN k Den Stromkreisunterbrecher der PCS auf Position EIN stellen EIN l Die Vordertür schließen und die Schrauben auf der rechten Seite festziehen 30 kgf cm ...

Page 82: ...drückt halten Dann hören Sie ein Klicken Wenn die LED Anzeige das SOC Niveau Ladezustand anzeigt ist der normale Akkubetrieb ermöglicht a b n Auf der rechten Seite des Akku Bausteins das Hauptetikett ausfindig machen und die Kontrollkästchen bei den zutreffenden Punkten markieren mit einem Autograf Stift auf Ölbasis schwarz ...

Page 83: ...r Plastikprodukte nicht über einen längeren Zeitraum in Kontakt sind mit dem Produkt Regelmäßige Inspektionen Es wird empfohlen jedes Jahr den Betriebszustand und die Anschlüsse zu überprüfen Sollte von einem LG zertifizierten Dienstleister durchgeführt werden Wenden Sie sich an einen autorisierten Händler oder die Vertriebsstelle wo Sie das System gekauft haben Kontakt Falls Sie technische Proble...

Page 84: ...zuständig ist und fragen wo der nächste autorisierte WEEE Sammelpunkt ist Die aktuellsten Informationen in Bezug auf Ihr Land finden Sie unter www lg com global recycling Beseitigung verbrauchter Batterien und Akkus NUR Produkt mit eingebautem Akku Sie können Ihr Gerät entweder zu dem Geschäft bringen wo Sie es gekauft haben oder Sie informieren sich bei der Behörde vor Ort die für Entsorgungsfrag...

Page 85: ...guration z B XSYP 28S 9P 28S 9P Maximale Ladespannung Gleichspannung 458 3 343 7 Spannung bei Ende der Entladung Gleichspannung 361 76 271 32 Maximaler Ladestrom A 16 00 16 00 Maximaler Entladestrom A 13 22 17 63 Standard Ladestrom A 11 1 11 1 Standard Entladestrom A 7 38 7 38 Größe mm 698 B x 205 T x 1073 H 698 B x 205 T x 1073 H Gewicht kg 142 00 117 00 Überspannungs Ausschalt Parameter Gleichsp...

Page 86: ...onfiguration z B XSYP 28S 9P Nennspannung Gleichspannung 101 64 Kapazität Ah Ah 36 90 Maximale Ladespannung Gleichspannung 114 60 Spannung bei Ende der Entladung Gleichspannung 70 00 Maximaler Ladestrom A 18 27 Maximale Ladeleistung kW 19 80 Maximaler Entladestrom bei 5 0 kW A 11 10 Empfohlene Entladeleistung bei 5 0 kW kW 1 79 Standard Ladestrom A 11 07 Standard Entladestrom A 7 38 Modulgröße mm ...

Page 87: ...Akku 70 bei 10 Jahren Zertifizierung UL1973 UN38 3 IEC62619 IEC63056 IEC60730 1 Annex H IEC61000 CE IP55 y y Konstruktion und Spezifikationen können ohne Vorankündigung geändert werden Damit die volle Leistungsfähigkeit des Akkus gewährleistet ist wird empfohlen dass das Inbetriebnahme Datum des Produkts nicht später als sechs Monate nach dem Herstellungsdatum liegt Bei Fragen zur Produktkonformit...

Page 88: ...ning Der Temperaturpegel bei Entladung ist niedriger als der Grenzwert Automatische Freigabe nach Beseitigung der Ursache für die Warnung 680 Charge Over Temperature Warning Der Temperaturpegel bei Laden ist höher als der Grenzwert Automatische Freigabe nach Beseitigung der Ursache für die Warnung 681 Charge Under Temperature Warning Der Temperaturpegel bei Laden ist niedriger als der Grenzwert Au...

Page 89: ...ng des Sicherheitsspeicherbereichs der CRC Daten Automatische Freigabe nach Beseitigung der Ursache für die Warnung 702 Cell Over Voltage Fault1 Der Zellen Spannungspegel der Akkuzelle ist höher als der Grenzwert Automatische Freigabe nach Beseitigung des Fehlers 703 Cell Under Voltage Fault1 Der Zellen Spannungspegel der Akkuzelle ist niedriger als der Grenzwert Kundendienst kontaktieren 705 Unit...

Page 90: ...r als der Grenzwert Automatische Freigabe nach Beseitigung des Fehlers 724 Atmosphere Charge Under Temperature Fault1 Der Luft Temperaturpegel bei Laden ist niedriger als der Grenzwert Automatische Freigabe nach Beseitigung des Fehlers 725 Current ADC Mux Fault1 Multiplex Fehler bei Stromstärken AD Umwandlung Automatische Freigabe nach Beseitigung des Fehlers 734 Cell Over Voltage Fault2 Der Zelle...

Page 91: ...iedriger als der Grenzwert Kundendienst kontaktieren 755 Atmosphere Charge Over Temperature Fault2 Der Luft Temperaturpegel bei Laden ist höher als der Grenzwert Kundendienst kontaktieren 756 Atmosphere Charge Under Temperature Fault2 Der Luft Temperaturpegel bei Laden ist niedriger als der Grenzwert Kundendienst kontaktieren 762 Relay Opreation Fault2 Fehler bei Relais Betrieb der Akku Stromverso...

Page 92: ...PU Register Error Fehler bei FPU Register Nach Fehlererkennung automatischer Neustart 789 VCU Register Error Fehler bei VCU Register Nach Fehlererkennung automatischer Neustart 790 PIE RAM Error Fehler bei PIE RAM Nach Fehlererkennung automatischer Neustart 791 PIE Handler Error Fehler bei PIE Handler Nach Fehlererkennung automatischer Neustart 792 BCU ROM ECC Check Error Fehler bei BCU ROM ECC Pr...

Page 93: ...Anhang 45 Elektroschaltplan BUEL011HBC1 Paket 3 BCU Gehäuse BUEL015HBC1 Paket 4 BCU Gehäuse ...

Page 94: ......

Page 95: ...R e v 0 1 2 1 0 4 2 0 2 2 Unidad de batería residencial Lea este manual detenidamente antes de utilizar el equipo y guárdelo para futuras consultas Para una operación estable y actualización periódica del sistema LG recomienda firmemente al usuario que firme y mantenga la conexión con EnerVu Modelo BUEL011HBC1 3 baterías BCU carcasa BUEL015HBC1 4 baterías BCU carcasa ...

Page 96: ...cto durante su funcionamiento y y Todas las labores en los ESS deben realizarla únicamente proveedores de servicios certificados por LG y y Las instalaciones eléctricas deben realizarse de acuerdo con los estándares de seguridad eléctrica locales y nacionales y y Lleve guantes de goma y ropa protectora incluidas gafas y botas protectoras al trabajar en el ESS y y Existe riesgo de descarga eléctric...

Page 97: ...gua goteo o salpicaduras y no se deben colocar objetos que contengan líquido como jarrones sobre él y y Este producto tiene clase de protección IP 55 Evite la instalación en entornos con polvo o niveles de humedad elevados y y El alojamiento metálico puede alcanzar temperaturas muy elevadas durante su funcionamiento y y Este producto debe eliminarse de acuerdo con la normativa local y y Conecte lo...

Page 98: ...tenga tensión de CA como una fuente de alimentación de CA o un generador Si conecta el producto a dispositivos externos podrían producirse daños graves en el equipo y y La manipulación de las baterías debe realizarla o supervisarla un instalador cualificado o un técnico de servicio de LG y y La batería no se descarga cuando la carga está por debajo de un nivel determinado y y Para ver los document...

Page 99: ...icadas En caso de incendios grandes use grandes cantidades de agua o un extintor de incendios de litio para extinguirlo Riesgos especiales derivados de los productos químicos Se puede formar ácido hidrofluórico si los electrolitos entran en contacto con el agua En caso de incendios no puede excluirse la formación de los siguientes gases con base de floruro Floruro de hidrógeno HF monóxido de carbo...

Page 100: ...contenidas en este documento son exactas en el momento de su impresión No obstante dado que en LG Electronics aspiramos a mejorar de forma continua nos reservamos el derecho a aplicar modificaciones al producto en cualquier momento Las imágenes proporcionadas en este documento son solo para fines de demostración Dependiendo de la versión del producto y la región del mercado puede haber detalles li...

Page 101: ...ra 15 Componentes de conexión 16 Indicadores LED 17 Instalación Lugar de instalación 18 Espacio mínimo 21 Montaje en pared en suelo 22 Instalación de los módulos de batería 25 Conexión de cableado entre la unidad de batería y PCS 29 Apéndice Mantenimiento 35 Limpieza del producto 35 Realice inspecciones con frecuencia 35 Contacto 35 Eliminación del producto 36 Especificaciones 37 Códigos y mensaje...

Page 102: ...ución peligro Precaución superficie caliente Precaución riesgo de descarga eléctrica descarga temporizada de almacenamiento de energía Precaución riesgo de descarga eléctrica Evitar llamas abiertas fuentes de ignición o fumar Utilice gafas de protección cuando trabaje con la unidad de batería Instale este producto fuera del alcance de niños Lea las instrucciones antes de empezar a trabajar así com...

Page 103: ...or encender material inflamable Asegure la ventilación adecuada de la zona de carga y evite el contacto con el ácido En caso de contacto de la piel o los ojos con un material ácido lave inmediatamente el área con abundante agua Solicite atención médica inmediatamente Lave la ropa contaminada con suficiente agua antes de volver a utilizarla En caso de llamas apáguelas con un extintor Asegúrese de q...

Page 104: ... la batería FV Sistema fotovoltaico Sistema de paneles solares que convierte la energía solar en electricidad de corriente directa SOC Estado de carga Nivel de carga actual de una batería recargable en relación con su capacidad BCU Unidad de control de batería Sistema electrónico que controla un sistema de batería recargable para garantizar su seguridad BIC Circuito de interfaz de batería Sistema ...

Page 105: ...c Extraiga la unidad de batería de la caja y y Se necesitarán al menos 2 personas para trasladar e instalar la batería de forma segura y y Se trata de un producto pesado Utilice el equipo de protección personal adecuado como guantes y calzado de protección cuando manipule la unidad Solo debe elevar el producto un número suficiente de personas cualificadas para ello ADVERTENCIA ...

Page 106: ... batería Manual de instalación y guía de instalación rápida Soportes de pared Módulo de batería BUEL011HBC1 3 EA BUEL015HBC1 4 EA Mazo de cables de alimentación Mazo de cables de comunicación Tuercas 17 unidades Prensas para paso de cable 2 EA ...

Page 107: ...la normativa local y y Cable CAT V mejor CAT VI con 4 x 2 x 0 4 mm o 4 x 2 x 0 6 mm TWP y y Cable de cobre Cu blindado de 3 conductores par trenzado o de doble aislamiento con un par trenzado de 300 V como mínimo Conexión de alimentación y y Cable de par trenzado blindado de 600 V se requiere un cable de al menos 3 pares y y Cable con 1 x 6 mm como mínimo de color negro y rojo conexión a tierra ve...

Page 108: ...rica con mango en T y hueco hexagonal magnético M5 M6 M8 Destornillador Phillips 5 mm Destornillador de pala 6 5 4 2 mm Llave hexagonal 6 mm 8 mm Cúter 14 Inclinómetro Cinta métrica Utensilio de escritura Pelacables A Pelacables C Cortacables B Llave para tuercas 17 mm Herramientas recomendadas Equipo de elevación Pelacables B Engarzadora de conectores RJ45 ...

Page 109: ...l y trasera A B C D E F G H A Indicación LED B Prensa para paso de cable comunicación C Prensa para paso de cable alimentación D Botón de START 5s E Botón de POWER F Cubierta delantera G Cubierta superior H Componentes conectados del soporte de pared ...

Page 110: ...Inicio 16 Componentes de conexión A B C D A Interruptor automático de PCS B Terminales de alimentación positivo GND tierra negativo C Terminal de comunicación D Disyuntor de la batería ...

Page 111: ...OC Código de error Activa Fallo Charge Carga Encendido Apagado Batería en carga Inactiva Discharge Descarga Encendido Apagado Batería en descarga Inactiva Fallo Encendido Apagado Fault Fallo Normal Consulte Códigos y mensajes de error para obtener más información ...

Page 112: ...y La intensidad nominal de corriente del disyuntor secundario aumenta en el punto de conexión de transferencia a la red eléctrica pública por la corriente nominal del PCS del ESS conectado y y Extreme las precauciones al transportar el producto Existe el riesgo de que el producto se caiga y provoque lesiones físicas y y Para el transporte utilice equipo adecuado que pueda soportar el peso del prod...

Page 113: ...11H 117 kg HBC15H 142 kg y y El suelo del lugar de instalación debe poder soportar el peso del producto aprox HBC 11H 117 kg HBC15H 142 kg y y No instale el producto en el techo y y No instale el producto en sentido transversal ni en una pared con una inclinación superior a 10 grados y y No instale el producto inclinado hacia delante 3 000 m y y Este producto no debe instalarse ni utilizarse a alt...

Page 114: ...s que se acumule mucho polvo y y No bloquee los orificios de ventilación para refrigeración y y Al limpiar el conducto de aire apague todos los sistemas incluida la unidad de batería y y A veces este producto genera cierto ruido por lo que no debe instalarse cerca de espacios para estar o dormir y y Realice una consulta sobre la ubicación a su instalador cuando vaya a instalar el producto en lugar...

Page 115: ...casas y otros dispositivos Mantenga una distancia de 700 mm entre la puerta frontal para dejar espacio para la instalación y las labores de servicio Si la puerta está cerrada los demás productos deben estar situados a una distancia mínima de 300 mm de la puerta delantera para garantizar un funcionamiento seguro No coloque ningún objeto encima de la carcasa Se podría producir un incendio o lesiones...

Page 116: ...de que el tamaño del agujero guía se ajusta al tipo de anclaje PRECAUCIÓN y y Al colocar el soporte de pared en una pared ajuste el nivel horizontal con un clinómetro y y Para decidir la posición de perforación puede consultar la Guía de instalación rápida que presenta la escala real del soporte de pared real necesario y y La Guía de instalación rápida está en el paquete de accesorios y y Antes de...

Page 117: ...alación y las necesidades de espacio libre Marque las posiciones de los taladros con un lápiz o similar Realice taladros en las posiciones indicadas Plantilla guía para el orificio del soporte de montaje 406 mm 305 mm 404 mm 755 mm b Fije el soporte de pared a la pared con tornillos y anclajes ...

Page 118: ... la parte inferior del producto ADVERTENCIA c Cuelgue el producto en el soporte de pared A continuación gire las patas para apoyar el producto en el suelo y y En función de la superficie puede que necesite diferentes tornillos anclajes y soportes adicionales para instalar los soportes de pared Por lo tanto estos tornillos y anclajes no vienen incluidos El instalador del sistema es responsable de s...

Page 119: ...tor automático de PCS y de la batería estén apagados correctamente ADVERTENCIA y y Podrían producirse lesiones graves debido al elevado peso del producto Por lo tanto debe tener especial cuidado al manipularlo Asegúrese de contar con al menos dos personas para mover el paquete y y Después de montar la carcasa en la pared retire los 5 tornillos situados a la derecha de la carcasa y abra la puerta D...

Page 120: ...e comenzar el cableado asegúrese de que el disyuntor de la unidad de batería está apagado APAGADO C Introduzca un módulo de batería en la carcasa y fije el módulo de batería con las tuercas suministradas 2 posiciones 25 kgf cm ...

Page 121: ...s posiciones de montaje de las tuercas se indican en la figura El número total de módulos de batería puede diferir en función del modelo E Retire las cubiertas y etiquetas de protección del conector de alimentación de los módulos de batería No toque los terminales después de haber retirado la cubierta y la etiqueta de protección Etiqueta de protección ...

Page 122: ...Instalación 28 F Conecte el mazo de cables de alimentación como se muestra en la figura G Conecte el mazo de cables de comunicación como se muestra en la figura ...

Page 123: ... que se pueda acceder fácilmente a los cables de la batería desde la unidad de batería Consulte el manual de instalación del PCS para obtener más información A Monte las prensas para paso de cable suministradas a la derecha de la unidad de batería b Para establecer las conexiones eléctricas debe retirar la cubierta de la caja de conexiones Afloje los 4 pernos y 2 tuercas indicadas en la figura ...

Page 124: ...raviesen la cubierta de la caja de conexiones Una vez que se establezcan todas las conexiones los cables retirados temporalmente deben devolverse a su estado original d Pase el cable de comunicación de 3 conductores por la prensa para paso de cable superior situada a la derecha de la unidad de batería Gire la prensa para paso de cable para apretar el orificio de paso ...

Page 125: ...e f Conecte los cables de comunicación de 3 conductores al bloque de terminales de comunicación como se muestra en la figura Para la conexión con LG ESS PCS consulte los siguientes capítulos del manual del PCS ATS BMS Conexiones de comunicación con EV METER 3 RS485_Low At PCS Port 18 4 RS485_High At PCS Port 17 6 Shield Earth At PCS Port 16 Azul Marrón Verde ...

Page 126: ...o del manual del PCS Conexiones de la batería h Pele los 3 cables de alimentación del lateral de la unidad de batería como se muestra en la figura 12 mm Rojo Verde Negro i Conecte los cables de alimentación de 3 conductores al bloque de terminales de alimentación como se muestra en la figura Una vez que se establezcan todas las conexiones la cubierta y los cables retirados temporalmente de la caja...

Page 127: ...disyuntor principal de la batería a la posición ON Encendido ENCENDIDO k Cambie el interruptor automático de PCS a la posición ON Encendido ENCENDIDO l Cierre la puerta delantera y fije los pernos situados a la derecha 30 kgf cm ...

Page 128: ... START 5s durante 5 segundos Podrá escuchar un clic Si aparece el nivel de SOC en la pantalla LED la batería funciona correctamente a b n Busque la etiqueta principal a la derecha de la unidad de batería y marque las casillas de verificación de los elementos correspondientes con un bolígrafo de tinta a base de aceite negro ...

Page 129: ...rolongado de tiempo Realice inspecciones con frecuencia Se recomienda comprobar el estado de funcionamiento y de conexión una vez al año Debe realizarlo un proveedor de servicios certificado por LG Póngase en contacto con un distribuidor autorizado o con el vendedor al que compró el sistema Contacto Si tiene problemas técnicos o preguntas póngase en contacto con la empresa que llevó a cabo la inst...

Page 130: ...lizada de su país consulte www lg com global recycling Eliminación de baterías y acumuladores usados SOLO productos con batería integrada Puede llevar el aparato al establecimiento donde lo adquirió o ponerse en contacto con el departamento de gestión de residuos de su gobierno local para que le informen sobre el punto de recogida autorizado de residuos de aparatos eléctricos y electrónicos más ce...

Page 131: ...os p ej XSYP 28S 9P 28S 9P Tensión de carga máxima Vcc 458 3 343 7 Tensión final de descarga Vcc 361 76 271 32 Corriente de carga máxima A 16 00 16 00 Corriente de descarga máxima A 13 22 17 63 Corriente de carga estándar A 11 1 11 1 Corriente de descarga estándar A 7 38 7 38 Tamaño mm 698 ancho 205 profundidad 1073 altura 698 ancho 205 profundidad 1073 altura Peso kg 142 00 117 00 Parámetro de de...

Page 132: ... BPLG004HBG1 Configuración de las células p ej XSYP 28S 9P Tensión nominal Vcc 101 64 Capacidad Ah 36 90 Tensión de carga máxima Vcc 114 60 Tensión final de descarga Vcc 70 00 Corriente de carga máxima A 18 27 Potencia de carga máxima kW 19 80 Corriente de descarga máxima a 5 0 kW A 11 10 Potencia de descarga recomendada a 5 0 kW kW 1 79 Corriente de carga estándar A 11 07 Corriente de descarga es...

Page 133: ...tada 10 años batería 70 a 10 años Certificación UL1973 UN38 3 IEC62619 IEC63056 IEC60730 1 Annex H IEC61000 CE IP55 y y El diseño y las especificaciones están sujetos a cambios sin previo aviso Para garantizar el pleno rendimiento de la batería se recomienda no superar los seis meses desde la fecha de fabricación hasta la fecha de puesta en marcha Póngase en contacto con la oficina para la conform...

Page 134: ...nivel de temperatura de carga es superior al límite Se libera automáticamente una vez que se desactiva la condición de advertencia 681 Charge Under Temperature Warning El nivel de temperatura de carga es inferior al límite Se libera automáticamente una vez que se desactiva la condición de advertencia 682 Terminal Over Temperature Warning El nivel de temperatura del terminal eléctrico es superior a...

Page 135: ... en contacto con el Centro de servicio técnico 705 Unit Over voltage Fault1 El nivel de voltaje de unidad de las celdas de la batería es superior al límite Se libera automáticamente una vez que se reinicia la condición de fallo 706 Unit Under voltage Fault1 El nivel de voltaje de unidad de las celdas de la batería es inferior al límite Se libera automáticamente una vez que se reinicia la condición...

Page 136: ... celda de las celdas de la batería es superior al límite Póngase en contacto con el Centro de servicio técnico 735 Cell Under Voltage Fault2 El nivel de voltaje de celda de las celdas de la batería es inferior al límite Póngase en contacto con el Centro de servicio técnico 737 Unit Over voltage Fault2 El nivel de voltaje de unidad de las celdas de la batería es superior al límite Póngase en contac...

Page 137: ... batería Póngase en contacto con el Centro de servicio técnico 764 Reset Over Count Fault2 Error de restablecimiento de recuento Póngase en contacto con el Centro de servicio técnico 766 BIC ADC Reference Voltage Error Error de voltaje de referencia de ADC BIC Póngase en contacto con el Centro de servicio técnico 767 Cell Voltage Sensor Open Wire Circuito abierto de sensor de voltaje de celda Póng...

Page 138: ...omáticamente tras detectar el fallo 790 PIE RAM Error Error de RAM PIE Se reinicia automáticamente tras detectar el fallo 791 PIE Handler Error Error de controlador PIE Se reinicia automáticamente tras detectar el fallo 792 BCU ROM ECC Check Error Error de comprobación de ECC de ROM BCU Se reinicia automáticamente tras detectar el fallo 793 BCU RAM ECC Check Error Error de comprobación de ECC de R...

Page 139: ...Apéndice 45 Diagrama de cableado BUEL011HBC1 3 baterías BCU carcasa BUEL015HBC1 4 baterías BCU carcasa ...

Page 140: ......

Reviews: