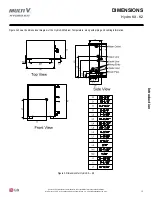
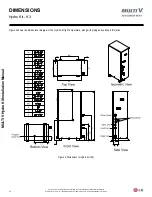
background image

Installation Manual

Hydro Kit Medium Temperature (K2) 

Hydro Kit High Temperature (K3)

Hydro Kit Medium Temperature (K2) 

Btu/h 107,500

Hydro Kit High Temperature (K3)


Btu/h 86,000

Summary of Contents for ARNH763K3B2

Page 1: ...Installation Manual Hydro Kit Medium Temperature K2 Hydro Kit High Temperature K3 Hydro Kit Medium Temperature K2 Btu h 107 500 Hydro Kit High Temperature K3 Btu h 86 000 ...

Page 2: ... to ignoring any instructions will cause harm or damage The level of seriousness is classified by the symbols described below Do not throw away destroy or lose this manual Please read carefully and store in a safe place for future reference Content familiarity required for proper installation For more technical materials such as submittals engineering databooks and catalogs visit www lg vrf com Fo...

Page 3: ...ydro Kit Medium Temperature K2 Control Panel Layout 43 Hydro Kit High Temperature K3 Control Panel Layout 43 Terminating Group Controlled Hydro Kits 46 Pre Commissioning 54 Group Control Setup 54 Plan the Multi V System Central Control Addresses Assignments 54 Hydro Kit Indoor Unit Central Control Address Assignments 54 Hex Address Assignment Limitations 54 Multi V System Central Controller Commun...

Page 4: ...innovation some specifications may change without notification LG Electronics U S A Inc Englewood Cliffs NJ All rights reserved LG is a registered trademark of LG Corp 4 MULTI V Hydro Kit Installation Manual This page left intentionally blank ...

Page 5: ...tance of mechanical transport equipment because there is a risk of personal injury Some products use polypropylene bands for packaging Do not use polypropylene bands to lift the unit Suspend the water source unit from the base at specified positions Support the outdoor unit a minimum of four points to avoid slippage from rigging apparatus Do not handle indoor units without the use of gloves and pr...

Page 6: ...Hydro Kit Wall Mounted Controller Use only LG provided communications cable Do not shorten modify lengthen or remove factory plug able connectors from the communications cable provided with the Hydro Kit Wall Mounted Controller wiring kit The product will malfunction Verify all power ground and communications wires and cables are properly terminated before applying power to the product Securely ti...

Page 7: ... injury or death Replace all control box and panel covers If cover panels are not installed securely dust water and animals may enter the outdoor unit causing fire electric shock and physical injury or death Always check for system refrigerant leaks after the unit has been installed or serviced Low refrigerant levels may cause product failure and exposure to high concentration levels of refrigeran...

Page 8: ...gerant piping during or after operation It can cause burns or frostbite Do not operate the unit with the panel s or protective cover s removed keep fingers and clothing away from moving parts The rotating hot cold and high voltage parts of the unit can cause physi cal injury or death If a refrigerant gas leak is detected leave the room Refrigerant gas in sufficient quantity in an enclosed area can...

Page 9: ...ro Kit High Temperature K3 ARNH763K3B2 Heating Only 86 000 Btu h These units are to be used in conjunction with LG s Multi V Variable Refrigerant Flow VRF Heating and Air Conditioning system Both units operate on 208 230 V 60 Hz 1 phase power Install these unit s in the location s specified by your design engineer HVAC system layout drawings and project specifications Perform the instal lation acc...

Page 10: ... registered trademark of LG Corp HydroKit Nomenclature ARN H 96 3 K2 A Generation 2 Second Electrical Ratings 3 208 230V 60Hz 1Ph 96 107 500 76 86 000 Type H Hydro Kit Family ARN Multi V Indoor Unit Refrigerant R410A 2 K2 Hydro Kit Medium Temperature K3 Hydro Kit High Temperature Combination of functions A Standard B High Temperature Water Heater Nominal Capacity Chassis Total Heating Capacity in ...

Page 11: ...tat Interface2 Conventional 24 vac Thermostat Interface2 X Conventional Mechanical Thermostat Interface1 Indirect Tank Water Pre Heating 3rd Party Solar Heating System Flow Control X Storage Tank Heating Operation Timer Water Temperature Reset Overheating Protection Emergency Heating Operation Available X Not available KEY Hydro Kit Compatibility The Hydro Kit is fully compatible with Multi V III ...

Page 12: ...er Wire Knock out R 410a Low Pressure Vapor Pipe R 410a High Pressure Liquid Pipe Heating Circuit Water Inlet Connection Hydronic Circuit Water Outlet Connection R 410a Low Pressure Vapor Pipe Connection R 410a High Pressure Vapor Liquid Pipe Connection Condensate Drain Pipe Hydronic Circuit Water Inlet Connection Communication Cable Knock out Power Wire Knock out Figure 1 Medium Temperature K2 Un...

Page 13: ...or each Hydro Kit Part Quantity Part Image Installation Manual this manual 1 n a Hydro Kit Remote Control Panel 1 Sensor Well 1 Indirect Hot Water Storage Tank Sensor 1 Refrigerant Strainer 1 Independent Power Module 1 Optional Accessories Table 4 lists additional optional accessories available through LG Electronics Table 4 Optional Accessories Available from LG Electronics Part Model Description...

Page 14: ... 3 9 5 Pressure Drop ft wg 23 1 7 Water Pipe Connections Inlet Diameter 1 MPT 1 MPT Outlet Diameter 1 MPT 1 MPT Refrigerant Pipe Connections Liquid ODU in 3 8 3 8 Vapor Gas ODU in 7 8 3 4 Drain Connection 1 MPT 1 MPT Multi V ODU Comm Cable AWG Conductors type 18 2 stranded shielded 18 2 stranded shielded Hydro Kit Wall Mounted Controller Communication Cable Use LG supplied cable only Use LG suppli...

Page 15: ...thout notification LG Electronics U S A Inc Englewood Cliffs NJ All rights reserved LG is a registered trademark of LG Corp Dimensions Figure 3 shows the dimensional diagram of the Hydro Kit Medium Temperature along with piping and cabling information Hydro Kit K2 Figure 3 Dimensions for Hydro Kit K2 ...

Page 16: ... may change without notification LG Electronics U S A Inc Englewood Cliffs NJ All rights reserved LG is a registered trademark of LG Corp Dimensions Figure 4 shows the dimensional diagram of the Hydro Kit High Temperature along with piping and cabling information Hydro Kit K3 Figure 4 Dimensions for Hydro Kit K3 ...

Page 17: ... C to conventional thermostat terminals 18 19 20 Sockets and Connections CN 2WAY A CN 2WAY B CN 3WAY A CN 3WAY B CN CC CN COM CN EEV CN FLOW1 To terminal strip B screws 14 15 16 Not used To terminal strip A screws 8 9 10 To terminal strip A screws 1 2 3 Optional LG Dry Contact connection Multi V communication to outdoor or water source unit R410A EEV value Factory mounted flow switch CN FLOW2 Not ...

Page 18: ...t unit controller CN ROOM LG RemoteTemperature Sensor optional CN TH3 TOP LEFT Heat exchanger inlet water temperature sensor CN TH3 BOTTOM CENTER Heat exchanger outlet water temperature sensor CN TH4 TOP Not used CN TH4 BOTTOM Hot water storage tank sensor field mounted CN THM01 To terminal strip A screws 7 8 9 10 CN WRITE EARTH Earth Ground CN DC Communications link with inverter board TERMINAL S...

Page 19: ...isture barrier plastic bonnet 8 Check the unit nameplate data and model number Verify the unit voltage and capacities are correct before proceeding 9 Remove and retain the installation manual It is located under the unit on top of the unit or taped and inserted inside the unit cabinet 10 Lift the unit but not by refrigerant piping and inspect for freight damage If damage is found repack the unit a...

Page 20: ...igure 7 Minimum Clearance Areas Around Units Match Letter Clearance Area to Corresponding Hydro Kit Chassis K2 Chassis Roughing In the Hydro Kit Chassis Match Letter Clearance Area to Corresponding Hydro Kit Chassis K3 Chassis Table 6 Hydro Kit Minimum Clearance Dimension in Inches Hydro Kit Chassis Maintenance Ventilation Piping Heat Exchanger Pull A B C E F G H I J K K2 20 1 2 24 13 1 2 8 25 K3 ...

Page 21: ...igure 8 Proper Transportation of Unit One person should not carry the product Some products include polypropylene bands around the unit for packag ing Do not use polypropylene bands to lift the unit Tear apart and throw away plastic packaging bags so that children may not play with them and risk suffocation and death Lift the water source unit from the base at specified locations Support the water...

Page 22: ... the Hydro Kit to a base and in a manner approved by the structural engineer to minimize damage to the unit in the event of an earth quake Any deficiency in installation may cause unit to fall resulting in physical injury or death Anchoring the Hydro Kit Unit Figure 9 shows the proper location and mounting of the anchor bolts for the Hydro Kit Location of the anchor bolts 13 15 16 15 1 4 Unit Inch...

Page 23: ...n of the wall mounted sensor or thermostat A good location will protect the sensor thermostat from direct sunlight and local sources of water vapor heated and cooled air If no mounting height was specified by the building designer place the handy box approximately fifty five 55 inches above the finished floor if regulations of the American Disability Act ADA do not require a lower mounting height ...

Page 24: ... may occur in the smallest room volume on the system and compare the results to the maximum allowable concentration number 1 Also consult state and local codes in regards to refriger ant safety Verify that the maximum refrigerant concentration level in the space where the indoor unit will be mounted meets the concentration limit for the application 1 Information about ASHRAE Standard 15 2010 34 20...

Page 25: ...the Port and the Piping Meet Insulation for Indoor Unit Port Field Supplied Insulation for Refrigerant Piping Field Supplied Insulation Clip Field Supplied Typical Refrigerant Line Connection Insulation Detail Roughing In Gas pipe 5 8 inch Liquid pipe 3 8 inch Hydro kit Gas pipe 7 8 inch Liquid pipe 3 8 inch Heat Recovery System Unit Refrigerant Pipe Connections When connected to a Heat Recovery U...

Page 26: ... surrounding insulation Do not compress the insulation in areas where the piping passes through pipe hangers conduit and or wall sleeves Protect insulation from compression inside hangers and sup ports by wrapping with a second layer Figure 16 Hydro Kit Pipe Insulation Insulation over Pipe Hydro Kit Condensate Piping for Hydro Kit High Temperature K3 Only The Hydro Kit condensate line connection i...

Page 27: ...iping 2 Prior to welding or cutting of piping check for defects Check to see there are no slags or burrs inside pipe before installing 3 Treat pipe threads with joint compound or Teflon tape to prevent leakage Gate Valve Pressure Gauge Temperature Gauge PT Service Port For Cleaning Heat Exchanger Gate Valve Strainer 50 Mesh Refrigerant Pipes Water Inlet Pipe Water Outlet Pipe Water Balancing Valve...

Page 28: ...rcuit Strainer which is provided with the Hydro Kit and place it on the water inlet pipe For specific steps on installation see Strainer Installation on page 30 of this installation manual If a replacement strainer is needed we recommend purchasing an OEM replacement from LG See specifications for the strainer in the Installation Parts section in Table 3 on page 13 of this installation manual 6 In...

Page 29: ... water circuit is isolated from the domestic water system 2 Use the pump see 1 on diagram with sufficient capacity to assure correct water pressure and to supply water to the Hydro Kit 3 Install the shut off valve see 2 on diagram on both sides of the pump to allow for cleaning and repair of the pump 4 Install the flexible connectors see 3 on diagram to minimize noise and vibration transferred fro...

Page 30: ...alue does not satisfy the minimum flow rate or if the set value is changed by the user arbitrarily it can result in perfor mance deterioration or system failure If the water source unit operates with a hard water supply the heat exchanger can be damaged or system failure can occur If the water source unit displays a CH24 or CH180 error code it is possible that the interior of the plate type heat e...

Page 31: ...he tank wall at the tank manufacturer s recommended location This sensor will provide the average tank water tem perature to the Hydro Kit 2 Remove well cap and sensor from the sensor well and place in a secure location 3 If welding the well to the tank Insert the well into the thread hole and rotate till the threads on the neck bottom out Weld the sensor to the tank and pressure test as necessary...

Page 32: ...e 23 as a guide when installing the Solar Heating System Interface Kit onto the Hydro Kit Medium Temperature Chassis Refer to the Solar Heating System Interface Kit Installation Manual for specific installation procedures Dual Source Hydronic Heating Schematic Figure 23 Dual Source Hydronic Heating Schematic Solar Thermal System Field Supply Solar Collector Field Supply Indirect Water Storage Tank...

Page 33: ... is a registered trademark of LG Corp Figure 24 Domestic Water Storage In floor Inductive Radiator and Forced Air Hydronic Heating Diagram Floor Heating With Mixing Tank Water Piping Schematic M Floor heating circuit Fan coil unit Symbols Key Pump B Balancing Valve M Modulating two way Valve M Modulating three way Valve Indirect Water Storage Tank Hot water City water Radiator K2 or K3 Roughing In...

Page 34: ...olutions To add the right amount of antifreeze Calculate the approximate volume of water in the system Add antifreeze solution to the Hydro Kit water circuit Use Table 8 as guidance as to the appropriate type and amount of antifreeze to use Table 8 Antifreeze Type and Minimum Temperature for Freeze Protection Type of Antifreeze Minimum Temperature for Freeze Protection 59 F 23 F 15 C 5 C 14 F 10 C...

Page 35: ...and zone controller cables 5 Field install a plastic or rubber grommet to the edge of the wire and cable cabinet access holes This will prevent wire chaffing 6 If using conduit connect the conduit to the unit cabinet Use field provided fittings Follow industry best practice procedures 7 Provide enough slack wire at each indoor unit to connect to the terminal block without tension on the wire 8 Rou...

Page 36: ...ct Controller CN CC DRY CONTACT PCB INPUT AC 220V LG does not supply this section 4 4 3 3 2 2 1 1 2 2 1 1 RY1 RY2 CN_DRY N L Operation Display Error Check Display Figure 27 Dry Contact Direct Power Wiring DRY CONTACT PCB LG does not supply this section Dry contact Controller CN_DRY 4 3 2 4 3 2 1 1 2 2 1 1 L N AC 220V RY1 RY2 CN CC DRY CONTACT PCB Operation Display Error Check Display Figure 28 Dry...

Page 37: ...communications cables within the confines of the Hydro Kit unit cabinet 2 When pulling cable between components leave enough slack to properly route the cable through the unit keeping it away from the line voltage wiring LG device communications cable voltage does not exceed 5 volts LG does not require a handy box to mount the Hydro Kit Unit Controller or the optional LG Remote Wall Mounted Sensor...

Page 38: ...perly Terminated Communications Cable Multiple Core Cable in a Starburst Configuration Select field supplied cable insulation material based on NEC and local code requirements Ring and spade terminals used to con nect communications cables MUST be copper bearing Do NOT use ter minals that are galvanized or nickle plate over steel Always verify the communication cable is connected to a communicatio...

Page 39: ...nes and Recommendations If any Hydro Kits are to operate together in a group use one or multiple three core Group Control Kits sold separately containing extension and Y splitter cables One 1 group control cable kit for each Hydro Kit in the group except for the last indoor unit Always use an LG provided group control communications cable Group Control Kit sold separately between the Hydro Kit and...

Page 40: ...es are used Locate the zone sensor on a flat interior dry wall surface away from direct sunlight Avoid placing sensor near significant heating cooling sources Do not cut or modify the length of the cable If the cable is too long roll it up and safely tie wrap it in an out of way location During cable rough in be careful not to damage the quick connect plug ends Do not remove and then re splice bac...

Page 41: ...ode Wiring Pre Check Verify power wiring and communication cable are all properly terminated Test the line voltage wiring insulation Conduct a Meg ohm test reaching a value of 2 0MΩ or higher Test the insulation resistance between the Hydro Kit power wiring terminal block and ground using a DC meg ohm tester DC 500V 1 Open the front panel of the Hydro Kit and the control box cover 2 Secure the pow...

Page 42: ...to the Independent Power Module Installation Manual for more detailed information regarding this system 1 Turn power off at circuit breaker 2 Disconnect the cable harness plug from the socket tagged CN EEV 3 Connect the Independent power module wire harness tagged CN EEV LOAD to the Hydro Kit EEV valve 4 Connect the Independent power module dual plug wiring harness 2 tagged CN EEV MAIN to the Hydr...

Page 43: ...Tank Temperature Sensor Socket 2 left pins Terminal Block Remote Controller Socket CN REMO Dry Contact Board Socket CN CC HYDRO KIT MEDIUM TEMPERATURE K2 2 Right Pins Are for Solar Heating Circuit Water Temp Sensor optional Optional LG Remote Temperature Sensor Wall Mounted PQRSTA0 208 230 60 1 Power Connection L 1 L 2 GND Hydro Kit to Outdoor Unit Communication Cable Terminals 3 A and 4 B Figure ...

Page 44: ...nd the subbase before mounting If mounting the Hydro Kit Wall Mounted Controller over a handy box seal the holes in the handy box shell using spray foam or similar insulating material approved for this use by local code The Hydro Kit Wall Mounted Controller is designed to be surface mount ed Recessing the controller will cause the onboard temperature sensor to misread the zone temperature Refer to...

Page 45: ...bbase to the socket of the already roughed in communications cable Figure 41 12 Attach the controller body to the subbase First insert the top edge and lastly the bottom edge Gently push on the frame of the controller body along the bottom edge until you hear it snap into place Gently pull along the bottom edge to verify it is properly seated Figure 42 Sub base Controller Attached to Subbase Remot...

Page 46: ...l Hydro Kits effected 2 Choose one Hydro kit of the group and designate it as the Master unit of the group Master designation is achieved by setting DIP switch 1 in the OFF position Hydro Kits designated as Slave units will need DIP Switch 1 placed in the ON position 3 If not already recorded record the Master status of this unit and identify all other units in the group as Slaves Record the assig...

Page 47: ...lot relay and the Hydro Kit terminal strip See Figure 45 Pump Motor Starter or Contactor Pilot Relay WIRE TO TERMINALS 1 AND 2 ON HIGH TEMPERATURE K3 HYDRO KIT Figure 45 K3 Hydro Kit High Temperature Terminal Block Total current draw of all connected devices provided by others shall not exceed 5 Amperes Pump Motor Starter or Contactor Pilot Relay WIRE TO TERMINALS 11 AND 12 ON MEDIUM TEMPERATURE K...

Page 48: ...vided with the sensor 2 Remove the sensor and cable from the well Loosen and remove the keeping nut at the entry of the well housing Remove the sensor from the well by gently pulling on the sensor cable 3 Slide the keeping nut up the sensor wire so it will not get misplaced Put the sensor sensor cable and keeping nut assembly in a safe location 4 If the Indirect Storage Tank has water in it isolat...

Page 49: ...e structure about every three 3 feet with cable ties 12 Avoid damaging the sensor cable do not pull the ties too tight 13 Route the sensor cable through the Hydro Kit casing and into the control panel area Where the cable passes through a hole with sharp edges install field supplied protective grommets 14 Locate socket CN TH4 Before plugging the male connector into the socket verify unit power is ...

Page 50: ...stallation 2 Some electro mechanical thermostats have a time delay to protect the compressor resulting in time lag between mode changes Users should refer to the Thermostat Installation Manual for any workarounds 3 Setting temperature ranges through direct thermostat can be different from direct unit control The heating set temperature should be chosen within the setting temperature range of the u...

Page 51: ...ough an opening behind the sensor housing 5 Seal all gaps cracks and holes in the wall surface and seal around the communications cable penetration Use a local code approved caulk or dry wall compound 6 Place the sensor casing directly over both the top and bottom screws see 1 on Figure 52 Slide the sensor housing downward on top of the two 2 screws so that screw head fits snugly into the screw an...

Page 52: ... Solar Heating System Inter face between the indirect hot water storage tank and the portion of the water loop serving devices designed to heat the conditioned space Follow the valve manufacturer s instructions for wiring termination guidance at the valve The procedure below describes how to terminate the valve wiring at the Hydro Kit Be sure to always have powered off before installation of acces...

Page 53: ...provides interface flexibility to the controls engineer for indoor unit operation The Dry Contact unit is designed to en able or disable normal Hydro Kit operations or determine occupancy for setback temperature setting through a binary input A binary output indicates if a system malfunction occurred A field supplied binary signal could be triggered using a timer keycard switch door switch motion ...

Page 54: ...Address Nomenclature Multi V System Central Controller Communications Limitations Each type of Central Controller device is designed to communicate with a limited quantity of Hydro Kits indoor units The quantity of Hydro Kits indoor units that can be connected to a single central control communications cable therefore will be defined by the central control device on that cable with the smallest Ma...

Page 55: ... not already completed plug the Hydro Kit Unit Controller communications cable into the pigtail cable 6 Using the controller go to the setup Function 07 Type in the Multi V System Central Control address designated for the Master Hydro Kit 7 Disable power to the Master Hydro Kit Do not restore power to the Master Hydro Kit at this time It will be restored in step 17 8 If the Hydro Kit Unit Control...

Page 56: ... are specific to the Hydro Kit Medium Tempera ture K2 unit Always turn off electric power before adjusting DIP switch settings There is a risk of electric shock if not turned off Guidelines DIP switch in the DOWN position is OFF If it is in the UP position it is ON as seen in Figure 56 Always set DIP switch 6 to DOWN OFF Follow DIP switch settings in Table 12 below precisely or unit may not operat...

Page 57: ...h DIP switch depending on the functioning of the Hydro Kit unit These settings are specific to the Hydro Kit High Temperature K3 unit Always turn off electric power before adjusting DIP switch settings There is a risk of electric shock if not turned off Guidelines DIP switch in the LEFT position is OFF If it is in the RIGHT posi tion it is ON as seen in Figure 57 Never place DIP switch 2 RIGHT ON ...

Page 58: ...For a complete description of all buttons and icons on the Hydro Kit Wall Mounted Controller see Hydro Kit K2 K3 Wall Mounted Controller Operation on page 70 Failure to correctly configure functionality through the Installer Setup can cause problems to the unit user injury or property damage Configuration should be done by a certified installer technician Non certified technical tampering can resu...

Page 59: ...Leaving Water Temperature Auto Dry Contact 06 01 01 Auto Start OFF 02 Auto Start ON Address Setting 07 00 00 FF Override Setting 08 00 00 Slave 01 Master Water Pump Test Run 09 00 01 Set Zone Temperature Setpoint Heating Mode 13 030 016 75 86 Upper Limit of setting range 60 71 Lower Limit of setting range Leaving Water Temperature Setpoint Heating Mode 14 080 046 22 76 Upper Limit of setting range...

Page 60: ...is table along with Table 14 when customizing the settings through the Installer Table 15 Common Function Code Descriptions for Hydro Kits K2 and K3 Function Code Description Common Settings 02 Disable 3 Minute Delay This function is only used for an inspection in a factory 03 Remote Air Sensor Connection Remote Air Sensor is connected to the unit and controls by room air temperature 04 Celsius Fa...

Page 61: ...nt for air temperature in heating mode This is only available when Remote Air Temperature Sensor is connected Accessory PQRSTA0 should be installed Function Code 03 must be set properly 14 Leaving Water Temperature Setpoint Heating Mode Assign heating setpoint temperature range when leaving temperature is selected as setting temperature 15 Setting Hot Water DHW Tank Water Temperature Setpoint Assi...

Page 62: ...mperature higher than 60 F when unit is operating in cooling mode If not condensation will occur on the floor If floor is in a humid environment do not set leaving water temperature below 64 F Water Condensation on the Radiator Cold water might not flow to the radiator while unit is operating in cooling mode Condensation on radiator may occur if cool water enters into the radiator Function Code 13...

Page 63: ...t Off Temperature Value 1 is read by the unit when Value 2 is set to 00 i e FCU is installed Value 2 FCU Installed not installed 00 FCU Installed 01 FCU NOT Installed FCU Installation If FCU is used 2 way isolation valve is installed and connected to the Main PCB Assembly 1 If Value 2 is set to 00 and FCU or 2 way isolation valve is NOT installed unit will not operate correctly Function Codes 23 2...

Page 64: ... heating demand priority between DHW tank heating and under floor heating Example If target temperature is set as 50 and Value 1 is set as 3 then water tank heating will be turned off when the water temperature is above 53 C 127 F Water tank heating will kick on when water temperature is below 50 C 122 F Example If Value 2 is set as 0 that means heating priority is on DHW heating Note that under f...

Page 65: ...16 for settings Table 16 Water Flow Rate Setting Value Setting Value Water Flow Rate l min 50 45 50 55 51 55 60 56 60 65 61 65 70 66 70 75 71 75 80 76 80 85 81 85 90 86 90 92 91 92 Function Code 2E and 2F Changing Thermal ON OFF Temperature gap Refer to Table 17 and Table 18 for the two types of thermal temperature values Table 17 Room Air Temperature Thermal ON Thermal OFF 0 0 9 F 0 5 C 2 7 F 1 5...

Page 66: ...Assign temperature setpoint for air temperature in heating mode This is only available when remote air temperature sensor is connected Accessory PQRSTA0 should be installed Function Code 03 must be set properly Function Code 14 Hydro Kit Leaving Water Temperature Operating Range Assign heating operating temperature range when leaving temperature is selected Function Code 15 Setting Water DHW Tank ...

Page 67: ...to Table 14 for an example of date and time scheduling Value 1 of Function Code 26 Enabling or disabling disinfection operation mode 00 for placing OFF disabled setting and 01 for placing ON enabling setting Value 2 of Function Code 26 Scheduling the disinfection function days Days of the week are given a numeral value Example 01 for Sunday 02 for Monday and 06 for Saturday Value 3 of Function Cod...

Page 68: ... between DHW tank heating and under floor heating Example If target temperature is set as 50 and Value 1 is set as 3 then water tank heating will be turned off when the water temperature is above 127 F 53 C Water tank heating will kick on when water temperature is below 122 F 50 C Example If Value 2 is set as 0 that means heating priority is on DHW heating Note that under floor heating can not tak...

Page 69: ...Kit High Temperature Continued Changing Thermal ON OFF temperature and temperature gap Refer to Table 19 and Table 20 for the two types of thermal temperature values Table 19 Room Air Temperature Thermal ON Thermal OFF 0 0 9 F 0 5 C 2 7 F 1 5 C 1 7 2 F 4 C 10 8 F 6 C 2 3 6 F 2 C 7 2 F 4 C 3 1 8 F 1 C 1 8 F 1 C Table 20 Leaving Water Temperature and Indirect Storage Tank Temperature Thermal ON Ther...

Page 70: ... be displayed all at once while your Hydro Kit is in operation Use Table 21 for a description of the functionality of each Panel button when operating and configuring the Hydro Kit unit Figure 65 Hydro Kit Wall Mounted Controller Display and Panel Functionality Function may not operate nor display Icon Function Icon Function Icon Function Cooling K2 model only Electric Heater 2 Defrost Heating Wat...

Page 71: ... unit will default operation and limit functionality based on the most severe fault For example if there is a slight operational fault but a major fault also trips the unit will operate at the safest level that it can during the major fault incident As an example the hot water heating might not work in an Emergency Operation mode due to a more severe fault that prevents it from warming You might n...

Page 72: ...rrect Purge any air from the system using the manual air vent Check for water leaks in the system Test the circulating water loop for proper levels of water treatment chemicals and anti freeze Quarterly Verify the strainer is clean Check the pump valve stems and pipe connections for leaks Check refrigerant pipe and water pipe insulation for tears or other damage that exposes cold surfaces that pro...

Page 73: ...d 39 feet cannot be used to extend tank sensor cable length Solar Heating System Interface Kit PHLLA K2 CN TH4 Solar Kit includes solar heating system tank sensor cable and tee fitting sensor well Monitors a third party solar heating system s water circuit temperature and controls the flow of solar heating system water to the indirect water storage tank Ancillary Solar Heating System Tank Replacem...

Page 74: ...mperature Mechanical Thermostat1 K3 TB 7 8 9 10 Single stage manual changeover Monitors and or controls optional the Hydro Kit based on the conditioned space temperature K2 TB 17 18 19 20 Harness Plug C to A Single stage heating only Hydro Kit Circuit 3 Way Domestic Water Divert ing Valve1 K3 TB 4 5 6 208 230 60 1 Valve A 208 230 60 1 3 wire SPDT Diverting valve circulates water to from the comfor...

Page 75: ...ro Kit High Temperature K3 units and will be marked accord ingly in the table Inverter PCB Fault LED Display The following sequencing of the LED lights will display during a fault display Once you determine the error code based on the sequencing and color of the LED lights refer to Table 27 for cause and resolution Note that if the sequencing code is a three digit number those codes are based on t...

Page 76: ...ge Tank temperature sensor error A malfunction with the indirect storage tank hot water temperature sensor was detected The sensor and or cable may be disconnected or shorted 09 K2 K3 Indoor unit EEPROM error Communication error occurred between the microprocessor on the Hydro Kit PCB board and the onboard EEPROM chip Check EEPROM chip for bent pins and improper installation If installed OK potent...

Page 77: ...iled to start 27 K3 Inverter PSC PFC Fault Error R134a circuit inverter board detected excessive current draw 28 K3 Inverter DC Link high voltage error Excessive power sensed in the DC charging circuit Triggered by an unexpected stop of the compressor Check inverter compressor for malfunction Use an inverter checker to verify the inverter board is operating properly 29 K3 Inverter compressor overc...

Page 78: ...has failed and or cable is loose disconnected or shorted 53 K3 Communication error indoor unit outdoor unit main PCB Lost communication between the Hydro Kit and the outdoor water source unit Communication cable is loose disconnected or shorted 60 K3 Inverter PCB EEPROM error Communication error occurred between the R134a circuit inverter board and the onboard inverter board EEPROM chip Check EEPR...

Page 79: ...D and Hydro Kit ID at the top of the page sign and date Provide a copy to your company s project manager or your Multi V System Commissioning Technician After completing the final checks be sure to reinstall all internal and external covers Be sure power is not connected to the unit Power will be connected at commissioning If any installation items are incomplete note the items on the checklist an...

Page 80: ...local code require a secondary drain pan under the Hydro Kit Is a secondary drain line connected to the pan Refrigerant Piping N A Not Complete Complete A dry nitrogen purge rate of three 3 psig was maintained during all brazing activity Refrigerant pipe is properly supported to keep lateral pressure off unit connections Refrigerant shutoff valves are full port design with integral Schrader port r...

Page 81: ...nt Communications cable between the outdoor water source unit and the Hydro kit is terminated at terminals tagged terminals 3 A and 4 B Field provided communications cable is 18 2 stranded and shielded All terminations are made at the terminal block No inline splices or wire caps are present Spade or ring connectors containing copper are used on all communications and low voltage cable termination...

Page 82: ...missioning Device Configuration Worksheet rev 20130619 3 Project Name Building ID Date AC Smart Static IP address System ID Page Mech Contractor Company Name MEP Project Mngr Name Pre Com Tech Name Ph email Ph Email IDU s Unit Tag Building Floor Room ID Type Model Serial System Address Central Control Address Group member ID or N A if not in a group Group Function M Master S Slave Sensor Strategy ...

Page 83: ...Unit Replacements Your LG Manufacturer Representative Missing Parts Your LG Manufacturer Representative Received Wrong Indoor Unit Model Your LG Manufacturer Representative Installation Startup and Commissioning Technical Assistance 1 888 865 3026 ...

Page 84: ...Road Alpharetta Georgia 30009 www lg vrf com VRF IM BT 001 US_014A06 Supercedes VRF IM BT 001 US_013M20 LG Customer Information Center Commercial Products 1 888 865 3026 USA Follow the prompts for commercial A C products and parts 20001747 ISO 9001 2008 LG ELECTRONICS INC ...

Reviews: