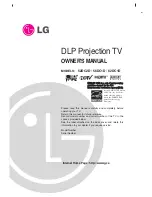
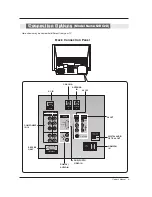
background image

DLP Projection TV

OWNER’S MANUAL

MODELS: 

52DC2D / 56DC1D / 62DC1D

Please read this manual carefully and completely before
operating your TV. 
Retain this manual for future reference.
Record model number and serial number of the TV in the
spaces provided below. 
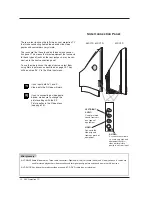
See the label attached on the back cover and relate this
information to your dealer if you require service.

Model Number : 
Serial Number : 

Internet Home Page : http://www.lg.ca

As an ENERGY STAR Partner
LGE U.S.A., Inc. has deter-
mined that this product
meets the ENERGY STAR
guidelines for energy
drriciency.

EEN

NEER

RG

GY

Y   SST

TA

AR

R   iiss   aa   sseett   o

off   p

po

ow

weerr--ssaavviinngg

gguuiid

deelliinneess   iissssuueed

d   b

byy   tthhee   U

U..SS..

EEnnvviirro

onnm

meennttaall   PPrro

otteeccttiio

onn   A

Aggeennccyy((EEPPA

A))..

R

TruSurround XT

Summary of Contents for 52DC2D

Page 1: ...ion to your dealer if you require service Model Number Serial Number Internet Home Page http www lg ca As an ENERGY STAR Partner LGE U S A Inc has deter mined that this product meets the ENERGY STAR guidelines for energy drriciency E EN NE ER RG GY Y S ST TA AR R i is s a a s se et t o of f p po ow we er r s sa av vi in ng g g gu ui id de el li in ne es s i is ss su ue ed d b by y t th he e U U S ...

Page 2: ...f the cable entry as practical REGULATORY INFORMATION This equipment has been tested and found to comply with the limits for a Class B digital device pursuant to Part 15 of the FCC Rules These limits are designed to provide reasonable protection against harmful interference in a residential installation This equipment generates uses and can radiate radio frequency energy and if not installed and u...

Page 3: ... instructions 5 Do not use this apparatus near water 6 Clean only with dry cloth 7 Do not block any ventilation openings Install in accordance with the manufacturer s instructions 8 Do not install near any heat sources such as radiators heat registers stoves or other apparatus including ampli fiers that produce heat 9 Do not defeat the safety purpose of the polarized or grounding type plug A polar...

Page 4: ...e appliance and have the cord replaced with an exact replacement part by an authorized servicer Protect the power cord from physical or mechanical abuse such as being twisted kinked pinched closed in a door or walked upon Pay particular attention to plugs wall outlets and the point where the cord exits the appliance 16 Outdoor Use Marking WARNING To Reduce The Risk Of Fire Or Electric Shock Do Not...

Page 5: ... Input Label 25 Video Menu Options Auto Picture Control EZ Picture 26 Adaptive Picture Mode APM 26 Color Temperature Control 27 28 XD 29 Advanced Cinema 3 2 Mode Black Level 30 Video Reset 31 Audio Menu Options Audio Language 32 Auto Volume Leveler EZ SoundRite 32 Auto Sound Control EZ Sound 32 Manual Sound Control EZ sound User Option 33 Balance 34 TV Speakers On Off Setup 34 Time Menu Options Au...

Page 6: ...f Power Cord is not connected Red Power Cord is connected TV is in standby mode Green TV turns on Orange blinking Preparing operation in standby mode Orange Projection lamp is reaching the end of its life and needs to be replaced with a new lamp Contact your service center Red blinking There is a problem with the lamp or around it Contact an authorized service center Green blinking The lamp cover ...

Page 7: ... AUDIO RGBDVI L R AUDIO VIDEO L R AV IN 1 AV OUT DIGITAL AUDIO OPTICAL OUTPUT ANTENNA SERVICE ONLY VIDEO AUDIO HDMI DVI IN ANTENNA IN AC IN Back Connection Panel Back Connection Panel Connection Options Connection Options Model Name Model Name 56 62DC1D 56 62DC1D Here shown may be somewhat different from your TV AC IN CABLE IN ANTENNA IN AV IN 1 AV OUT DIGITAL AUDIO OPTICAL OUT HDMI DVI IN RGB PC ...

Page 8: ...in standby mode Green TV turns on Orange blinking Preparing operation in standby mode Orange Projection lamp is reaching the end of its life and needs to be replaced with a new lamp Contact your service center Red blinking There is a problem with the lamp or around it Contact an authorized service center Green blinking The lamp cover is not closed Orange The projection TV is overheating Check the ...

Page 9: ...RVICE ONLY HDMI DVI IN ANTENNA IN AC IN VIDEO AUDIO Back Connection Panel Back Connection Panel Connection Options Connection Options Model Name Model Name 52DC2D 52DC2D Here shown may be somewhat different from your TV AC IN CABLE IN ANTENNA IN AV IN 1 AV OUT DIGITAL AUDIO OPTICAL OUT HDMI DVI IN RGB PC DTV VIDEO IN RGB DVI AUDIO IN SERVICE ONLY COMPONENT IN 1 2 ...

Page 10: ...ackpack may be con nect ed to the front connection panel To use the side jacks as the signal source select them using Main Input menu as described on page 25 They will be named AV 2 in the Main Input menu If you input both AV 2 and S Video only the S Video will work If you re connecting a video game device make sure to change the picture settings with the EZ Picture option in the Video menu see pa...

Page 11: ...e Control keys INPUT Selects Antenna Cable AV1 AV2 Component1 2 RGB and HDMI DVI input sources FAV Scrolls the Favorite channels INFO When you watch the TV information dis plays on top of the screen MUTE Switches the sound on or off Refer to p 22 ADJUST Adjusts screen position size and phase in RGB DTV PC or HDMI PC mode VOLUME UP DOWN Increases decreases the sound level NUMBER KEYPAD For direct c...

Page 12: ...V turns itself off auto matically TV INPUT Rotates the input mode between Antenna and Cable AV1 2 Component 1 2 RGB DTV or RGB PC and HDMI DVI input sources TV will return to the last TV channel SAP Selects MTS sound Mono Stereo and SAP in Analog mode Change the audio language in DTV mode CHANNEL UP DOWN Scrolls through available channels in EZ Scan memory HDMI DVI APM ADAPTIVE PICTURE MODE Concur...

Page 13: ...ovided on cable ANTENNA IN Multi family Dwellings Apartments Connect to wall antenna socket Single family Dwellings Houses Connect to wall jack for outdoor antenna Outdoor Antenna Wall Antenna Socket VHF Antenna UHF Antenna RF Coaxial Wire 75 ohm Bronze Wire Turn clockwise to tighten Bronze Wire Be careful not to bend the bronze wire when connecting the antenna Bronze Wire Cable TV Wall Jack RF Co...

Page 14: ...les from the VCR s output jacks to the TV input jacks as shown in the figure When connecting the TV to VCR match the jack colors Video yellow Audio Left white and Audio Right red If you connect an S VIDEO output from VCR to the S VIDEO input the picture quality is improved compared to connecting only the Video input 2 Insert a video tape into the VCR and press PLAY on the VCR Refer to the VCR owne...

Page 15: ...elect the AV1 or AV2 external input source 3 Refer to the DVD player s manual for operating instructions DVD Setup DVD Setup R AUDIO L S VIDEO B R R AUDIO L DIGITAL AUDIO OPTICAL RGB PC DTV S VIDEO PR PB Y MONO RGB IN COMPONENT IN 2 1 L R AUDIO RGB DVI L R AUDIO VIDEO L R AV IN 1 AV OUT DIGITAL AUDIO OPTICAL OUT SERVICE ONLY VIDEO AUDIO HDMI DVI IN CABLE IN AC IN ANTENNA IN DVD or How to connect C...

Page 16: ...or Then make the corresponding audio connections Note HDMI High Definition Multimedia Interface Input that accepts uncom pressed digital signal and multi channel digital audio signal How to use 1 Turn on the digital set top box Refer to the owner s manual for the digital set top box 2 Use INPUT on the Remote Control to select Component 1 Component 2 RGB DTV or HDMI DVI source HDSTB Setup HDSTB Set...

Page 17: ...ical cable to the digital audio opti cal input on the audio equipment 3 Set the TV Speaker option Off in the AUDIO menu Refer to page 34 See the external audio equipment instruction manual for operation Caution Do not look into the optical output port Looking at the laser beam may damage your vision Digital Digital Audio Output Audio Output C A B L E C A R D DVI HDMI S VIDEO MONO L R AUDIO VIDEO A...

Page 18: ...MI DVI input source in main input option of SETUP menu INPUT button is also available for this purpose Check the image on your TV There may be noise associated with the resolution vertical pattern contrast or bright ness in PC mode If noise is present change the PC output to another resolution change the refresh rate to anoth er rate adjust Phase Calibration using the ADJUST button or adjust the b...

Page 19: ... to Screen If not refer to the Manual of HDMI DVI Source Devices or contact your service center In case HDMI DVI Source Devices is not connected Cable or poor cable connection No signal OSD dis play in HDMI DVI Input In case that Video Resolution is not supported TV SET output in HDMI DVI Source Devices Invalid Format OSD display Refer to the Manual of HDMI DVI Source Devices or contact your servi...

Page 20: ...B DTV mode SIZE PHASE is not available In HDMI DVI mode POSITION SIZE RESET is available When PC format is inputted or any function is not available When DTV format is inputted Screen Setup for PC mode After connecting RGB PC or HDMI DVI to PC input and checking the screen quality Display PC Adjust Menu using ADJUST button Position Adjust the screen position After displaying the Adjust select the ...

Page 21: ... the TV power cord is still connected 1 Connect power cord correctly At this moment the TV is switched to standby mode 2 Press the POWER or CH D D E E buttons on the TV front panel or press the POWER INPUT TV INPUT CH or Number 0 9 buttons on the Remote Control to turn the TV on Check the power cable 1 If the TV is off without indicators on the TV 2 If the TV was turned off with the remote control...

Page 22: ...ction On screen Menus Language Selection Aspect Ratio Caption Text Caption Option Language G Low Power English Español Spanish Français French Aspect Ratio Caption Text Caption Option Language Low Power Press the CH or NUMBER buttons to select a channel number Channel Selection Channel Selection Note When you selects the Scramble channel and then moves the channel is automatically deleted To watch...

Page 23: ... CATV DTV 4 Press the G G button and then use D D E E button to select channel number you want to add or delete 5 Press the ENTER button to add or delete for the channel number 6 Press EXIT button to return to TV viewing or press MENU button to return to the previous menu Manual Scan Manual Scan Setup Menu Options Setup Menu Options A password is required to gain access to Manual Scan menu if the ...

Page 24: ...utton and then use D D E E button to select the SETUP menu 2 Press the G G button and then use D D E E button to select DTV Signal 3 View the on screen signal strength monitor to see the quality of the signal being received 4 Press EXIT button to return to TV viewing or press MENU button to return to the previous menu Create two different types of channel lists in memory Custom List and Favorite L...

Page 25: ...gnal Input Input Label EZ Scan Manual Scan Channel Edit DTV Signal Input G Input Label Antenna Cable AV1 AV2 Component1 Component2 RGB PC HDMI DVI Sets a label to each input source which is in use when you press INPUT button 1 Press the MENU button and then use D D E E button to select the SETUP menu 2 Press the G G button and then use D D E E button to select Input Label 3 Press the G G button an...

Page 26: ...ory and are not adjustable In the User 1 and User 2 modes only user can directly adjust the contrast brightness color sharpness tint V Video Menu Options ideo Menu Options Allows you to select your preferred picture mode after compairing the four different picture Daylight Normal Night Time User 1 and User 2 settings 1 Press the APM button at once As shown below the screen is divided to 4 split 2 ...

Page 27: ...2 Press the G G button and then use D D E E button to select Color Temperature 3 Press the G G button and then use D D E E button to select either Cool Medium Warm or User 4 Press EXIT button to return to TV viewing or press MENU button to return to the previous menu Color Color T Temperature Control emperature Control EZ Picture Color Temperature G XD Advanced Video Reset EZ Picture Color Tempera...

Page 28: ...Medium Warm User G User Red 0 G Green 0 Blue 0 1 Press the MENU button and then use D D E E button to select the VIDEO menu 2 Press the G G button and then use D D E E button to select Color Temperature 3 Press the G G button and then use D D E E button to select User 4 Press the G G button and then use D D E E button to select Red Green or Blue 5 Press the G G button and then use F F G G button t...

Page 29: ...ress the MENU button and then use D D E E button to select the VIDEO menu 2 Press the G G button and then use D D E E button to select XD 3 Press the G G button and then use D D E E button to select Auto or Manual 4 Press EXIT button to return to TV viewing or press MENU button to return to the previous menu Selecting the Manual 1 Press the G G button and then use F F G G button to select XD Contr...

Page 30: ...icture Color Temperature XD Advanced G Video Reset Cinema 3 2 Mode Off Black Level Auto 1 Press the MENU button and then use D D E E button to select the VIDEO menu 2 Press the G G button and then use D D E E button to select Advanced 3 Press the G G button and then use D D E E button to select Cinema 3 2 Mode or Black Level 5 Press EXIT button to return to TV viewing or press MENU button to retur...

Page 31: ...re XD Advanced Video Reset EZ Picture Color Temperature XD Advanced Video Reset G Selection G or resets to the factory settings default 1 Press the MENU button and then use D D E E button to select the VIDEO menu 2 Press the G G button and then use D D E E button to select Video Reset 3 Press the G G button to reset the Video menu options to original values ...

Page 32: ...ewing or press MENU button to return to the previous menu Auto V Auto Volume Leveler EZ SoundRite olume Leveler EZ SoundRite Scans for changes in sound level during commercials then adjusts the sound to match the specified audio level SoundRite makes sure that the volume level remains consistent whether you are watching a commer cial or a regular TV program Audio Language EZ SoundRite EZ Sound Bal...

Page 33: ...ess the G G button and then use D D E E button to select User 4 Press the G G button and then use D D E E button to select the desired sound option Treble Bass or Front Surround 5 Press the G G button and then use F F G G button to make appropriate adjustments 6 Press EXIT button to return to TV viewing or press MENU button to return to the previous menu Audio Language EZ SoundRite EZ Sound Balanc...

Page 34: ...ress EXIT button to return to TV viewing or press MENU but ton to return to the previous menu TV Speaker On Of TV Speaker On Off Setup f Setup Turn TV speakers off if using external audio equipment Feature turns the TV Speakers option On or Off Audio Language EZ SoundRite EZ Sound Balance TV Speaker Audio Language EZ SoundRite EZ Sound Balance TV Speaker G Off On 1 Press the MENU button and then u...

Page 35: ...tton to select your viewing area time zone Eastern Central Mountain Pacific New F land or Atlantic 5 Press the G G button and then use D D E E button to set Daylight Saving Auto Off or On depending on whether or not your viewing area observes Daylight Savings Time 6 Press EXIT button to return to TV viewing or press MENU button to return to the previous menu Manual Clock Setup Manual Clock Setup I...

Page 36: ... to set the hour 5 Press the G G button and then use D D E E button to set the minutes 6 For only On Timer function Press the G G button and then use D D E E button to select the channel at turn on Press the G G button and then use D D E E button to set the sound level at turn on 7 Press EXIT button to return to TV viewing or press MENU button to return to the previous menu Sleep Sleep T Timer ime...

Page 37: ...on and then use D D E E button to select Auto Off 3 Press the G G button and then use D D E E button to select On or Off 4 Press EXIT button to return to TV viewing or press MENU button to return to the previous menu Auto Clock Manual Clock Off Timer On Timer Sleep Timer Auto Off Auto Clock Manual Clock Off Timer On Timer Sleep Timer Auto Off G Off On TV will be automatically turned off in case of...

Page 38: ... view a picture with an origi nal 4 3 aspect ratio 16 9 Adjust the picture horizontally in a linear proportion to fill the entire screen Horizon The screen size is more enlarged at both sides to create a spectacular view Zoom 1 Choose Zoom 1 when you want to view the picture with out any alteration However the top and bottom portions of the picture will be cropped Zoom 2 Choose Zoom 2 when you wan...

Page 39: ...large black frame and almost cover the entire screen usually messages provided by the broadcaster 4 Press EXIT button to return to TV viewing or press MENU button to return to the previous menu 1 Use the CC button repeatedly to select Caption Off CC1 CC2 CC3 CC4 Text1 Text2 Text3 or Text4 2 Press EXIT button to save and return to TV viewing You can also use the OPTION menu to select Caption Text A...

Page 40: ...ords will appear in Font Select a typeface for the words Text Color Choose a color for the text Text Opacity Specify the opacity for the text color Bg Background Color Select a background color Bg Background Opacity Select the opacity for the background color Edge Type Select an edge type Edge Color Select a color for the edges 5 Press EXIT button to return to TV viewing or press MENU button to re...

Page 41: ...or a time period To use this function the following must be done 1 Set ratings and categories to be blocked 2 Specify a password 3 Enable the lock V Chip rating and categories Rating guidelines are provided by broadcasting stations Most television programs and television movies can be blocked by TV Rating and or Individual Categories Movies that have been shown at the theaters or direct to video m...

Page 42: ...0 0 0 0 2 Use the D D E E button to choose from the following Lock Menu options Once the option is selected change the settings to your preference Lock System Activates or disables the blocking scheme you set up previously Set Password Change the password by inputting a new password twice Block Channel Select a channel number that you wish to block TV Rating English Selecting canadian english lang...

Page 43: ... listings start and end times for all available services This function can be used only when the EPG information is broadcasted by broadcasting companies The EPG displays the program description for next 3 days This function is only supported in DTV mode 1 Press the GUIDE button to switch on EPG 2 Press the D D E E F F G G button to select desired program then press the ENTER button to display the...

Page 44: ...sed caption Input Signal has rating information Refer to the Lock Menu D Dialogue L Language S Sex V Violence FV Fantasy Violence 480i 480p 720p 1080i CC Function Show the present screen information On Watching with the upper Input signal press the INFO button Press the INFO button or EXIT button to exit A Banner information B Program title C Day Month Year D Program start time E Program finish ti...

Page 45: ...s repeatedly the codes will change one at a time Press the POWER button after each code change If the right code is found the device will turn off B Enter a code number using the number buttons on the Remote Control The right code numbers for the corresponding compo nent can be found on the following pages Again if the code is correct the device will turn off 5 Press the EXIT button to store the p...

Page 46: ...8 042 049 077 116 MINERVA 088 MITSUBISHI 004 006 024 028 040 042 109 116 124 146 MTC 004 006 062 101 NAD 015 025 NEC 006 007 016 Brand Codes 019 024 040 056 130 132 134 NIKEI 043 ONKING 043 ONWA 043 OPTONICA 019 081 PANASONIC 034 056 080 092 164 PHILCO 003 004 006 024 043 056 059 060 063 064 127 143 164 PHILIPS 003 004 005 006 038 059 070 093 143 160 164 PIONEER 006 018 023 025 027 116 135 176 POR...

Page 47: ...PACE SKY SATELLITE 143 PANASONIC 060 142 PANSAT 121 Brand Codes PERSONAL CABLE 117 PHILIPS 071 PICO 105 PRESIDENT 019 102 PRIMESTAR 030 110 111 PROSAT 072 RCA 066 106 REALISTIC 043 074 SAMSUNG 123 SATELLITE SERVICE CO 028 035 047 057 085 SCIENTIFIC ATLANTA 032 138 SONY 103 STARCAST 041 SUPER GUIDE 020 124 125 TEECOM 023 026 075 087 088 090 107 130 137 TOSHIBA 002 127 UNIDEN 016 025 042 043 044 045...

Page 48: ...KARDON 027 JVC 012 LG 001 010 016 Brand Codes 025 MAGNAVOX 013 MARANTZ 024 MITSUBISHI 002 NAD 023 ONKYO 008 017 PANASONIC 003 009 Brand Codes PHILIPS 013 PIONEER 004 026 PROCEED 021 PROSCAN 005 006 RCA 005 006 SAMSUNG 011 015 SONY 007 Brand Codes THOMPSON 005 006 TOSHIBA 019 008 YAMAHA 009 018 ZENITH 010 016 025 ...

Page 49: ...remote control doesn t work Check to see if there is any object between the TV and the remote control causing obstruction Are batteries installed with correct polarity to to Refer to p 12 Correct remote operating mode set TV VCR etc Install new batteries Refer to p 12 Picture OK No sound Press the VOLUME D D E E button Sound muted Press MUTE button Picture appears slowly after switching on This is...

Page 50: ...NA and CABLE connection Unsuitable Aspect Ratio You can adjust the RATIO button or Aspect Ratio in the OPTION menu No output from one of the speakers Adjust Balance in the AUDIO menu Refer to p 34 Unusual sound from inside the TV A change in ambient humidity or temperature may result in the unit turning off and does not indicate a fault with the TV ...

Page 51: ...ar cleaning can extend the amount of time you will have your new TV Be sure to turn the power off and unplug the power cord before you begin any cleaning Cleaning the Screen Cleaning the Screen Cleaning the Cabinet Cleaning the Cabinet Extended Extended Absence Absence Maintenance Maintenance Product Specifications Product Specifications The specifications shown above may be changed without prior ...

Page 52: ......

Reviews: